Outdated Drivers Are Slowing You Down
Outbyte Driver Updater · freeOne free scan finds every outdated or missing driver and matches the right update for your exact hardware.
Scan My Drivers Free →ThatPainter is reader-supported. When you buy through links on our site, we may earn an affiliate commission. Learn More
You can make a kitchen look substantially newer without replacing its cabinets or starting a full renovation. The most dependable one-day changes are bounded jobs: clear and clean the room, change cabinet hardware, add a removable backsplash, improve under-cabinet lighting, repaint selected surfaces, or replace a faucet that matches the existing sink.
“In a day” should describe the hands-on work you schedule, not promise that paint, adhesive, caulk, or finish is fully cured by bedtime. Read the chosen product’s label and installation instructions, and keep the kitchen out of service for as long as those instructions require.
As an Amazon Associate I earn from qualifying purchases.
Free tools Windows power users keep installed
One-click scans. No signup required.
What counts as a one-day kitchen update?
A useful one-day project has a defined starting condition, a limited number of components, and a clear stopping point. You should be able to finish the installation or application in one work session, even if the result needs additional drying, curing, or setting time before heavy use.
Choose only a few updates that suit your room, skill level, and available hours. A faucet may be a quick swap in one sink but a more involved job if the mounting arrangement, shutoff valves, or supply connections do not match. Paint can be applied in a day while still needing more time before doors, drawers, or cooking equipment can be used normally.
#1 Best Overall

- Easy DIY, Just Peel & stick, cut with tin snip, utility knives or hand saws, saving large amount on labor
- 3"x6" individual subway tile, plans the layout freely to your imagination
- Waterproof, heat resistant, stain resistant, anti-scratch, high impact, color fadeless, easy to clean, durable
- Suitable surfaces: painted gypsum/dry wall, ceramic tile, linoleum, glass, marble/granite, metal/steel, sealed/polished/painted wood
- Unsuitable surfaces: brick wall, oily glossy painted wall, textured wall and any uneven rough surfaces
- Check the surface, hole pattern, mounting method, and product compatibility before buying supplies.
- Protect floors, counters, appliances, and sink fixtures before sanding, painting, or applying adhesive.
- Keep labels and installation instructions available while you work; they take precedence over a general schedule.
- Plan a stopping point that leaves the kitchen safe if a material needs to dry overnight.
Ten updates, organized by the part of the kitchen they change
| Update | Primary visual change | Important check |
|---|---|---|
| 1. Clear and clean | More open, orderly counters and cabinet fronts | Sort items before deciding what storage or hardware work is actually needed |
| 2. Change cabinet hardware | New detail and a different style at every door and drawer | Measure existing hole spacing and confirm the mounting method |
| 3. Paint cabinet fronts | A new color on the most prominent surfaces | Preparation and the coating’s label determine when doors and drawers can be handled |
| 4. Add a removable backsplash | Pattern or color between the counter and wall cabinets | Verify the wall surface is suitable for the selected shelf paper, removable wallpaper, or peel-and-stick material |
| 5. Paint the walls | A broad color change around the work area | Mask edges and allow the coating to dry according to its instructions |
| 6. Install accent shelving | Open display and storage on an unused wall | Locate sound fastening points and account for the wall condition |
| 7. Add crown moulding or trim | A finished transition at cabinets or ceiling lines | Measure corners and decide how the trim will be fastened and finished |
| 8. Add puck lighting | Small, localized lighting under cabinets | Use a plug-in or battery unit for a straightforward DIY installation |
| 9. Add rope lighting | A continuous lighting element under or along cabinets | Confirm the mounting surface, power route, and product instructions |
| 10. Replace the faucet | A new focal point at the sink | Match the new faucet to the sink’s hole count and mounting style |
Cabinet details: the quickest visual payoff
1. Clear and clean counters and cabinets
The least expensive refresh is often the first one to try. Remove everything from the counters, group items by frequency of use, and return only what belongs in the work area. Wipe cabinet fronts, handles, backsplash surfaces, and the exposed counter. Cleaning may reveal that the room feels dated because of visual clutter or residue rather than because the finishes need replacing.
Use the empty counter to identify the next project. If a crowded area is caused by missing storage, accent shelving may help. If the cabinets look flat after cleaning, hardware or paint can provide a more targeted change. This reset also gives you a clean, dry surface for adhesive or lighting work.
The Tool Desk
Outbyte Driver Updater FREEFix the driver behind crashes, sound loss and screen glitchesFind Drivers →Outbyte PC Repair FREERepair Windows errors before they cause bigger problemsFix Now →2. Swap cabinet knobs or pulls
Hardware changes are visible from across the room and can be completed without removing the cabinet boxes. Start by measuring the distance between the centers of the existing screw holes. Pulls must match that spacing unless you are prepared to fill old holes and drill new ones. Knobs generally use one mounting hole; pulls use two or more, so changing from one type to the other can add filling, marking, and alignment work.
Remove one existing piece and take its screws with you when checking replacements. Screw length matters because a fastener that is too long can interfere with the cabinet door or drawer. Before installing every piece, test one on a door and one on a drawer. Confirm that the style, projection, and grip feel comfortable, then tighten the remaining hardware without overtightening.
3. Paint cabinet fronts
Painting the doors and drawer fronts changes a large percentage of the visible kitchen while leaving the cabinet layout intact. A bounded session is possible when you limit the scope to accessible fronts and prepare in advance. Label each door and drawer as it comes off, remove the hardware, and create a level area where pieces can dry without being touched.
Cleaning and surface preparation determine whether the new coating bonds well. Degrease thoroughly, repair obvious damage, and follow the paint manufacturer’s instructions for sanding, primer, coats, recoat intervals, and handling. Reinstalling doors too soon can mark the finish or cause sticking, so schedule the installation for the point specified on the label rather than assuming the surface is ready the same day.
Do these 3 things before closing this tab:
1Repair Windows errors before they cause bigger problems2Fix the driver behind crashes, sound loss and screen glitches3Clear out junk files and repair common Windows errorsRank #2

- 2-3 Times Thickness: Much thicker than ordinary peel & stick tile, 2mm-2.5mm each, durable and solid tile, unlike soft sticker tiles
- Stronger Upgrade Adhesive: 3X Stronger backing glue than ordinary vinyl backsplash tile, not only stick firmly to the smooth surface, but also available on lightly textured wall
- 1.4 Times Coverage Area: 10 sheets thickened self-adhesive tiles, 12" X 12" each, which covers 40% more area than 10"x10" tile
- Widely Use: Perfectly decorated in kitchen island walls, bathroom backsplash, shower, fireplace, and installed behind the stove
- Easy Do It Yourself: Just peel, interlock and stick. No need to overlap, no grout and no mess, save your time and money on labor
Surfaces: color and pattern without a full renovation
4. Apply a removable backsplash material
Shelf paper, removable wallpaper, and peel-and-stick backsplash material can change the wall area between the counter and upper cabinets without demolition. These options are useful when you want a temporary change or cannot make a permanent alteration.
Measure the backsplash area, plan seams around outlets and corners, and clean the wall so it is smooth, dry, and free of grease. Check the product directions for painted, textured, dusty, or porous surfaces; not every adhesive is suitable for every wall. Apply a small test piece where possible, and remove it according to the instructions to avoid pulling paint from the wall.
Keep the material away from heat and moisture zones unless its instructions specifically allow that use. Around a range or sink, the product’s temperature and water-resistance guidance is more important than a general promise of easy installation.
5. Paint the kitchen walls
Wall paint is a broad, relatively contained way to make the room feel different. Move or cover appliances, remove switch and outlet plates, and mask the edges where walls meet cabinets, trim, and counters. A small repair to dents or nail holes before painting will show more than a rushed extra coat.
Outdated Drivers Are Slowing You Down
One free scan finds every outdated or missing driver and matches the right update for your exact hardware.Free scan · exact hardware matchPC Slower Than It Used to Be?
A free scan shows the junk files, broken settings and background clutter dragging Windows down - then fixes them in one click.Free scan · Windows 10 & 11Work in a sequence that keeps a wet edge and prevents you from brushing against freshly painted trim. Keep ventilation appropriate for the product and respect the label’s drying and recoating directions. The kitchen may look finished before the film has reached its stated hardness, so protect the walls from splashes and abrasion during that interval.
6. Add accent shelving
An open shelf can turn an unused wall into a display or a practical landing spot for frequently used items. Decide what the shelf must hold before choosing its size and fastening method. Plates, jars, and cookware create different loads, and the wall may be drywall, masonry, tile, or a stud-backed area.
Rank #3
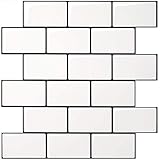
- Upgraded Thicker Build: 2–3 times thicker than regular peel and stick tiles, resistant to tearing and bending for easier installation.
- Stronger Adhesive Backing: Upgraded backing glue grips smooth, clean surfaces and lightly textured walls firmly for a more secure application.
- Classic Contrast Style: White subway tiles with contrasting black grout add crisp definition and a timeless look to your wall.
- Standard Size & Value Pack: Includes 10 ticker self-adhesive tile sheets measuring 12 x 12 inches for your wall makeover project.
- Versatile Wall Decor: Suitable for kitchen backsplashes, kitchen island walls, and other decorative wall applications.
Use a level, mark the bracket positions carefully, and locate reliable fastening points. Keep shelves clear of door swings, appliance vents, and the working area above a cooktop. If the wall condition or expected load is uncertain, reduce the scope to a lighter display shelf rather than treating every wall as interchangeable.
7. Install crown moulding or other trim
Trim can make the cabinet-to-ceiling transition look intentional and can hide an uneven gap. Measure each wall separately; older rooms rarely have perfectly square corners. Mark the direction of each cut, dry-fit pieces before fastening, and plan how outside and inside corners will meet.
Leave time for filling fastener holes, caulking appropriate joints, and touching up the finish. The installation may be physically complete in one session, but filler, caulk, and paint still need the time stated on their labels before cleaning or scrubbing the trim.
Independent reader supportYour contribution helps us test, update, and keep practical guides available for everyone.Lighting: improve the work area without opening walls
8. Add plug-in or battery puck lights
Puck lights provide a compact under-cabinet option when you want to avoid electrical work inside the wall. Choose a unit whose control method and power source fit the location, then mark a consistent position under each cabinet. Clean the mounting area, install the light according to its directions, and route or secure the cord so it cannot hang into the work surface.
Use plug-in or battery-powered products for a straightforward DIY project. Hardwired lighting changes the safety and skill requirements; the cited guidance treats that work as a job for a skilled electrician rather than a casual one-day installation.
9. Add rope lighting
Rope lighting is another under-cabinet format listed for kitchen refreshes. Before buying, measure the run and identify where the power connection will sit. Follow the product’s rules for cutting, joining, bending, and mounting; do not assume that one rope product can be shortened or connected in the same way as another.
Rank #4

- Material:Made of PVC composite laminate, anti-scratch, high impact, color fadeless, more durable and stronger than other plastic self-adhesive tiles. Glossy/Poished surface finishing with realistic ceramic look, high waterproof and stain-resistant performance, protect the walls from splash and oil.
- Strong Adhesive:PVC peel and stick backsplash tile with strong backing glue,can be easily installed over existing ceramic tiles or other smooth surface,such as kitchen island walls, bathroom backsplash, living room wall,washbasin backsplash, laundry room ,fireplace, and installed behind the stove etc.
- Size and Coverage:100 pieces self adhesive polyvinyl chloride peel and stick subway tiles , cover about 12.08 square feet. Please consider cutting loss 3-5% in every DIY project.
- DIY-Friendly:Just peel, interlock and stick, easy to cut with sharp utility knife. No need to overlap, no grout and no mess, save your time and energy.3"x6" individual subway tile plans the layout freely to your imagination,perfect choices for DIY'ER.
- Wide Application: Ideal for kitchen backsplashes, bathroom backsplash, basin,laundry rooms, RVs, campers, pantries, fireplaces, living room walls, and more, these tiles are tailored to meet and exceed consumer expectations.
Keep the route tidy and away from heat, water, and moving cabinet doors. A plug-in or battery configuration keeps the project within the same accessible DIY boundary as puck lights. If the desired route requires new wiring behind the wall, stop and obtain qualified electrical help instead of treating it as a cosmetic installation.
Sink area
10. Replace the faucet
A new faucet can give the sink area a strong focal change, but it is not a universal drop-in upgrade. Look under the sink and count the holes in the sink or countertop. Check whether the existing faucet uses a single-hole, centerset, or another mounting arrangement, and compare that configuration with the replacement.
Shut off the water, open the faucet to relieve pressure, and protect the cabinet below before disconnecting the supply lines. Clean the mounting surface, install the new faucet and any required plate or gasket exactly as directed, and check every connection for leaks before returning stored items. If the holes, mounting hardware, or supply connections do not match, choose a compatible model or plan for additional parts and time.
How to choose a realistic combination
Start with the change that solves the most noticeable problem. A cluttered room benefits from the no-cost reset before you spend money on finishes. Cabinets that look dated but function well are good candidates for hardware or paint. A dark work surface may benefit from under-cabinet lighting, while a blank wall may be better served by shelving or a new color.
Keep tasks that share preparation together. Wall painting and trim touch-ups can use the same drop cloths and masking supplies. Hardware and faucet work both benefit from a small screwdriver set, a level, and containers for screws, but the faucet also requires compatible plumbing connections. A removable backsplash should wait until the wall is clean and fully dry.
Retail refresh lists also mention countertops as a possible update, but countertop work varies widely by material and product. Do not assume that a coating, resurfacing system, or replacement surface can be installed and returned to normal use in one day; judge that option by its specific preparation, ventilation, drying, and cure instructions.
Quick Recap
One-day planning checklist
- Photograph the existing cabinet, sink, and wall conditions before removing anything.
- Measure cabinet hardware hole spacing and sink faucet holes.
- Read the labels for paint, adhesive, lighting, caulk, filler, and plumbing components before purchase.
- Buy protection materials, fasteners, replacement screws, and cleaning supplies so a missing small part does not stop the job.
- Remove doors, drawers, or hardware only after labeling their positions.
- Complete the messiest preparation first: cleaning, repairs, sanding, and masking.
- Install or apply the chosen update, then leave it undisturbed for the product’s stated drying, setting, or curing period.
- Restore the kitchen gradually, checking doors, drawers, lighting cords, and plumbing connections before normal use.

Product prices and availability are accurate as of the date/time indicated and are subject to change. Any price and availability information displayed on Amazon at the time of purchase will apply.

