The Tool Desk
Outbyte Driver Updater FREEFix the driver behind crashes, sound loss and screen glitchesFind Drivers →Outbyte PC Repair FREEClear out junk files and repair common Windows errorsFree Scan →
ThatPainter is reader-supported. When you buy through links on our site, we may earn an affiliate commission. Learn More
Needle-turn appliqué gives fabric shapes a clean, soft edge by turning the cut edge underneath as you sew it to a background. The International Quilt Museum defines it this way: “Needle-turn appliqué involves turning the cut edge of the appliqué shape underneath and sewing the shape down with near-invisible stitches.” The most reliable results come from a forgiving design, an accurate template, a fine needle and thread, and turning only a small section immediately before each stitch.
1. Begin with a forgiving shape
Choose a bold or relatively large shape while learning. Tiny pieces leave too little fabric to turn and make every adjustment harder. A heart is excellent practice because it includes both curves and points without being overwhelmingly intricate.

2. Use stable, crease-free fabric
Finely woven cotton is the easiest starting fabric for hand appliqué. Press the fabric flat before marking and keep it free of wrinkles; a crease can distort the marked edge and make the finished shape wavy. Try looser weaves or specialty fabrics only after you are comfortable controlling the turn.
What’s actually slowing this PC down?
Pick the symptom - the matching free tool is one click away.
3. Match the needle and thread to the work
A size 11 straw, or milliners, needle is long enough to tuck the seam allowance under while you stitch. Use fine 50-weight cotton or silk thread that matches the appliqué, and work with a manageable length so the thread does not tangle or wear before you finish the shape. The phrase “straw needles for hand appliqué” accurately describes the tool to look for.
#1 Best Overall
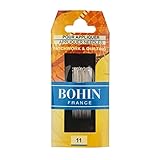
- Bohin is renowned in Europe as one of the leading manufacturers of quality needles since 1822
- High standards and innovative manufacturing techniques make these needles a popular choice for sewers and quilters
- Made in France
4. Prepare an accurate template and allowance
Accuracy begins before cutting. With freezer paper, trace the finished shape without seam allowance, press the shiny side to the wrong side of the fabric, and cut around it with approximately a 1/4-inch border. A turned-edge method may use a narrower 1/8- to 1/4-inch border. Some teaching describes about 3/16 inch as ideal, while 1/4 inch is common; the correct amount depends on the method and template. Choose one system and follow its marked line consistently rather than mixing allowances.
5. Select a holding method deliberately
Temporary preparation affects both accuracy and how easily you can correct a shape.
| Method | Setup and accuracy | Repositioning | Curves and points | Iron required | Removing temporary materials |
|---|---|---|---|---|---|
| Freezer paper | Repeatable pressed template; cut the border after pressing | Moderate; reposition before stitching | Good control when the pressed edge is accurate | Yes | Paper must be removed after stitching |
| Turned-edge | Mark the right side, leave a narrow border, and optionally machine-stitch the guide | Moderate | Direct control as each edge is turned | Not necessarily | Guide stitching, if used, is removed or concealed as appropriate |
| Back-basting | Trace the design on the background wrong side, baste the appliqué on the line, and trim the border to about 1/8 to 1/4 inch | Good; the piece can be adjusted before stitching | Useful for progressive control of complex edges | No | Remove basting a few stitches at a time as the edge is sewn |
Hand-basting is often easier to reposition than glue when alignment shifts. Back-basting is especially useful if you prefer the temporary stitches to become your turning guide.
Outdated Drivers Are Slowing You Down
One free scan finds every outdated or missing driver and matches the right update for your exact hardware.Free scan · exact hardware matchWindows Errors? Fix Them Before They Spread
Repair common Windows errors and clear accumulated junk for a smoother, more stable PC - no reinstall needed.Free scan · no reinstallRank #2

- 【All-in-one Comprehensive Sewing Kit】Provides *all essential tools* needed for basic sewing, mending, embroidery, and quilting in one convenient package. Package includes: 25*Big Eye Steel Needles with 1*Needle Case, 10*Color Thread, 1*Seam Ripper, 2*Needle Threader, 2*Thimble, 4*Curved Needles, 1*Tape Measure, 1*Thread Snip, 1*Mesh Bag
- 【Hand Sewing Needles】There are 5 sizes of steel needles for hand sewing, suitable for different fabrics from chiffon to leather. The large needle eyes enables quick, frustration-free threading of threads. Sharp needle points requires less pressure during stitching.
- 【Finger Protection】The thimble shields fingers during forceful stitching. The grooved surface firmly grip needle ends, preventing slips that cause bent needles or fabric damage. The thimble is flexible, can be adjusted to fit any finger size.
- 【Essential Core Tools】The U-shaped blade is made of high-quality stainless steel material, super sharp, crucial for fixing mistakes quickly and cleanly. At the end of the small fork, there is a red circular mini ball used to protect your fabric.
- 【Convenience Sewing Supplies】Everything is gathered in one set, ready to use. This thread and needle kit suitable for embroidery, beadwork, garment mending, etc.
6. Start on a straight section
Begin on an uncomplicated stretch, not at a point, inside corner or curve. Sweep the seam allowance under a short distance ahead of the needle and hold it with your thumb. This establishes a rhythm before you tackle the places where the edge needs more shaping.
7. Let the grain do some of the work
Curves turn more smoothly when the edge is cut on the bias. For an inside curve, make small clips close to—but not through—the marked line so the allowance can spread. Leave outside curves unclipped; the excess fabric can usually be eased under with the needle. When clipping is needed, make directional cuts that respect the bias and stop safely short of the stitching line.
8. Shape points and inside Vs in stages
Outside points
Fold one side of the point under, trim any bulky overlap, and use the needle to extend the tip if it has become blunt. Fold the second side over the first and secure the point before continuing along the next edge.
Rank #3
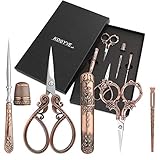
- 6 PCS Sewing Embroidery Kit: The embroidery scissors kits, stainless steel safety scissors, threader with needle bottle, awl, thimble.
- Metal Retro Scissors: The vintage scissors are made of high-quality and durable metal materials with a smooth surface and can be reused. The new generation of scissors has retro and beautiful patterns, suitable for long-term use.
- Multi-purpose: Small embroidery scissors and accessories are well-made tools that can complete the work quickly and efficiently. This very useful and practical sewing tool, suitable for various materials, fishing line, fabric, thread. Please be careful when using, the scissor heads are relatively sharp.
- Widely Used: Designed for beginners in sewing, suitable for daily knitting and cutting. Can be used to make friendship bracelets, cross-stitch projects, tassels, art, and handicrafts. For needlework, embroidery, DIY crafts, or other sewing work, please use our embroidery scissors kit.
- Excellent Embroidery Tool for DIY Lovers: Vintage sewing kit is an indispensable tool for handmade, sewing machines, repairing clothes, and embroidery thread. This is the best choice for preparing souvenir for your wife, mom, sister, or friends!
Inside V shapes
Clip almost to the marked line without cutting the future stitch path. Use the needle to swoop the fabric into the V, then place an extra securing stitch or two. Closer stitches at this stress point help prevent raveling.
9. Make the stitches disappear
Use slip or blind stitches with thread that matches the appliqué. Bring the needle from the wrong side of the background, catch only a few background threads, then take a small bite of the turned appliqué edge. Keep the stitch spacing even and the bites shallow; large catches pull the background upward and make the seam visible.
Independent reader supportYour contribution helps us test, update, and keep practical guides available for everyone.10. Finish the shape without rushing
Continue around the entire shape, keeping the allowance turned just ahead of the needle. At the join, add one or two extra securing stitches, then knot the thread on the back. Do not pull hard enough to pucker the background. A steady pace produces a cleaner edge than trying to force a difficult point or curve in one oversized stitch.
A practical needle-turn sequence
- Press the background and appliqué fabric flat.
- Prepare the chosen template and mark the finished outline.
- Cut the appliqué with the allowance required by that method.
- Position and hold the shape by freezer paper, turned-edge marking, basting or pins.
- Thread a size 11 straw needle with fine matching thread.
- Begin on a straight section and bring the needle up from the background wrong side.
- Turn a short section of allowance under with the needle and your thumb.
- Take small blind or slip stitches, catching only a few background threads.
- Clip inside curves as needed and handle outside curves without clipping.
- Shape points and inside Vs with staged folds and extra securing stitches.
- Stitch completely around the shape, reinforce the join, and knot on the back.
- Remove freezer paper, basting or guide materials carefully and press according to the fabric’s needs.
Common problems and corrections
- Wavy edge: Check that the fabric was flat and that the allowance is even; excessive allowance can also create bulk.
- Blunt point: Trim overlapping fabric, extend the tip with the needle, and fold each side separately.
- Open inside V: Clip closer to the line, swoop the fabric into the corner, and add one or two extra stitches.
- Visible stitches: Switch to finer matching thread, take smaller bites of the background, and shorten the stitch length.
- Fraying edge: Use closer stitches at points and clipped curves, and avoid cutting into the marked stitch line.
- Puckered background: Relax the thread tension and make sure you are not taking large bites or pulling the fabric while turning.
How much seam allowance should you leave?
There is no single universal number. Freezer-paper preparation commonly uses about a 1/4-inch cut border, while turned-edge instructions may specify 1/8 to 1/4 inch; some guidance identifies roughly 3/16 inch as an ideal working allowance. The template’s marked line and the turning method control the result. A consistent, manageable allowance is more useful than chasing a number that belongs to a different preparation system.
Needle-turn is a flexible technique
As Kristin Hamilton wrote in the Star Quilters Guild tutorial in 2011, “The first rule of needle-turn appliqué is that there really are no rules for needle-turn appliqué.” That flexibility is useful, but the fundamentals remain stable: accurate preparation, a controlled turn, tiny matching stitches and extra care at points and inside curves.
Do these 3 things before closing this tab:
1Fix the driver behind crashes, sound loss and screen glitches2Repair Windows errors before they cause bigger problems3Scan for outdated or missing drivers - takes under a minuteQuick Recap

Product prices and availability are accurate as of the date/time indicated and are subject to change. Any price and availability information displayed on Amazon at the time of purchase will apply.




