Free tools Windows power users keep installed
One-click scans. No signup required.
ThatPainter is reader-supported. When you buy through links on our site, we may earn an affiliate commission. Learn More
The best pergola starts with a decision about how you want to use the yard. A dining pergola needs different proportions and lighting from a quiet reading retreat; a poolside frame has different material and drainage demands from a garden arbor. Use the 33 ideas below to choose the right location, roof, structure, planting and accessories, then check the site conditions before you buy or build.
As an Amazon Associate I earn from qualifying purchases.
Design the outdoor room before choosing the pergola
A pergola can define an outdoor room without enclosing it. Posts establish a boundary, the overhead structure gives the space a visual ceiling, and furniture tells people what the room is for. Decide whether the main outcome is dining, lounging, a garden focal point, flexible shade, privacy or a transition from the house to the yard. That decision should determine the footprint, orientation, roof style, finish and electrical plan.
Measure the usable area rather than choosing a size from a catalog alone. Leave enough circulation around chairs, a table or a grill, and check that posts will not obstruct doors, steps, utility covers or established roots. Watch the sun at the times you expect to use the space. A pergola that shades breakfast may leave an afternoon seating area exposed, while a roof that blocks low western sun can make evening gatherings more comfortable.
#1 Best Overall
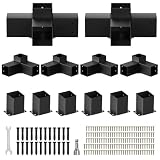
- 3-Way & 4-Way Pergola Brackets Kit: Upgraded 3-way & 4-way right-angle pergola brackets boost pergola stability in harsh weather. Designed for 4"x4" (actual 3.5"x3.5") sizes, the 4x4 pergola brackets are weather-resistant and sturdy, with no need to worry about storm or wind damage
- Long-lasting Use & Strong:This pergola brackets kit, made of heavy-duty galvanized steel and 2mm thickened steel, is extremely sturdy. Advanced welding prevents breakage and deformation, effectively extending its service life.
- Easy to Install:The 4x4 pergola brackets kit are equipped with high-quality screws and expansion bolts. Each gazebo bracket features pre-drilled holes, enabling quick and straightforward installation. All accessories included in the package help you assemble quickly and easily.
- Super Rust Resistance: This pergola brackets kit is crafted from high-quality steel with black powder coated. This dual protection endows the pergola gazebo kit with excellent rust resistance; even after long-term exposure to harsh weather, it can effectively resist rusting.
- Widely Applications: This pergola bracket is suitable for patios, balconies, courtyards, parks, outdoor camps, decks, and lawns. Additionally, the 4x4 pergola kits can also serve as a wooden post reliable support for pergolas, pavilions, sheds, garden furniture.
33 pergola ideas, organized by the way you will use the yard
Dining pergolas
- Frame a full outdoor dining room. Center a table beneath a rectangular pergola and align the long axis with the house or the best garden view. Plan a clear route from the kitchen and leave room to pull chairs out on every side.
- Add a built-in serving wall. Use one edge for a narrow counter, buffet shelf or bar ledge. It keeps food and drinks within reach without crowding the dining table, and it gives the structure a purposeful visual anchor.
- Create a breakfast corner. A compact pergola near the kitchen can hold a small café table and two chairs. Orient the open side toward morning light and use a light canopy or adjustable roof when early sun becomes too strong.
- Make a long-table gathering space. A generous freestanding frame suits family meals and celebrations. Repeat pendant lights or evenly spaced rafters along the length so the table feels centered rather than lost beneath a large roof.
- Use a pergola as a grill-and-dining link. Place cooking equipment just outside the main seating zone, with the dining area under the pergola. Keep combustible materials and roof overhangs appropriate to the appliance manufacturer’s clearances.
Lounge and conversation areas
- Build a conversation square. Arrange sofas or deep chairs around a low table, leaving an opening that faces the garden. The posts define the room while the open sides preserve breezes and sightlines.
- Design a two-chair reading retreat. A smaller pergola with a pair of comfortable chairs, a side table and a task light can turn an unused corner into a destination. Add a retractable cover if you need occasional protection from glare.
- Make an outdoor living-room extension. Continue the home’s flooring tone and furniture proportions beneath an attached or closely aligned pergola. The visual connection makes the yard feel like another room rather than a separate platform.
- Center a fire-table lounge. Place seating around a fire feature with generous circulation between the flame and posts. Follow local fire rules and the appliance instructions; do not assume a pergola roof is suitable for every fuel type.
- Create a flexible game lounge. Leave the center open for cards, puzzles or children’s play and use movable seating at the perimeter. A canopy or louvers let you adjust the space as weather changes.
Private garden retreats
- Hide a bench at the end of a path. Set a narrow pergola where a walkway terminates, then point the opening toward a specimen tree, pond or border. The structure turns arrival at the end of the path into a small event.
- Make a screened reading nook. Use slatted side panels, curtains or dense planting on the sides that face neighbors, while leaving the upper roof open for daylight and airflow.
- Design a meditation pavilion. Keep furnishings spare: a bench, mat or low platform and a small shelf. Consistent spacing of posts and rafters creates a calm rhythm, while a muted finish lets foliage provide the color.
- Use a corner pergola for privacy. Two connected sides can shield a seating area without enclosing it completely. Place the solidest screen toward the view you want to block and keep the garden-facing side open.
- Turn a side yard into a retreat. A narrow pergola can reclaim the strip between a house and boundary fence. Confirm access for maintenance and drainage before adding furniture or screens.
Poolside and entertaining structures
- Shade a pool lounge. Position the pergola where swimmers can move between water and seating without crossing a dining route. Select finishes and hardware suited to frequent moisture, and plan where water will drain away from the deck.
- Create a towel-and-refreshment station. Add hooks, a narrow counter and storage at one end of the structure. Keeping wet towels and drinks in one place reduces clutter around loungers.
- Build a poolside cabana effect. Use a deeper roof, curtains or partial screens to make room for loungers. Keep at least one side open so the space does not become a wind trap.
- Combine a pergola with an outdoor kitchen. Put the cooking, prep and dining zones in a logical sequence, then locate electrical outlets and lighting before the roof is installed. Coordinate gas, water and drainage work with qualified trades.
Placement and architectural ideas
- Attach a pergola to the house. A house-adjacent structure can extend a patio or create a sheltered threshold at a frequently used door. Attachment details, flashing and load paths must be designed for the specific wall and local requirements.
- Use a freestanding focal point. Set the pergola slightly away from the house so it becomes a destination in the landscape. A straight path, contrasting paving or a change in grade can emphasize the journey to it.
- Mark the transition between zones. Place a pergola where lawn changes to patio, kitchen garden or pool deck. The overhead frame acts as a visual gateway without requiring a wall or fence.
- Use two small pergolas instead of one large one. Separate dining and lounging structures can fit irregular yards and let each space have its own roof, furniture and lighting strategy.
Roof and shade concepts
- Choose an open lattice roof. Evenly spaced rafters provide a classic garden framework and a changing pattern of sun and shade. It suits readers who want maximum openness and plan to use plants, fabric or movable umbrellas for additional coverage.
- Install adjustable louvers. Rotating slats let you tune shade and airflow during the day. Motorized systems require early decisions about controls, electrical access, post locations, drainage and the path of the sun.
- Add a retractable canopy. A sliding or rolling fabric canopy gives shade when needed and can be opened for a brighter, more exposed setting. Verify the fabric, attachment method and wind guidance for the specific system.
- Use a fixed fabric cover. A taut cover creates a softer, more architectural ceiling than bare rafters. Choose a fabric intended for outdoor exposure and make sure the frame can shed rain rather than trapping water.
- Layer roof options. Combine an open lattice with a removable canopy or a few adjustable panels. This approach preserves the pergola’s structure while allowing seasonal changes in shade and openness.
Greenery, lighting and finishing details
- Train climbers over the rafters. Add trellis wires or slender supports so climate-appropriate climbing plants can establish a living ceiling. Check mature weight, spread and maintenance needs before planting near the structure.
- Use planting to soften posts. Repeat containers or narrow beds at selected corners rather than surrounding every post. This keeps circulation clear while visually tying the pergola to the garden.
- Install layered lighting. Combine low path or step lights, warm overhead fixtures and focused task lighting over a table or counter. Plan cable routes and switch locations before closing ceilings or adding screens.
- Make privacy movable. Outdoor curtains, roll-down shades or hinged screens can be opened for breezes and closed when neighbors are active. Store or secure fabric according to the manufacturer’s weather guidance.
- Finish the structure as a garden feature. Coordinate the pergola’s stain, paint or vinyl color with paving, fencing and the house trim. A deliberate palette makes even a simple kit look integrated rather than temporary.
Compare the main roof choices
Roof design controls how much sun, rain and air reach the room. The four common approaches below offer different balances; none is automatically best for every yard.
| Roof type | Shade control | Airflow and openness | Planning considerations |
|---|---|---|---|
| Open lattice | Partial, patterned shade; can be supplemented with plants or fabric | Most open and naturally ventilated | Best when you want a visible rafter framework and flexible add-ons |
| Adjustable louvers | Variable shade controlled by louver angle | Can balance airflow and coverage as conditions change | Plan sun path, drainage, post locations and electrical access; local permit or engineering coordination may be needed |
| Retractable canopy | On-demand fabric shade | Open when retracted; more sheltered when extended | Check track or roller support, fabric care and wind procedures |
| Fixed fabric cover | Consistent filtered or solid shade, depending on fabric | Less open than bare rafters | Specify outdoor fabric and a frame with a safe drainage strategy |
Manufacturers describe their own weather performance, drainage and durability differently. Treat those statements as product-specific claims and confirm them in the installation and care documentation for the exact model.
Rank #2
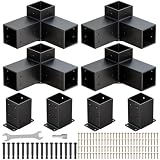
- 3-Way Pergola Brackets Kit: Upgraded 3-Way right-angle pergola brackets boost pergola stability in harsh weather. Designed for 4"x4" lumber, the brackets are weather-resistant and sturdy, no need to worry about storm or wind damage
- Super Durable & Long-Lasting: The pergola kit crafted from heavy-duty 13-gauge solid steel & 2mm thickened plate (50% thicker than ordinary pergola kit), this kit is extremely robust. Full welding reinforces structure to prevent breakage and deformation, effectively extending service life
- Superior Rust Resistance: The pergola bracket kit are made of 13-gauge solid steel with UV-resistant powder coating, the dual-protection design delivers excellent rust resistance. Even after long-term exposure to harsh weather, it resists corrosion effectively
- Fast & Easy Installation: The 4x4 pergola bracket kit are equipped with high-quality screws and expansion bolts, each gazebo bracket features pre-drilled holes for quick, hassle-free assembly
- Wide Applications: The 3-Way pergola brackets suitable for patios, balconies, courtyards, parks, outdoor camps, decks, and lawns—ideal for supporting pergolas, pavilions, sheds, and garden furniture
Choose the structure, site and finish together
- Material: Wood offers a traditional, customizable appearance; vinyl provides a different maintenance and color profile. Compare the finish system, expected upkeep and how each material works with your home’s architecture.
- Attachment: Attached designs connect to the house but require careful structural and water-management details. Freestanding designs offer more placement freedom but need independent footings or anchoring.
- Ground conditions: Identify paving thickness, soil, slopes, drainage paths and underground utilities before selecting post locations. Pool decks, raised platforms and frost-prone ground may require different anchoring approaches.
- Climate and exposure: Record prevailing wind, intense afternoon sun, freeze-thaw cycles and moisture. Use that information to choose roof adjustability, screens, finishes and planting.
- Scale: Size the interior around the furniture and circulation you actually need, then add room for doors, serving paths and maintenance access.
What to check before buying a pergola kit
Catalogs for configurable pergolas commonly let you choose dimensions, wood or vinyl construction, site type and shade style. Treat those selections as a starting specification, not proof that a particular kit suits your site.
- Confirm the exact outside dimensions and finished post-to-post space.
- Check whether the kit is intended for freestanding, patio, deck or house-adjacent installation.
- Review the anchoring method and whether your substrate can accept it.
- List every included component: posts, rafters, brackets, fasteners, roof parts and instructions.
- Compare finish options and identify what must be sealed, painted or maintained after assembly.
- For louvers, canopies or lighting, verify motors, controls, power requirements, drainage parts and weather procedures.
- Ask whether the design requires engineering drawings or site-specific modifications.
A practical planning sequence
- Map the use. Draw the furniture, circulation and sightlines first. Mark the hours when shade matters most.
- Survey the site. Locate doors, windows, utilities, roots, slopes, drainage routes and existing footings.
- Select the placement type. Decide whether the pergola is attached or freestanding and whether it connects to a patio, deck, lawn or pool area.
- Choose the roof response. Match openness and adjustability to sun, rain, airflow and your willingness to operate or maintain moving parts.
- Coordinate structure and services. Set post locations, lighting circuits, controls, water, gas and drainage before construction begins.
- Check local approvals. Permit, setback, structural and electrical requirements vary by jurisdiction and project scope. Ask the local building authority or a qualified professional what applies to your address.
- Install and test. Follow the product instructions, verify anchoring and drainage, operate every moving component, and inspect clearances around appliances, doors and walkways before furnishing.
Make the pergola feel like an oasis in spring
Start with one strong visual anchor: a dining table, a pair of lounge chairs, a planted corner or a view through the rafters. Add textiles and lighting only after circulation works. Introduce climbing plants gradually and select varieties suited to your climate, because a plant that grows vigorously in one region may fail or become unmanageable in another. Keep roof controls, drains, fasteners and fabric accessible for seasonal inspection. The result is a pergola that changes how the yard functions, not merely a decorative frame placed in it.
Quick Recap
Rank #3

- Superior Quality Materials: This 4x4 pergola brackets feature a 90° right angle gusset plate design and weather-proof performance and a stable frame,so you do not have to worry about the attack and damage to storms and wind.
- Long-lasting durability: Made from 13-gauge solid steel, these pergola hardware boast stability and indestructibility. precision welding techniques ensure resistance against breakage and deformation, enhancing the pergola's stability. ensuring long-lasting durability for years of use.
- Rust and Corrosion Resistance: This pergola kit is made of constructed from galvanized steel and coated with durable paint, and then powder coated - far superior to paint alonerust-resistant powder coating. It prevents rust, maintaining their shine over the long term.
- Easy Installation: 4x4 post bracket equipped with high-quality screws and expansion bolts,installation is swift and straightforward,requiring no intricate steps. following the instructions provided in our user manual, you can quickly secure wood posts, saving time and effort.
- Wide Application: Designed for actual 3.5x3.5 inch wood post bases. Comes with 3/8 inch concrete anchor bolts for secure installation. Suitable for wood or concrete surfaces, providing sturdy support for various applications such as gazebos, patios, and porch railings.

Product prices and availability are accurate as of the date/time indicated and are subject to change. Any price and availability information displayed on Amazon at the time of purchase will apply.

