Do these 3 things before closing this tab:
The Tool Desk
Outbyte Driver Updater FREEFix the driver behind crashes, sound loss and screen glitchesFind Drivers →Outbyte PC Repair FREEClear out junk files and repair common Windows errorsFree Scan →1Clear out junk files and repair common Windows errors2Scan for outdated or missing drivers - takes under a minute3Repair Windows errors before they cause bigger problems
ThatPainter is reader-supported. When you buy through links on our site, we may earn an affiliate commission. Learn More
Chain piecing connects compatible quilt pieces in a continuous sewing run, reducing repeated starts and thread cutting. Four useful approaches are sewing repeated pairs, attaching pieces one after another to a long strip, offsetting seams on triangle-square units, and organizing the chain to preserve block order. The time benefit is qualitative; the reviewed sources do not report a measured number of minutes saved.
What chain piecing does
Chain piecing means sewing one quilt unit and continuing directly to the next without cutting the thread between them. Short thread bridges connect the units until you cut them apart. It works best when you prepare pieces for one construction step and feed compatible units in sewing order.
Chain piecing is a quilting technique, not the hand-embroidery chain stitch.
Free tools Windows power users keep installed
One-click scans. No signup required.
Before you start: organize one batch
- Choose one repeated sewing step. Identify the units and seam the pattern calls for.
- Arrange pieces in sewing order. Lay them out on a table or design wall before bringing them to the machine.
- Mark rows or groups. Use a labeled pin or tape to identify the first piece in each row when order matters.
- Test a seam. Check the seam allowance and unit size before sewing the batch.
- Keep the thread bridges short. Leave enough room for the units to move without creating a tangled chain.
A quarter-inch quilting foot can support consistent seam accuracy, but it is optional. Check that any foot you use fits your sewing machine. Follow the pattern’s seam instructions; chain piecing does not correct inaccurate cutting or seam placement.
#1 Best Overall
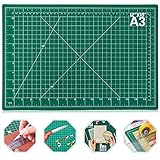
- 【SEWING CUTTING MAT】Aneuzs self-healing cutting mat protects your work surface. Compatible with rotary cutters and straight blades, won't hurt the cutter blade and keep the blade sharpness. Ideal for artist, crafters, quilters, engraver and hobbyists
- 【SELF HEALING CUTTING MAT】Made of 5-layer PVC material, the white hardness PVC in the middle help to prevent cutting through. Special finish reseals surface cuts, providing a continually smooth surface for all cutting projects
- 【ROTARY MAT SIZE】Rotary cutting mat measures approx.12 x 18 inches (A3 size), durable and reusable. Perfect for small, medium and large craft and sewing projects
- 【DOUBLE SIDE CRAFT CUTTING MAT】This double side sewing mat with measurements is printed clearly with both inches, metric grid lines and angles help to cut precisely
- 【MULTIPURPOSE SEWING BOARD CUTTING MAT】Great for sewing, crafts, model, quilting, fabric, scrapbooking project cutting projects
1. Chain piece repeated pairs or units
This is the basic method for sewing many compatible pairs or units that receive the same seam. Prepare the pieces in sewing order, sew one pair, continue off its edge, and feed the next pair without breaking the thread.
How to do it
- Arrange the pairs in the order you plan to sew them, checking orientation.
- Place the first pair under the presser foot and sew the required seam.
- Continue beyond the edge of the pair, then feed the next pair under the foot without cutting the thread.
- Repeat for the batch. If you pause, stop with the needle down to help hold the work in place.
- Cut the thread bridges when the repeated sewing step is complete, then press as the pattern directs.
A slower pace may help you control the pieces. If a unit already has seams, orient its pressed seam toward you and away from the machine to help the presser foot pass over it without twisting the fabric.
2. Sew pieces to a long strip
When many same-size pieces are being joined to one fabric color, sew them to a long strip of that fabric instead of handling a separate square for every seam. Cut the strip to the width required by the pattern, then attach the pieces one after another with little thread between them.
What’s actually slowing this PC down?
Pick the symptom - the matching free tool is one click away.
How to do it
- Cut a strip to the pattern’s required width and prepare the pieces that will attach to it.
- Place the first piece against the strip and sew the required seam.
- Feed the next piece against the strip and continue sewing, keeping the pieces close together with short thread bridges.
- Continue until the batch is sewn.
- Press the pieces out as directed, then cut the units apart.
Use this approach only when the pieces and seam placement are compatible with the pattern. Check the layout and orientation before sewing a long run.
3. Offset stitching on triangle-square units
For triangle-square units, the researched method alternates which side of the marked line is sewn. Sew a quarter-inch from the marked line on one side of a unit, then offset the next unit and sew a quarter-inch from the opposite side. The alternating arrangement is intended to reduce thread waste and bunching and help keep points from being pulled into the machine.
Rank #2

- SELF HEALING ROTARY MAT - Our rotary mat is self-healing, it reseals surface cuts for a continually smooth cutting surface. Using a self-healing cutting mat extends the life of your blade and protects the surfaces of your work area.
- DOUBLE SIDED - Our double-sided rotary mat has one side with grid lines and one side without grid lines. Grid lines help with easy measuring and accurate cutting of straight lines and precise angles. The solid color side is used for general cutting.
- 24 INCH BY 36 INCH MAT - This rotary cutting mat is 24"x36" and 1.5mm thick. The large size makes it perfect for most crafting projects. Great for cutting multiple layers of fabric into bias strips, squares, triangles, and squaring up blocks.
- PROTECT YOUR ROTARY MAT - Our professional quality cutting mat is designed for use with rotary cutters only. Not for use with fixed blade utility knives. To prevent warping, store it flat and out of direct sunlight.
- THE OLFA STANDARD - As the inventor of the Rotary Cutter in 1979, OLFA has maintained a standard of cutting excellence for our quality and durability. Pairing OLFA brand rotary cutter, blades and cutting mats together will provide optimal results.
How to do it
- Prepare the units and mark the sewing line as the pattern directs.
- Position the first unit and sew the instructed seam a quarter-inch from the marked line on one side.
- Position the next unit offset from the first and sew a quarter-inch from the opposite side of its marked line.
- Continue alternating the placement and seam side through the batch.
- Cut and press the units, then trim to the pattern’s required unfinished size if instructed.
The offset method does not replace accurate seam placement. Follow the pattern’s marked line and seam instructions, and check the units before moving on.
4. Preserve the order of blocks or units
When a block has pieces that must stay in a particular sequence, organize them before chain piecing so you can reconstruct the layout after sewing. Marking rows and stacking the pieces in pickup order helps prevent pieces from being confused or reversed.
How to keep the chain in order
- Lay out the pieces in their intended arrangement on a table or design wall.
- Mark the first piece in each row with its row number using tape or a labeled pin.
- Stack the pieces in the order you will pick them up, placing the first piece to be sewn on the bottom.
- Sew the pieces in that order, keeping track of the chain and row markings.
- Use the layout and labels to restore the intended order before joining rows or sections.
Take particular care with mirror-image pieces and directional prints. If the layout is hard to verify while the pieces are connected, stop and arrange the units again before proceeding.
Optional extension: leaders and enders
Leaders and enders use small fabric units in the gaps between sewing on the main project. Instead of feeding a throwaway scrap between sewing runs, you can keep a small unit under the presser foot while pausing to press or trim. Over time, those units can become a second project.
Leaders and enders are optional and may be easier once you are comfortable managing the main project. A specific pattern’s dimensions apply to that pattern only; they are not universal block standards.
Rank #3

- Smooth & Consistent Cutting Experience: Offers a flat, steady surface for clean cuts on fabric, paper, and cardstock. Ideal for sewing supplies, scrapbooking supplies, card making supplies, and everyday creative hobbies that require precision and control.
- Double-Sided Grid Design for Accuracy: Printed on both sides with clear inch grids, angle markings, and alignment guides to support precise measuring and layout. A practical choice for quilting supplies, pattern cutting, and detailed crafting supplies projects.
- Durable Self-Healing Cutting Surface: The premium self-healing layer absorbs light cuts and closes up over time, keeping the surface smooth. Fully compatible with a rotary cutter for fabric, straight blades, and other cutting tools.
- Thick Multi-Layer PVC Construction: Built with reinforced PVC layers and a firm core for long-term durability. Protects tabletops and cutting tools while functioning as a dependable craft mat and fabric cutting mat for frequent use.
- Multi-Purpose Mat for Creative Workspaces: Designed for sewing, quilting, paper crafts, modeling, and more. Its generous size also allows it to double as a large cutting board for studios, classrooms, or professional workshops.
Which technique should you use?
| Project situation | Technique to try | Key consideration |
|---|---|---|
| Many compatible pairs or units need the same seam | Chain piece repeated pairs or units | Arrange them in sewing order and verify orientation. |
| Many same-size pieces join to one fabric color | Sew pieces to a long strip | Use the strip width and seam placement required by the pattern. |
| Triangle-square units are being chain pieced | Offset stitching | Follow the marked line and pattern seam instructions. |
| Rows or blocks must stay in a specific sequence | Mark and stack pieces in pickup order | Label the first piece in each row before sewing. |
| You want to sew a second project between main-project units | Try leaders and enders | It is optional and requires keeping track of two projects. |
Common mistakes and quick fixes
Pieces are sewn in the wrong order
Stop and compare the chain with the layout before cutting it apart. Label rows and stack pieces in pickup order before sewing the remaining units.
The chain bunches or tangles
Use short thread bridges and avoid forcing connected pieces through the machine. If the chain is awkward to handle, cut it into manageable groups.
Triangle-square units are inaccurate
Check the marked line, seam placement, cutting dimensions, and pattern instructions. Offset stitching is a way to organize the chain, not a substitute for accurate seams.
A seam allowance is inconsistent
Test a seam before sewing the batch. A quarter-inch foot may help, but confirm that it fits your machine and still check the result.
FAQ
How do I chain piece quilt blocks?
Arrange compatible pieces in sewing order, sew one unit, and continue to the next without cutting the thread between them. Cut the thread bridges after the repeated sewing step is complete.
Outdated Drivers Are Slowing You Down
One free scan finds every outdated or missing driver and matches the right update for your exact hardware.Free scan · exact hardware matchWindows Errors? Fix Them Before They Spread
Repair common Windows errors and clear accumulated junk for a smoother, more stable PC - no reinstall needed.Free scan · no reinstallRank #4

- EXTRA LARGE CUTTING SURFACE: Perfectly sized for cutting full widths of fabric, extra-large squares, and long strips with ease
- SELF-HEALING DESIGN: Durable mat with a double-sided, self-healing surface for extended use and precise measurements
- EASY-TO-READ GRIDS: Features measuring grids and 30, 45, and 60-degree bias lines for accurate angle cutting
- PROTECTS WORK SURFACE: Ideal for sewing, quilting, scrapbooking, and gift wrapping while keeping your work area safe
- QUALITY CRAFT TOOLS: Designed to enhance your creativity with reliable and long-lasting materials
How can I keep quilt pieces in order while chain piecing?
Lay out the pieces in the intended order, mark the first piece in each row with a row number, and stack the pieces in pickup order with the first piece on the bottom.
Can I sew quilt pieces to a long strip?
Yes, when many same-size pieces join to the same fabric color and the pattern’s construction allows it. Cut the strip to the required width, sew the pieces along it in sequence, press them out as directed, and cut the units apart.
Do I need a special presser foot for chain piecing?
No. A quarter-inch quilting foot is optional support for seam accuracy. Check that it is compatible with your sewing machine and test your seam.
Does chain piecing save a specific amount of time?
The reviewed sources describe time and thread savings qualitatively, but do not report a controlled timing result or a number of minutes saved.
Free tools Windows power users keep installed
One-click scans. No signup required.
The Bottom Line
Chain piecing can reduce repeated starts and thread cutting when you prepare compatible pieces in advance. Choose the workflow that fits the units: repeated pairs, pieces sewn to a strip, offset triangle-square seams, or labeled pieces arranged to preserve block order. Leaders and enders are an optional way to build a second project between sewing runs.
Quick Recap

Product prices and availability are accurate as of the date/time indicated and are subject to change. Any price and availability information displayed on Amazon at the time of purchase will apply.




