PC Slower Than It Used to Be?
Free tools Windows power users keep installed
One-click scans. No signup required.
Outbyte PC Repair · freeA free scan shows the junk files, broken settings and background clutter dragging Windows down - then fixes them in one click.
Run a Free PC Scan →ThatPainter is reader-supported. When you buy through links on our site, we may earn an affiliate commission. Learn More
The easiest turned Christmas ornament is a small solid wood form shaped between centers on a lathe. Round a sound hardwood or scrap blank, cut a bulb or teardrop profile with a spindle-turning tool, sand and finish it, then add a secure loop. More advanced turners can hollow a sphere or add contrasting finials; painting is an easy way to turn several simple forms into a coordinated holiday set.
A turned Christmas ornament is one of the most approachable wood-lathe projects: start with a small, sound hardwood blank, round it between centers, shape a simple bulb or teardrop, sand it smooth, and add a loop for hanging. You can leave the grain natural, combine contrasting woods, or paint a batch of identical ornaments in coordinated holiday colors.
The simplest solid ornament is suitable for a careful beginner with basic spindle-turning tools. A hollow sphere with finials is lighter and more elaborate, but drilling and hollowing require significantly more control. Choose the design before buying materials, because the mounting method, blank dimensions, and finishing steps change with the project.
Choose the ornament design first
| Design | Best for | What makes it different |
|---|---|---|
| Simple solid ornament | First projects and scrap wood | Fastest route; turn a rounded body with a small neck or finial. |
| Finial ornament | Practicing spindle details | Uses beads, coves, shoulders, and pointed ends for a more decorative profile. |
| Hollow sphere | Experienced turners | Requires drilling and controlled hollowing; the reduced weight makes it easier to hang. |
| Two-tone ornament | Decorative contrast | Combines different species for the body, cap, or finials. |
| Kit-based droplet ornament | Repeatable gifts and polished hardware | Uses purpose-made metal components, but still requires wood, a lathe, and turning tools. |
| Painted ornament set | Holiday color themes | Allows inexpensive, similar blanks to become a coordinated set. |
For a first attempt, use the solid form. It teaches the essential spindle-turning skills without adding the drilling, wall-thickness, and breakthrough problems associated with hollowing.
#1 Best Overall

- 【Professional-Grade Versatility】 5 Carbide Tips + Bowl Sander Combo.This wood lathe tools set combines precision carbide cutters and a bowl sander for unmatched versatility. The 5 durable carbide blades (Diamond, Square-Round, Square, Round, and Gooseneck) handle every woodturning task—from roughing to detailing. Pair them with the adjustable-angle bowl sander and 50 sanding discs (60-320 grit) to smooth curves and polish bowls effortlessly. No more switching tools mid-project!
- 【Extended Reach & Anti-Slip Grip for Total Control】Dominate large or deep projects with our carbide lathe tools! The 550mm extended handle (280mm base + 270mm extension) and ergonomic rubberized grip ensure stability, even during prolonged use. Adjust blade depth in seconds and tackle bowls, spindles, or pens with confidence. The swappable carbide tips stay razor-sharp, eliminating downtime for sharpening.
- 【Unbreakable Build】CNC-Machined Steel & Rotatable Carbide Blades. Built for pros, our wood turning tools feature CNC-crafted stainless steel shafts that resist rolling and flexing. The tungsten carbide blades outlast traditional steel, and their indexable design lets you rotate or replace dull edges instantly. Whether you’re a beginner or expert, these tools deliver flawless cuts every time—no grinding required!
- 【50+ Sanding Discs & Mandrels】Perfect Finish, Zero Hassle. Go beyond turning with the included bowl sander kit! Two mandrels (1” and 2”), interface pads, and 50 hook-and-loop sanding discs (60-320 grit) let you sand curves, bowls, and intricate details in minutes. The quick-change design keeps your workflow smooth, while the aluminum handle ensures lightweight maneuverability.
- 【Complete Kit, Lifetime Value: Save Time & Money】Why buy separate tools? This all-in-one set includes 5 carbide lathe tools, 2 extendable handles, and a pro bowl sander—everything for woodturning and finishing. Durable aluminum storage keeps parts organized, while replaceable blades and sandpaper ensure years of use. Perfect for DIYers, carpenters, or gift-seekers craving premium quality!
Gather the wood, tools, and safety gear
Wood
A small, straight-grained hardwood blank is a dependable choice for a natural-finish ornament. Hard maple turning stock is one documented option, and contrasting hardwoods can be used for finials or accent rings. You do not need a specialty ornament blank: suitable dry scrap wood is perfectly reasonable if it is sound, free of dangerous cracks and loose bark, and large enough for the design.
Avoid stock with deep splits, unstable knots, loose bark, embedded metal, or other defects that could release while the lathe is running. The blank should be dry and cut reasonably square so it can be centered accurately.
Lathe and turning tools
- A wood lathe with a mounting method appropriate to the design.
- A roughing gouge or spindle roughing gouge for removing corners and establishing a cylinder.
- A spindle gouge for coves, beads, transitions, and controlled shaping.
- A skew chisel for clean finishing cuts if you are comfortable presenting it correctly.
- A parting tool for defining shoulders, narrow details, or the ends of the work.
- Sandpaper and a finish compatible with the wood.
- A drill and suitable bit if the design requires a hole for a hanger or hollowing access.
- A hanging loop, eyelet, ribbon, wire, brass tube, or kit-supplied hardware.
If you want ready-made metal components, look for a woodturning ornament kit. Dedicated kits may supply plated brass or solid brass caps, ferrules, tubes, and hanging components. They generally do not replace the wood blank, lathe, or turning tools. Check the individual kit instructions before preparing the blank: one documented droplet kit, for example, specifies a 7 mm drill and compatibility with a 7 mm pen mandrel, along with its own blank-size requirements.
What’s actually slowing this PC down?
Pick the symptom - the matching free tool is one click away.
Safety equipment
Wear a full face shield whenever the lathe is running. Tie back long hair, remove loose clothing and jewelry, and do not wear gloves while turning. Follow your lathe manufacturer’s instructions and established woodturning safety guidance; the steps below are reminders, not a substitute for training.
- Inspect the blank for cracks, voids, loose bark, and other defects.
- Mount it securely using the method appropriate for the ornament.
- Rotate the workpiece by hand before switching on the lathe. Confirm that it clears the tool rest and bed.
- Start at a low speed, especially when the blank is rough, large for the lathe, or not yet known to be balanced.
- Increase speed only after the work is rotating smoothly and your lathe’s manual permits it. There is no single safe speed for every ornament.
- Keep the tool supported on the rest before bringing its cutting edge into contact with the wood.
- Keep your body out of the firing zone—the area where a failed mounting or fractured blank could travel.
- Stop the lathe completely before measuring, adjusting the tool rest, changing the mounting, or removing the ornament.
- Remove the tool rest before sanding or polishing on the lathe.
How to turn a simple solid Christmas ornament
1. Prepare and mark the blank
Cut a small square or rectangular blank to the approximate dimensions required by your intended shape. The exact size is your choice for a simple ornament, but keep the piece modest: a smaller, balanced blank is easier to control than an oversized one.
Mark the center of each end carefully. Accurate centers help the blank run true between centers and leave enough material for a symmetrical profile. If you are using a kit, follow its drilling, blank, and mandrel specifications rather than estimating from the appearance of the finished hardware.
2. Mount the blank and check clearance
Mount the blank securely between centers or with the chuck, mandrel, or other method specified by the design. Set the tool rest close to the work without allowing it to touch the rotating blank. Turn the piece by hand through a complete revolution. Check the clearance at both ends and along the full length before starting the motor.
Crashes, No Sound, or Screen Glitches?
Random freezes, missing sound and display glitches usually trace back to one bad driver. Find and replace yours safely.Free scan · under a minutePC Slower Than It Used to Be?
A free scan shows the junk files, broken settings and background clutter dragging Windows down - then fixes them in one click.Free scan · Windows 10 & 11Begin at a low speed. Rough or unbalanced stock can move violently when started too quickly. Once the corners have been removed and the piece is demonstrably balanced, you may adjust the speed in accordance with the lathe manual, the workpiece size, and your experience.
3. Round the stock
Use a sharp roughing gouge or spindle roughing gouge to remove the corners and establish a cylinder. Keep the bevel supported and make controlled cuts rather than trying to remove too much material at once. Work progressively along the blank until the major high spots are gone.
Rank #2

- Professional Application - This 8 pcs wood lathe chisel set is designed for turners in cutting and woodworking projects as well as hobbyists or handy men. This portable set is suitable for carving intricate details into wood pieces or chiseling runners for you furniture pieces
- What's included: 2-Skew: 1"", 1/2"" , 1-Spear Point: 1/2"" , 1-Parting Tool: 1/8"" , 1-Round Nose: 1/2"" , 3-Gouge: 1/4"", 1/2"", 3/4"" "
- Detailed Design - Light, very sharp, and responsive, the tools are already sharpened and can be used immediately when you get, no need further sharpening; durable metal ferrules tighten the handle for stable use experience, easuring chisels' safety and reliability while working. "
- Premium Material - Made from high-quality triple tempered chromium-vanadium steel and hardened to last long, allowing you to have smooth and sharp carving experience; ground tips for precision turning
- Sturdy Handle - Shaped to minimize operator fatigue, high quality hardwood handles make it comfortable and convenient for you to hand the chisel
Once the stock is round, stop the lathe and inspect it. Look for cracks, looseness, or defects that were hidden by the original corners. If the blank is no longer sound, stop and replace it rather than trying to rescue it while rotating.
4. Mark the main transitions
Use a pencil or a light tool mark to indicate the intended ends of the body, neck, shoulder, bead, cove, or finial. Planning these transitions before cutting makes it easier to preserve symmetry and avoid turning away more wood than necessary.
A beginner-friendly profile is a rounded body that tapers gently toward a narrow top. Add one small bead or shoulder near the top if you want a decorative transition, but do not make the first project dependent on a complex finial. A clean, restrained silhouette usually looks better than several uneven details.
5. Shape the body
Use a spindle gouge for the curved body and any coves or beads you have marked. Let the tool rest support the tool and make light, progressive cuts. Frequently compare both sides of the ornament visually. You can also stop the lathe to check the profile with a paper or cardboard template.
A skew chisel can leave a particularly clean surface on straight or gently curved areas, but it demands careful presentation. An improperly presented skew can catch. If you are still learning the tool, use the spindle gouge for the main form and reserve the skew for practice on scrap or for cuts you can make confidently.
6. Add a neck or finial
Use a parting tool to establish narrow shoulders or boundaries, then refine the shape with a spindle gouge. A small pointed top can be left as a simple cone, or you can create a separate contrasting finial if the mounting and design allow it.
Recommended Free Tools
Rank #3
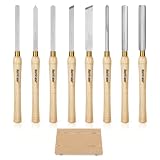
- 【VERSATILE 8-PIECE TOOL SELECTION】 Covers core woodturning needs with precise specifications: 1/2" Bowl Gouge, 7/8" Roughing Gouge, 3/4" Spindle Gouge, 1"/5/8" Skew Chisels, 3/16" Parting Tool and 5/8" Scraper. Ideal for crafting bowls, pens, spindles, and kitchenware—from initial shaping to fine detailing.
- 【DURABLE M2 HSS BLADES】 Forged from M2 High-Speed Steel with HRC 56-63 hardness, offering a reliable balance of toughness and edge retention. These blades are designed to stay sharp through multiple DIY projects on various wood types and are easy to resharpen to match your personalized cutting style.
- 【ERGONOMIC SHOCK-ABSORBING HANDLES】 Each tool features a 10-inch solid hardwood handle that delivers a secure, comfortable grip with natural vibration dampening. Brass ferrules reinforce the blade-handle connection, ensuring balanced leverage and steady operation during your turning sessions.
- 【DESIGNED FOR HOBBYISTS & DIY】 Ready-to-use factory edge—perfect for beginners building foundational skills and intermediate hobbyists tackling home projects. The 16.3-inch total length provides optimal control for those learning precision cutting and detailed craftsmanship.
- 【STURDY WOODEN STORAGE CASE】 Keep your workspace organized and protect your tool edges. Dedicated slots for each chisel prevent blade nicks and keep tools secure and portable. This organized set makes a practical and thoughtful gift for any woodworking enthusiast.
Do not reduce the neck so far that it becomes fragile. The hanging hardware must have enough sound wood around its hole or attachment point to support the finished ornament. If you plan to drill into the top, leave a flat or gently rounded area that can be located accurately.
7. Refine the shape and remove the work
Make a final light cut to remove tool marks and unify the transitions. Stop the lathe and inspect the ornament from several angles. If it is symmetrical and the surface is clean, turn off the machine and wait for it to stop completely before loosening the work.
Sand and finish the ornament
Remove the tool rest before sanding or polishing operations. Sand through suitable grits with care, keeping your fingers clear of openings and avoiding pressure that could overheat the wood or damage the shape. Sanding should improve the surface left by the tools, not compensate for deep ridges or an uneven profile.
For a natural ornament, use a finish appropriate to the wood and the look you want. A clear finish emphasizes figure and contrast; a colored stain can change the tone while retaining some grain. Allow the finish to cure according to its instructions before adding ribbon or storing the ornament.
The Tool Desk
Outbyte Driver Updater FREEFix the driver behind crashes, sound loss and screen glitchesFind Drivers →Outbyte PC Repair FREEClear out junk files and repair common Windows errorsFree Scan →Painting is useful when you want a coordinated set or when the wood is inexpensive and visually plain. Sand the surface smoothly, remove dust, and use a paint system suitable for the material and your intended indoor use. You can paint the entire form, leave the beads or finials natural, or use a restrained band of color to highlight the turned profile. Make sure the finish is fully dry before handling and hanging it.
Add the hanging loop or hardware
The final attachment can be as simple as a drilled hole with ribbon or wire, an eyelet, or a kit-supplied cap and loop. Drill carefully into sound wood and keep the hole aligned with the ornament’s axis. A brass tube or ferrule can provide a polished transition between the wood and the hanging component; some project designs use brass tubing, while dedicated kits supply purpose-made metal parts.
Before placing the ornament on a tree, test the attachment by holding the loop and gently checking that the hardware does not pull loose. Do not rely on a thin, cracked neck or a shallow hole to support a heavier metal fitting.
Rank #4

- Complete 8-in-1 woodturning tool kit meets all carving demands, equipped with roughing gouge, spindle gouge, bowl gouge, scraper, parting tool and skew chisel, ideal for making bowls, pens and wooden crafts.
- Adopted premium M2 high speed steel material, outstanding hardness and heat resistance, keeps sharp edge longer, delivers smooth clean cutting on softwood, hardwood and exotic wood.
- 11.6 inch extra long polished hardwood handle with brass ferrule, offers stable grip and great leverage, effectively reduces hand fatigue and kickback risk for safe precise operation.
- Pre-sharpened out of box for instant use. The durable M2 HSS blade supports repeated sharpening, can be restored to sharp state easily, serves permanent long time service.
- Solid reinforced structure not easy to deform or break, widely compatible with most bench and floor wood lathes, perfect choice for DIY enthusiasts and professional woodworkers
Advanced variation: a hollow sphere
A hollow sphere produces a lighter, more intricate ornament, but it should be treated as an advanced variation rather than the default beginner project. It begins with a small cube or similar blank. The outside is turned toward a spherical form, an opening is drilled, and material is removed from inside through that opening with a suitable hollowing tool.
Hollowing requires controlled cuts and constant attention to the remaining wall. Remove material gradually and avoid breaking through the shell. The correct wall thickness depends on the design, blank, opening, tools, and method; there is no universal measurement to apply to every hollow ornament. If you cannot reliably control the tool or judge the wall, practice on a simpler form first.
A hollow sphere can be capped with contrasting wooden finials or metal components. Because it contains less wood, it is lighter to hang, but the opening, caps, and attachment points still need to be strong enough for the finished design.
Independent reader supportYour contribution helps us test, update, and keep practical guides available for everyone.Ways to make a turned ornament set
- Repeat one simple profile: Make a template and reproduce the same bulb or teardrop shape from several blanks.
- Use two species: Pair a pale body with a dark finial, or reverse the combination across the set.
- Paint after turning: Use inexpensive, sound hardwood or suitable scrap and finish each ornament in a shared palette.
- Vary only one feature: Keep the body consistent while changing the bead, cove, cap, or hanging ribbon.
- Use a kit for consistency: A metal ornament kit can make the hanging hardware look uniform across multiple gifts, but prepare each blank to the kit’s instructions.
Buying guidance: what you actually need
The most project-specific purchase is a woodturning ornament kit, particularly if you want matching brass or gold-plated hanging components. It is not a substitute for a lathe or for the tools used to shape the blank. If you already have suitable wire, ribbon, tubing, or an eyelet, a kit may add convenience rather than capability.
For a low-cost first project, prioritize a sound piece of dry scrap wood, safe mounting, a sharp spindle-turning tool, abrasive, finish, and a full face shield. A hardwood turning blank is convenient but not mandatory. Specialist woodturning retailers are also the most appropriate place to compare spindle gouges, small-lathe accessories, and hollowing tools when you progress beyond the basic form.
Do these 3 things before closing this tab:
1Clear out junk files and repair common Windows errors2Fix the driver behind crashes, sound loss and screen glitches3Repair Windows errors before they cause bigger problemsTroubleshooting common problems
The ornament vibrates
Stop the lathe and check the mounting, centers, clearance, and balance. Rough or irregular stock may need to start at a lower speed. Do not continue turning a blank that is loose, cracked, or visibly unstable.
The surface is covered in ridges
Improve the final cutting technique before relying on heavier sanding. Check that the tool is sharp, supported by the rest, and being presented with a controlled bevel-supported cut. A final light pass with a spindle gouge or a confidently used skew can produce a cleaner surface.
Best Value

- Complete 8 Piece Set: This all-in-one set includes 2 skew chisels (1", 1/2"), 1 spear point (1/2"), 1 parting tool (1/8"), 1 round nose scraper (1/2"), and 3 spindle gouges (1/4", 1/2", 3/4"). You have the right tool for every turning and carving task
- Pre-Sharpened Blades: No sharpening needed. Every chisel arrives factory-sharpened and ready to cut. Beginners can start turning with confidence immediately, while experienced woodworkers love the convenience of grabbing a tool that's ready to go.
- Quality Construction: Features high-grade 60CR-V alloy steel blades that maintain long-lasting sharpness for smooth and precise wood turning experiences.
- Comfort-Grip Handles & Canvas Bag: The solid wood handles fit naturally in your grip with a smooth finish that prevents slipping. You get better control and less hand fatigue. The tough canvas bag keeps everything organized with individual pockets for each chisel, easy to roll up for job sites or store neatly on your workbench.
- Ideal For: Beginner woodturners, hobbyists building their workshop, DIY enthusiasts, and experienced craftsmen needing a reliable backup set. Designed for cutting and woodworking projects, perfect for handy men and turning enthusiasts alike.
The finial breaks
The neck may be too thin, the grain may be weak, or the tool may have caught. Return to a simpler, thicker transition and leave more supporting wood around the attachment point. Practice pointed details on scrap before making them part of a finished ornament.
The paint looks uneven
Uneven tool marks, dust, or a rough end grain can show through paint. Refine the turned surface, sand consistently, remove dust, and apply compatible coats according to the finish instructions. A simple shape with clean transitions is easier to paint well than an overly detailed one.
The hanging hardware will not fit
Do not force it. Recheck the kit’s required blank dimensions, drilling size, tube or mandrel specification, and insertion method. Hardware dimensions are not interchangeable simply because the components look similar.
Frequently Asked Questions
What wood is best for a turned Christmas ornament?
A small, sound, dry hardwood blank is a practical choice, but you do not need specialty wood. Suitable scrap wood can work if it is free of cracks, loose bark, and other defects and is large enough for the design.
Does a woodturning ornament kit include everything I need?
No. A kit may include brass or plated metal caps, tubes, ferrules, and hanging components, but it generally does not include the wood blank, lathe, or turning tools. Follow the individual kit’s blank and drilling requirements.
Is a hollow ornament suitable for a beginner?
A solid ornament with a rounded profile is the better first project. A hollow sphere requires drilling, controlled hollowing, and careful attention to wall thickness, so it is an advanced variation.
Can I paint a turned wooden ornament?
Yes. Sand the turned surface smoothly, remove dust, and use a paint system suitable for the wood and intended indoor use. Painting is especially useful for making a coordinated set from inexpensive blanks.
The Bottom Line
For the best first turned Christmas ornament, use a sound dry hardwood or scrap blank, make a simple solid bulb or teardrop, and focus on secure mounting, controlled spindle cuts, careful sanding, and a reliable hanging point. Add paint, contrasting wood, or a purpose-made kit when you want a coordinated decorative finish. Save hollow spheres for after you are comfortable with drilling and hollowing.
Quick Recap

Product prices and availability are accurate as of the date/time indicated and are subject to change. Any price and availability information displayed on Amazon at the time of purchase will apply.




