Free tools Windows power users keep installed
One-click scans. No signup required.
ThatPainter is reader-supported. When you buy through links on our site, we may earn an affiliate commission. Learn More
To fade an entire picture in desktop Microsoft Word, select it, open Picture Format, choose Transparency, and select a preset. For a precise result, choose Picture Transparency Options and enter a percentage. A higher percentage makes the picture more see-through: 0% is fully opaque and 100% is fully transparent.
This control is available in current desktop versions including Word for Microsoft 365, Word 2024, Word 2021, Word 2019, and Word 2016, although labels and available features can vary by platform, edition, updates, and object type. Microsoft says the same picture-transparency control is not currently available in Word for the web. Open the document in the desktop app if you are using the browser version.
Fade an entire picture in Word
- Click the picture in your document.
- Open the Picture Format tab. On some Mac installations, the tab may be labeled slightly differently.
- Select Transparency.
- Choose one of the preset levels, or select Picture Transparency Options.
- In the Format Picture pane, adjust the transparency slider or enter a percentage.
Microsoft’s current gallery includes presets at 0%, 15%, 30%, 50%, 65%, 80%, and 95%. Custom values are available in the formatting pane. Start at about 30% to 50% for a clearly faded but recognizable image. Try 65% to 80% when placing text over it. These are practical starting points, not fixed requirements; the ideal setting depends on the image, page color, text, and whether the document will be printed.
The Tool Desk
Outbyte Driver Updater FREEFix the driver behind crashes, sound loss and screen glitchesFind Drivers →Outbyte PC Repair FREEClear out junk files and repair common Windows errorsFree Scan →#1 Best Overall
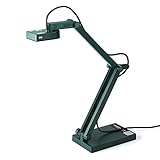
- Features an 8 Megapixel camera for capturing Ultra High Definition live images up to 3264 x 2448 pixels
- High frame rate for lag-free live streaming – streams at up to 30 fps at full HD, and up to 15 fps at 3264 x 2448 pixel
- Fast focusing speed helps minimize interruptions for frequent switching between different materials; features Sony CMOS Image Sensor for exceptional noise reduction and color Reproduction – great for capturing in dimly lit environments
- Designed and made in Taiwan. Multi-jointed stand offers a simple fix for tightening loose joints caused by heavy daily use.Max Shooting Area:13.46 inch x 10.04 inch
- Works with a variety of software and applications on Mac, PC and Chromebook that allows you to use it in different ways. System Requirements - Mac Intel Core i5 CPU 2.5 GHz or higher, OS X 10.10 or higher, Solid-state drive, and 200MB of free hard disk space, 256MB of dedicated video memory (For lag-free live streaming up to 1920 x 1080, and video recording of 1920 x 1080). Windows Recommended Requirements - Microsoft Windows 10,Intel Core i5 CPU 3.40 GHz or higher, 4 GB RAM, 200MB of free hard disk space, 256MB of dedicated video memory (For lag-free live streaming up to 1920 x 1080, and video recording of 1920 x 1080)
At 0% transparency, the image remains fully solid. At 100%, it becomes invisible. In other words, increasing transparency reduces opacity.
For Microsoft’s current steps and feature availability, see Microsoft’s picture-transparency guide.
Choose the right way to make a picture look faded
| Desired result | Best control |
|---|---|
| Make the whole image see-through | Picture Format > Transparency |
| Put text over a subdued image | Transparency, possibly combined with brightness or contrast adjustments |
| Create a pale page background | Picture Watermark with Washout |
| Remove one solid-colored area | Color > Set Transparent Color |
| Remove a complex photo background | Picture Format > Remove Background |
| Make the image less vivid while keeping it solid | Brightness, contrast, or recolor controls |
“Fade” is not a separate Word picture effect. It can mean transparency, a pale watermark, reduced color intensity, or removal of part of the image. Choose the method based on the result you need.
Fade a picture as a watermark
Use a picture watermark when the image should sit behind document content as a page-level background element, rather than behaving like an ordinary picture in the text layout.
What’s actually slowing this PC down?
Pick the symptom - the matching free tool is one click away.
Rank #2

- Document camera with Image reversal function: The image reversal function can be realized through the button (no need to pass the software). When video chatting or picture output, the picture can be freely reversed left and right, up and down; The PAKOTOO document camera connects the computer via USB 2.0 cable, it does not support zoom and HDMI features, nor it does compatible with iPad.
- Document camera for teachers with 3 levels of brightness adjustment and 10 levels of exposure adjustment: The brightness function can be realized by buttons to ensure that you can get clearer images. It can also realize the Selfie fill light function in dark and bright environments
- Document camera for classroom with Foldable: Embedded design, takes up little space after folding, and is easy to carry; multi-joint supports multi-angle free rotation, which can better capture 2D and 3D objects. Maximum coverage area: 16.5" x 11.6" in (A3 paper)
- USB document camera with autofocus: 2448P high-definition document cameras, press the focus (AF) button once, and the document camera will automatically focus once. Move the object under the lens, the image will not be blurred. Macro captures objects as small as 3.94"
- Important: PAKOTOO Document camera is not plug and play. You need to select "USB Camera" in the system that comes with your computer. The document camera is equipped with a USB-C cable, which can be directly used with devices with USB-C interface such as MacBook. Compatible with Windows PCS, Macs and Chromebooks, works with Tiktok, Google Meet, Skyp-Microsoft Teams, Zoom; If you encounter any problems during the use of the product, or the computer does not recognize the camera, please be sure to contact our friendly support team for a quick solution.
- Open the Design tab.
- Select Watermark, then Custom Watermark.
- Choose Picture Watermark.
- Select Select Picture and choose the image.
- Leave Scale set to Auto unless you need a specific size.
- Enable Washout.
- Select OK.
Washout is intended to create the pale appearance associated with a watermark. It is related to fading but is not the same as applying whole-picture transparency to a normal inserted picture. Microsoft’s instructions are available in its guide to inserting a picture watermark.
Edit an existing picture watermark
A watermark is normally stored in the document header, which is why it may not be selectable in the main page area.
- Double-click near the top of the page to open the header.
- Move over the watermark until the pointer changes to a four-headed arrow.
- Click the watermark.
- Open Picture Tools > Format, or open Format Picture.
- Adjust Picture Transparency, Brightness, or Contrast.
Check File > Print or print preview after adjusting it. Microsoft explains this process in its guide to adjusting a watermark’s washout effect.
Make one color transparent
To remove one color from a simple logo, illustration, or graphic:
Quick wins for a faster PC:
Scan for outdated or missing drivers - takes under a minuteDriver Scan →Clear out junk files and repair common Windows errorsFree Scan →Fix the driver behind crashes, sound loss and screen glitchesFind Drivers →Rank #3

- AIKOR 2MP 3-in-1 USB Webcam, Document Camera and Visualiser: It can be used as a webcam for video chats and teleconferences. The rotating lens allows for image clarity adjustment during live demonstrations. Featuring a flexible 0.47-inch diameter hose design, it can be adjusted to any angle.
- Portable Document Camera: This lightweight document camera weighs only 1.1 pounds, extends up to 20.4 inches in height, and features a 360-degree adjustable and rotatable camera for capturing images and videos from multiple angles. It can present objects of varying sizes and positions, and the weighted base ensures excellent operational stability. This document camera combines portability with high performance, making it an ideal choice for educators and professionals.
- Manual focus webcam: This document camera uses precise manual focus to avoid the repeated unclear focus caused by auto focus. It can achieve virtualized real-life effect shooting when needed, supports 1080P full HD resolution, and refresh rate up to 30 frames per second. Manual focus helps to stabilize the focus and restore the true color and texture.
- Versatile Document Camera: Equipped with a CMOS image sensor and built-in sealed silicon microphone to reduce noise and improve sound quality, achieving excellent noise reduction and color reproduction. Suitable for education, home and office (video conferencing, online teaching, online tutoring, home office, video calls, making teaching videos, animations, games and live demonstrations).
- High compatibility: The visualiser document camera comes with a USB-C cable and can be used directly with devices equipped with a USB-C port (such as MacBook). Compatible with Windows PC, Mac and Chromebook, and can be used with software such as TikTok, Google Meet, Skype, etc. It can be used with all major web conferencing software applications (Zoom, Google Meet, etc.).
- Insert the picture directly into the document.
- Select it and open Picture Format.
- Choose Color.
- Select Set Transparent Color.
- Click the color in the picture that you want to remove.
This affects one selected color, not the entire picture. It works best when the background is a single, solid color. Photographs and anti-aliased artwork often contain many subtly different shades, so the result can have incomplete areas or jagged edges. For those images, use whole-picture transparency or background removal instead.
Remove a picture background instead of fading it
Transparency makes the entire image, or one selected color, see-through. It does not isolate the subject. If your goal is to keep a person or object while removing its background, try:
- Select the picture.
- Choose Picture Format > Remove Background.
- Review the area Word marks in magenta.
- Use Mark Areas to Keep or Mark Areas to Remove to correct the selection.
- Choose Keep Changes.
Microsoft says background removal is unavailable for some vector formats, including SVG, AI, WMF, and DRW. See Microsoft’s background-removal instructions.
Make a picture look lighter without making it transparent
If you want a pale or subdued image that remains essentially solid, try the picture corrections instead:
Rank #4

- [Crystal-Clear Imaging and Smooth Video Streaming] 8 Megapixel Ultra-High definition SONY camera captures live images at up to 3264 x 2448 pixels with lag-free video streaming at 30 fps across all resolutions.
- [Your Space-Saving Multi-Joint Camera] Experience the durability of our multi-joint design while enjoying a generous viewing size of 14.72 x 11 inches. This compact camera is perfect for your desktop set up.
- [Powerful Features, Crisp Image] Featuring LED light, and an anti-glare sheet for exposure challenges in varying lighting. 7-segment brightness control, image flip, and built-in mic ensure top-notch performance. Autofocus lens and macro capability (capturing objects as close as 3.9 inches).
- [Feature-Packed INSWAN Documate Software] The bundled full-function INSWAN Documate software offers digital zoom, image annotation, hue adjustment, image rotation/flip, video recording, snapshots and other useful features. Download the latest version for free and access tutorial videos!
- [Plug-n-Play & High Compatibility for Effortless Conferencing] The INS-1 comes with a USB-A cable for instant plug-and-play operation. Seamlessly works with Documate and other webinar software on PC (Windows 7/8/10/11), Mac (OS13.5 or higher), iPad (OS 17 or higher; must have a USB-C port) , Chromebook (38.0 or higher). Designed and made in Taiwan.
- Increase Brightness to lighten the image.
- Reduce Contrast to soften dark and light differences.
- Use Color > Recolor or a grayscale-style preset for a quieter appearance.
- Use Washout for a picture watermark.
Brightness changes the image’s lightness; transparency lets the page or objects behind it show through. In some layouts, a slight brightness or contrast adjustment produces clearer text than transparency alone.
Place text over a faded picture
- Select the picture and apply the desired transparency.
- Open Layout Options or Wrap Text.
- Choose Behind Text for a background effect, or choose In Front of Text or a square/tight arrangement when the picture should remain a separate layout object.
- Adjust the transparency until the text is readable at normal viewing size.
The correct wrapping choice depends on the document layout. A faded image can still reduce readability if it contains dark edges, faces, lettering, or strong patterns. If necessary, increase transparency, brighten the image, reduce contrast, or use a solid-color overlay.
Independent reader supportYour contribution helps us test, update, and keep practical guides available for everyone.Workaround for older Word versions
If direct picture transparency is unavailable, insert the picture as a shape fill:
- Choose Insert > Shapes and select a shape.
- Draw the shape to match the picture’s proportions.
- Right-click the shape and choose Outline > No Outline.
- Right-click it again and choose Format Shape.
- In the formatting pane, select Fill.
- Choose Picture or texture fill and insert the picture.
- Adjust the fill’s Transparency slider.
The same range applies: 0% is fully opaque and 100% is fully transparent. This workaround turns the image into the fill of a shape, so cropping, wrapping, positioning, and selection may behave differently from a normal picture. Resize the shape carefully to avoid distorting the image. Microsoft documents this shape-fill method in its picture transparency support article.
The Tool Desk
Outbyte Driver Updater FREEScan for outdated or missing drivers - takes under a minuteDriver Scan →Outbyte PC Repair FREEClear out junk files and repair common Windows errorsFree Scan →Best Value

- 8MP visualiser with adjustable image reversal: In video chat or image output, the image can be freely adjusted left/right and up/down; you can also manually adjust the reversed image that appears in the device to a normal image. The first usb camera that can manually adjust image reversal
- Adjustable Image Brightness: the usb document camera has brightness buttons, you can manually adjust the image brightness with 10 degree, to make sure that you can get the clear image. 3 levels of brightness adjustable, which can eliminate shooting problems under difficult lighting conditions, allowing you to capture objects in dark and bright environments, and it can also achieve Selfie fill-in function
- Foldable visualiser for teaching: embedded design, occupies a small space after folding, easy to carry; Multi-joint support with multi-angle rotate freely usb camera can capture 2D and 3D objects better and shooting high-definition images and videos. Maximum covering area: 16.5" x 116" in (A3 paper)
- 8MP/2448P document camera for teachers with 30fps: using High-end image sensor, it output ultra-high-definition images and videos live transmission, up to 2448P megapixels. Press the focus button once to automatically focus the document camera once. Moving the object under the lens, the camera will not be arbitrary automatic focus and the image dance. Macro can capture objects as close as 3.94"
- Plug-n-Play & High Compatibility: the Kitchbai Visualiser comes with a USB-C cable that allows for instant plug-and-play operation for distance education and web conferencing. It applicable to Windows PCS (Windows 7/8/10/11) , Macs (OS10.11 or higher), and Chromebooks(38.00 or higher), and work with Tiktok, Google Meet, Skyp-Microsoft Teams, Zoom; it has built-in dual silicon microphones, which can reduce noise and improve sound quality
Why the Transparency control is missing
The picture is not selected
The Picture Format tab appears only when Word recognizes that a picture is selected. Click the image once and look again. If you cannot select it, it may be behind another object, part of a header, or a shape filled with a picture.
The object is a shape containing a picture
A picture inserted directly and a picture used as a shape fill expose different controls. Select the shape, open Shape Format, choose Format Shape > Fill > Picture or texture fill, and adjust the fill transparency.
You are using Word for the web
Microsoft’s current documentation says picture transparency is not available in Microsoft 365 for the web. Use Editing > Open in Desktop App, when available, and apply the desktop steps there. The browser version may display existing document elements without offering the same editing controls.
The image is a watermark
Double-click near the top of the page to open the header, then select the watermark there. Use its picture-formatting controls to adjust transparency, brightness, or contrast.
Free tools Windows power users keep installed
One-click scans. No signup required.
Check the result on screen and on paper
Transparent areas show the page or background color on screen. When printed, they appear as the paper color rather than as a separate transparent ink. A light image may therefore look weaker on paper than it does on your monitor.
Before sharing or printing:
- View the document in Print Layout.
- Check File > Print or print preview.
- Confirm that text remains readable over the image.
- Check the image against the actual paper color.
- If exporting to PDF, inspect the finished PDF rather than relying only on the editable Word file.
Fading is also not the same as securely deleting image information. For example, Microsoft notes that cropped portions may remain stored in the file and potentially be recoverable unless removed with the relevant desktop feature. See Microsoft’s guidance on cropping pictures.
Quick Recap

Product prices and availability are accurate as of the date/time indicated and are subject to change. Any price and availability information displayed on Amazon at the time of purchase will apply.




