Recommended Free Tools
ThatPainter is reader-supported. When you buy through links on our site, we may earn an affiliate commission. Learn More
“Printed as a single unit” means a button’s cap, guides and flexible return elements are printed together as a mechanical actuator assembly. It does not mean the electrical switch is printed: the design by Marc Schömann is intended to sit over and press a separate tactile switch. That distinction matters if you want to recreate the idea or adapt it to a PCB-mounted button.
What the 2019 project actually prints
Hackaday’s July 6, 2019 article describes Schömann’s print-in-place design for covering and actuating tactile switches. The printed cover and spring-like compliant elements form one connected mechanical part, so there is no separate printed cap or spring to assemble. The electronic switch, PCB, wiring and any enclosure remain separate components. Hackaday’s project coverage describes the design as still under development at the time.
The article says the design was intended to cover “just about any kind” of tactile switch. Treat that as the project’s aim, not a compatibility guarantee: switch packages, heights and mounting positions vary, and the article does not give a verified list of supported switch dimensions.
#1 Best Overall

- Mechanical Keyboard Experience: The Fidget Clicker Keychain is designed with a built-in mechanical switch, providing a crisp clicking sound with each press, reminiscent of the tactile feedback from a mechanical keyboard.(Note: Suitable for adults aged 14 and above.)
- Unique Designs: Available in charming and fun shapes such as a Tortoise, Star, and Toast, these keychains serve as both a stress reliever and a decorative accessory for your bag, keys, or desk.
- Stress and Anxiety Relief: Perfect for managing stress and anxiety, this fidget toy can help you stay focused or pass the time during long commutes, meetings, or overtime work.
- Portable and Versatile: Compact and lightweight, the keychain can be easily attached to your keys, backpack, or used as a bag charm.
- Perfect for Gifting: Whether it’s a birthday, party, or just a thoughtful gift, this fidget keychain is a memorable and unique present for friends, colleagues, or anyone else.
How the mechanism works
Think of the part as a small guided plunger with printed flexures. Pressing the cap moves its lower actuator toward the switch. The guides limit sideways movement, while thin compliant members bend and help return the cap when pressure is released. Deliberate clearance around moving features keeps them from printing as one fused solid.
- Button surface: the larger face a finger presses.
- Guides: features that constrain lateral movement and keep the actuator aligned.
- Compliant members: flexible printed elements that bend as the button travels and provide return force.
- Actuator: the lower feature that transfers force to the separate tactile switch.
- Clearance gaps: spaces that must remain open for movement after printing.
In a later iteration discussed in the Hackaday article, narrow bars guided the button. Schömann noted that the printed mechanism itself did not provide tactile feedback; the underlying microswitch supplied the click. The printed flexure and commercial switch therefore do different jobs: the flexure can guide and return the cap, while the switch makes the electrical contact and typically supplies its snap feel.
Rank #2

- Keyfeel:The distinct tactile feedback provides a pronounced “click” sensation when activated, featuring a crisp and audible mechanical sound. The auditory and tactile feedback during typing and gaming are highly synchronized, with rapid and responsive key travel that minimizes fatigue during extended use.
- Specifications:Type: Clicky,Pretravel: 2.0+0.6mm,Operating force: 50+10gf,Total Travel: 4.0 +0.5/-0.5mm,Pressure point force: 60=10gf ,Service life: 80 million cycles.
- Materials:Mechanical keyboard switches are made of plastic housing,copper spacers,high quality springs,shaft core material is POM,waterproof,key life is about 80 million times,durable.
- Ideal for: Gaming, typing/office work, programming, daily content creation, and users who prefer mechanical feel and distinct feedback. Note: The loud sound makes it unsuitable for quiet environments like libraries or offices, and may disturb others' rest.
- Exquisite Packaging:Packed in a delicate and beautiful PVC plastic box,effectively protects the switch from damage and prevents the pin from bending,which is the best gift for mechanical keyboard enthusiasts.
What the original files establish—and what they do not
Hackaday links to a Google Drive ZIP identified as Springbutton_preview.zip. The linked model file is discoverable, but its current contents, compatibility, printer settings and license are not established here. Check the file and its terms yourself before printing, sharing or using it commercially; an open-source license associated with Schömann’s Blackbox tool-changing printer does not by itself establish a license for this button model.
The original article shows a two-color print, but does not establish that two colors are needed for the mechanism. Treat color changes as optional unless the model itself says otherwise. Nor does the article supply dimensions, clearances, actuation force, travel, fatigue testing or cycle life. Do not assume the design is production-qualified from the demonstration.
What’s actually slowing this PC down?
Pick the symptom - the matching free tool is one click away.
Rank #3
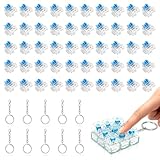
- 【Complete Kit–50 Clicky Switches + 10 Metal Keychains】Each kit comes with 50pcs pre-lubed 3-pin mechanical switches and 10pcs solid metal keychains.They deliver crisp clicks and a strong tactile bump, making them great for keyboard upgrades and 3d printed fidget toys. Once your print is done, clip the keychain to a backpack or keyring and take that satisfying click with you everywhere. Please note: fidget toy is not included.
- 【Built to Last – 30 Million Clicks】 The Smaxthsen blue clickers are constructed with a durable plastic housing, copper washers, and high-quality springs. They are rated for 30 million keystrokes, delivering consistent and satisfying performance click after click. No need to worry about wear and tear.
- 【Compatible with Most Keyboards】 These switches share the same size and pin layout as Cherry MX 3-pin switches, making them compatible with most mechanical keyboards on the market. The transparent blue casing is designed to perfectly complement LED backlighting, allowing the light to shine through clearly. With excellent tactile feedback built right in, they offer a pleasant and responsive typing experience with every press.
- 【Perfect for 3D Printed Fidget Toy】 Experience the crisp tactile click and audible feedback of Smaxthsen Blue Switches – the ultimate keyboard clicker for 3D prints. Whether you're feeling stressed or simply bored, these clicky switches instantly transform any 3D printed fidget toy into a mood booster. Assembly is quick and requires absolutely no tools – just print the base, snap in your Smaxthsen blue switch, and push on the keycap. No soldering, no glue, no hassle at all.
- 【Dust Protection Design】The built‑in dust cover keeps dirt and debris out without interfering with installation or the smooth clicky feel.
Adapting the concept to your switch
Measure the actual switch and its mounting arrangement rather than designing around a generic “tactile switch” label. A cap that looks aligned can still miss the switch, bottom out against the PCB, or hold the contact closed.
- Switch package and position: record the body dimensions, actuator location and installed height, plus the PCB or enclosure features that locate the button.
- Actuator length: leave enough reach to operate the switch, but not so much that the switch is preloaded or kept closed at rest.
- Travel and stops: ensure the cap can move far enough to actuate without forcing the switch past its intended travel. A mechanical stop should protect the switch from excess force.
- Guide fit: allow the moving section to travel without wobbling excessively or binding. Keep the guides aligned with the switch.
- Flexure shape: avoid very thin members and sharp internal corners, which can concentrate stress. A larger radius where a flexure joins the body can reduce that concentration.
- Clearances: tune gaps to your printer, material and orientation. There is no universal clearance value established for Schömann’s design.
The printed flexure’s force adds to the force a user feels at the switch. If it is too stiff, pressing becomes difficult; if too weak or damaged, the cap may not return reliably. Where the tactile switch already supplies adequate return force, a strong printed spring may be unnecessary.
Rank #4

- ASMR in Your Pocket: Every clicker is powered by a genuine mechanical keyboard switch, providing that legendary tactile feedback and crisp "clicky" sound that clears the mind.
- Handcrafted Visual Details: From the iconic pink toe beans on our cat paw to the intricate "latte art" foam designs (hearts, yin-yangs, and paws) or the mischevious scowl on the Snarky Kitten, each piece is a miniature work of art for your desk.
- Instant Stress Relief: Designed as a sensory outlet, these clickers provide a satisfying alternative to pen-clicking or nail-biting, perfect for office meetings, study sessions, or travel.
- Proudly made by a USA Small Business
Printing and tolerance checks
Print-in-place buttons are especially sensitive to small gaps. A printer can make a large articulated part successfully and still fuse a tiny button’s guides. Horizontal gaps may print narrower than modeled; first-layer expansion can lock the bottom; blobs, stringing, warping or excess extrusion can close clearances.
- Layer height and nozzle: finer layers or a smaller nozzle may resolve small features better, but neither guarantees a free-moving mechanism. Follow the printer and material limits, and expect slower printing with finer settings.
- Material: PLA is easy to print and stiff, but thin flexures can be brittle or creep under sustained stress. PETG is tougher but may string or fuse across tight gaps. TPU is flexible, yet may be too soft for precise guides and can be harder to print accurately.
- Orientation: repeated bending across weak layer interfaces can encourage splitting. Choose an orientation that supports the flexures; layer direction can matter more than a material’s headline strength.
- Cooling and first layer: poor bridging, excessive heat or an over-wide first layer can obstruct motion. Check the first layer and gap-forming features before printing a whole panel.
- Supports and settings: the Hackaday article does not establish a support requirement or a verified print profile for the original model.
A separate print-in-place fidget-button listing suggests 0.15–0.2 mm layer height, 15–20% infill, PLA or PETG and no supports, but those are settings for that particular model, not verified settings for Schömann’s design. See that model’s listing for its own guidance.
Quick wins for a faster PC:
Clear out junk files and repair common Windows errorsFree Scan →Scan for outdated or missing drivers - takes under a minuteDriver Scan →Repair Windows errors before they cause bigger problemsFix Now →Best Value

- 【Satisfying Tactile Clicks–Perfect for 3D Printed Fidget】 Engineered with a pronounced tactile bump and distinct click sound, these keyboard clickers for 3d prints provide the satisfying response that makes every 3D print clicker more interactive and enjoyable. Perfect for fidget toys, stress-relief projects, and custom printable clicker designs.Featuring standard 3-pin Cherry MX style dimensions, these 3d print clicker button fit most popular 3d printed clicker fidget STL files, clicker button models, and printable fidget designs. The dustproof structure helps prevent debris buildup while maintaining smooth operation.
- 【Compatible with Most Keyboards】 These switches share the same size and pin layout as Cherry MX 3-pin switches, making them compatible with most mechanical keyboards on the market. The transparent blue casing is designed to perfectly complement LED backlighting, allowing the light to shine through clearly. With excellent tactile feedback built right in, they offer a pleasant and responsive typing experience with every press.
- 【Built to Last – Rated for 30 Million Clicks】 Designed for long-term durability, each switch is rated for up to 30 million actuations. Whether used for prototyping, repeated testing, daily fidgeting, or maker projects, these fidget clickers for 3d prints deliver consistent performance over time. The dustproof structure helps prevent debris buildup while maintaining smooth operation.
- 【Easy 3‑Step Assembly–No Tools Required】Just print, mount, press–print the fidget toy base, snap in your Smaxthsen Blue Switch, and push on the keycap.
- 【Complete Kit–50 Switches + 10 Metal Keychains】Each kit includes 50pcs blue keyboard switches and 10pcs durable metal keychains, allowing you to build multiple portable 3d printer clicker insert for personal use, gifts, craft fairs, classrooms, maker events, and community projects. Note: 3D printed models and keycaps are not included.
A practical workflow for a remake
- Calibrate the printer: check extrusion and first-layer behavior using your usual calibration method.
- Test the fit: print a small clearance or tolerance coupon that uses gaps and flexures comparable to the button, rather than committing to a full panel.
- Print one button: start with a single unit in a material you can print reliably.
- Inspect and free the motion: look for fused gaps, strings and blobs. Remove loose filament carefully; do not force the mechanism before inspecting it.
- Test without the switch: move the cap gently and confirm that it travels and returns without binding.
- Fit the real switch: check alignment and resting clearance in the intended mount or enclosure.
- Verify the electrical result: use a multimeter continuity test or a microcontroller input test. A mechanical click alone does not prove reliable electrical switching.
- Test the finished installation: press the center and edges, check repeated presses, then check for unintended activation when the enclosure is closed and under expected heat, load or vibration.
Troubleshooting common failures
| Symptom | Likely causes | What to try |
|---|---|---|
| Button is fused or will not move | Clearance too small, over-extrusion, first-layer expansion, strings or blobs bridging a gap, excess heat, or warping. | Inspect before applying force; remove loose strings cautiously. If movement remains blocked or the flexure is damaged, enlarge the gap in the model and print a tolerance test before retrying. |
| Button moves but misses the switch | Actuator too short, switch height or package differs from the design, lateral misalignment, or the body bottoms out first. | Measure the installed switch, correct the alignment or mount height, and verify contact electrically rather than by sound. |
| Switch stays activated | Actuator is too long, the enclosure compresses the cap, return clearance is inadequate, or the flexure is misaligned or has crept. | Test outside the enclosure, shorten the actuator incrementally, increase resting clearance, or add a stop that prevents continuous loading of the switch. |
| Flexure cracks or breaks | Member is too thin, bending crosses weak layer interfaces, material is too brittle for the strain, a sharp corner concentrates stress, or the cap is overloaded from an edge. | Revise thickness and corner radii, change orientation, or try a tougher material. If service life matters, use a replaceable spring rather than relying on a printed flexure. |
| Buttons feel different across a panel | Switch heights vary, the PCB flexes, dimensional errors accumulate, flexures differ, or a large cap is pressed at different points. | Test every position, not just the first; check the board support, switch seating and alignment across the panel. |
When a single printed unit is—and is not—the right choice
A print-in-place unit is attractive for a low-load prototype, a customized interface, or a small button where eliminating a separate assembly step matters. It is less suitable when the spring must be replaceable, force and travel need precise calibration, the button will see high cycle counts, or the part must tolerate heat, sunlight, chemicals or harsh cleaning. One-piece construction trades assembly simplicity for tighter print tolerances and reduced serviceability.
| Approach | Best fit | Main trade-off |
|---|---|---|
| Print-in-place actuator and flexures | Compact prototypes and customized, low-load controls where fewer assembly steps matter. | Clearance-sensitive; a broken flexure can mean replacing the whole printed part. |
| Separate printed cap over a tactile switch | Simple controls where the commercial switch’s spring and click are enough. | Requires assembly, but the cap and switch are easier to replace independently. |
| Printed cap with a separate metal spring | Designs that need a replaceable spring or more predictable spring behavior. | Adds parts and assembly. |
| Printed button with a silicone or TPU membrane | When a softer feel or protection from dust and moisture is needed. | Can be harder to produce accurately and may soften the switch’s tactile response. |
| Commercial keycaps, elastomer keypads or panel-mount buttons | Interfaces that prioritize repeatability, service life or production requirements. | Less freedom to customize than a one-off printed mechanism. |
| Fully printed multi-material input device | Research into integrating deformable and electrical elements in one print. | A distinct, advanced direction—not a drop-in version of the 2019 actuator. |
For example, Adafruit’s illuminated-button project uses separate printed cover and backing pieces with a commercial 6 mm momentary switch and NeoPixel; it is a useful contrast, not a one-piece actuator design. Adafruit’s project documentation describes that assembly.
FlexKeys is a more advanced research example of tactile input devices produced in a multi-material print without assembly. It explores a different level of integration and should not be confused with a printed cap over a conventional switch. Read the FlexKeys paper.
Bottom line for makers
Schömann’s project is best understood as a print-in-place mechanical interface for a separate tactile switch—not as a fully printed electrical button. Its useful idea is combining the cap, guides and compliant return features in one print. To adapt it, start with the exact switch, test clearances on your printer, and validate both free movement and electrical actuation before scaling to a panel.
The Tool Desk
Outbyte PC Repair FREERepair Windows errors before they cause bigger problemsFix Now →Outbyte Driver Updater FREEScan for outdated or missing drivers - takes under a minuteDriver Scan →Quick Recap

Product prices and availability are accurate as of the date/time indicated and are subject to change. Any price and availability information displayed on Amazon at the time of purchase will apply.




