Do these 3 things before closing this tab:
Outdated Drivers Are Slowing You Down
One free scan finds every outdated or missing driver and matches the right update for your exact hardware.Free scan · exact hardware matchPC Slower Than It Used to Be?
A free scan shows the junk files, broken settings and background clutter dragging Windows down - then fixes them in one click.Free scan · Windows 10 & 111Fix the driver behind crashes, sound loss and screen glitches2Repair Windows errors before they cause bigger problems3Scan for outdated or missing drivers - takes under a minute
ThatPainter is reader-supported. When you buy through links on our site, we may earn an affiliate commission. Learn More
To sew a cowl collar, first identify how your pattern builds it: a cut-on cowl usually folds over the back neckline as a self-facing, while a separate or double cowl needs its own assembly method. Mark the fold line, follow the pattern’s grainline and shoulder instructions, and handle the fabric gently so the neckline does not stretch or shift.
Identify the cowl construction before sewing
“Cowl collar” and “cowl neckline” describe fabric that falls into soft folds from the neckline, but the pieces are not constructed the same way in every pattern. Check the pattern pieces, fold lines and instructions before cutting or joining the shoulders.
- Cut-on front cowl: The front bodice extends into a cowl section that commonly folds back to form its own facing.
- Separate cowl: A separate piece is joined to the neckline with a seam. Use that pattern’s seam and finishing instructions rather than treating it as a cut-on facing.
- Double cowl: Both front and back have cowl sections or self-facings. The shoulder assembly and inside finishing differ from a front-only cowl.
Sew a cut-on cowl with a self-facing
These steps describe a common cut-on construction. Follow your pattern if its shoulder, neckline or facing instructions differ.
What’s actually slowing this PC down?
Pick the symptom - the matching free tool is one click away.
- Mark the fold line. Transfer the cowl line to the wrong side of the cut front. This mark shows where the self-facing turns.
- Finish the back neckline. Use the pattern’s specified facing, binding or turned-edge finish. Staystitching the back neckline, when directed, helps keep it from stretching.
- Join the shoulders with the facing in place. Put the front and back right sides together. Fold the front self-facing along the marked cowl line and wrap it over the back neckline. Position the facing’s right side against the garment back’s wrong side, then pin and stitch the shoulder seam, catching the facing in the seam allowance.
- Turn the facing into position. Fold it over the shoulder seam allowances so they are enclosed, then arrange the cowl as the pattern directs.
This shoulder method is described in the NIMI/Bharat Skills Dress Making (Trade Practical), Exercise 46: Cowl Neck.
#1 Best Overall

- Women's sewing pattern packet comes with sewing templates, fabric recommendations, pattern pieces, sizing guides, and instructions for (3) tops.
- Blouse templates for misses' sizes L, XL, and XXL.
- The perfect accent to your favorite pair of jeans, our pullover blouse patterns feature cowl sleeves and can be made with different collar styles.
- McCall's sewing patterns are proudly printed in the U.S.A. with easy-to-use instructions.
- Designed with beginners in mind, these easy sewing patterns are a great way for novices to sharpen their skills.
Finish a double cowl inside
For a double cowl, match the front and back self-facings at each shoulder. Fold them inward along their cowl lines, wrong sides together, so they cover the shoulder seams. Tack their edges to the seam allowances or stitch in the ditch from the garment’s right side, as suitable for the pattern. The NIMI/Bharat Skills instructions also suggest lingerie guards at the inner shoulder seams to help keep a double cowl from slipping off the shoulders.
Choose fabric and grainline for the intended drape
A cowl’s folds depend on both fabric and pattern layout. Fluid cloth generally falls more readily than stiff cloth, but there is no single grainline rule for every cowl: use the pattern’s stated layout rather than assuming every cowl must be cut on the bias.
Rank #2

- This is a Style Arc sewing pattern for a stunning knee-length women's jacket / coat featuring an asymmetrical zip and shawl collar.
- Sizes 10-22 included. Each size is printed in a different colour. Style Arc's industry-based patterns are available for you to sew at home!
- Difficulty rating: Medium - Challenging. Check out Style Arc's up-to-the minute styles. Sewing patterns don't have to be boring! Remember, you can always get in touch with us or the super helpful Style Arc community if you need some pointers along the way while sewing your garment.
- Pattern pieces and basic instructions in English are included for this women's jacket sewing pattern.
- This sewing pattern was designed and printed in Australia.
- For woven fabric: A bias layout can help the cloth fall into soft folds, but bias pieces can shift or grow and may require more yardage. Minerva Patterns’ 2026 cowl-drafting article recommends fluid options such as jersey, crepe, satin-back crepe, lightweight rayon or silk and suggests letting a bias-cut piece hang overnight before finishing.
- For knits: Some patterns permit straight-grain jersey, while others specify a different layout. Susan Elias Couture’s Cowl Neck Top instructions allow its front to be cut on bias or straight grain in jersey and recommend rayon, modal or cotton jersey without spandex. Its advice about sizing with spandex knits or stretch wovens applies to that particular pattern, not to knit cowls generally.
- Before choosing a layout: Check how fluidly the fabric falls, whether it is woven or knit and how much stretch it has, the pattern’s grainline, the intended cowl depth, and the yardage and handling needed for bias cutting.
The Susan Elias Couture instructions give a pattern-specific example for 60-inch-wide jersey: 1 yard for a straight-grain layout or 1 3/4 yards with the front on the bias. Those amounts are not general yardage requirements.
Change the depth of a cowl neckline
Test the alteration in paper or a muslin before cutting final fabric. A deeper cowl changes the amount of fabric hanging from the neckline, and the finished drape depends on the cloth as well as the pattern.
Rank #3

- McCall's pattern kits come with pattern pieces for cutting out the fabric, step by step written and illustrated instructions to guide you through the sewing process, information on how to select fabric and trims, and sizing information
- These clothing sewing patterns can be made to fit men's and women's sizes XS-S-M-L-XL-XXL
- Notched collar blazer has front button opening, faux welt chest pocket, waist pockets with flaps, shoulder pads and back vent
- Fabric suggestions: corduroy, linen blends, twill, tweed, wool and wool blends; Lining: cotton blends, polyester blends; Interfacing: medium weight fusible
- McCall's sewing patterns are proudly designed and manufactured in the United States
- Preserve the original. Trace the front pattern piece so you can return to the unaltered version.
- Slash and spread. On the traced piece, cut along the fold line and make slash lines from center front toward the shoulder and lower armscye, leaving hinges so the sections remain attached.
- Add depth and redraw. Spread the sections to the desired depth, then redraw the center front and neckline. Keep the neckline perpendicular at the fold.
- Recreate the facing. Fold the paper at the new neckline to check that the built-in facing is formed correctly.
- Test the shape. Make a muslin or hold the altered front against the body to assess the fall before sewing the final garment.
This slash-and-spread method is shown in Love Notions’ How to Modify a Cowl Neckline. For a different approach, Threads Magazine’s cut-on cowl drafting example extends a bodice to form a cowl/pleat, then joins the cowl’s center-back seam and sews across the shoulder and back-neck seam. Its example uses a 10 1/4-inch extension at the “Place on fold” line; that measurement belongs to that design, not to cowl alterations generally. Threads Senior Technical Editor Carol Fresia notes that the shoulder and cowl back-neck seam intersect, so the seamline must be pivoted at that intersection on each side. The edge can be finished as desired; a double-fold hem is one option.
Quick Recap
Best Value

- Size: A(6-8-10-12-14-16-18)
- Printed in the USA
- H0172 is a Counter/Promotional version of 6577
- This is a sewing pattern not a completed product. It gives you the information and instructions to make the items shown yourself.
- Envelope may have printing difference but contents are the same.
Rank #4
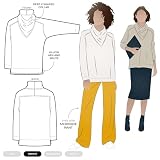
- The Belmore Knit Tunic is a versatile sewing pattern style from Style Arc. You will receive a paper sewing pattern with instructions with your purchase. The Belmore Knit Tunic features a square shaped body and funnel cowl neck, Deep V with cowl collar insert, Long sleeve with saddle shoulder, Slight hi-low hem with small side splits. Make this versatile style sweater knit with drape, light ponte, lurex knit or any knit that will allow the cowl to drape.
- Sizes 4-16 included. Each size is printed in a different colour. Style Arc's industry-based patterns are available for you to sew at home!
- Difficulty rating: Medium. Check out Style Arc's up-to-the minute styles. Sewing patterns don't have to be boring! Remember, you can always get in touch with us or the super helpful Style Arc community if you need some pointers along the way while sewing your garment.
- Pattern pieces and basic instructions in English are included for this women's dress sewing pattern.
- This sewing pattern was designed and printed in Australia.

Product prices and availability are accurate as of the date/time indicated and are subject to change. Any price and availability information displayed on Amazon at the time of purchase will apply.




