Outdated Drivers Are Slowing You Down
Recommended Free Tools
Outbyte Driver Updater · freeOne free scan finds every outdated or missing driver and matches the right update for your exact hardware.
Scan My Drivers Free →ThatPainter is reader-supported. When you buy through links on our site, we may earn an affiliate commission. Learn More
To make a decorative paper button, stack five matching cardstock shapes with glue, smooth the edges, punch two or four sewing holes, then coat the top and sides with clear-drying glaze if desired. The result is a craft button; its durability on washable clothing has not been established.
Supplies for layered cardstock buttons
- Cardstock
- A circle or other shape punch; the Splitcoast Stampers tutorial uses 3/4-inch and 1-inch circles
- Glue or an adhesive pen
- A sanding block
- A Crop-A-Dile, small hole punch or piercing tool
- Optional: clear-drying glaze and wax paper for drying
These are tool examples, not brand requirements. Choose a shape punch for the size and outline you want, and a hole-making tool that can create the holes you need. The tutorials do not compare brands or establish that one tool is superior. See the Splitcoast Stampers paper button tutorial and Happy Paper People’s paper-button tutorial.
How to make a paper button
- Choose a shape and size. Circles are straightforward, but a heart or another shape works if you have a matching punch. The Splitcoast Stampers method gives 3/4-inch and 1-inch circles as examples.
- Punch five matching shapes. Use the same cardstock and punch for each piece so the stack lines up.
- Glue the pieces together. Align the edges as closely as possible, then press the layers into one stack.
- Sand the perimeter. Once the glue has set enough to hold the stack together, smooth uneven edges with a sanding block.
- Mark and punch the sewing holes. Mark a two-hole or four-hole layout, then use a Crop-A-Dile, hole punch or piercing tool to make the holes. Make sure the holes pass through the full stack.
- Finish the surface, if desired. Brush clear-drying glaze over the top and sides, then leave the button on wax paper to dry. Splitcoast Stampers gives about 30 minutes for its method; drying time varies with the coating, so follow its product directions.
Choose a finish and use it appropriately
Glaze is an optional decorative finish in the cited method. The tutorials do not establish that it makes cardstock water-resistant or suitable for regular laundering. They also do not test repeated pulling, moisture exposure or long-term wear. Treat the result as a decorative craft button, rather than assuming it can replace a conventional garment button. Performance when sewn onto clothing is not established by these sources.
A button press makes a different kind of button
A press is not needed for the layered, sew-through cardstock button above. Button presses belong to a separate project: making pin-back badges from printed graphics and button components. Mira Byler’s button-making video describes that press-based approach, and the University of Florida Libraries Marston Makerspace instructions cover printed graphics and components such as shells and mylar.
Quick Recap
Best Value

- ✨ Premium Button Making Supplies:Crafted from durable, high-quality paper, these Button Badge Blank Papers resist tearing during pressing. Includes 100 pieces for bulk DIY projects – ideal for schools, events, or small businesses!
- 📏 Multi-Size DIY Button Pin Paper:Flexible sizing! Choose from 3 diameters (4.9cm/1.93", 5.4cm/2.13", 7cm/2.76") to fit most button maker machines. Create custom pins, badges, or heart shape ornaments effortlessly.
- 🎨 Essential Round Badge Craft Paper:Smooth surface for vibrant designs! Use these round blank papers with inks, photos, or markers to make unique DIY Button Pins – perfect for promotions or collectibles.
- ✂️ User-Friendly & Portable:Lightweight & compact! These durable badge button papers require no complex tools – design, cut, press. Ideal for craft fairs or creative projects on-the-go.
- 🎁 Perfect Handmade Gift Material:Unleash creativity for any occasion! Turn this 100Pcs blank paper set into heartfelt gifts: party favors, memorial pins, or personalized handmade ornaments.
Rank #4

- 🎁Button Machine for All Sizes - Happizza button maker machine kit is equipped with two replaceable button-models, 32mm and 58mm, to meet your needs of different sizes. You can also purchase other sizes of button-models to install and use separately. With this one button making machine, you own the button world.
- 🎁Easy to Assemble and Use - It only takes 2 steps to assemble the button maker machine, and it is even easier to make badge buttons. We provide you with an instruction manual, even a beginner can easily master the use of the button pin maker within 2 minutes.
- 🎁Happizza Brand Consistently High Quality - As the most professional button maker machine supplier in the world, Happizza's button maker machine has been recognized by tens of millions of American families and has a large number of loyal fans. Owning a Happizza pin press machine is every DIY enthusiast's wish, come and join us.
- 🎁DIY Button Maker Multiple Sizes Kit Includes - 1 × detachable buton badge maker machine, 2 × 32/58mm (1.25/2.25 in) button-models, 2 × circle cutter, 100 sets 32mm button parts and 100 sets 58mm button parts (include: mylars & round blank paper).
- 🎁Special Gift - The button making kit itself can be given as a gift to your children or friends. We have provided a very exquisite packaging box with high-grade atmosphere. At the same time, the DIY buttons made by badge making machines are also particularly suitable for personalized gifts for commemorating tourist attractions, various conferences, advertising promotions, organizations, schools, communities, businesses, and families.
Rank #3
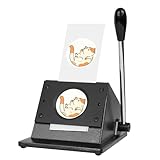
- 【Precise size】Different button maker machines require different image sizes. If used as a circle cutter for a button making machine, ensure the cutting dimensions match this equipment. Our circle punch can process 70mm/2.756 inch discs, suitable for buttons with a diameter of 58mm/2.283 inch
- 【Heavy-Duty Performance】Built with industrial-grade steel and aluminum the magnet press machine delivers professional results every time The rust-resistant frame ensures long-term reliability for crafting photo fridge magnets with lasting quality
- 【Upgraded Design】Our paper circle cutter features a metal base for enhanced stability and durability during use. The built-in limit mechanism effectively minimizes wear caused by excessive stretching, extending the service life of the button cutter. Please note: To ensure smooth pressure, lubricant is applied during manufacturing. Wipe off before use to prevent smudging your pattern or photo
- 【Scope of Application】 The circle cutter is suitable of cutting roughly 300 grams of paper like A4 paper, photo paper, coated paper, etc. Also can cut thin films, card stock, thin leather ≤0.076mm., not suitable for PVC or paper with glue. It can be widely used to make buttons, small mirrors, bottle openers etc.
- 【Brand Reputation】Happizza's all produts are machinesare meticulously crafted and undergo rigorous quality inspections, ensuring reliable performance. Additionally, our dedicated after-sales team is always available to assist you.Please feel free to contact us, we will reply you in time
Rank #2

- Punched Out Size : 1 3/4 inch x 1 7/16 inch (L x W)
- Punch measures: 4" x 3 3/8" x 3 1/8"
- Material : Plastic & Metal, color may vary from the picture.
- Compact & easy to use for paper crafting projects ,school,home scrapbooks, cards, decorations and any paper craft
- Best Weight of Craft Paper For This Punch :160gsm - 250gsm
#1 Best Overall

- One Side Glossy Photo Copy & Printer Paper
- Paper Size: A4 (8.3x11.7")
- Weight:135g/㎡

Product prices and availability are accurate as of the date/time indicated and are subject to change. Any price and availability information displayed on Amazon at the time of purchase will apply.
Independent reader supportYour contribution helps us test, update, and keep practical guides available for everyone.



