Free tools Windows power users keep installed
One-click scans. No signup required.
Crashes, No Sound, or Screen Glitches?
Random freezes, missing sound and display glitches usually trace back to one bad driver. Find and replace yours safely.Free scan · under a minutePC Slower Than It Used to Be?
A free scan shows the junk files, broken settings and background clutter dragging Windows down - then fixes them in one click.Free scan · Windows 10 & 11ThatPainter is reader-supported. When you buy through links on our site, we may earn an affiliate commission. Learn More
For most quilting batches, the fastest reliable method is to press and align the fabric, cut width-of-fabric (WOF) strips, stack a controlled number of layers, and cut with a sharp 45 mm rotary cutter against an acrylic ruler on a self-healing mat. Start with fewer layers than the tool’s maximum; reduce the stack whenever fabric shifts, bunches or twists.
Set up the fabric before stacking
- Press the fabric. Remove wrinkles so layers can lie flat. Align the selvages and keep the grain, fold and any directional print consistent.
- Square one edge. Place the fabric on the mat and trim one edge against its grid. A square starting edge prevents accumulated error in every later cut.
- Choose the stack size conservatively. Begin with two or three layers. Add layers only when the stack remains flat and the cutter passes cleanly. Slippery, stretchy, bulky or loosely woven fabric may need individual cutting or extra stabilization.
Keep all layers oriented the same way unless the pattern specifically calls for mirrored pieces. A directional print can produce technically identical shapes that face the wrong way if the layers are flipped.
The fastest workflow for squares and rectangles
1. Cut WOF strips
Measure the required strip width from the squared edge and cut long strips parallel to the selvage. When practical, align the folded fabric edges and cut several strips at once. The Alberta government quilt guide describes stacking three or four strips with their edges matched.
The Tool Desk
Outbyte PC Repair FREEClear out junk files and repair common Windows errorsFree Scan →Outbyte Driver Updater FREEScan for outdated or missing drivers - takes under a minuteDriver Scan →#1 Best Overall

- SEWING, ARTS, AND CRAFTS STAPLE: This Fiskars Rotary Cutter can cut batting, foams, multiple layers of fabric, and quilting materials; Ideal for doing arts and crafts for adults or kids; Great addition to your sewing accessories and quilting supplies
- PRECISION ART SUPPLIES: Precision-ground, 60mm rotary blade with titanium coating is perfect for projects and fabric that require precise cutting of thicker materials; Pair with Fiskars Self-Healing Cutting Mat for easy and enjoyable creating
- LONG LASTING AND RELIABLE: Blade with titanium coating is three times harder than steel for improved durability and long-lasting sharpness; Fiskars craft supplies and materials are built to last and backed by a full lifetime warranty
- COMFORTABLE AND CONVENIENT: Easy-to-use loop handle improves comfort and control; Sliding button extends blade during use, locks it into position, and retracts it for safe storage; Blades snap in or out easily for quick replacement
- QUALITY TOOLS FOR ARTS AND CRAFTS: From scissors and cutting mats, rotary and paper cutters, to classroom essentials, scissors for kids, and quilting and scrapbooking supplies, Fiskars crafting tools are designed to help you express yourself
2. Cross-cut the strips
Align the strip ends and use the ruler and mat grid to cut the required length. Cutting a strip set first keeps every cross-cut the same width and is usually faster than measuring each rectangle separately.
3. Check the first pieces
Before cutting the entire batch, compare one piece with the pattern dimensions. Confirm that the ruler has not slipped and that the layers have not crept out of alignment.
Rank #2

- SEWING, ARTS, AND CRAFTS STAPLE: This Fiskars Rotary Cutter can cut multiple layers of fabric, felt, vinyl, and quilting materials; Ideal for doing arts and crafts for adults; Great addition to your sewing accessories and quilting supplies
- PRECISION ART SUPPLIES: Precision-ground, 45mm rotary blade is perfect for projects and fabric that require precise cutting of multiple layers of materials; Pair with Fiskars Self-Healing Cutting Mat to protect your work surfaces
- LONG LASTING AND RELIABLE: High-grade steel blade provides improved durability and long-lasting sharpness; Fiskars craft supplies and materials are built to last
- COMFORTABLE AND CONVENIENT: Symmetrical stick handle design allows for ambidextrous cutting for right-handed users and left-handed users; Sliding button extends blade during use, locks it into position, and retracts it for safe storage;
- QUALITY TOOLS FOR ARTS AND CRAFTS: From scissors and cutting mats, rotary and paper cutters, to classroom essentials, scissors for kids, and quilting and scrapbooking supplies, Fiskars crafting tools are designed to help you express yourself
Cutting template-based shapes in a stack
- Cut WOF strips slightly larger than the template. This leaves trimming room and follows Denyse Schmidt Quilts’ method for saving time on repeated pattern pieces.
- Place up to four layers right sides up, keeping edges and grain aligned. Use fewer layers if the fabric is unstable.
- Trace the template on the top layer only. Mark notches or other registration points before separating the pieces.
- Hold an acrylic ruler firmly over the straight sections and run the rotary cutter with its blade perpendicular to the ruler and flush against its edge.
- Cut shared or long straight sides first. Finish tight curves, points and small notches with a smaller rotary blade or fabric scissors.
Do not force the cutter around a curve. A short, controlled pass reduces distortion and protects the template edge.
How many layers can you cut?
There is no universal safe layer count. Fabric thickness, stretch, friction, ruler pressure, blade sharpness and the accuracy required by the pattern all change the practical limit.
Rank #3

- SEWING, ARTS, AND CRAFTS STAPLE: This Fiskars Quick Change Rotary Cutter can cut multiple layers of fabric, felt, vinyl, and quilting materials; Ideal for doing arts and crafts; Great addition to your sewing accessories and quilting supplies
- PRECISION ART SUPPLIES: Precision-ground, 45mm rotary blade is perfect for projects and fabric that require precise cutting of materials; Pair with Fiskars Self-Healing Cutting Mat to protect your work surfaces
- LONG LASTING AND RELIABLE: High-grade steel blade provides improved durability and long-lasting sharpness; Fiskars craft supplies and materials are built to last
- COMFORTABLE AND CONVENIENT: Easy-to-use loop handle improves comfort and control; Sliding button extends blade during use, locks it into position, and retracts it for safe storage; Blades snap in or out easily for quick replacement
- QUALITY TOOLS FOR ARTS AND CRAFTS: From scissors and cutting mats, rotary and paper cutters, to classroom essentials, scissors for kids, and quilting and scrapbooking supplies, Fiskars crafting tools, express yourself; Ideal for sewing kit gift sets
- Sewing & Craft Alliance guidance says rotary cutters can cut up to six or eight layers, but advises reducing the number when fabric bunches or twists.
- The Denyse Schmidt template procedure uses up to four layers.
- For an AccuQuilt GO! fabric cutter, American Patchwork & Quilting Editors reported up to six layers in 2022.
- Cricut’s multi-layer procedure specifies two or three layers of light cotton and requires its model-specific fabric setup.
Treat these figures as method- or equipment-specific ceilings, not a promise for every fabric. If the bottom layers are no longer matching the top layer, stop and reduce the stack.
Keep cuts accurate and safe
- Use a sharp blade. American Patchwork & Quilting recommends replacing a dull rotary blade for smoother cutting and less hand strain.
- Keep your free hand behind the blade path and use a ruler with a firm, non-slip hold.
- Use a self-healing mat large enough to support the entire cut; do not cut on a table surface that can be damaged.
- Cut with the blade vertical. Tilting it can undercut the ruler or produce beveled edges through the stack.
- Close or retract the blade whenever the cutter is set down, and store it away from children.
- Rotate the mat rather than twisting your wrist for an awkward angle.
Choose the method for your quantity and shape
| Method | Best use | Layer or capacity guidance | Main advantages | Trade-offs |
|---|---|---|---|---|
| Rotary cutter, acrylic ruler and mat | Most home quilting batches, especially squares, rectangles and custom shapes | Start low; Sewing & Craft Alliance cites up to six or eight layers when the fabric remains stable | Flexible shapes, low setup cost and immediate size changes | Requires careful alignment and repeated hand cutting |
| Die-cutting machine | Large quantities of the same standardized shape | Depends on the machine and die; AccuQuilt GO! guidance cited by American Patchwork & Quilting lists up to six layers (2022) | Consistent repeated shapes and fast batch production | Purchase cost, die cost, available shape library and machine capacity limit flexibility |
| Electronic cutter | Users who already own a compatible machine and need digital shapes | Cricut guidance specifies two or three layers of light cotton with its Rotary Blade, FabricGrip mat and temporary adhesive | Digital patterns and automated repeat cutting | Fabric type, adhesive preparation, mat size and layer setting are model-specific |
Compare options by pieces per hour, dimensional accuracy, shifting, practical layer count, fabric waste, curve performance and equipment cost—not by maximum advertised layers alone.
Rank #4

- Ideal for cutting multiple layers of fabric, felt and vinyl, with 7 mm blade exposure when in use
- Rotary blade can be assembled to either side to accommodate right- and left-handed users
- High-grade, precision-ground, premium steel, 45 mm rotary blade provides long-lasting sharpness
- Sliding button extends and locks the blade for secure use, retract the blade for safe storage using the push button, which is receded to prevent accidental use
- Beautifully hued loop handle provides a natural fit for your hand, improves control, and lets you securely hold cutter while arranging materials
Troubleshoot common batch-cutting problems
Layers shift while cutting
Reduce the stack, realign the selvages and press again. Keep the ruler over the cut line and make one confident pass instead of repeatedly sawing through the fabric. For very slippery fabric, stabilize or cut fewer layers.
Edges are ragged or require force
Replace the blade and check that the mat is clean and adequately supported. A dull blade increases hand pressure and can push lower layers out of alignment.
What’s actually slowing this PC down?
Pick the symptom - the matching free tool is one click away.
Best Value
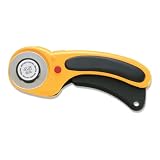
- RAZOR SHARP 45MM ROTARY BLADE - The RTY-2/DX is pre-loaded with an RB45-1H Endurance Rotary Blade. The ultra-sharp rolling razor blade delivers unparalleled sharpness and superior edge retention for twice the life of a standard rotary blade.
- SQUEEZE TRIGGER HANDLE - Easy squeeze handle exposes the blade and self-retracts for safety. The curved handle with anti-slip rubber grip reduces hand fatigue and stress. The integrated grooves help prevent finger slippage.
- QUICK & EASY BLADE REPLACEMENT - OLFA's 45mm Rotary Cutter has a blade system that provides simple and safe blade changes. The dual-action safety lock allows the blade to be locked while open or closed.
- INTRICATE & ACCURATE CUTTING - Provides detailed and precise cutting of a variety of materials including cotton, wool, paper, vinyl, leather, and more. Also fits our Pinking Blade (PIB45-1), Scallop/Peak Blade (SCB45-1), and Wave Blade (WAB45-1).
- THE OLFA STANDARD - As the inventor of the Rotary Cutter in 1979, OLFA has maintained a standard of cutting excellence for our quality and durability. Pairing OLFA brand rotary cutter, blades and cutting mats together will provide optimal results.
Pieces are different sizes
Re-square the starting edge, verify the ruler markings against the mat grid and test a single strip before continuing. Measure the first completed piece rather than assuming the stack stayed registered.
Curves look angular or distorted
Use shorter cuts, a smaller blade or scissors around tight curves. Keep the template flat and avoid turning the fabric stack while the blade is engaged.
Directional prints are reversed
Keep every layer right side up for template cutting and mark the required orientation. Do not flip a traced template unless the pattern calls for a mirror image.
Quick Recap
A practical decision rule
- Mostly squares or rectangles: use WOF strips, then cross-cut with a ruler.
- A few custom shapes: use a rotary cutter and template, usually in a stack of up to four stable layers.
- Hundreds of identical shapes: compare a die cutter after accounting for dies, waste and setup time.
- You already own an electronic cutter: follow that model’s fabric, adhesive, mat and layer instructions exactly.
- The stack moves: the stack is too large for the fabric or setup; reduce it rather than chasing a nominal maximum.
What to have within reach
- 45 mm rotary cutter with a fresh blade
- Acrylic quilting ruler long enough for the main cuts
- Self-healing cutting mat with a clear grid
- Iron and pressing surface
- Paper or acrylic templates, plus scissors or a smaller rotary cutter for curves

Product prices and availability are accurate as of the date/time indicated and are subject to change. Any price and availability information displayed on Amazon at the time of purchase will apply.




