ThatPainter is reader-supported. When you buy through links on our site, we may earn an affiliate commission. Learn More
Quilt as you go (QAYG) means quilting smaller blocks or sections first, then joining them to make a larger quilt. It is a family of methods, not one fixed recipe. If your main concern is avoiding “weird seams all over the back,” start by choosing a joining method: some methods add visible sashing, while others fold or sew the backing across the join.
What quilt as you go means
In a conventional workflow, the full quilt top, batting, and backing are assembled before quilting. With QAYG, you quilt manageable pieces before joining them. That can mean quilting pieced blocks individually, building a block from strips sewn onto batting and backing, or assembling rows while adding backing as you go. The tutorials below use different sequences and dimensions, so follow one method at a time rather than combining their measurements.
Working on smaller pieces can be helpful when quilting a large quilt on a household sewing machine feels cumbersome. The cited tutorials do not establish a universal machine-size or quilt-size limit.
Quick wins for a faster PC:
Repair Windows errors before they cause bigger problemsFix Now →Scan for outdated or missing drivers - takes under a minuteDriver Scan →#1 Best Overall

- June Tailor Batting Quilt As You Go Cotton/Polyester Tree Skirt 40"
- Pre-printed 80% Cotton 20% Polyester batting.
- With easy piece-by-number construction, you can automatically quilt as you sew.
- Includes batting and fabric cutting template to ensure perfectly sized fabric cutting.
- Finished size is approximately 40" in diameter.
How do QAYG joins look on the back?
There is no single back finish. A sashing method can leave a visible strip on the quilt top and a separately finished backing join. A folded-backing approach brings backing fabric across the join. A row-based method adds and topstitches backing as each row is attached. Decide how you want both faces to look before choosing a tutorial, because the appearance depends on the joining sequence.
- Front: Choose sashing if a strip between blocks suits the design; a backing-fold join need not create the same top-strip look.
- Back: A backing-fold method covers the join with folded fabric. Other methods trim and sew backing in a different arrangement.
- Batting: Tutorials vary in whether batting edges are trimmed, brought together, or held in place. No standardized seam-strength or bulk measurements are provided, so there is no evidence-based durability ranking here.
Choose a tutorial method
| Method | Construction order | Join and appearance | Method-specific detail |
|---|---|---|---|
| Blocks with sashing | Piece, layer, and quilt blocks; trim and join them afterward. | Joins blocks with backing and top strips that mimic sashing. | Leave at least 1/4 inch unquilted at block edges in this lesson. |
| Strip-built blocks | Sew strips over batting and backing until the base is covered; square each block. | Join squared blocks with fabric channels. | Batting and backing start 1/2 to 1 inch larger than the desired unfinished block in this guide. |
| Backing as rows are joined | Assemble a row, add backing, press and topstitch, then trim and repeat. | Backing is incorporated progressively at row joins. | The guide recommends thinner batting and backing at least 2 inches wider than the row pieces on all sides. |
| Section joins with folded backing | Prepare and label sections, then join the top and batting before folding backing across the join. | Backing fabric folds over the join. | The guild handout describes fusible batting to hold sections, or non-fusible batting with more pinning. |
1. Quilt blocks first, then join with sashing
In Ashley Hough’s National Quilters Circle lesson, blocks are pieced as usual, layered with batting and backing, and quilted separately. Keep the quilting at least 1/4 inch away from each block edge for this method so the edges remain available for joining. After quilting, trim the batting and backing as shown. The lesson joins backing first, trims batting between blocks, overlaps and presses the top fabric, then adds a top strip to create the look of sashing. It also demonstrates building rows from joined blocks. The sashing is part of this method’s front appearance; it is not a required QAYG feature.
Rank #2
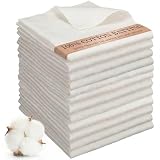
- Ultimate Comfort with Cotton: experience the soft, breathable sensation of 100% natural cotton; Our pads are crafted from pure cotton, ensuring a fluffy, tear-resistant texture that enhances comfort and durability in every quilting or craft project
- Versatile 20 Pack for Creative Freedom: enjoy the flexibility of 20 pre-cut cotton batting pads, suitable for crafters seeking endless possibilities; With this generous supply, you can effortlessly complete multiple projects, from cushions and pot holders to wearable art
- Ideal Size for Flexible Projects: each cotton pad measures 20 x 20 inches, making them suitable for small to medium quilting endeavors; This versatile size allows for easy layering or custom cuts, catering to a wide range of DIY creations and designs
- Effortless Crafting at Your Fingertips: craft with ease thanks to our lightweight and durable cotton batting, designed for easy cutting and shaping; The flat, even texture ensures smooth application, making it suitable for both beginners and seasoned professionals
- Unleash Multi-purpose Potential: our cotton batting pads are suitable for quilting, sewing, and beyond; Whether adding warmth to patchwork or crafting stuffed toys, these pads offer comfort and durability, washable post-quilt without the need for disassembly
2. Build blocks from strips over batting and backing
Annie’s Attic’s strip-block guide begins with batting and backing cut 1/2 to 1 inch larger than the desired unfinished block. The extra allowance accommodates quilting shrinkage and squaring in this specific workflow. Sew fabric strips diagonally across the layered base with 1/4-inch seams, adding strips outward until the base is covered. Square the block from the backing side.
For joining, the guide calls for consistently trimmed blocks and fabric channels; it gives connecting-strip widths of 1 1/8 inches and 1 5/8 inches. Those are dimensions for that guide’s channel method, not universal QAYG measurements.
Free tools Windows power users keep installed
One-click scans. No signup required.
Rank #3

- PRECUT QUILT BATTING HEXAGON SHAPES - Ensure you have neat, uniform hexagonal shapes to use for your next project with this pack of 42
- TIME SAVING PRECUTS - Save time - and make your next project easier on your hands and wrists!
- BATTING SQUARE FABRIC DETAILS - This batting is non-fusible and made from a 60/40 polyester/cotton blend for easy care
- QUILTING SUPPLIES FROM THE EXPERTS – Based in the quilting capital of the world, Missouri Star Quilt Company transformed the quilting industry. By helping standardize precut fabrics and offering popular tutorials, they have stitched together a tight-knit community.
3. Add backing as you assemble rows
mySewnet’s January 22, 2025 guide joins quilt rows and backing progressively. It recommends thinner batting for this workflow and illustrates backing cut at least 2 inches wider than the row pieces on all sides. The sequence is to add a row and backing, press, topstitch near the edge, trim excess, and repeat. The backing allowance and batting recommendation belong to this row-based method; do not transfer them automatically to the other tutorials.
4. Join prepared sections with backing folded over the seam
The St. James Plantation Quilters Guild handout describes planning the quilt top in sections, labeling sections by row and block, joining top sections, bringing batting edges together, and folding backing across the join. It suggests fusible batting to help hold sections in position, while noting that non-fusible batting can be used with more pinning. These are the handout’s instructions, not requirements for every QAYG method.
Rank #4

- 100% Cotton Batting for Quilts:Made from high-quality cotton, these Jelly Roll Batting Strips provide warmth, breathability, and versatile functionality, making them the perfect choice for Quilt, Bag, & DIY Sewing Projects.
- RRKTP Microwave Batting: This special batting is designed for microwave-safe applications, ideal for creating heat-resistant batting for potholders and other microwave projects. Never leave your microwave unattended while using this batting.
- Perfect for Sewing: Whether for quilting or crafting, this batting offers superior durability and support, making it a versatile choice for all your sewing needs. Its ease of use makes it a favorite among DIY enthusiasts.
- Microwave Safety Instructions: For optimal safety, microwave projects using this batting in two-minute intervals, ensuring not to exceed eight minutes total. This feature makes it perfect for practical projects you can use around the kitchen.
- Continuous Cuts Available: When ordering multiple yards, rest assured you will receive it in one continuous piece, making it ideal for larger quilting or crafting projects without the hassle of piecing smaller sections together.
Materials and preparation
Choose materials around the method and pattern you plan to follow. Core materials across these approaches include quilt blocks or fabric strips, batting, backing fabric, and joining or sashing strips when the chosen method uses them.
- Batting and backing: Cut them to the dimensions required by your chosen tutorial. Some methods intentionally begin oversized; others use a row-specific backing allowance.
- Fabric strips: The strip-built method uses strips sewn across the batting-and-backing base. Missouri Star’s demonstrated project lists a roll of 2.5-inch strips, background fabric, border fabric, and quilt backing; those are supplies for that project, not a universal QAYG kit.
- Cutting tools: A rotary cutter and quilting ruler can help cut and square sections, but the cited instructions do not make specialty tools mandatory.
- Labels: If you prepare several sections, labeling them by row and block, as the guild handout recommends, helps preserve their intended order.
For a block-joining walkthrough that addresses needle, thread, batting at seams, and pressing concerns, see Shiny Happy World’s joining tutorial. Follow its seam approach as that tutorial presents it rather than treating it as a rule for all QAYG construction.
Recommended Free Tools
Quick Recap
Best Value

- June Tailor Quilt As You Go Cotton/Polyester Alexandra Tote Bag Pattern
- June Tailor Quilt As You Go Cotton/Polyester Alexandra Tote Bag Pattern- Take scrapes of fabric to make your own tote Bag.
- Model Number: JT-1477
- Country of origin: United States
What to settle before you start
- Choose the front and back finish. Decide whether you want visible sashing, a folded backing join, or backing added during row assembly.
- Choose one complete construction sequence. Keep that tutorial’s cutting allowances, quilting stop points, batting handling, and joining-strip widths together.
- Plan the layout. If working in sections, label their intended row and block positions before joining.
- Check the scale against your workspace. QAYG reduces the size of the unit being quilted at one time, but the sources do not specify a universal maximum quilt size or machine capacity.

Product prices and availability are accurate as of the date/time indicated and are subject to change. Any price and availability information displayed on Amazon at the time of purchase will apply.




