Free tools Windows power users keep installed
One-click scans. No signup required.
Do these 3 things before closing this tab:
1Clear out junk files and repair common Windows errors2Scan for outdated or missing drivers - takes under a minute3Repair Windows errors before they cause bigger problemsThatPainter is reader-supported. When you buy through links on our site, we may earn an affiliate commission. Learn More
To sew quilt borders on without waves, measure the quilt top in three places, average the measurements, cut borders to fit, and attach the side borders before the top and bottom borders. Pin at the ends and center, guide the fabric without pulling, and press the seams toward the borders.
How to measure and attach straight borders
-
Measure the quilt top
Lay the top flat. Measure its length in three places and average the readings. Cut both side borders to that averaged length. Utah State University Extension warns that sewing on borders of different lengths makes differences more obvious and leaves the quilt out of square. Utah State University Extension’s border lesson provides this measuring approach.
-
Sew on the side borders first
Match each side border to the quilt top, pin at both ends and the center, then ease any extra fullness only between those pins. Sew with a consistent ¼-inch seam. Avoid stretching either layer: crossgrain strips have some give and can be eased, while lengthwise-grain strips have less give. Let the feed dogs move the fabric and guide it gently. The American Quilter’s Society advises, “Use a gentle touch when sewing those border seams (no pulling allowed!).” See its border guidance.
Special offer. See more information about Outbyte and uninstall instructions. Please review EULA and Privacy policy.#1 Best Overall
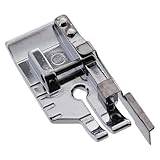 1/4 inch Snap on Foot w/Guide | Fits Low Shank Sewing Machines - Babylock, Brother, Janome, Singer, and More | Quarter Inch Foot for Patchwork, Quilting, and Piecing
- Use this foot when pivoting, topstitching, or for 1/4" seams.
- Reference markings on the side of the foot for visibility and accuracy.
- Flat bottom ensures that the material will make good contact with the feed dogs.
- Guide on foot makes it easy to obtain a 1/4" seam allowance. Place the edge of the fabric against the guide while you sew.
- This 1/4 inch snap-on foot is compatible with most low shank machines (adapter may be required).
-
Measure for the top and bottom borders
After sewing on the side borders, measure the new width across the quilt in three places and average those readings. Cut the top and bottom borders to that measurement, then attach them. Measuring the adjusted quilt rather than relying on the original width accounts for the newly added side borders. Utah State University Extension also recommends setting the stitches by pressing the seam flat along the stitching line, then pressing the seam toward the border.
How to prevent or fix a wavy edge
Start with a flat, square quilt top. If an edge is wavy before the border goes on, Brother recommends stay-stitching just inside the ¼-inch seam line with a long stitch to stabilize it. When attaching the border, pin its ends and center to the quilt, and ease only the fullness between those points. Pulling the fabric as you sew can stretch the edge and create waves. Brother’s tutorial also recommends a ¼-inch presser foot when piecing border strips; see Brother’s quilt-border instructions.
Rank #2

- Open toe for decorative stitching: The open toe design allows space for dense decorative stitches to glide easily under the foot, for more consistent stitching
- Manage tricky fabrics such as plaids, knits and slick minky cloth easily with Open Toe Walking Foot with guide bar. This modern twist on the classic walking foot provides a clear view of the stitching area
- Heavy duty construction: engineered for precision and designed for use even with thicker fabric layers
- Widely compatible with popular sewing and quilting machine brands, HONEYSEW open toe walking foot fits on low-shank models of Euro-Pro, Kenmore, White, Necchi, Singer, Brother, Husqvarna Viking, Toyota, Pfaff and more.
Straight borders or mitered corners?
| Consideration | Straight, butted corners | Mitered corners |
|---|---|---|
| Corner appearance | Border ends meet at square corners. | A diagonal seam runs through each corner, creating a picture-frame effect. |
| Extra length | Measure the quilt after attaching the side borders; cut the top and bottom borders to the new averaged width. | Allow extra fabric for the diagonal corner seams. Annie’s recommends adding at least twice the border width to the border lengths; Brother gives a formula of side length + twice the total combined border width + 3 inches. |
| Pattern matching | No diagonal corner pattern match is needed. | Patterns may need to align across the diagonal seams. |
| Sewing precision | Keep the seam allowance consistent and avoid stretching the fabric. | Mark and sew precisely to the corner point; small errors can make the corners uneven. |
The length formulas are instructions from different tutorials, not interchangeable guarantees for every quilt. Follow the method you choose and check its measurements against your border width and pattern before cutting.
How to sew a mitered border corner
-
Plan and cut for the miters
Use the mitered-border method’s specified extra-length calculation before cutting. Annie’s says to add at least twice the border width; Brother’s calculation is side length + twice the total combined border width + 3 inches. Do not substitute the straight-border measurement method without accounting for the extra fabric needed at the corners.
PC Slower Than It Used to Be?
A free scan shows the junk files, broken settings and background clutter dragging Windows down - then fixes them in one click.Free scan · Windows 10 & 11Crashes, No Sound, or Screen Glitches?
Random freezes, missing sound and display glitches usually trace back to one bad driver. Find and replace yours safely.Free scan · under a minuteSpecial offer. See more information about Outbyte and uninstall instructions. Please review EULA and Privacy policy.Rank #3
Sale YMXFAWO Walking Foot Kit for Brother, Singer, Janome & Low Shank Machines
- Universal Compatibility: This walking foot attachment is designed to fit Brother, Singer, Janome, and all low shank sewing machine models. Whether you own a Brother walking foot sewing machine or a Singer walking foot sewing machine, this accessory ensures seamless integration and enhanced stitching performance
- Effortless Fabric Handling: Achieve smooth, even fabric feeding without puckering or shifting, making it ideal for quilting, layered fabrics, and thick materials like denim or upholstery. The walking foot for Brother sewing machine guarantees professional results every time
- Perfect for Quilting & DIY Projects: Specifically designed for quilters and crafters, the Brother walking foot for quilting enables precise stitch control when working with multiple fabric layers. It’s also great for sewing stretchy fabrics, vinyl, and leather
- Enhanced Stitching Precision: Unlike standard presser feet, this walking foot attachment mimics the action of industrial sewing machines by evenly feeding top and bottom layers simultaneously. Say goodbye to mismatched seams and fabric drag
- Durable & Easy to Use: Crafted from high-quality materials, this walking foot brother accessory is built to last. It installs in seconds without tools and includes clear instructions for quick setup, making it suitable for beginners and experts alike
-
Mark the corner and align the border
Mark a crosshair ¼ inch from the edges at the corner. Match the centers of the border strip and quilt edge, and pin the border in place. Brother’s miter instructions emphasize sewing precisely to the mark.
-
Sew accurately to the mark
Sew the border with a consistent ¼-inch seam and stop exactly at the marked point. The mark identifies where the seam should end so the adjoining border can form the diagonal corner seam.
Rank #4
 AMZTKDIY Metal Open Toe Free Motion Quilting Darning Presser Foot for Brother Singer Babylock Janome New Home Other Sewing Machines
- High-Quality Metal Construction: The AMZTKDIY Free Motion Quilting Darning Foot is crafted from premium metal, ensuring exceptional durability and long-lasting performance. Its polished surface resists rust and maintains a bright finish, making it a reliable tool for all your sewing projects
- Enhanced Visibility & Precision: Featuring an open-toe design, this presser foot provides excellent visibility, allowing you to easily follow intricate patterns and designs for free motion quilting, embroidery, stippling, and thread painting, ensuring precise stitching every time
- Spring-Loaded Design for Smooth Operation: The spring-loaded mechanism keeps the fabric flat and prevents lifting as the needle moves, reducing skipped stitches and thread breakage. This makes it suitable for working with thick materials like hollow cotton, silk, and leather
- Versatile & Creative Freedom: Unleash your creativity with the AMZTKDIY presser foot. Whether you're quilting, darning, or embroidering, this foot allows you to experiment with various techniques and patterns, making it a must-have for sewing enthusiasts and professionals alike
- Wide Compatibility: Designed to fit most low-shank sewing machines, including Brother, Singer, Janome, Juki, Babylock, Kenmore, White, Euro-Pro, Elna, Simplicity, and more. This presser foot is a versatile addition to your sewing toolkit, ensuring seamless compatibility across multiple brands
Stitch length and pressing
Utah State University Extension’s 2008 straight-border lesson specifies 12 stitches per inch, or a 2.5 setting on the stitch-length regulator, for side-border seams. Treat that as the setting given in that lesson, not a universal requirement for every machine or fabric. Press the seam flat on the stitching line first to set the stitches, then press toward the border, as the lesson recommends. See the Extension lesson.
Quick Recap
Best Value

- O(∩_∩)O Enhances Functionality:This walking foot attachment set is compatible with Brother sewing machines, as well as part Singer 、Janome models, making it a versatile addition to your crafting tool kit.
- O(∩_∩)O Precision Crafted: The unique design allows for even fabric feeding from both the top and bottom, preventing shifting and puckering.
- O(∩_∩)O Easy Installation:The user-friendly design ensures quick and easy attachment to your sewing machine, so you can focus on your creativity without hassle.
- O(∩_∩)O Compact Size: Measuring W/Guide Walking Foot Presser Foot at 3.4 x 3.4 x 1 inches and Metal Free Motion Quilting Darning Presser Foot at 2.4 x 1.2 x 0.7 inches and 1/4 inch Snap on Foot at 1.4 x 0.6 x 0.3 inches weighing only 0.20 lbs, this walking foot set is easy to store and transport.
- O(∩_∩)O After-sales:We promise to provide you with a high-quality after-sales and we will reply your questions in time to sure an excellent Shopping experience.

Product prices and availability are accurate as of the date/time indicated and are subject to change. Any price and availability information displayed on Amazon at the time of purchase will apply.




