ThatPainter is reader-supported. When you buy through links on our site, we may earn an affiliate commission. Learn More
A bathroom vanity light makeover can be as simple as replacing one fixture at the existing junction box or as extensive as rewiring the wall for two sconces. Start by measuring the mirror and fixture area, locating the junction box, and deciding whether you need better illumination or only a new look. Then choose a fixture whose dimensions, mounting hardware, bulb requirements, and stated bathroom-location suitability match the installation.
As an Amazon Associate I earn from qualifying purchases.
The safe dividing line is scope: a same-box replacement follows the existing wiring, while moving the electrical point or adding fixtures can require new cable, wall repairs, and locally required permits. Shut off power at the breaker or main supply and verify that it is off before touching wiring; a wall switch alone is not enough.
What’s actually slowing this PC down?
Pick the symptom - the matching free tool is one click away.
Decide what kind of makeover you need
“Custom” does not necessarily mean opening the wall. Three common approaches have very different time, wiring, and design consequences.
#1 Best Overall
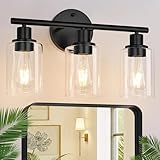
- Upgraded Matte Black Finish: The vanity lighting fixtures feature a sleek matte black finish lamp body accompanied by clear glass shades. The upgraded finish not only adds an elegant touch but also includes a scratch and tarnish-resistant coating, ensuring that the black bathroom light maintains its pristine appearance over time. This exquisite bathroom vanity light is suitable for various decoration styles, making it the perfect choice to enhance your home lighting.
- Sturdy Construction & Safe Use: The black bathroom lighting is constructed with an all-metal lamp body, including metal holding rings. Additionally, the bathroom vanity light also features a strong and robust metal lamp pole that does not bend or become crooked during use or transportation. The metal ring is more durable and keeps the glass shades securely in place, ensuring both safety and durability for prolonged use.
- UL-Certified E26 Heat-Resistant Socket: Our vanity lights feature a UL-certified, heat-resistant ceramic E26 socket designed to safely withstand the heat generated by long-term bulb use. UL certification ensures the socket meets strict U.S. safety standards for electrical performance and reliability, reducing the risk of overheating. This durable design helps minimize frequent bulb replacements, making these bathroom lights over the mirror a safer, more dependable, and cost-effective choice with an extended lifespan.
- Up and Down Reversible Mounting: This versatile vanity light fixtures can be installed in either an upward or downward direction, giving you the freedom to customize the lighting to suit your preferences. It is suitable for various locations such as bathroom mirrors, beds, doorways, closets, living rooms, mirror cabinets, dressing tables, porches, and corridors. Elevate the atmosphere of your home and other spaces with this stylish and adaptable lighting solution.
- 36-month warranty: We proudly stand behind all our vanity lights for bathroom, guaranteeing their quality with a full 36-month warranty. If your bathroom light fixtures encounter any defects or stop working within 3 years, we are here to assist you with troubleshooting or provide a replacement. If you experience any issues with our wall light fixtures, please contact us through the Amazon message box, and we will respond within 24 hours.
| Approach | What changes | Typical electrical scope | Best fit |
|---|---|---|---|
| Same-box fixture swap | New bar, globe, or multi-light fixture uses the existing junction box. | Disconnect the old fixture, attach the new mounting hardware, connect conductors as directed, and secure the fixture. | A dated fixture is the problem, but its location works. |
| New fixture at a revised position | The light moves higher, lower, or to another part of the wall. | Wiring may need to be extended or rerouted; the wall may need patching and finishing. | The existing box is badly placed or conflicts with the mirror. |
| Two flanking sconces | One central light becomes a pair on either side of the mirror. | Usually requires additional boxes, wiring paths, and wall work. | You want cross-illumination and a built-in, symmetrical appearance. |
Lowe’s “How to Replace Vanity Lights,” published September 9, 2024, treats a fixture replacement at the existing location as the limited project. Relocating a box or splitting one fixture into two is a different job, not merely a more decorative version of the same installation.
Measure the mirror, wall and junction box first
Record the mirror and vanity dimensions
Measure the mirror’s width and height, the vanity or sink width, and the clear wall space above and beside the mirror. Photograph the existing fixture and junction-box area after removing decorative covers but before disconnecting anything. Note whether the box is centered, offset, or hidden behind a fixture canopy. A replacement can look oversized, leave exposed paint, or fail to cover the old mounting footprint if these measurements are skipped.
Check the box and mounting pattern
Measure the distance from the junction box to the mirror edges and finished floor. Check whether the existing box is securely mounted and whether the replacement’s mounting plate, screws, and bracket align with it. A new fixture may include a different crossbar or stud spacing; compatibility must be confirmed before purchase. If the box is loose, damaged, or not where the new design needs it, stop treating the project as a cosmetic swap.
Crashes, No Sound, or Screen Glitches?
Random freezes, missing sound and display glitches usually trace back to one bad driver. Find and replace yours safely.Free scan · under a minuteWindows Errors? Fix Them Before They Spread
Repair common Windows errors and clear accumulated junk for a smoother, more stable PC - no reinstall needed.Free scan · no reinstallPlan for the finished surface
Replacing a narrow fixture with a smaller canopy can expose an unpainted rectangle or screw holes. Conversely, a wide canopy may overlap mirror trim, tile, or a medicine cabinet. Include the canopy and arm projection in your measurements, not just the visible shades. If painting is part of the makeover, complete wall repairs and touch-up painting before final fixture installation, while leaving the junction box accessible.
Rank #2

- 17.3-inch vanity light: Fits 24” and 30” standard bathroom mirrors—the top single-sink vanity sizes in homes. Well-proportioned and never too small or oversized, it delivers balanced, full coverage for your entire vanity area
- ETL-Certified Ceramic E26 Socket: Vanity lights for bathroom is compatible with any E26 base bulb, including incandescent, CFL, halogen, and LED bulbs (max 60W per bulb, not included). When used with a dimmable bulb and switch (not included), the wall light offers full dimming capability, allowing you to select different bulb styles and control the desired brightness
- Milky white frosted glass lampshade: Creates bright and soft atmosphere, eye-friendly perfect for the whole family. It is also a great choice for decorating home corners
- Double-Layer Spray Painting Process: This technique applies a thicker, smoother, and more even coating, enhancing the overall appearance of the fixture. It improves durability by making the light more resistant to scratches and maintaining a pristine, refined look. This contributes to a more stylish and polished bathroom design
- Durable Construction: Bathroom lighting fixtures over mirror features a robust all-metal construction, including a metal securing ring that firmly holds the glass shade in place for long-lasting safety and durability. Additionally, it is built with a sturdy metal arm that remains straight and secure during use or transport, ensuring reliable performance over time
Choose a layout that improves the mirror area
One bar above the mirror
A horizontal bar is usually the least disruptive same-box option. It can cover the old footprint and preserve the existing wiring path. Select a width that relates to the mirror rather than automatically buying the longest model available. A bar that is nearly the mirror’s width can read as intentional; one that extends far beyond it can dominate a small bathroom.
A pair of sconces beside the mirror
The Journal of Light Construction field guide warns that a single fixture above the mirror can cast “strange shadows on a viewer’s face.” It recommends two lights flanking the mirror for cross-illumination. Light arriving from both sides reduces the deep shadowing that can occur under the eyes, nose, and chin when all illumination comes from above.
That improvement comes with construction consequences. Two sconces generally need two electrical boxes and a wiring route between them or from the switch location. If the wall is finished, access may require strategic openings and subsequent drywall repair. A licensed electrician is the prudent choice when the wiring path, box support, or grounding is unfamiliar.
Use placement figures as starting points, not code
For a single-sink vanity, the JLC field guide gives practical starting guidance of about 30 inches between the two lights and a light-bar center usually 62–64 inches above the finished floor, measured to the electrical-box center. The guide does not present those figures as universal code requirements. Mirror height, ceiling height, user height, fixture dimensions, and local rules can justify a different position. Mark the proposed centerlines with painter’s tape and check the sightline from a standing position before drilling or relocating boxes.
Rank #3

- Modern Design: Unicozin wall sconces is made of solid metal, equipped with transparent glass lampshade, which can bring a more refined and warm feeling for your home lighting
- Standard E26 Socket: The bathroom light fixtures designed with E26 medium base with a max power of 60 W. Compatible with a variety of bulbs, including Incandescent, LED, CFL, etc. (Note: bulbs are not included)
- Up and Down Reversible Mounting: Through hard wiring, vanity lighting fixtures can be installed above bathrooms, stairs, kitchens and mirrors. You can install the vanity light fixtures up or down according to your preferences to achieve the lighting effect you want
- Wide Application: Our wall light fixtures are completely suitable for various styles of decoration. Modern wall lamp lighting fixtures for headboard bedroom nightstand, porch or bathroom vanity, dressing table, vanity table. Our vanity light can decor your room at bedroom, dining room, living room , kitchen, etc
- Easy Installation: The vanity lights comes with all the installation hardware and instructions required for installation, which can be installed quickly and easily
| Design question | What to check before ordering |
|---|---|
| Will a bar fit? | Mirror width, canopy width, side clearances, and the existing box centerline. |
| Will sconces work? | Space beside the mirror, desired center-to-center spacing, box locations, and a feasible wiring route. |
| Will the light help grooming? | Whether illumination reaches the face from the front or sides instead of only from overhead. |
Verify damp-location suitability
Bathrooms are not automatically one electrical environment. The exact fixture listing and owner’s manual determine the locations for which that product is intended. Lowe’s advises selecting a fixture warranted for damp or wet locations and following local electrical requirements. The cited three-light vanity fixture manual says its particular model is intended for indoor or damp locations; that statement applies to that model, not to every vanity light.
Before purchase, look for the manufacturer’s stated location rating and any restrictions on shower or tub zones. Do not infer that a fixture suitable for a dry bedroom is acceptable over a sink, and do not assume a damp rating qualifies a fixture for every position in every bathroom. Keep the listing and instructions with the fixture so an electrician or inspector can verify the intended use.
Know when the work requires an electrician
Shut off and test power correctly
Lowe’s and Moen Solutions both instruct installers to turn off the bathroom circuit and test for absence of voltage. The owner’s manual for the cited three-light fixture gives the explicit warning: “Turning off the electrical power by using the light switch is not sufficient to prevent electrical shock.” Turn off the circuit breaker or main supply that feeds the fixture, then verify the wires are de-energized with an appropriate voltage tester. A tester is a verification tool, not a substitute for electrical knowledge.
The Tool Desk
Outbyte PC Repair FREEClear out junk files and repair common Windows errorsFree Scan →Outbyte Driver Updater FREEFix the driver behind crashes, sound loss and screen glitchesFind Drivers →Use a qualified professional when the wiring is unfamiliar
The same manual advises people who are unfamiliar with wiring methods to use a qualified licensed electrician. That advice is especially important if the box is loose, conductors are damaged, the circuit behavior is unclear, grounding is absent, or the new fixture does not match the existing mounting arrangement. Installation must meet applicable national and local codes.
Rank #4

- Sleek Modern Aesthetics - Perfect for modern or farmhouse decor, our 4-light bathroom fixture pairs a matte black metal body with thick clear glass shades. This exquisite bathroom vanity light is suitable for various decoration styles, making it the perfect choice to enhance your home lighting. Product size: 23in L x 7in W x 11.56in H
- High-Quality Materials - This black bathroom light features a full metal body, including a metal mounting ring, ensuring safety and durability for long-term use. Additionally, the upgraded surface treatment not only adds an elegant touch but also includes scratch-resistant and stain-resistant coatings, ensuring that the bathroom lighting can maintain its pristine appearance for an extended period
- E26 Heat-Resistant Sockets – Featuring heat-resistant ceramic sockets, our vanity lights are designed to withstand the heat from prolonged bulb use, reducing the frequency of bulb replacements and providing a cost-effective, durable lighting solution. UL certified for safety and quality assurance, they offer reliable performance you can trust in residential and commercial settings.
- Up and Down Flexible Mounting - Install our bathroom mirror lights either upwards or downwards to suit your preference, suitable for enhancing any room, from bathrooms to living spaces, such as bathroom mirrors, beds, doorways, closets, living rooms, cabinets, dressing tables, porches, and corridors
- 12-Month Warranty - With our commitment to 100% after-sales service, we offer a comprehensive 12-month warranty, providing support and replacements if any issues arise within 1 years. If you experience any issues with our wall light fixtures, please contact us through the Amazon message box, and we will respond within 24 hours
Understand relocation and permit limits
Moving a junction box, adding a box, or converting one central fixture into two sconces changes the wiring path and may require wall repairs. Permit requirements are set locally. Oakwood Remodeling Group’s guide, updated July 16, 2026, discusses examples for Sacramento and Placer County, California; those examples cannot be applied nationwide. Ask the local building department or your electrician whether a permit or inspection is required where you live.
Same-box vanity light replacement: a safe sequence
Use the fixture’s instructions as the controlling document. The following sequence reflects the steps covered by Lowe’s, Moen, and the cited owner’s manual without assuming that every product uses identical hardware.
- Confirm the replacement. Recheck width, projection, box position, mounting-plate compatibility, location suitability, bulb base, dimmer compatibility, and maximum wattage before opening the package.
- Prepare the work area. Clear the vanity, protect the sink and counter, and have the manual, screwdriver, voltage tester, and any tools specifically called for by the instructions available. Basic tools such as wire strippers are appropriate only when the fixture instructions require them and you know how to use them.
- Switch off the correct circuit. Turn off the breaker or main supply, not merely the wall switch. Tell others not to restore power while you work.
- Verify zero voltage. Test the conductors with the voltage tester according to its instructions. If the tester indicates power or you cannot confidently identify the circuit, stop and call an electrician.
- Remove the old fixture. Support its weight while removing the decorative nuts or screws. Lower it carefully, then disconnect the conductors only after confirming the circuit is off. Keep track of the existing mounting arrangement for comparison with the new bracket.
- Install the new mounting hardware. Attach the supplied mounting plate or crossbar to the junction box as directed. Do not improvise unsupported fastening or rely on a loose box.
- Make the wire connections. Follow the fixture’s wiring diagram and local requirements for the supply conductors and equipment grounding conductor. Moen’s installation guidance includes connecting wires before mounting the fixture; use the connector type and method specified by the manufacturer.
- Secure the fixture body. Tuck conductors without pinching them, align the canopy, and tighten the supplied hardware evenly. Confirm that the fixture is level and firmly supported.
- Install compatible lamps. If the fixture uses replaceable bulbs, install only the base type, dimming-compatible lamp, and maximum wattage permitted by its instructions.
- Restore power and test. Turn the breaker back on, operate the switch or dimmer, and check for flicker, unexpected heat, looseness, or a tripped breaker. Turn power off again and call an electrician if anything is abnormal.
Bulb, dimmer and control decisions
Replaceable-bulb fixtures give you flexibility, but only within the product’s limits. The cited three-light manual specifies E26-base LED, CFL, or incandescent bulbs up to 60 watts for that particular fixture. Its 60-watt maximum is not a universal vanity-light rule. Your chosen model may specify a different base, lamp technology, wattage, or dimmer requirement.
Free tools Windows power users keep installed
One-click scans. No signup required.
- Match the bulb base exactly; an attractive lamp with the wrong base will not install safely.
- Confirm that the lamp and wall dimmer are compatible if you plan to dim the light.
- Never exceed the fixture’s stated maximum wattage, even if the socket appears physically large enough.
- Follow any instructions about enclosed fixtures, bulb shape, or minimum clearance around the lamp.
If you are retaining an existing dimmer, verify that the new bulbs support it. If the fixture has integrated LEDs, its instructions—not replaceable-lamp rules—control dimming and replacement expectations.
Best Value

- Unique Design: Bathroom vanity light is built in a sturdy metal lamp body with clear glass shades and designed in refined and contemporary style on the wall when lighting to create a touch of brilliance to your residence. This wall sconce perfectly fit with any style, from modern to rustic. The vanity light is 11.02'' height x 16.93" wide, features a 5.91" high x 3.94" diameter glass shade
- Widely Application: The glass bathroom lighting is great for home indoor decoration to create a touch of brilliance to your residence, which is an excellent idea for your bathroom mirror kitchen, dining room, living room, corridor, cafe, basement, bar, club, office, library, and bedroom
- Durable Quality Construction: Wall sconces is crafted from metal in brushed nickel finish which no need to worry about getting oxidation and color fading, thick clear glass shades emit aesthetic and ample glow to create a beautiful lighting atmosphere outside your home or inside your room
- E26 Base Required: Its light socket of the wall sconces is standard E26 socket and three bulbs (max 60 W) needed which is compatible with Edison bulbs, incandescent bulbs, CFL and LED bulbs (bulbs are not included). The light fixture is fully dimmable when used with a dimmable bulb and compatible dimmer switch (bulbs are not included)
- Easy & Quick Installation: The vanity light is super easy and fast to install, it can be mounted facing upward or downward to suit your needs, all mounting hardware required is included in the package, you just need to connect the wire, then place the glass shade and bulb. Please check the glass lampshade before installation
Common failure points and practical fixes
The new canopy does not cover the old paint outline
Stop before final tightening and compare the canopy dimensions with the exposed wall. A larger compatible canopy may solve the problem. Otherwise, patch and repaint the area with the power off and the fixture removed, allowing the finish to cure before reinstalling it.
The mounting plate does not align with the box
Do not force screws at an angle or hang the fixture from unsupported drywall. Recheck the supplied hardware and the box condition. If the box or bracket needs modification, treat that as an electrical repair and involve a qualified electrician.
The light is visually centered but functionally harsh
Look at the light from the user’s standing position, not only from across the room. A single overhead source can create facial shadows, as the JLC field guide notes. If the wall cannot be opened, a wider bar, multiple lamps, or a compatible dimmer may improve the result within the existing box. If balanced facial illumination is the priority, plan for side sconces as a separate electrical project.
Quick wins for a faster PC:
Clear out junk files and repair common Windows errorsFree Scan →Scan for outdated or missing drivers - takes under a minuteDriver Scan →The breaker trips after installation
Turn the breaker off immediately and do not keep resetting it. A trip can indicate an incorrect connection, damaged conductor, incompatible device, or another circuit problem. Have a licensed electrician diagnose it rather than troubleshooting energized wiring.
The fixture is not approved for the intended area
Do not rely on appearance or a generic retailer category. Recheck the exact listing and manual. If the stated suitability does not cover your location, return the fixture and select one with an appropriate rating and local-code compliance.
A final pre-purchase and pre-install checklist
- Mirror, vanity, wall-clearance, and existing-canopy dimensions are recorded.
- Junction-box location, condition, and mounting pattern are known.
- The selected fixture’s exact location suitability is documented.
- Bar-versus-sconce layout is chosen with the wiring scope understood.
- Breaker shutoff and voltage-testing steps are planned.
- Bulb base, dimmer compatibility, and maximum wattage match the instructions.
- An electrician is scheduled if wiring is unfamiliar or the box will move or multiply.
- Any permit or inspection requirement has been checked with the local authority.
A successful makeover is the one that fits the mirror, lights the face deliberately, and matches the actual electrical conditions. Keep a same-box swap within that scope; treat relocation or added sconces as electrical work, not as a simple fixture-style upgrade.
Quick Recap

Product prices and availability are accurate as of the date/time indicated and are subject to change. Any price and availability information displayed on Amazon at the time of purchase will apply.

