Do these 3 things before closing this tab:
What’s actually slowing this PC down?
Pick the symptom - the matching free tool is one click away.
1Scan for outdated or missing drivers - takes under a minute2Repair Windows errors before they cause bigger problems3Fix the driver behind crashes, sound loss and screen glitches
ThatPainter is reader-supported. When you buy through links on our site, we may earn an affiliate commission. Learn More
Turn sound offcuts into a compact vertical garden by building a shallow wooden box, lining it, covering the planting face with 1/2-inch hardware cloth, and securing the filled planter to a wall for its actual load. The box method suits succulents and other small plants. A pallet garden is a separate, roomier design that uses fabric-lined slats and needs a different planting and curing sequence.
Choose the design before cutting wood
Two ideas are often called a “vertical wall planter,” but they are not interchangeable.
As an Amazon Associate I earn from qualifying purchases.
Quick wins for a faster PC:
Clear out junk files and repair common Windows errorsFree Scan →Fix the driver behind crashes, sound loss and screen glitchesFind Drivers →Compact scrap-wood box
The close match for a small offcut project is a shallow frame made from boards approximately the size of 1×4 lumber, a 1/2-inch plywood back, a plastic drop-cloth liner, and a 1/2-inch steel hardware-cloth face. Soil sits inside the lined box and the cloth keeps it in place while roots and stems grow through the openings. Dimensions are adaptable because the project does not establish a universal size or structural load rating.
Pallet garden
A pallet garden uses the pallet slats as the visible face. Its back, bottom, and sides are lined with doubled or tripled landscape fabric or plastic, and plants are rooted through the slat gaps. Texas A&M AgriLife Extension describes a pallet around 25 × 38 inches holding about 2.5 cubic feet of potting soil. Those figures apply to that example, not to a small scrap box. Optional scrap-wood strips can reinforce an open-backed pallet.
#1 Best Overall
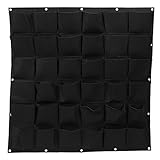
- 【36 Pocket Vertical Garden】Features 36 individual planting pockets, allowing you to grow herbs, flowers, succulents, strawberries, vegetables, and other plants while maximizing vertical space.
- 【Large Growing Area】Measures 39.4 x 39.4 inches, providing ample room for multiple plants. Ideal for balconies, patios, fences, walls, gardens, and other indoor or outdoor spaces.
- 【Breathable Felt Material】Made from durable, eco-friendly felt fabric that retains moisture while allowing excess water to drain, promoting healthy root growth and helping plants thrive.
- 【Easy Installation】Equipped with reinforced grommets for convenient hanging. Easily mount on fences, walls, railings, or other vertical surfaces using zip ties, hooks, nails, or screws.
- 【Indoor & Outdoor Use】Suitable for creating vertical gardens in homes, apartments, patios, balconies, greenhouses, and outdoor living areas. A practical solution for gardeners with limited space.
| Decision | Scrap-wood box | Pallet format |
|---|---|---|
| Best use | Small wall area, shallow planting, succulents or moss | Larger feature wall with many plants |
| Soil retention | Plywood back, plastic liner, hardware-cloth face | Fabric or plastic on back, bottom, and sides; slats retain the front |
| Plant opening | Hardware-cloth openings; choose plants that fit through them | Slat gaps; AgriLife says root balls from pots 4 inches or smaller are easier to insert |
| Drainage and runoff | Must be planned; the project specifies a liner but no drainage-hole detail | Water can move through the lined pallet, so protect the wall and floor below |
| Mounting | Hanger selected for the filled planter and wall material | Heavier filled structure; a stud-fastened cleat or equivalent may be needed |
| Establishment | Plant in place after filling and hanging carefully | Water while horizontal, then leave flat for 1 to 2 weeks before standing upright |
Build one format as designed rather than combining the box’s hardware cloth with the pallet’s fabric-retention method. The different depths, openings, and weight distribution change how each one should be assembled and mounted.
Inspect and size your scraps
Select sound, suitable wood
Choose boards without rot, soft spots, serious splits, or loose fasteners. The frame must remain square while it carries damp soil. Check the history of reclaimed lumber before using it around edible plants. Iowa State University Extension identifies cedar and redwood as decay-resistant examples, while warning that older CCA- or creosote-treated lumber raises concerns. Unknown reclaimed boards should not be casually used for food crops; a liner does not make every unidentified chemical treatment safe.
Plan dimensions around the wall and plants
Measure the wall, the clearance around doors or windows, and the mature spread of the plants. A shallow box is easier to lift, but it also limits root volume and can dry rapidly. Cut two side pieces and two rails from the boards, then size the plywood to cover the back of the assembled rectangle. Keep enough depth for a level layer of potting soil without making the planter unnecessarily heavy.
Materials and tools
The compact project calls for:
- Sound scrap boards approximately 1×4 size
- 1/2-inch plywood for the back
- #8 1/2-inch wood screws
- 1/2-inch steel hardware cloth
- Plastic drop cloth for an interior liner
- A suitable hanger and wall fasteners
- Saw, drill or driver, and drill bit for pilot holes
- Heavy-duty stapler and staples
- Wire snips and pliers
- Potting soil, succulents, and optional moss
These are project materials, not a requirement to buy everything new. Reuse serviceable offcuts and select fasteners and hanging hardware for the actual dimensions, wall construction, and filled weight.
Rank #2

- PACKAGE: 8 pack 13 inch dark green vertical planter with screw for wall mount and S hook for rail hanging. Choose the right size for your plant to prevent unpleasant experiences and potential wastage of resources. Flowers and plants are not included.
- SPACE-SAVING: The vertical wall-mounted design helps you maximize growing space while keeping plants neatly organized and off the ground, making it ideal for small patios, balconies, and apartments.
- EASY TO INSTALL: This plastic planter is simple and hassle-free. It’s quick to assemble and can be placed almost anywhere. You can link multiple planters together in seconds and hang them on a balcony, fence, patio, deck, or even outside a window. Using the accessories like S-hooks and screw, you can also attach them easily to rails or railings.
- VERTICAL LIVE GARDEN: This wall-mounted planter is perfect for creating a vibrant outdoor plant wall. Simply drill a few holes and transform any wall into a stylish, living feature with minimal effort. For larger wall installations, adding a water pipe (not included, optional) is recommended. Grow your favorite herbs, fresh vegetables, or sweet fruits like strawberries to enjoy a beautiful vertical garden.
- VERSATILE FOR OUTDOOR USE: These planters are designed to enhance any outdoor area, whether it’s a balcony, patio, deck, fence, or garden wall. Their versatile design lets you easily create a lush vertical garden in a variety of outdoor settings.
Build the shallow box
- Mark and cut. Lay out the two sides, top, and bottom on the boards. Cut the plywood back to the outside dimensions of the rectangle, checking that its edges will sit flush.
- Pre-drill the corners. Clamp or hold the boards square, drill pilot holes, and drive the #8 1/2-inch screws through each corner. Pilot holes reduce the chance of splitting, especially near the ends of reclaimed boards.
- Attach the plywood. Place the back on the assembled frame and screw it to the boards at regular intervals. Do not rely on staples alone for the structural back.
- Remove hazards. Sand rough edges and corners. Pull protruding nails or staples, and make sure no fastener point will contact the liner, plants, or wall.
- Finish if desired. Apply a finish appropriate to the wood and the intended location, following its label. Let it cure fully before adding the liner or soil.
Line the box and retain the soil
Install the liner
Cut a plastic drop cloth large enough to cover the inside back, bottom, and sides with manageable folds. Staple it to the interior surfaces, keeping it taut enough that soil will not bunch it into thick ridges. Trim excess material so it cannot hang over the wall-facing edges.
The liner is a barrier, not a drainage system. The close-match instructions do not specify drainage holes. Decide how excess water can leave without staining or saturating the wall: for example, direct any planned outlet toward a protected, non-structural surface and leave clearance below the planter. A small drainage-hole pattern is a design consideration, not a universal specification established for this project. Test the water path before mounting a filled unit.
Attach the hardware-cloth face
Lay the 1/2-inch steel hardware cloth across the open planting face. Staple it securely around the frame, keeping the mesh tight so soil cannot slump out between the cloth and the boards. Cut the excess with wire snips, then bend or flatten every sharp end with pliers. A loose strand can puncture the liner, cut hands, or scratch the wall.
Mount it for the real load
Soil and plants become substantially heavier when watered. The project does not provide a load rating, and no single anchor or screw size is correct for every wall. Weigh or conservatively estimate the dry materials, soil, and mature plants, then account for water before choosing the hanger.
Rank #3

- Innovative Space-saving Design: maximize your gardening potential with our stackable wall planter system; Each piece measures 9.45" x 5.71" x 5.51" and features two pockets, The overall dimensions are 47.5"x33"x5.5" offering ample growth space for a variety of plants; Nice for Fence Balcony Wall Decor, these vertical wall planters change limited spaces into gardens effortlessly
- Breathable Material for Healthy Growth: crafted from pp material, our garden self-watering wall-mounted planter ensures stability and breathability; Resistant to uv and corrosion, this watering stackable vertical planter promotes robust plant health while minimizing maintenance challenges, making it perfect for both indoor and outdoor use
- Efficient Water and Soil Separation: our vertical stackable watering wall planters feature an ingenious water-soil separation design; Protect root rot and overwatering issues through a cotton rope system that draws water selectively, safeguarding your plants; Enjoy hassle-free gardening with this smart vertical wall planter
- User-friendly Drainage System: with a thoughtfully designed drainage system, these stackable vertical wall planters avoid water overflow, keeping walls clean; The seamless stacking prevents mess, ensuring your living or garden areas remain pristine without the need for special waterproof installations
- Versatile Installation Options: customize your garden layout with flexible installation methods; This is nice for creating green walls in homes or shops, turning indoor environments into natural oxygen bars; It provides the optimal solution for your home or shop renovation, or even for remodeling old walls; Our planters can be screwed onto the wall and stacked, allowing for adjustments based on the type of wall surface
- Identify the wall material: wood studs, masonry, plaster over framing, or another surface.
- Choose hanging hardware rated for the calculated loaded weight and compatible with that wall.
- Fasten into structural framing or use anchors specifically rated for the wall type; follow the fastener maker’s spacing and installation instructions.
- Verify that the planter hangs flat, that the hardware is fully engaged, and that the liner or runoff path cannot rub against the wall.
- Have another person help lift a large or filled unit. Do not fill a planter on the wall unless the hardware and wall are designed for that installation sequence.
A French cleat is one established approach for a larger planter: one half is secured to the planter and the wall-side half is fastened into studs. That method comes from a separate plank-planter design, so it is an example of a mounting strategy rather than a rating for this scrap box. That separate design is reported as weighing 25 pounds or more when loaded; do not transfer that number to your planter.
Fill and plant the box
- Prepare the soil. Use a quality potting mix suitable for the plants, not heavy garden soil. Add it gradually and settle it into corners so there are no large voids behind the mesh.
- Check the final weight and position. If the planter is not already mounted, place it on a stable work surface while filling. If it is mounted, stay within the hardware and wall capacity you selected.
- Insert roots through the mesh. Make openings only as large as needed, and guide succulent roots through without crushing stems or leaves.
- Firm the planting. Press mix gently around each root ball. Do not pack it so tightly that water cannot move through the soil.
- Add moss if useful. Moss can fill visible gaps while the plants establish, but it does not replace secure mesh or a correctly fitted liner.
- Water carefully. Moisten the mix thoroughly but slowly, watching where water exits. Stop if runoff reaches the wall, and correct the drainage or protection before routine watering.
The project’s authors report this succulent-and-moss method; it is not a controlled test or a guarantee for every species, indoor condition, or climate.
Recommended Free Tools
How do you water a vertical planter?
Watering depends on the format, plant choice, light, and airflow. Most vegetables and flowers need at least six hours of full sun for peak performance, according to Iowa State University Extension and Outreach. Sun, wind, and a small soil volume can make a vertical planting area dry faster than a conventional garden site.
For the compact box
Check the mix with a finger or moisture meter at several points rather than judging only the surface. Water slowly across the top and upper sections, allowing moisture to move through the root zones. Use a narrow-spout can or low-flow nozzle so the stream does not dislodge soil through the hardware cloth. Confirm that excess water follows the route you planned and does not collect behind the planter.
Rank #4
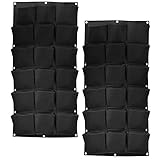
- PREMIUM MATERIAL - The main component of these wall hanging plant bags is felt, which can maintain sufficient moisture, drainage and ventilation at the same time. Its back lining adopts a waterproof design, effectively protecting the wall from being wet or dirty.
- EASY TO INSTALL - The pockets vertical wall garden is designed with fixing holes around it. You can easily fix it on the wall, door and fence with nails, straps, ropes or iron wires. Place the soil and seeds in multiple pockets to show a whole plant wall.
- MULTIPLE POCKETS - Hanging growth bags vertical wall garden has multiple pockets, which can meet your various planting needs. All kinds of plants and flowers can be planted on the same wall. Let the wall decoration of your residence be unique and make the environment full of nature.
- WIDELY APPLICABLE - Vertical grow bags hanging can grow plants, flowers, vegetables, succulents and other products. At the same time, it can be used to decorate the walls of various places, such as home, indoor or outdoor walls, offices, gardens, balconies, yards, etc.
- HASSLE-FREE SHOPPING - Once you purchase our hanging vertical felt grow bags, you are entitled to a 30 day worry-free refund. Or if you have any questions or doubts about the product, please feel free to email us. We will get back to you as soon as possible.
For a pallet garden
Texas A&M AgriLife Extension advises watering the planted pallet thoroughly while it is horizontal, then leaving it flat for 1 to 2 weeks so roots can establish. After it is stood upright, water from the top; water seeps toward the lower sections. Choose plants that tolerate relatively dry conditions and check the lower pockets as well as the top, because the upper area may dry first while lower sections remain damp.
Independent reader supportYour contribution helps us test, update, and keep practical guides available for everyone.How do you keep dirt from falling out?
Containment comes from the design, not from planting densely and hoping roots hold the mix. In the box method, the plywood back and stapled plastic liner form the container while tight hardware cloth closes the front. Soil must be packed into all corners, and the cloth must remain flush with the frame. In a pallet, the doubled or tripled fabric or plastic must cover the back, bottom, and sides before soil is added; the slats then act as the front restraint.
Crashes, No Sound, or Screen Glitches?
Random freezes, missing sound and display glitches usually trace back to one bad driver. Find and replace yours safely.Free scan · under a minutePC Slower Than It Used to Be?
A free scan shows the junk files, broken settings and background clutter dragging Windows down - then fixes them in one click.Free scan · Windows 10 & 11Plant openings should match the root balls. AgriLife notes that plants from pots 4 inches or smaller are easier to fit through pallet slats. That is guidance for its pallet example, not a universal maximum for hardware cloth. If a root ball requires force, enlarge the opening or select a smaller plant rather than tearing the liner or deforming the frame.
Plant selection and maintenance
Match plants to light
Use sun-loving plants only where the wall receives enough direct light. In a dim location, select shade-tolerant species rather than compensating with constant watering. Succulents are a practical starting point for the shallow box because they tolerate drying between waterings, but individual species still differ in light and frost tolerance.
Best Value

- 【Save Time & Space with Self-Watering Wall Planters】Transform any space into a lush vertical garden with this ready-to-use wall-mounted planter. Enjoy fresh herbs, vibrant succulents, or beautiful flowers effortlessly. Keep your indoor plants thriving with this self-watering wall planter featuring a 1L water reservoir. Includes four 4'' pots, self watering pots ideal for small plants, succulents, or herbs, turning cluttered floors into a tidy vertical garden
- 【Easy Setup Hanging Planter】Ready to use right out of the box—no assembly needed. Includes a water gauge for easy monitoring (optional installation). Our quick setup video shows you how to hang your wall planter in under a minute. Ideal for creating a stress-free indoor plant display
- 【Stylish Vertical Plant Display & Wall Decor】Transform your walls into living art with a modern hanging planter. Perfect for offices, living rooms, balconies, hallways, or kitchens, this vertical plant display enhances your home decor while providing a healthy environment for succulents, herbs, ferns, and other small indoor plants
- 【Build Your Indoor Plant Wall】Create a custom vertical garden by arranging rectangular planters like building blocks. Mount easily on any wall and gather scattered greenery into a neat indoor plant display. Planter dimensions: 26.5 x 7 x 28 cm (10.4" x 2.7" x 11.2")
- 【Simplify Plant Care & Enjoy Life】Reclaim your time with minimal maintenance. This wall planter for indoor plants makes watering and cleaning simple, letting you enjoy nature and greenery without stress—because life is too short to spend it only on chores
Match plants to your routine
Vertical containers need closer observation than ground beds. Inspect for wilt, shrinking leaves, algae, persistent wetness, and soil settling. Rotate or replace plants that outgrow their openings. Remove dead material before it blocks runoff or presses against the wall.
Use faux plants only when you want a no-soil display
Faux plants can fill the same frame when live-plant care or wall moisture is unacceptable. They avoid watering and soil weight from the plants themselves, but the frame and any ballast still need secure mounting. The available project guidance does not establish comparative performance between faux and live plants, so choose based on maintenance and exposure rather than an assumed durability advantage.
Do these 3 things before closing this tab:
1Fix the driver behind crashes, sound loss and screen glitches2Repair Windows errors before they cause bigger problems3Scan for outdated or missing drivers - takes under a minuteCommon mistakes and fixes
- Using unknown treated lumber for herbs or vegetables: replace it with identified, suitable wood; do not assume a liner neutralizes an unknown treatment.
- Leaving drainage until after installation: establish an exit path and wall protection before filling. A liner alone does not solve runoff.
- Choosing anchors by planter size alone: calculate the wet, planted load and match fasteners to the wall construction.
- Stapling loose hardware cloth: retension it, add fasteners around the perimeter, and flatten every cut end.
- Planting oversized root balls: use smaller plants or enlarge the opening without compromising the liner and frame.
- Watering only the top: inspect lower pockets and, for pallets, follow the top-to-bottom watering approach after the curing period.
- Mounting a heavy planter alone: get lifting help and verify the hanger is engaged before releasing the unit.
Pre-hanging checklist
- Frame is square, sound, sanded, and free of protruding fasteners.
- Wood treatment history is known, especially if edible plants are planned.
- Plywood back is screwed on securely.
- Plastic covers the intended interior surfaces without tears.
- Hardware cloth is tight, fully stapled, and has no sharp ends.
- Runoff has a planned route that will not damage the wall or finish.
- Plant choices fit the light, opening size, and watering schedule.
- Hanger and wall fasteners suit the actual filled weight and wall material.
- At least two people are available for lifting a large or filled unit.
A shallow scrap-wood box is the most direct route to a small wall planter: build the frame, secure the back, line it, retain the soil with hardware cloth, and mount it for its real wet weight. Use the pallet method only when you want its larger capacity and are prepared for fabric lining, horizontal root establishment, and top-down watering.
Quick Recap

Product prices and availability are accurate as of the date/time indicated and are subject to change. Any price and availability information displayed on Amazon at the time of purchase will apply.

