Windows Errors? Fix Them Before They Spread
Outbyte PC Repair · freeRepair common Windows errors and clear accumulated junk for a smoother, more stable PC - no reinstall needed.
Fix My PC Now →ThatPainter is reader-supported. When you buy through links on our site, we may earn an affiliate commission. Learn More
A successful colour revamp is won before the first roller load: clear and protect the room, repair defects, identify the existing coating, prime where needed, then paint from the ceiling down. The right brush, roller, extension pole, masking tape and drying time matter as much as the colour itself.
The sequence below adapts practical guidance published by Better Homes & Gardens Australia on 8 February 2021. Product formulas, labels and availability can change, so treat named products as examples and follow the current instructions for the paint and filler you buy.
As an Amazon Associate I earn from qualifying purchases.
What’s actually slowing this PC down?
Pick the symptom - the matching free tool is one click away.
The 12-step colour revamp
1. Clear the room and protect what stays
Remove furniture whenever you can. A clear floor gives you safer ladder and roller-pole movement and prevents wet paint from being brushed against chairs or shelves. Take down curtains, blinds and other window coverings so you can reach the reveals and avoid splashes.
If a large item cannot leave, move it to the centre of the room and cover it completely with plastic drop sheets. Tape or weight the edges so the sheet cannot slide under your feet. Cover the floor with a drop sheet that stays flat; thin plastic on its own can be slippery, so secure it around high-traffic edges.
#1 Best Overall
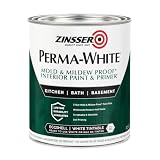
- Self-Priming formula - requires no sanding
- Mold & Mildew-Proof paint film - guaranteed for 5 years
- Resists dirt and moisture on film coating
- Finish is washable and scrubbable with soap and water
- Product contains a mildewcide to prevent the growth of mold and mildew on the paint film only
2. Repair cracks, holes and fixing marks
Remove redundant hooks, screws and wall anchors before filling. Choose a filler for the substrate rather than using one product indiscriminately. The 2021 guide names Selleys Spakfilla Rapid for plasterboard and timber and Selleys Mortar Works for masonry; comparable products are acceptable when their current labels list your surface.
Press filler firmly into the defect and leave the repair slightly proud of the surrounding surface. Once it has dried for the time on the label, sand it flush where sanding is permitted, then remove dust. Deep holes may need more than one application; forcing a thick layer to dry in one go can leave a soft centre or shrinkage.
Recommended Free Tools
3. Seal moving joints and larger gaps
Cornices, skirtings and junctions can move a little as a building settles. Use a flexible gap filler rather than a rigid patch in these locations. The source gives Selleys No More Gaps as an example, applied with a caulking gun.
Run a continuous bead, then smooth the excess with a dampened tool or finger as directed by the product. Remove smears before they cure. Allow the bead to dry fully before priming; painting over uncured filler can cause cracking, dull patches or visible sinkage.
4. Remove loose paint and stabilise damaged areas
Scrape every flaking or blistered section back to a sound edge. Feather the boundary with a sanding pad so the transition is gradual, then fill any remaining low spots and let the repair dry. Painting over loose film only traps the failure under a new colour.
Rank #2

- PAINT + PRIMER IN ONE: Evolve’s paint-and-primer formula helps you get great coverage from the start, sealing your surface and reducing the extra work of multiple coats.
- AVAILABLE IN MULTIPLE SHEENS, COLORS & SIZES: Choose from a curated palette of designer colors in Flat, Eggshell, Satin, and Semi-Gloss sheens to match any style, room, or project. Available in 1-Gallons & 5-Gallons.
- EGGSHELL SHEEN – Soft, Velvety Glow: Offers a gentle sheen that balances elegance with durability. Ideal for moderate-traffic areas like dining rooms, hallways, and family rooms. Easy to clean without compromising the finish.
- STAIN & SCRUB RESISTANT: Built to last in real spaces, Evolve helps resist marks, scuffs, and water spotting, so your home continues to look polished and well-maintained.
- DESIGNED FOR MOISTURE-PRONE AREAS: Formulated to perform well in bathrooms, kitchens, entryways, laundry rooms, and other high-humidity spaces.
At a recurring ceiling join, the guide recommends stress-crack tape covered with finishing compound, followed by light sanding once dry. Tape is not a cure for structural movement; if a crack keeps reopening, investigate the cause before decorating.
5. Check whether the old coating is acrylic or oil-based
For a quick indication, rub an inconspicuous area with a rag dampened with methylated spirits. Paint transferred to the rag suggests an acrylic coating; no transfer suggests it is likely oil-based. This is the article’s suggested check, not a definitive identification test for every modern or layered coating.
Use the result to choose compatible preparation. When uncertain, clean and lightly abrade the surface, then use a primer whose current label specifically permits the transition you need. Test in a hidden spot and allow it to dry before committing to the whole room.
6. Prime and seal repairs before topcoat
After filler is dry and sanded, seal patched areas so they do not absorb colour differently from the surrounding wall. An all-in-one primer, sealer and undercoat such as the Dulux 1 Step Primer, Sealer & Undercoat is one example named in the guide; check the present label for compatible substrates, recoat time and coverage.
Stained timber can release tannins that show through pale water-based paint. Apply a stain-blocking primer to those areas, following its preparation and drying directions, before applying the finish coat. Smoke, soot, water marks and other stains may also require a dedicated blocker rather than extra layers of ordinary wall paint.
PC Slower Than It Used to Be?
A free scan shows the junk files, broken settings and background clutter dragging Windows down - then fixes them in one click.Free scan · Windows 10 & 11Outdated Drivers Are Slowing You Down
One free scan finds every outdated or missing driver and matches the right update for your exact hardware.Free scan · exact hardware matchRank #3

- Use for a variety of indoor and outdoor project surfaces including wood, metal, plaster, masonry or unglazed ceramic
- Water-based acrylic formula is low odor, resist chips and provides long-lasting protection
- Covers up to 120 sq ft and dries to touch in 30 minutes for quick project completion
- Semi-gloss finish minimizes surface imperfections, goes on smoothly and provides excellent hide
- Prior to application sand surfaces with 180/200 grit sandpaper, then wash with a degreaser, allow the surface to dry and apply paint
7. Keep every fitting and fastener together
As you remove switch plates, curtain hardware, handles or other small parts, place each group in a labelled bag or container. Keep screws with the fitting they belong to. This simple step prevents a finished room being held up by a missing screw and helps you return hardware to its original position.
Turn off power before removing electrical faceplates and have electrical work handled by a licensed professional where required. Do not paint over terminals, switches or fittings that are meant to remain removable.
8. Prepare doors, frames and trim for a new finish
Glossy trim needs a mechanical key. Sand until the shine is uniformly dulled, concentrating on ridges and corners, then vacuum and wipe away residue. Sanding is for adhesion, not for removing every trace of the old colour.
If existing enamel is oil-based, the source suggests another oil-based enamel as one compatible route. If you want an acrylic topcoat, use a suitable undercoat designed for that changeover. Follow the selected system’s label: some products require a solvent clean, specific sanding grade or a longer recoat period.
The Tool Desk
Outbyte Driver Updater FREEFix the driver behind crashes, sound loss and screen glitchesFind Drivers →Outbyte PC Repair FREERepair Windows errors before they cause bigger problemsFix Now →9. Mask edges before opening the paint
Apply painter’s tape where you need a sharp boundary or must protect an adjacent surface. Press the edge down firmly, especially over textured walls, and remove dust first so the adhesive can bond. Paint in the direction that pulls colour away from the tape edge rather than forcing a heavy ridge against it.
Rank #4

- ALL-IN-1 PAINT & PRIMER: A hardy multi-purpose and multi-surface one-coat paint and primer in one for almost any indoor or outdoor surface. A wall, ceiling, floor, skirting board, cabinet, furniture and door paint for your bathroom, kitchen, home and garden.
- DURABLE & VERSATILE: A highly pigmented, thick formula available in 12 bold colors and a Matte, Satin or Gloss finish. Ideal for interior and exterior paint jobs on wood, laminate, plastic/UPVC, metal, concrete, brick, masonry, stone, glass and more.
- EFFECTIVE MONEY & TIME SAVER: A quick painting solution for DIY or professional builders and painters; our luxuriously opaque formula requires just 1 coat and is fast drying for a premium finish.
- ADVANCED ECO FORMULA: Our UK-made chalk paint is water-based, non-toxic, low odor, and has low VOCs for an environmentally friendly decorating choice.
- EASY APPLICATION: Remove dirt with a damp cloth, wipe the surface clean and dry, sand/score the surface (optional based upon the finish required), stir to mix the color and paint with a brush or roller.
Remove tape according to its label, usually while the final coat is still slightly soft rather than after it has fully hardened. If paint has bridged the tape, score the edge lightly with a sharp blade before peeling to avoid lifting the new film.
10. Paint the ceiling first
Start with the ceiling so drips and roller mist cannot ruin finished walls. Brush cornices, ceiling roses and detailed plaster, then use a roller on an extension pole for the broad area. Keep a wet edge and avoid overworking paint as it begins to tack.
Heavy smoke or soot staining may need a stain blocker before the ceiling colour. In bathrooms, laundries and other damp areas, choose a coating whose label specifies moisture resistance and mould-inhibiting properties; ventilation and moisture control remain necessary even with a specialised paint.
11. Clean, test and paint the walls
Vacuum sanding dust from walls, skirtings and the floor, then wash washable surfaces with sugar soap. Rinse or wipe as the cleaner directs and let everything dry completely. Residual cleaner, grease or moisture can cause crawling, poor adhesion or uneven sheen.
Use test pots on the actual wall, not only on a small card. View the patches in daylight and artificial light and at different times of day; nearby flooring and trim can change how a colour appears. Once you choose, cut in around corners and openings with a brush, then roll the larger fields. Work in manageable sections so the brushed edge stays wet when the roller meets it.
Best Value

- WHAT'S IN THIS 10 PIECE PAINT KIT FOR WALLS: includes one plastic paint tray; one 9 inch roller frame; one 4 inch mini roller frame; two 9 inch microfiber roller covers (1/2 inch nap); two 4 inch microfiber roller covers (1/2 inch nap); one 1 inch flat brush; one 1.5 inch angle sash brush; one 2 inch angle sash brush
- Versatile Application: Perfect for any project, this set includes paint rollers 9 inch for large surfaces and smaller brushes for detail work
- All-in-One Kit: This paint brush set and paint tray combo ensures you have all the paint supplies needed for any home improvement task
- Professional Grade: Get a smooth, even finish with our high-quality paint roller set; ideal for applying interior paint gallon or smaller quantities
- Cost-Effective: This paint brush and roller set provides unbeatable value; includes paint pan and paint trays for easy cleanup and reuse
Two topcoats are usual, but the product label controls the final number. Respect its minimum drying time between coats; cool, humid or poorly ventilated rooms take longer. A second coat applied too soon can drag the first, while waiting too long is rarely harmful if the surface remains clean and sound.
12. Choose sheen for the surface, not just the colour
Sheen changes how a wall looks and how readily it reveals preparation marks. Let the paint dry fully before judging the final sheen, because wet film can look glossier or darker than the cured finish.
What’s actually slowing this PC down?
Pick the symptom - the matching free tool is one click away.
| Finish | What it shows | Where it is useful | Decision points |
|---|---|---|---|
| Flat or low-sheen | Helps disguise minor dents, patches and uneven texture | Broad wall and ceiling areas where a softer reflection is preferred | Check the label’s cleaning and durability guidance before using it in a high-touch zone |
| Semi-gloss | Reflects more light and can highlight sanding marks or wavy surfaces | Doors, frames, skirtings and other trim traditionally given a harder-wearing appearance | Requires thorough preparation; confirm scrub resistance and recoat instructions on the product |
| Gloss | Highlights surface defects most strongly because reflections are sharp | Decorative or high-contact trim when a bright, durable look is wanted | Use only on a well-prepared surface and follow the manufacturer’s cleaning guidance |
How much paint do two coats require?
Measure each wall’s width and multiply by its height, add the wall areas, then subtract large doors and windows. The 2021 guide uses about 16 m² per litre as a rough coverage estimate. Divide your net area by 16 to estimate one coat, then multiply by two for two coats.
For example, a 4 m by 3 m room with 2.4 m ceilings has 14 m of perimeter and 33.6 m² of gross wall area. If openings total 5 m², the net area is 28.6 m². At the rough rate, one coat is 28.6 ÷ 16 = 1.79 litres; two coats are about 3.58 litres. Round up to the next available quantity rather than planning to run out on the final wall.
Sixteen square metres per litre is not a promise. Porous filler, textured plaster, a dramatic colour change, application method and the particular product can all alter coverage. Use the selected paint’s stated coverage as the purchasing basis, and keep a small amount sealed for future touch-ups if the label permits.
Common failure points and the practical fix
- Patchy colour: The wall may have been dusty, greasy or unevenly sealed. Clean again, spot-prime absorbent repairs and apply the specified full coat after drying.
- Peeling at an edge: Scrape back to sound paint, feather the boundary, prime if required and repaint. Do not simply feather a loose flap into the new colour.
- Visible roller bands: Keep a wet edge, load the roller evenly and finish sections with light, parallel passes. Excessive back-rolling after the film starts to set creates texture.
- Cracks returning at cornices: Replace rigid filler with a flexible joint product where movement is expected. Persistent or widening cracks warrant building assessment.
- Tannin or smoke bleeding through: Stop adding ordinary topcoat and apply a compatible stain blocker, then observe its required drying and recoating interval.
- Trim paint not sticking: Degrease, dull the gloss, remove sanding dust and use the correct undercoat for the old and new coating types.
- Colour looks wrong after painting: Wait for the finish to cure before deciding. Compare the dried test area in the room’s actual lighting rather than relying on a wet patch or a store card.
A room-by-room work sequence
- Remove or centre furniture, cover floors and take down window coverings.
- Remove fixings, scrape loose paint and complete all crack, hole and gap repairs.
- Let repairs dry, sand where appropriate, vacuum dust and identify the existing coating.
- Prime patched, stained or difficult surfaces and prepare doors and trim.
- Mask edges and protect hardware, switches and fittings.
- Paint the ceiling, including detailed plaster first, then allow it to dry.
- Wash and dry the walls, test colour, cut in and roll the first coat.
- Apply the second coat only after the label’s drying interval, then remove masking carefully.
- Reinstall clean, labelled hardware after the paint has cured enough for normal handling.
Preparation determines whether a colour change looks deliberate or merely covers yesterday’s problems. Matching the coating to the surface, using the ceiling-to-floor order and allowing every repair and coat to dry gives the new colour the best chance of an even, durable finish.
Quick Recap

Product prices and availability are accurate as of the date/time indicated and are subject to change. Any price and availability information displayed on Amazon at the time of purchase will apply.

