Outdated Drivers Are Slowing You Down
Do these 3 things before closing this tab:
1Fix the driver behind crashes, sound loss and screen glitches2Clear out junk files and repair common Windows errors3Scan for outdated or missing drivers - takes under a minuteOutbyte Driver Updater · freeOne free scan finds every outdated or missing driver and matches the right update for your exact hardware.
Scan My Drivers Free →ThatPainter is reader-supported. When you buy through links on our site, we may earn an affiliate commission. Learn More
Crown molding becomes predictable when you control three things: its three-dimensional orientation, the actual angle of each corner, and a test cut made from scrap before you touch finished stock. Keep the ceiling edge and wall edge consistent, choose either a nested or flat compound-saw method, and verify every setup with short offcuts. That approach prevents the classic failures—reversed miters, open corners, and molding that twists away from the wall.
What makes crown molding difficult?
Unlike baseboard, crown molding rests on two planes at once. One edge contacts the wall and the other contacts the ceiling, so turning a board over or changing which face touches the saw fence reverses the cut. A corner that looks like 90 degrees may also be slightly out of square, and a small error becomes obvious across a wide profile.
As an Amazon Associate I earn from qualifying purchases.
Before cutting, identify the molding’s ceiling edge and wall edge with a pencil on the back. Mark every test piece the same way. Keep that orientation when measuring, cutting, dry-fitting, and fastening.
DEWALT’s crown-cutting guidance emphasizes the most important habit: “PRETESTING WITH SCRAP MATERIAL IS EXTREMELY IMPORTANT!” Its example for a 52/38-degree crown at a true 90-degree wall corner uses a 31.62-degree miter and a 33.85-degree bevel when cutting the molding flat. Those numbers apply only to that spring angle, corner angle, and flat-cut setup—not to every profile or saw arrangement. See the DEWALT crown molding guide.
#1 Best Overall

- The Right Cut: Beautiful, seamless-fitting crown molding takes the guesswork out of crown molding
- Many Angles: Adjustable spring base locks anywhere from 30 to 60°; compatible with 10- and 12-inch miter saw
- Crown Molding Cutting Tool: Eliminates compound-angle cuts; cuts molding up to 5 1/2 inches wide
- Angle Finder: Measures exact angle of inside and outside corners; also measures molding spring angle
- Premium Kreg Tools: We offer products that help woodworkers close the gap between idea and outcome
Tools and materials checklist
- Crown molding stock, with enough extra length for test pieces, waste, and scarf joints.
- Compound miter saw appropriate for the molding width, plus the saw manufacturer’s manual. The Makita LS1219 North America instruction manual advises using several test pieces to check saw angles.
- Sharp blade suited to trim work, tape measure, pencil, combination square, and a straightedge.
- Coping saw for shaping inside-corner joints; a fine file or sanding block can refine the back bevel.
- Angle finder for corners that are not square. It helps measure the room, but it does not replace test cuts.
- Stud finder or a way to locate framing, finish nails, nail set, filler, and paintable caulk.
- Clamps or a helper for long pieces, and eye and hearing protection while cutting.
Lay a short offcut beside the saw before making a full-length cut. Label the offcut “wall” and “ceiling,” and draw an arrow showing the direction the piece will run. This physical reference is more reliable than trying to remember a diagram.
Measure each wall and plan the joint order
Measure every wall run independently at the molding’s installation height. Do not assume a rectangular room has four identical 90-degree corners. Record which corners are inside and which project outward, and note obstacles such as door casings, beams, or a change in ceiling height.
- Sketch the room and number the wall runs in the order you intend to install them.
- Mark the ceiling and wall ends of each run on your sketch. Include the direction of every corner.
- Add material for waste, test cuts, and any scarf joint. Long runs should not be cut to the exact measured distance on the first attempt.
- Choose a prominent wall for the first piece and place joints where they can be fastened to framing and viewed least often.
- Transfer measurements to the molding’s back, keeping the same reference edge throughout.
For a piece that terminates at a corner, decide whether your measurement describes the short point or the long point of the cut. Inside-corner coping usually starts with a square-ended piece; outside miters are measured to their long points.
Choose one cutting setup and do not mix its angle charts
Two common methods are valid, but they hold the molding differently. A miter and bevel value from one method cannot be transferred to the other.
Rank #2
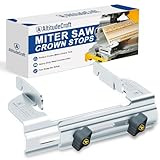
- Simplify Complex Cutting: Streamlines crown cutting by allowing for precise 45° miter cuts (nested method) without needing the saw’s bevel adjustment. This avoids the confusion of complex 31.6°/33.9° geometry, ensuring fast and tight joints with fewer test pieces and less wasted trim
- Guaranteed Repeatable Accuracy: Heavy-duty metal stops mechanically secure the Crown Molding Jig setup in the exact spring angle (upside down and backwards). This prevents the material from rolling or shifting during cutting, delivering consistent cuts and professional-looking joints, even on long runs
- Custom DEWALT Fitment & Quick Setup: ⚠️ IMPORTANT: Please check the compatibility list carefully before purchasing. Designed to fit ONLY specific factory-compatible saws, including DW702, DW703, DW706, DW708, DW712, DW713, DW715, DW716, DW717, DW718, and DWS780. Other brands or unlisted models are either incompatible or will require custom drilling to fit. Installs in seconds with the included Clip Nuts and knobs, supporting both threaded and pre-existing non-threaded mounting holes without requiring drilling
- Heavy-Duty Galvanized Steel: Constructed from reinforced, rust-proof galvanized steel. This pro-grade material maintains peak rigidity under jobsite use, providing rock-solid support where cheap jigs fail, ensuring long-term durability
- Versatile Stop Block System: Beyond Crown Molding Jig applications, these stops provide necessary stability for tall baseboards, casing, and trim, acting as a reliable vertical fence support. Easily adjustable and simple to remove or slide out of the way to switch back to flat cutting instantly
| Setup | How the molding is held | What to verify | Best use |
|---|---|---|---|
| Nested (upright) | The molding sits against the saw fence and table in the same relationship it will have against the wall and ceiling. The fence-contact edge and face remain consistent. | Confirm which end is the ceiling edge, which end is the wall edge, and whether the saw is cutting the left or right end. | Fast repeated cuts when the saw and profile fit securely in the nested position. |
| Flat compound | The broad back of the molding lies flat on the saw table. The saw uses both miter and bevel adjustments to recreate the spring angle. | Set the actual spring angle and corner angle, then prove the result with a labeled scrap. | Profiles that are awkward or unsafe to nest, provided the saw has the required bevel capacity. |
Use the instructions for your specific saw when setting stops, bevels, and fences. The DEWALT method illustrates flat compound cutting; the Makita manual supplies model-specific operating guidance. Never read a flat-cut chart while the molding is nested, or vice versa.
Set the angles, then test on scrap
The spring angle is the angle between the back of the molding and the wall or ceiling when installed. Common profiles are sold with different spring angles, so measure yours or use the manufacturer’s specification. A 90-degree wall corner is an assumption, not a measurement.
The Tool Desk
Outbyte Driver Updater FREEScan for outdated or missing drivers - takes under a minuteDriver Scan →Outbyte PC Repair FREERepair Windows errors before they cause bigger problemsFix Now →- Measure the corner with an angle finder when it is visibly open, closed, or irregular. Divide the measured corner angle between the two adjoining pieces according to your saw method.
- Set the miter and bevel (for a flat compound cut) or the miter alone (for a nested cut), following the saw manual.
- Cut two short scraps with the same ceiling-edge and wall-edge marks as the finished pieces.
- Hold the scraps in the corner exactly as they will be installed. Check the face, top, and bottom edges—not just the visible front.
- Adjust one variable at a time and recut scraps until the joint closes. Keep the successful scraps as a setup gauge for the rest of that corner.
For reference, DEWALT gives 31.62 degrees of miter and 33.85 degrees of bevel for a 52/38-degree crown, flat-cut against a 90-degree corner. Treat those as an example of a specified setup, not a universal recipe. Walls, spring angles, and saw scales vary.
How do you cut crown molding inside corners?
The most forgiving inside-corner joint for many wood profiles is a coped joint. One piece ends square in the corner; the adjoining piece is shaped to follow the first piece’s face. Coping is normally used on inside corners, not outside corners.
Rank #3
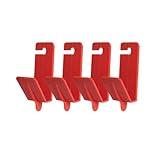
- Professional Solution - FastCap's Crown Molding Clip, designed by a seasoned cabinet maker, streamlines the crown molding installation process, eliminating struggle and making your job easier.
- Durable Construction - Made from sturdy nylon, the Crown Molding Clip provides a reliable solution that can withstand the rigors of continuous use and tough installation jobs.
- Easy to Install and Remove - The Crown Molding Clip is designed for ease-of-use. Its simple installation process and pinch-to-tab removal feature save time and effort.
- Versatile Use - This clip is perfect for a variety of projects, making it an ideal tool for both remodels and general trim installations.
- Efficiency Booster - The Crown Molding Clip not only simplifies installation but also improves work efficiency, making it an invaluable addition to any tool kit.
Install the first piece square
Cut the first wall run with a square end at the inside corner. Fit its wall and ceiling edges, then fasten it while keeping the piece straight. Leave the opposite end ready for its next joint.
Expose the profile on the adjoining piece
Cut the second piece at approximately 45 degrees so the front face shows the molding’s profile. The cut face becomes a clear line to follow; it is not the final joint by itself.
Mark and cope the waste
- Place the second piece against the first and transfer the profile line to the face.
- With a coping saw, remove the material behind the profile line. Keep the saw slightly tilted to create a small back bevel; the visible front edge should remain on the line.
- Refine tight spots with a file or sanding block, then test-fit the piece against the installed square end.
- Trim the back gradually until the profile nests without forcing the molding away from the wall or ceiling.
Different profiles have different curves and flats, so let the actual cut face guide your coping line. A coped joint can hide small changes in an inside angle better than a miter, but it takes more hand work and is most practical with materials that cut cleanly.
How do I measure an outside corner?
An outside corner is measured to the long point because the molding wraps around the projecting point. A practical method described by Fine Homebuilding is to use a scrap of the same profile: hold it at the ceiling on one wall, trace the top edge onto that ceiling plane, repeat on the adjoining plane, and measure to the intersection of those lines. That intersection establishes the long point for the outside joint.
Rank #4

- EVERYTHING YOU NEED IN ONE BOX - Skip the hardware-store guesswork. Five matched supplies to install and finish up to 80 feet of Creative Crown foam crown molding, curated so you're ready the day your molding arrives. This is a finishing supply kit only; crown molding is not included.
- SEAL GAPS FOR A SEAMLESS LOOK - Paintable acrylic latex caulk closes the lines where molding meets the ceiling and wall, and the 3-in-1 caulk tool lets you apply, smooth, and shape a clean professional bead without the mess.
- FILL SEAMS AND GAPS FOR AN INVISIBLE FINISH - The pink-to-white filler closes butt-joints between lengths, corner gaps, and any fastener holes, so seams disappear under paint. Goes on pink, dries white, so you know exactly when it's ready.
- SMOOTH FOR A FLAWLESS SEAM - Very-fine 220-grit sheets and a contour sanding sponge lightly knock down filled joints and touch-ups, so finished corners look factory-clean. Only where you fill, no sanding the molding face.
- MADE FOR FOAM CROWN MOLDING, MADE IN THE USA - Sized and matched for all six Creative Crown profiles - Angelo, Bennett, Carson, Duncan, Engel, and Fairchild - in every kit size, and for lightweight foam crown molding that installs cleaner and faster than wood. From the first bead of caulk to final sanding, this kit takes your trim to a flawless, paint-ready finish.
Cut and fit the opposing miters
- Transfer the long-point measurement to the correctly oriented molding.
- Cut the first outside miter, then cut the opposing miter on the adjoining piece. Keep the ceiling and wall marks visible until the fit is proven.
- Dry-fit both pieces around the corner. If the corner is not exactly 90 degrees, adjust the cut based on the measured angle and another pair of scraps.
- Fasten only after the front profile, top edge, and bottom edge all meet cleanly.
Can you cope an outside corner? Coping is designed to follow a profile into an inside corner. An outside corner needs two opposing miters so the visible faces wrap around the projection; coping one side does not create that wrap.
Join runs longer than your stock
When a wall exceeds the length of available molding, use a scarf joint rather than butting two square ends together. A scarf uses opposing angled cuts, creating more glue and fastening area while making the seam less conspicuous.
- Place the scarf where it is least noticeable and, where possible, over a stud or another solid nailing point.
- Cut both pieces with the same orientation marks and test the seam on the floor.
- Install the first piece securely, then fit and fasten the second while keeping the joint tight.
- Do not rely on filler to correct a joint that is misaligned or unsupported.
This Old House’s installation guidance also recommends planning joints and fastening points before installation.
Independent reader supportYour contribution helps us test, update, and keep practical guides available for everyone.Fasten, fill, and caulk without hiding problems
Once a joint fits dry, position the molding so both reference edges contact their planes. Fasten into framing or other solid backing using finish nails appropriate to the molding and substrate. Drive heads slightly below the surface and use a nail set where needed.
Best Value

- LED Baseboard Molding with Integrated Duct: each package includes 16 pcs pre-cut crown moulding with LED light channels, totaling 63 ft/ 19.2 m in length; Each piece measures about 47.24 inch/ 1.2m; This baseboard molding is ideal for ceiling LED baseboard lighting, baseboard LED trim, or indirect lighting setups in modern homes( Glue Not Include)
- Customizable Paint Finish & Waterproof: our white crown moulding can be painted to match your style and paired with various LED lights to add a personalized touch to your home; Its waterproof surface makes it ideal for bathroom LED molding or Ceiling or floor baseboard molding
- Polystyrene Crown Moulding: quality LED crown moulding with integrated light channels; Lightweight, sturdy, and easy to install; Its versatile design is suitable for adding soft ambient lighting and a modern aesthetic to any room
- Easy Installation Process: designed for hassle-free installation, our ceiling crown molding adds a polished finish to your walls; Sturdy fit ideal for baseboard LED light strip applications along walls, floors, or standard skirting boards; Ideal for both beginners and experienced DIY enthusiasts; Note: adhesives or glue are not included in the package
- Suit for LED Light Integration in Any Space: whether you're upgrading to baseboards with LED lights or adding crown molding LED lights, this LED base board molding is compatible with most standard LED light strips and skirting trims
- Start with the corner or joint that establishes the piece’s position.
- Work along the run, checking the wall and ceiling edges as you go so a bowed wall does not pull the profile out of alignment.
- At a scarf joint, secure both pieces near the seam and at additional framing points.
- Fill nail holes after the adhesive or fasteners have stabilized the molding.
- Apply paintable caulk only to small, appropriate gaps at the wall and ceiling or at a joint that is otherwise correctly fitted.
- Sand filler smooth, prime bare wood or MDF as required by the finish system, and apply the final coats.
Caulk should not be used to disguise a reversed cut, a large open miter, or molding that is not fastened. Correct the fit first, then use filler and caulk for finish-level imperfections.
Choose molding material for the room and finish
| Material | Strengths | Planning considerations |
|---|---|---|
| Wood | Can be stained or painted and is available in many profiles. | Movement, knots, and grain can affect joints and finishing; allow for careful fitting. |
| MDF | Uniform surface and commonly used for painted trim. | Protect cut edges from moisture and follow the finish manufacturer’s preparation requirements. |
| PVC | Lowe’s guide identifies PVC as a waterproof option for bathroom wall molding. | This is retailer guidance, not a universal code or performance guarantee. Confirm that the specific product, adhesive, and finish are rated for the room. |
| Corner blocks | Allow straight cuts at inside or outside corners and can simplify installation. | They change the look of the trim and require enough flat wall space for the block to sit correctly. |
Wood, MDF, PVC, and corner-block approaches each trade cutting effort, moisture tolerance, appearance, and finishing requirements. Select the profile and material together; a joint method that works beautifully on one stock can be difficult on another.
Quick wins for a faster PC:
Clear out junk files and repair common Windows errorsFree Scan →Fix the driver behind crashes, sound loss and screen glitchesFind Drivers →Repair Windows errors before they cause bigger problemsFix Now →When an alignment jig helps
An optional positioning jig can hold crown at a repeatable spring angle while you cut. Kreg’s current Crown-Pro specification lists capacity for molding up to 5 1/2 inches wide, spring angles from 30 to 60 degrees, and compatibility with 10- and 12-inch miter saws. The maker notes that actual saw capacity depends on the manufacturer, and lists a three-year limited warranty. Check the current Crown-Pro specification page before relying on those limits or warranty terms.
A jig does not measure your room or correct an incorrect spring-angle assumption. Use it to hold the molding consistently, then make and inspect the same scrap tests you would make without it.
Troubleshoot the common failures
- Joint opens at the front: Recheck whether one piece was flipped or whether the cut was made for the opposite end. Recreate the joint with labeled scraps before touching the installed pieces.
- Top edge touches but bottom edge gaps: The spring angle or bevel is wrong, or the wall and ceiling are not in the assumed planes. Measure the profile and corner, then retest.
- Inside cope rocks: More waste remains behind the profile, or the back bevel is too small. Remove material gradually and keep the visible edge on the profile line.
- Outside corner is short: The measurement was taken to the short point instead of the long point. Re-establish the ceiling-line intersection with a profile scrap.
- Long seam telegraphs through paint: The scarf is unsupported, misaligned, or filled before the pieces were secured. Refasten at framing and remake the seam if necessary.
- Caulk line keeps cracking: The molding is moving or the gap is too large for caulk. Correct the fastening or fit rather than adding another layer.
A repeatable workflow for the whole room
- Mark each molding’s wall and ceiling edges.
- Measure every wall run and record inside, outside, and scarf locations.
- Choose nested or flat compound cutting based on the saw, profile, and your comfort level.
- Measure unusual corners and identify the spring angle.
- Make labeled scrap tests for every new corner or setup.
- Install square-ended and coped inside-corner pieces in the planned order.
- Measure outside corners to the long point and use opposing miters.
- Use scarf joints over framing when stock is shorter than a run.
- Fasten, fill, caulk, sand, prime, and paint only after the dry-fit joints are sound.
The result is not dependent on memorizing one angle chart. It comes from maintaining orientation, measuring the actual room, and proving each cut on scrap before committing your finished molding.
Quick Recap

Product prices and availability are accurate as of the date/time indicated and are subject to change. Any price and availability information displayed on Amazon at the time of purchase will apply.
Do these 3 things before closing this tab:
1Clear out junk files and repair common Windows errors2Scan for outdated or missing drivers - takes under a minute3Repair Windows errors before they cause bigger problems
