Recommended Free Tools
PC Slower Than It Used to Be?
Free scan · Windows 10 & 11
Crashes, No Sound, or Screen Glitches?
Free scan · under a minute
Windows Errors? Fix Them Before They Spread
Free scan · no reinstall
ThatPainter is reader-supported. When you buy through links on our site, we may earn an affiliate commission. Learn More
DIY animatronic eyes use hobby servos to pivot a lightweight eyeball, usually across two axes. For a first prototype, a ping-pong ball and cardboard bracket can demonstrate the basic gimbal; printed mechanisms add integrated frames, linkages, and sometimes moving eyelids. Choose the movement you want before choosing servos, electronics, or a power supply: there is no single parts list that fits every design.
As an Amazon Associate I earn from qualifying purchases.
Choose a mechanism for the movement you want
Start by deciding which parts should move: one eye or both, left-right and up-down gaze, eyelids, and possibly a larger face or neck. Then choose a mechanism that can provide those movements. In a two-axis gimbal, one servo turns the eye horizontally while a second, nested axis moves it vertically. Linkages can distribute motion to both eyes or operate eyelids.
| Approach | Fabrication | Movement and control | Trade-off |
|---|---|---|---|
| Cardboard gimbal | Ping-pong ball, cardboard bracket, glue, and two nested servo axes | Two-axis eye movement; the Adafruit tutorial focuses on making the eye and mechanism | Simple to prototype, but pivot alignment still matters. Adafruit’s eye and mechanism guide |
| Printed servo linkage | Printed eyes, frame, or eyelids, plus rods or wire linkages | Can coordinate multiple axes or eyelids; servo count depends on the design | More integrated geometry, but requires printed parts and careful assembly. Tinkster’s printed design |
| Kit-based assembly | Parts supplied for the selected kit configuration | Greene Robotics documents joystick and wireless control variants, with optional neck motion | Guided assembly can help, but check the kit’s configuration and availability. Greene Robotics’ kit guide |
| Sensor-triggered prop | Printed face, servos, controller, PIR sensor, and optional audio hardware | Can trigger eye, eyelid, and audio actions from motion detection | Adds sensing, wiring, code, and audio setup beyond basic eye movement. Arduino Project Hub example |
These are different projects, not interchangeable recipes. A two-servo gimbal is a useful starting point for learning eye movement; a multi-servo face or sensor-triggered prop solves a broader problem and needs more parts and setup.
#1 Best Overall
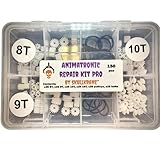
- x25 8T gears
- x25 9T gears
- x25 10T gears
- x25 pulley gears
- x25 small rubber belts
Gather parts to match the design
A basic cardboard proof of concept needs an eyeball, a bracket, servo(s), and a way to command them. Adafruit’s example uses a white ping-pong ball, markers for the pupil and iris, a servo horn glued to the ball, a micro servo, and a cardboard bracket attached to a full-size servo. A 3D printer is not required for this approach.
For printed builds, dimensions and mechanisms determine the parts. Tinkster’s listed project uses six SG90 or MG90S servos, a 5V 3A supply, 1 mm steel linkage wire, M3 screws, heat-set inserts, a USB-C panel connector, jumper wires, and PLA prints. These are specifications for that project, not a universal requirement. The build by Will Cogley lists six SG90 micro servos, an Arduino Uno, a 16-channel servo driver, a 5V supply described as around 4A, a joystick, jumper wires, screws, and filament; those details likewise apply to that specific build. Will Cogley’s 2019 project description
The Tool Desk
Outbyte PC Repair FREERepair Windows errors before they cause bigger problemsFix Now →Outbyte Driver Updater FREEScan for outdated or missing drivers - takes under a minuteDriver Scan →Rank #2

- Expressive Blinking Puppet Eyes: Puppet eyes provide realistic blinking eyes with soft natural movement, creating an anthropomorphic look for plush toys. This doll accessory adds lively charm, great for handmade dolls and puppet shows
- Doll Restoration Fake Eye: Designed for doll restoration, this fake eyeball combines scratch-safe doll fabric with a flexible, durable eye mechanism to deliver a smooth repeated blink action, providing a reliable old eye replacement for doll making and repair supply needs
- Parent-Child Craft Activity Must-Have: Craft eyeballs serve as a versatile doll eye accessory, perfect for craft project themed decor and engaging parent child craft activity. Their easy eye part installation ensures compatibility with plush and cloth dolls, adding charm to DIY creations
- Bunny Eyes Creative Gift Kit: This bunny eyes creative handmade gift kit offers a movable eye craft surprise, enabling you to build blinking doll making fun. As a thoughtful present, it is perfect for holiday gift hobby share, sparking creativity and joy during holiday crafting
- Complete Doll Eye Replacement Set: This doll eye replacement kit and creative toy repair accessory gives each plush toy a lively expression; its smart movable doll eyes include wireless blink control eyes, making them ideal for stuffed animal restoration and puppet crafting
A separate Arduino Project Hub face build, dated September 30, 2024, lists an Arduino Nano, five MG90S servos, a PIR sensor, a 3D printer, and optional audio playback hardware. Its servos are assigned to eye and eyelid motion. Do not combine the component counts or power examples from these projects into one assumed bill of materials.
- Servos: Pick sizes that physically fit the mechanism and can handle its moving parts. SG90 and MG90S appear in the cited builds, but those names alone do not establish compatibility with every frame or load.
- Controller: A microcontroller can run programmed movement or accept manual input. Builds with several servos may use a separate multi-channel servo driver, as in Cogley’s example.
- Power: Use the supply specified for your chosen design and servo load. The cited printed builds give different examples—5V 3A for Tinkster’s project and around 5V 4A in Cogley’s description—rather than a universal current rating.
- Fabrication and hardware: Printed mechanisms need access to the design’s printed parts and specified fasteners or linkage material. A cardboard prototype avoids that requirement.
Build and align the eye mechanism
- Make the eyeball. For the cardboard prototype, mark a white ping-pong ball with a pupil and iris, then attach a servo horn to the ball as shown in the Adafruit construction guide.
- Set servo neutral positions before attaching horns. Put each servo shaft at its intended center position before fixing the horn or linkage. If a horn was attached off-center, Adafruit advises finding the center positions and reconnecting the bracket and eyeball.
- Align the pivots. In Adafruit’s gimbal, a micro servo for left-right movement sits on a full-size servo for up-down movement. The eye’s pivot must line up with the full-size servo shaft; the axes should be arranged so the eye turns around its intended center rather than being dragged through an arc.
- Move the mechanism through its intended range before finishing. Check for binding and interference before adding cosmetic parts or fully tightening fasteners. Greene Robotics warns that tight screws can restrict movement or stress motors; keep retainers secure without pinching moving parts.
- Secure and route the build. Support the bracket or printed frame and route wires clear of the eye and linkages so movement cannot snag them.
Servo shafts and gears can be damaged by force. Greene Robotics cautions against manually moving servos; use the controller and follow the instructions for the selected servo and mechanism instead.
Rank #3

- x3 brass 8T gears
- x3 brass 9T gears
- x3 brass 10T gears
- x3 plastic pulley gears
- x3 small rubber belts
Choose how to control the eyes
A controller can issue preset positions or respond to a manual input such as a joystick. More elaborate projects can coordinate eyes with eyelids, audio, or a sensor. In the Arduino Project Hub face example, a PIR sensor is used to trigger eye, eyelid, and audio actions. That sensing layer is optional: it is not needed to build a basic moving eye.
Plan control alongside the mechanism. Count the axes and any eyelid or other movements, then check that the chosen controller and any driver can serve them. Also make sure the selected design’s power arrangement suits its servos; the cited project examples differ, so one project’s supply should not be treated as a specification for another.
What’s actually slowing this PC down?
Pick the symptom - the matching free tool is one click away.
Troubleshoot binding or uneven movement
- The eye cannot reach its intended position: Check that the eye pivot and servo shaft are aligned, and that the bracket or frame does not obstruct travel.
- The motion is rough or stalls: Inspect linkages and fasteners for friction or interference. Loosen any screw that is pinching a moving part, then test the intended range again.
- The motion is miscentered: Recheck servo neutral positions and horn placement. Reattach horns or linkages with the shafts at the intended center.
- A servo is under strain: Do not force its shaft by hand. Stop the mechanism and correct alignment or interference before commanding further movement.
- Wires catch during motion: Reroute them away from the moving eye, horns, and linkages, then test the full intended travel.
Sources and scope
The cardboard gimbal instructions and pivot-alignment advice are from Adafruit’s tutorial, last edited March 8, 2024. The printed parts list is from Tinkster’s project page, whose publication date is not stated there. The sensor-triggered face example is dated September 30, 2024, and Will Cogley’s six-servo project description was published November 5, 2019. Greene Robotics documents kit assembly and cautions about screw tightness and manually forcing servos. The counts and power examples above are project-specific, not general ratings.
Quick Recap

Product prices and availability are accurate as of the date/time indicated and are subject to change. Any price and availability information displayed on Amazon at the time of purchase will apply.




