The Tool Desk
Free tools Windows power users keep installed
One-click scans. No signup required.
Outbyte Driver Updater FREEScan for outdated or missing drivers - takes under a minuteDriver Scan →Outbyte PC Repair FREERepair Windows errors before they cause bigger problemsFix Now →
ThatPainter is reader-supported. When you buy through links on our site, we may earn an affiliate commission. Learn More
You can make a concrete lamp at home by casting a fine concrete mix around a secured inner mold, leaving a protected route for the cord, curing the casting fully, then installing a socket-and-cord assembly. Disposable bottles, cartons, or reusable boxes provide inexpensive molds for pendant and table-lamp designs.
Choose the lamp design and mold
The mold determines the lamp’s shape and the position of its electrical parts. Decide where the socket, threaded tube, cord, and any switch will sit before mixing concrete.
Pendant lamp from bottles
Use a large soda bottle as the outer form and a smaller water bottle as the inner void former. The gap between them becomes the concrete shade. Cut or drill the openings needed for the threaded tube or cord, and plan how the bottle will be removed after curing.
Box or table lamp from a carton
A milk carton can serve as the outer mold, with a plastic bottle or food container inside to create the cavity. Sealed wood or plastic boxes are better when you want a reusable form or a consistent series of lamps.
#1 Best Overall

- EXTRA LONG 12 FOOT CORD & QUALITY HARDWARE SET Included - A 12ft Electric Cord with polarized plug fit both Table Lamp and Floor Lamp Making / Repair. Wire ends are fitted with U-shaped connector,which make connection work simple .Qualified hardwares have good color matching and looks upgraded.
- UPGRADED LAMP PARTS IN COMPLETE LAMP SET - The kit includes a 3-way turn knob socket,a 12ft cord,a 8" lamp shade harp,a brass switch knob replacement, 4 kinds of washers and hex nuts, 1 brass pipe coupling, and 3 options of nipples -8", 2.5" ,0.8" for your different assembly needs. All essential parts included.
- UL LISTED ELECTRICAL COMPONENTS -Both the electric cord and the light socket are UL listed. Safe material for electrical installation.
- APPLICATION- Making & fixing table or floor Lamps;repair & rewire vintage lighting fixtures;create your own unique lamp from scratch or to repair an old one;ideal for creating new lamps from vases, bottles, or items with threaded openings.
- WITH INSTRUCTIONS to guide you assembly process. No matter repair a vintage lamp or make a new custom lighting,you will have clear idea on each step through the wiring instructions.
| Design | Typical mold approach | Best suited to | Important planning point |
|---|---|---|---|
| Pendant | Large soda bottle around a smaller water bottle | A hollow shade suspended from a cord | Align the top opening and secure the inner bottle against floating |
| Box/table lamp | Milk carton or reusable box around a plastic inner mold | A heavy freestanding base or block-shaped lamp | Provide a straight cord route and a stable footprint |
Materials, tools, and protective equipment
- Fine concrete or QUIKRETE 5000 concrete mix
- Outer and inner molds: soda bottle, water bottle, milk carton, plastic food container, or sealed wood box
- Lamp socket, two-conductor cord, plug, and optional inline switch
- Threaded tube, nuts, screws, caulk or silicone, tape, and a cord-protection sleeve where appropriate
- Mixing bucket, spoon or trowel, wire cutters and strippers, screwdriver, box cutter or scissors, drill, 120-grit sandpaper, and masonry bits for optional holes
- Waterproof gloves and safety glasses; use a particulate dust mask or respirator when handling dry powdered mix
QUIKRETE’s official project instructions state: “When working with cement-based products, always wear eye protection and waterproof gloves.” Keep dry powder away from your breathing zone and wash exposed skin promptly.
Prepare and secure the mold
- Cut the openings. Make openings for the threaded tube, cord, or socket hardware while the disposable mold is still easy to work. Size each opening to the part that will pass through it.
- Seal leaks. Use caulk, silicone, or tape at seams and around cord openings where wet mix could escape. A sealed mold also produces cleaner edges.
- Fix the inner mold in place. Center it and brace it so it cannot shift or float when concrete is poured. Screws, a threaded tube, a temporary support, or a taped fixture can hold the alignment.
- Protect the cord path. Use a sleeve or other protection where the cable passes through concrete. Keep the route clear of sharp edges and avoid trapping the finished cord in the casting unless the component is designed for that use.
Mix and cast the concrete
Use the package water ratio
Measure water according to the selected concrete’s label rather than improvising. A fine concrete mix generally fills small lamp molds more cleanly than a coarse aggregate mix, but the product directions control the correct consistency and handling time.
Fill corners and remove trapped air
- Put on waterproof gloves and eye protection before opening or mixing the product.
- Mix in a bucket with a spoon or trowel until the material is uniform and workable.
- Spoon or pour the mix into the outer mold in stages, pushing it into corners around the inner mold.
- Tap or gently vibrate the mold repeatedly. This helps release air pockets that otherwise become voids or weak-looking pits on the surface.
- Check that the inner mold and cord-path hardware have not moved before leaving the casting undisturbed.
Cure before demolding
Do not judge readiness by the surface alone. Follow the concrete product’s instructions and the project’s curing time, allowing extra time for thick sections.
Rank #2

- EXTRA LONG 12 FOOT CORD & QUALITY HARDWARE SET Included - A 12ft Electric Cord with polarized plug fit both Table Lamp and Floor Lamp Making / Repair. Wire ends are fitted with U-shaped connector,which make connection work simple .Qualified hardwares have good color matching and looks upgraded.
- UPGRADED LAMP PARTS IN COMPLETE LAMP SET - The kit includes a 3-way turn knob socket,a 12ft cord,a 8" lamp shade harp,a brass switch knob replacement, 4 kinds of washers and hex nuts, 1 brass pipe coupling, and 3 options of nipples -8", 2.5" ,0.8" for your different assembly needs. All essential parts included.
- UL LISTED ELECTRICAL COMPONENTS -Both the electric cord and the light socket are UL listed. Safe material for electrical installation.
- APPLICATION- Making & fixing table or floor Lamps;repair & rewire vintage lighting fixtures;create your own unique lamp from scratch or to repair an old one;ideal for creating new lamps from vases, bottles, or items with threaded openings.
- WITH INSTRUCTIONS to guide you assembly process. No matter repair a vintage lamp or make a new custom lighting,you will have clear idea on each step through the wiring instructions.
| Project example | Stated minimum before demolding | How to apply it |
|---|---|---|
| QUIKRETE pendant project | At least 20 hours | Use this only when it matches the selected product and the casting is adequately hardened |
| QUIKRETE box-lamp project | 48 hours | Allow the longer period for a substantial box-shaped casting |
| Another cited tutorial | 48 hours | Use a longer wait when the casting is thick or still feels vulnerable |
Keep the mold still during curing. Removing it too early can chip corners, deform thin walls, or damage the inner cavity.
Demold, sand, and add details
Remove disposable forms carefully
Cut bottles or cartons away with a box cutter or scissors rather than levering against the concrete. For reusable molds, loosen the sides gradually and support the casting’s edges.
Refine the surface
Sand rough edges with 120-grit paper, as specified in the QUIKRETE pendant instructions. Work slowly around openings so you do not widen them or thin a wall. Wipe away dust before installing electrical parts.
Rank #3

- 🛠️ ALL-IN-ONE DIY LAMP KIT: Our kit includes everything you need to create a custom lamp or refurbish an old one. Perfect for adding a personal touch to your space.
- ⏰ QUICK & EASY ASSEMBLY: With all parts included and clear, step-by-step instructions, you can create or restore a lamp in minutes.
- 🔩 COMPLETE SET OF COMPONENTS: The kit includes an 8-inch harp with base and finial cap knob, a 3-way socket, an 8-foot cord, and necessary hardware.
- 💡 UL LISTED & SAFE: Our cord set and fittings are UL Listed for your safety. A 75-watt max household bulb is recommended.
- 🎨 ANTIQUE BRASS FINISH: The components come in a sophisticated antique brass finish, offering a vintage touch to your lamps.
Drill decorative holes only after curing
Use masonry bits on fully cured concrete if you want perforations or a patterned shade. QUIKRETE’s box-lamp instructions advise leaving at least 3/4 inch between holes to reduce the chance of breakage. Do not drill near an opening, edge, or cord route where the remaining wall would be too thin.
Quick wins for a faster PC:
Clear out junk files and repair common Windows errorsFree Scan →Fix the driver behind crashes, sound loss and screen glitchesFind Drivers →Repair Windows errors before they cause bigger problemsFix Now →Install the socket, cord, and switch
- Keep the fixture unplugged. Perform every wiring operation with the plug disconnected from power.
- Thread the cord and hardware. Pass the cord through the protected route, fit the threaded tube or socket hardware, and tighten nuts without crushing the concrete.
- Connect the socket and switch. Follow the instructions supplied with the specific socket, cord, and switch. Preserve the intended polarity and terminal arrangement.
- Add strain relief. The cord must be secured so pulling on the cable cannot transfer force to the socket terminals or concrete edge.
- Inspect before powering. Check for exposed conductors, pinched insulation, loose terminals, sharp concrete edges, and a stable base or suspension point.
Mains wiring and local electrical requirements vary by location and component. If you are not comfortable identifying conductors, making connections, or checking strain relief, have a qualified electrician complete or inspect the wiring. Do not plug in a lamp with damaged insulation or uncertain connections.
Protect furniture and the finished concrete
A concrete sealer can reduce dusting and staining, but select one compatible with the product and intended indoor use. Let the sealer cure as directed before placing the lamp on furniture. Attach felt pads beneath a table-lamp base to prevent scratches and make the heavy lamp easier to move.
Rank #4
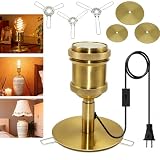
- 3 Table Lamp Bases in Different Sizes—Compatible with various ceramic vase and vase: Having studied the opening sizes of most ceramic jars, vases and decorative bottles, we have designed 3 metal bases with different diameters (6cm, 9cm and 12cm). Whether you’re using a narrow-necked vase or a wide-necked ceramic vase, this table lamp fitting will sit securely on the opening, providing you with a warm glow
- Retractable Metal Clamp—No complicated installation required: The table lamp base features a retractable metal clamp, designed to fit various hole sizes, allowing it to slide easily into ceramic vases or other containers, providing secure support for the lamp without damaging the vessel. No drilling, no tools, and no need for a professional. Simply select the right size base , place it over the mouth of the bottle, and transform your decorative bottle into a practical table lamp
- Table Lamp & Vase-Lamp Conversion Kit — One lamp, multiple uses: The E27 lamp kit can be placed directly on a table to serve as a table lamp(as a bedside lamp in the bedroom, a night light in the hallway, a reading lamp in the study, or a task light in the office...) The lamp kit can also transform vases, ceramic jars, or other decorative containers into a beautiful, unique lamp that is all your own. Furthermore, with metal adhesive, you can also attach it to walls to use as a wall lamp
- Metal E27 Lamp Holder — Install lampshade: Metal light socket, heat-resistant and it will not melt. The E27 bulb holder is fitted with a locking ring, allowing for the secure attachment of any style of lampshade (bulb not included). Whether you’re looking for an industrial metal shade, a minimalist paper shade or a boho woven shade, our table lamp kit has you covered. This table lamp base is compatible with all types of E26/E27 bulbs (bulb not included) and is simple to use
- 240cm Lamp Cable & Available in Multiple Colours—Unrestricted use: The 240cm lamp cable with switch and plug, offering a practical length that is neither too short to be restrictive nor too long to take up unnecessary space on your desk, thus saving space. The plug design allows for plug and play use, requiring no installation. It features a built-in toggle switch for ease of use. Available in various colours, allowing you to choose the favorite desk lamp to complement your décor
Troubleshoot common casting problems
Voids and pinholes
Insufficient tapping, dry mix, or unfilled corners can leave air pockets. For the next casting, work the mix into narrow spaces and vibrate the mold more consistently.
Cracked or chipped edges
Premature demolding, thin walls, or holes placed too close together are common causes. Allow the full curing period, support edges while removing the mold, and keep decorative holes at least 3/4 inch apart where that project guidance applies.
Recommended Free Tools
Inner mold moved or floated
Wet concrete can lift an unsecured bottle or container. Brace the inner mold before pouring and recheck its position after each fill stage.
Best Value
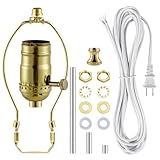
- EXTRA LONG 12 FOOT CORD & QUALITY HARDWARE SET Included - A 12ft Electric Cord with polarized plug fit both Table Lamp and Floor Lamp Making / Repair. Wire ends are fitted with U-shaped connector,which make connection work simple .Qualified hardwares have good color matching and looks upgraded.
- UPGRADED LAMP PARTS IN COMPLETE LAMP SET - The kit includes a 3-way turn knob socket,a 12ft cord,a 8" lamp shade harp,a brass switch knob replacement, 4 kinds of washers and hex nuts, 1 brass pipe coupling, and 3 options of nipples -8", 2.5" ,0.8" for your different assembly needs. All essential parts included.
- UL LISTED ELECTRICAL COMPONENTS -Both the electric cord and the light socket are UL listed. Safe material for electrical installation.
- APPLICATION- Making & fixing table or floor Lamps;repair & rewire vintage lighting fixtures;create your own unique lamp from scratch or to repair an old one;ideal for creating new lamps from vases, bottles, or items with threaded openings.
- WITH INSTRUCTIONS to guide you assembly process. No matter repair a vintage lamp or make a new custom lighting,you will have clear idea on each step through the wiring instructions.
Cord or socket does not sit securely
Openings that are oversized, unprotected, or poorly aligned can let hardware wobble or abrade insulation. Use the correct threaded tube, nuts, sleeve, and strain relief, and repair the casting before connecting power.
Design choices worth comparing
- Form: Pendant shades emphasize a hollow, suspended shape; box lamps provide a broad, stable base.
- Mold reusability: Bottles and cartons are inexpensive for one-offs; sealed wood or plastic molds suit repeat builds.
- Finish: A naturally rough surface shows the casting process, while sanding and sealing produce a cleaner furniture finish.
- Drilling detail: Decorative perforations add light patterns but reduce the material between holes and increase breakage risk.
- Wiring arrangement: A pendant needs a secure suspension and top cord route; a table lamp needs a stable base, protected exit, and strain relief.
The Bottom Line
A safe DIY concrete lamp depends on three controls: a rigid, leak-resistant mold; adequate curing before demolding; and correctly installed, strain-relieved electrical parts. Shape and finish are flexible, but concrete handling and mains-safety steps are not.
Quick Recap

Product prices and availability are accurate as of the date/time indicated and are subject to change. Any price and availability information displayed on Amazon at the time of purchase will apply.
What’s actually slowing this PC down?
Pick the symptom - the matching free tool is one click away.




