Quick wins for a faster PC:
Free tools Windows power users keep installed
One-click scans. No signup required.
Clear out junk files and repair common Windows errorsFree Scan →Scan for outdated or missing drivers - takes under a minuteDriver Scan →Repair Windows errors before they cause bigger problemsFix Now →
ThatPainter is reader-supported. When you buy through links on our site, we may earn an affiliate commission. Learn More
A hideaway bench is ordinary seating with storage concealed behind its apron or beneath its seat. The two practical designs are a pull-out drawer for front access and a hinged lift-top compartment for access from above. Choose the mechanism before cutting: each uses different dimensions, hardware and clearance.
The drawer version is suited to boots and other items you want to reach without lifting the seat. The lift-top version creates one large compartment and works well when the bench sits where a drawer cannot travel. Both reviewed plans describe an intermediate-level build, so accurate measuring, square assembly and safe tool use matter.
As an Amazon Associate I earn from qualifying purchases.
Choose the hideaway mechanism first
Pull-out drawer behind a front apron
Ana White’s intermediate hidden-boot bench places a drawer behind a false-looking front apron. The drawer uses 16-inch full-extension, side-mount slides and is stated to hold up to four pairs of full-size boots. The same space can hold shoes, scarves or gloves. The front of the bench remains visually quiet while the drawer pulls straight toward you.
This layout needs unobstructed floor space in front of the bench for the drawer’s travel. It is a good choice when you want to keep the seat undisturbed while retrieving footwear or when the bench is against a wall with no need to lift a lid.
#1 Best Overall

- Heavy-Duty Support: Built with thick MDF panels for strong structural support, this storage ottoman bench holds up to 660 lbs. The cushioned top features high-density foam and breathable linen fabric, providing a comfortable seating experience
- Large Capacity for Home Organization: With a spacious 43-inch design and up to 35 gallons (154L) of storage, this storage chest is ideal for blankets, pillows, and more—helping you keep your living space neat and clutter-free
- Foldable Design for Easy Storage: This practical folding ottoman bench supports tool-free setup. You can easily fold it flat when idle, then place it in closets, corners or other narrow spots to greatly save household space
- Versatile Bench for Multiple Uses: Use it as an end-of-bed bench in the bedroom, a footrest or coffee table in the living room, or a shoe bench in the entryway. Its clean design blends easily with different home styles
- Quick Assembly & User-Friendly: It comes with straightforward step-by-step instructions for hassle-free assembly in minutes. The simple solid structure ensures speedy installation and brings smooth convenient experience for daily household use
Hinged seat over a compartment
A lift-top bench opens from above. The Minwax stowaway plan cites a storage compartment 11 inches deep by 44 inches long. Those are dimensions for that plan, not a universal standard or a promise that every bench should use them.
Kreg’s indexed plan excerpt describes a plywood storage box with the seat attached by either a 30-inch piano hinge or two small cabinet hinges. Optional chest-lid supports or soft-close mechanisms can help control the lid. Because the full Kreg page was not available for verification, confirm the current plan and hardware dimensions before buying materials.
A lift-top needs vertical clearance above the seat and a safe place for the lid while it is open. It avoids drawer travel across the floor, but anything stored inside must be reachable from the top.
| Design | Access direction | Plan-specific facts | Typical contents described by the plan |
|---|---|---|---|
| Front drawer | Pulls outward on slides | 16-inch full-extension side-mount slides; 3/4-inch panel and common 1x lumber | Up to four pairs of full-size boots, shoes, scarves and gloves |
| Lift-top compartment | Seat lifts on hinges | Minwax compartment: 11 inches deep by 44 inches long; Kreg excerpt: 30-inch piano hinge or two cabinet hinges | General entryway storage in one open compartment |
The clearance comparison is a practical consequence of the mechanisms, not a tested performance claim: a drawer needs room in front, while a lid needs room to swing upward.
Rank #2

- Heavy-Duty Support: Built with thick MDF panels for strong structural support, this storage ottoman bench holds up to 660 lbs. The cushioned top features high-density foam and breathable linen fabric, providing a comfortable seating experience
- Large Capacity for Home Organization: With a spacious 43-inch design and up to 35 gallons (154L) of storage, this storage chest is ideal for blankets, pillows, and more—helping you keep your living space neat and clutter-free
- Foldable Design for Easy Storage: This practical folding ottoman bench supports tool-free setup. You can easily fold it flat when idle, then place it in closets, corners or other narrow spots to greatly save household space
- Versatile Bench for Multiple Uses: Use it as an end-of-bed bench in the bedroom, a footrest or coffee table in the living room, or a shoe bench in the entryway. Its clean design blends easily with different home styles
- Quick Assembly & User-Friendly: It comes with straightforward step-by-step instructions for hassle-free assembly in minutes. The simple solid structure ensures speedy installation and brings smooth convenient experience for daily household use
Plan dimensions, materials and hardware
Materials for the drawer version
The Ana White shopping list calls for a 3/4-inch-thick project panel 18 inches wide and 7 feet long, or a 48-by-48-inch sheet of 3/4-inch plywood cut into two 18-by-48-inch pieces. It also lists 1×6, 1×4 and 1×2 stock, plus 16-inch full-extension side-mount drawer slides.
Use the plan’s cut list rather than assuming these stock sizes define the finished bench. A change to one dimension can alter several adjoining parts. Lay out every panel and apron piece on paper, mark its finished face and verify the slide and drawer clearances before cutting.
Materials for the lift-top version
The indexed Kreg excerpt lists 3/4-inch plywood, two hinges and optional chest-lid supports. It gives the hinge choices as one 30-inch piano hinge or two cabinet hinges. Keep this hardware set separate from the drawer design; drawer slides are not a substitute for lid hinges.
For the Minwax layout, treat the cited 11-by-44-inch interior as a plan-specific reference. If you resize the box for your room, recalculate the lid, hinge position, internal supports and wall or floor clearances together.
Rank #3

- 【QUICK ASSEMBLY, EASY FOLDAWAY】This storage ottoman from the SONGMICS MAZIE Collection has a foldable design that allows quick setup in seconds by simply inserting the bottom panel. Easily fold and store it under the bed or in a closet when not in use
- 【AMPLE STORAGE】Measuring 15"D x 43"W x 15"H (38 x 110 x 38 cm), this storage bench offers a 35-gallon (131 L) volume. Its removable divider keeps your books, clothes, and blankets neatly sorted, or stores larger items like bed sheets
- 【STURDY AND DURABLE】Built with premium MDF panels and reinforced with metal corner guards on the lid, this ottoman is strong enough to support up to 660 lb (300 kg), making it a reliable seating or storage solution that will stand the test of time
- 【ELEGANT DESIGN, ENDURING COMFORT】This ottoman boasts a chic linen-look surface with an elegant tufting design, adding a stylish touch to your space. The double-layer fabric and high-resilience foam ensure lasting comfort for relaxation
- 【VERSATILE USES】This folding ottoman serves as a storage box, a footstool, and even a coffee table! It fits seamlessly into the living room, bedroom, entryway, or dressing room to meet various needs
Seat strength and support
The reviewed plans do not publish a rated seat load or an independently tested capacity. Do not assign a weight limit to a modified bench. Ana White cautions that changing one measurement can affect several parts and advises maintaining structural supports and safe spans. Build a continuous, well-supported frame, keep joints tight and do not remove supports merely to increase storage volume.
Tools and workshop safety
The drawer plan names a tape measure, square, pencil, safety glasses, hearing protection, pocket-hole jig, drill, circular saw, jigsaw and sander. Clamps are useful for holding panels square while fasteners are driven. A lift-top build uses the same measuring, cutting, drilling and sanding fundamentals, with extra attention to hinge layout.
- Wear safety glasses whenever cutting, drilling or sanding, and hearing protection around powered saws.
- Support sheet goods before cutting so the offcut cannot pinch the blade.
- Clamp a straightedge or guide for long circular-saw cuts and keep hands outside the blade path.
- Dry-fit the box, drawer and lid before applying glue or finish.
- Keep the work area clear so a drawer or raised lid cannot strike tools, children or passersby.
How to build the pull-out drawer bench
Follow the dimensions and cut list in the chosen plan. The sequence below explains the decisions and checks that prevent the common failures of a hidden drawer.
- Make a cutting diagram. Mark the 3/4-inch plywood panels and 1x stock, allowing for the saw kerf. Label each part by location and orientation. Confirm the drawer opening and slide length before cutting the drawer parts.
- Cut the panels. Use the circular saw for straight cuts and the jigsaw for detail cuts called for by the plan. Sand sharp edges and check each panel against the drawing rather than relying on a tape-measure total alone.
- Assemble the bench frame and apron. Use the pocket-hole jig and drill to join the frame. Clamp across each joint and measure diagonals; equal diagonals indicate a square opening. The front apron should read as a normal bench face while leaving the designed drawer opening behind it.
- Build the drawer. Assemble the drawer box from the specified stock, keeping the bottom flat and the corners square. Test-fit it in the opening before attaching the slides. A drawer that is slightly out of square can bind even when the opening looks correct.
- Install the 16-inch slides. Mount the full-extension, side-mount slides parallel to one another and at the same height. Follow the slide manufacturer’s setback and screw guidance; the plan identifies the slide type and length but does not replace those hardware instructions.
- Fit the front. Attach or align the false-looking front apron so its gaps are even. Open the drawer fully, inspect the slide engagement and verify that the front does not scrape the frame or floor.
- Sand and test before finishing. Remove pencil marks, ease exposed edges and cycle the drawer repeatedly. Correct binding now; paint can make a tight fit tighter.
How to build the lift-top bench
- Size the box and lid together. Start with the selected plan’s dimensions, including the Minwax reference compartment of 11 inches deep by 44 inches long if you are following that layout. Account for plywood thickness, the frame, lid overhang and the hinge’s position.
- Cut and assemble the plywood box. Keep the long sides straight and the corners square. Add the structural supports shown in the plan; storage volume is never a reason to omit members that carry the seat.
- Prepare the lid. Dry-fit the seat on the box and check that it clears the walls or adjacent furniture as it opens. Mark the hinge centerline before drilling.
- Choose the hinge arrangement. The Kreg excerpt lists either a 30-inch piano hinge or two small cabinet hinges. Use one arrangement, not both, unless the current plan specifically requires it. A piano hinge distributes movement along a long edge; cabinet hinges require accurate cup or plate placement and alignment.
- Add controlled-opening hardware if desired. Chest-lid supports or soft-close mechanisms are optional items in the indexed excerpt. Select hardware rated for the lid’s size and weight, and follow its installation instructions so the lid cannot fall unexpectedly.
- Cycle the lid. Open and close it slowly, checking for rubbing, hinge strain and pinched fingers. Make any alignment corrections before sanding and painting.
Prepare the bench for paint or stain
Painting is where a utility box becomes furniture. Sand the assembled bench until joints and exposed edges feel even, then remove dust with the cleaning method recommended by your coating manufacturer. Test the chosen color and sheen on an offcut or hidden area before committing to the whole bench.
Rank #4
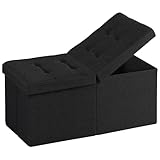
- Space-Saving Double-Grid Storage: Perfectly sized at 30" x 13" x 13", this ottoman fits effortlessly at the foot of the bed, by the wardrobe, beside the sofa, or in the entryway—compact but surprisingly spacious for all your daily essentials. Collapsible design folds flat in seconds, tuck it into a cabinet when not in use to keep your space open and organized
- Premium 4-Layer Crafted Exterior: Layered with Linen-Look Fabric, High-Density Foam, and Non-Woven Lining, it offers a soft. Sturdy MDF panels and metal corner guards, ensuring exceptional load-bearing strength. Sit with confidence—solid, stable, and built for adults.
- Smart Bidirectional Lid: Designed with a split-top opening, allowing you to open one side even while sitting on the other. No more lifting the whole lid—just grab what you need with ease and convenience.
- Entryway Shoe Bench & Storage in One: Doubles as a shoe-changing stool and a compact shoe organizer, no need for a bulky shoe cabinet. Keep your frequently worn shoes neatly hidden yet always within reach.
- Multipurpose for Any Room: Functions as a footrest, coffee table, temporary desk, clothing storage, and more. One piece, fits anywhere you need it to declutter and elevate your home.
For a painted interior bench
- Fill fastener holes and visible gaps with a compatible filler, then sand the repairs flush after they dry.
- Prime raw plywood edges and end grain; these absorb paint differently from the broad faces.
- Apply the specified number of finish coats, respecting the product’s recoat time. Thin, even coats reduce runs on the apron and lid edges.
- Allow the finish to dry and cure fully before loading boots or closing the lid. A surface that feels dry can still be soft underneath.
For stained wood
Sand consistently so color does not vary from panel to panel. Remove dust, apply stain according to the product directions and protect it with the recommended topcoat. Do not assume a stain-and-topcoat schedule used indoors is suitable for a porch or mudroom exposed to moisture.
For outdoor placement
Ana White advises using lumber and finish suitable for the local climate and following the manufacturer’s preparation, application, drying and curing instructions. Exterior exposure can require different wood, primers, fasteners and maintenance than an indoor entryway. Choose the finish after deciding where the bench will live, not afterward.
Free tools Windows power users keep installed
One-click scans. No signup required.
Placement and everyday use
Measure the room before building. A drawer needs its full travel zone kept clear; a lift-top needs a vertical arc free of shelves, hooks and low ceilings. Leave enough standing space for a person to open the storage without twisting around another piece of furniture.
Use the drawer for long, paired items such as boots when front access is convenient. Use a lift-top for loose accessories or a larger assortment that benefits from one uninterrupted opening. Keep wet footwear from being sealed against an uncured finish; allow mud and moisture to dry and clean the compartment so the bench does not trap dampness.
Best Value

- More Comfortable Shoe Change Cabinet: With a 2-inch thickened padded sponge cushion on the bench top, you can change shoes by sitting on the bench more comfortable without bending down or squatting
- Keep Your Shoes Organized: The depth of bench is 13.8 inches, which makes it easily to put in your shoes, meanwhile shoes of various heights can be placed by adjusting middle movable boards. The bench doors design ensures not only your privacy, but also a tidy space
- Match Your Home Style: Enhance your home decor with the bench's modern style, featuring clean lines and a sophisticated finish that complements any contemporary interior. You can put it at various places in your home such as entryways, corridor, living rooms, bedrooms, etc
- Stable & Long-lasting: Made of EPA-Certified board, the product is built to last and with a static load of up to 300 lbs. The zipper design of cushion can help you remove and clean cover easily. What are you hesitating about? Now preparing a shoe bench for your home
- Easy Assembly: Designed for quick and hassle-free assembly with clear instructions and all necessary hardware included. Set up your bench in no time and enjoy its benefits immediately
Cost and plan sources
Ana White’s plan displays an estimated cost of $20–$50. That is the plan’s estimate, not a current quote; plywood, lumber, slides, finish and local prices can change the total substantially.
Anika’s DIY Life lists a $9.99 digital PDF price when its page was accessed in 2026. The listing describes a 15-page file with materials, tools, cut lists, plywood diagrams, dimensions and step-by-step instructions, and says no physical item ships. Treat that price as changeable and confirm the listing details before purchase.
Troubleshoot before you finish
The drawer binds
Check that both slides are parallel, mounted at the same height and fully engaged. Measure the drawer diagonals and inspect for a proud screw head or paint buildup. Do not force the drawer; remove the obstruction and retest.
The false front looks uneven
Loosen the front fasteners, center the gaps with the drawer closed and retighten. Sanding a single edge may hide a symptom while leaving the opening out of square.
The lid rubs or drops
Verify that the box is square, the hinge is centered and the lid has the planned clearance. If using supports or a soft-close device, check its adjustment and rating rather than adding random hardware.
The paint remains soft
Stop loading the bench and check the coating instructions for temperature, humidity, recoat and cure times. Additional coats applied too soon can extend curing and leave hinge or drawer areas vulnerable to sticking.
What makes a reliable hideaway bench
Decide access direction first, preserve the structural supports, and test every moving part before finishing. A drawer bench conceals a useful boot drawer behind an ordinary apron; a lift-top bench trades front clearance for a broad opening. The best choice is the one whose mechanism fits your room, your stored items and your willingness to align the hardware precisely.
Quick Recap

Product prices and availability are accurate as of the date/time indicated and are subject to change. Any price and availability information displayed on Amazon at the time of purchase will apply.

