PC Slower Than It Used to Be?
Outbyte PC Repair · freeA free scan shows the junk files, broken settings and background clutter dragging Windows down - then fixes them in one click.
Run a Free PC Scan →ThatPainter is reader-supported. When you buy through links on our site, we may earn an affiliate commission. Learn More
To frame a fabric panel, press and inspect it, trim conservatively, then measure the edge in three places and average those measurements to determine border length. Sew the side borders as a matched pair, remeasure the bordered top for the top and bottom strips, and secure the quilt layers smoothly before quilting and binding.
A simple fabric border is the most approachable option; additional borders or pieced treatments can add size and visual interest. Use the panel’s actual dimensions and your intended finished size to guide the plan rather than relying on a universal cutting chart.
What is a panel quilt?
A fabric panel is a relatively large piece of preprinted fabric designed to become the focal point of a quilt or another sewing project. A panel may contain one large illustration, or several printed squares or rectangles that can be used as individual blocks.
A panel quilt can use the panel as the center of a larger design framed with borders or other blocks. The appeal is visual impact with less piecing: the image is printed rather than constructed from many small fabric pieces.
#1 Best Overall

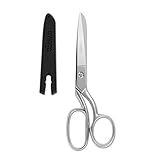
- RAZOREDGE FABRIC SCISSORS: Ultra-sharp, premium-grade stainless steel blades with a precisely honed edge for clean cuts to the tip
- SMOOTHEST CUTTING ACTION: Advanced pivot design delivers exceptionally smooth performance through fabric
- ERGONOMIC CONTROL: Thumb and finger loops with ergonomic sculpting match hand shape and natural movement
- SOFTGRIP TOUCHPOINTS: Added comfort and control for steady, accurate cutting
- PROTECTIVE SHEATH INCLUDED: Keeps blades safe and protected; 8", White/Orange
Trimming, border installation, layering, quilting, and binding still require care. A crooked trim or stretched border can be obvious around a large printed image.
Choose a construction style
Decide how much of the panel you want to preserve before buying fabric or cutting anything. Compare the options by difficulty, visual balance, desired finished size, and fabric use.
| Style | What you do | Consider |
|---|---|---|
| Simple framed panel | Add one or more plain borders around a single panel. | The simplest approach; choose colors that complement the image. |
| Inner and outer borders | Add a narrow contrast border followed by a wider border. | Separates a busy image from a larger frame but uses more fabric. |
| Sashed panel squares | Cut a multi-square panel apart and place sashing between printed sections. | Check that the panel is intended to be separated and that its layout will still work. |
| Pieced border | Surround the panel with treatments such as fence-rail strips, bricks, pinwheel blocks, or prairie points. | Adds construction steps and texture; plan the finished size and fabric use. |
Pull colors from the panel and consider whether a quiet border will help the image stand out. If the panel contains multiple scenes, preserve their intended order unless the pattern says otherwise.
Free tools Windows power users keep installed
One-click scans. No signup required.
Supplies
- Printed fabric panel and coordinating border fabric
- Backing fabric, batting or wadding, and binding fabric
- Sewing machine, matching thread, and basic sewing supplies
- Rotary cutter and cutting mat, or fabric scissors
- Measuring tape or quilting ruler
- Iron and pressing surface
- Pins or other basting supplies
These are practical options, not brand-specific requirements. Border fabric amounts depend on the panel and desired finished size; backing and batting needs depend on the quilting method and setup.
Step 1: Inspect and measure the panel
Lay the panel flat and inspect the printed image, usable edges, grain, and any manufacturer instructions about washing, pressing, or cutting. Notice whether the design is centered and whether the printed edges appear perpendicular.
Rank #2

- Ultra Sharp Fabric Scissors: Wteehn sewing scissors for fabric cutting is made of high-quality galvanized manganese, exquisite hand-forged craftsmanship, high hardness, sharp, durable, rust-proof and not easy to deform, and can cleanly cut thick materials such as multi-layer fabrics and leather
- Professional Fabric Sewing Scissors: Our tailor scissors are designed for fabric cutting and sewing tasks, and the adjustable bolt lock ensures precise cutting. The blade angle is 45°, scientific and labor-saving, this professional fabric scissors can achieve smooth and accurate cutting
- Ergonomic Design: The aluminum alloy handle wrapped with plastic on the outside is ergonomically designed, comfortable to hold and non-slip, which can reduce hand fatigue after long-term use. The upgraded ear protection design fits the hand muscles, making cutting easy and accurate. There will be no friction or pinching
- Multifunctional Fabric Scissors. This 8" sharp sewing shears is suitable for cutting a variety of materials, including cotton, linen, canvas, leather, non-woven fabrics, etc., to meet your various craft needs and provide work efficiency. The chamfering process on the head of the heavy duty sewing scissors can avoid accidental scratches on the fabric
- Widely Applicable: Whether it is sewing, handicrafts, or home repairs, this sharp sewing shears can provide you with stable cutting performance and help you complete a variety of complex and delicate cutting tasks. It is suitable for sewing, tailoring, quilting, clothing, cutting patterns, alterations, art projects, etc
Press the panel as directed. Decide which artwork and seam allowance must be preserved before trimming. Measure the panel in several places rather than relying on a nominal size printed on the bolt or pattern envelope.
Step 2: Square the panel conservatively
Squaring means trimming enough to create workable straight edges; it does not mean cutting away important artwork to reach a convenient number.
The Tool Desk
Outbyte PC Repair FREEClear out junk files and repair common Windows errorsFree Scan →Outbyte Driver Updater FREEScan for outdated or missing drivers - takes under a minuteDriver Scan →- Place the pressed panel on a flat cutting surface.
- Identify a reliable straight reference. Selvages can help, but the printed design may not align perfectly with them.
- Use a ruler to establish a straight edge and trim only what is needed.
- Square the adjoining edge, then continue around the remaining sides.
- Re-measure the panel and record the dimensions you will use in your border plan.
If the panel is slightly skewed, prioritize preserving the focal image and adjust the border plan to the resulting dimensions.
Step 3: Plan the frame and calculate border lengths
For a simple frame, plan one border or a matched pair of borders on opposite sides. You can add a second border or a pieced treatment if it suits the design and finished size you want. There is no universal cutting chart because panels vary.
- Measure the panel edge that will receive the first pair of borders in three places.
- Average those measurements to determine the length for both border strips.
- Choose the border width, accounting for the seam allowance in your pattern.
- After attaching the first pair, measure the new quilt top edge in three places and average those measurements.
- Use that average to cut the second pair of border strips.
Utah State University Extension’s panel-quilt pattern recommends averaging three measurements for border lengths and warns that sewing borders of different lengths on the sides can make the quilt visibly uneven and not square. Its quarter-inch seam allowance is a pattern instruction, not a universal rule; use the allowance specified by your chosen pattern and keep it consistent.
Rank #3
- DURABLE Strong Stainless Steel Rust Resistant Blades: Forging press manufacturing process enables high-density steel that makes 5 times harder than normal stainless steel and are smoother cutting.
- ULTRA SHARP and ALL-PURPOSE: Easy for cutting multi layers of fabrics. Ideal for sewing, tailoring, quilting, dressmaking, cutting patterns, alterations, hand craft, home and office use etc.
- BENT and Mirror finish design
- 3.5" Blades and 8" Overall Length, extra sharp long-lasting cutting edges.
- Every Product is independently tested and selected to ensure the performance you expect. The result is a quality item backed by our commitment to your satisfaction.
Step 4: Cut and attach the borders
- Cut the first pair of strips to the averaged edge measurement.
- Mark the center of the quilt edge and each strip. Pin or clip the ends and centers together.
- Ease small fullness evenly between the pins; do not stretch the panel or force a substantially longer strip onto it.
- Sew with a consistent seam allowance and press the seam toward the border.
- Measure the quilt top in three places for the next pair, average those measurements, and repeat the process.
Re-measuring after each pair helps keep the top square. If an edge is wavy or significantly longer than its border, stop and correct the measurement or construction rather than trying to hide the difference with pins.
What’s actually slowing this PC down?
Pick the symptom - the matching free tool is one click away.
Step 5: Check the quilt top
After pressing each seam, place the top on a flat surface and check that it lies flat, the border seams are straight, and the printed image remains centered or intentionally positioned. Make corrections before layering; a ripple is easier to fix now than after quilting.
Step 6: Make and secure the quilt sandwich
A conventional quilt sandwich has three layers: the quilt top, batting (also called wadding), and backing. Choose batting by considering the intended use and laundering, whether you will quilt by hand or machine, the required stitching interval on the product label, and the loft you want. There is no universally best batting for every panel quilt.
- Place the backing wrong side up on a clean, flat surface and smooth it.
- Lay the batting over the backing, then center the pressed quilt top right side up.
- Make sure the backing and batting extend beyond the quilt top as needed for your quilting method or frame.
- Secure the layers smoothly with pins or other appropriate basting supplies. For hand quilting, tacking is another option.
- Work from the center outward when securing the layers to help reduce puckers.
Follow the instructions for your frame or longarm setup if you are using one. Any excess batting and backing can be trimmed after quilting.
Step 7: Quilt, trim, and bind
Choose quilting that supports the printed image without obscuring it, and follow the batting label’s spacing guidance. For machine quilting, pins are one way to secure the layers; hand quilting can use tacking. Work from the center outward to help limit puckers.
Rank #4

- Ultra Sharp and Sturdy: blades are made of high strength Stainless Steel, anti-rust and sturdy for use, with 3x hardness of common stainless steel and stays sharper longer
- Titanium Coating Blades: iridescent titanium coating adds an extra layer of protection, making the scissors more resistant to wear and corrosion. clorful blades not only pretty, but also resilient to adhesives such as glue and tape, making them suitable for almost any type of task
- Comfortable to Use: Ergonomically designed handles made of high-quality ABS material, featuring a purple easy-grip design for comfortable and precise control. Both right and left-handed users can experience comfortable handling during use
- Heavy Duty All-Purpose Scissors: Ideal for sewing, tailoring, quilting, and dressmaking. Perfect for cutting multiple layers of fabric, clothes, denim, jeans, leather, burlap, canvas, upholstery, vinyl, patterns, alterations, yarn, thread, ribbon, photos for scrapbooking, paper, cardboard, wrapping paper, and other arts & crafts for home or office use
- SIZE: 8.3 Inch Long and 3.5 Inch Wide
After quilting, trim the edges square as needed and bind the quilt using your preferred method. The finished size can differ from the top measurements because of quilting and finishing, so measure the completed quilt if you need to report its final size.
Independent reader supportYour contribution helps us test, update, and keep practical guides available for everyone.Common panel-quilt problems
The panel is not square
Cause: The fabric may be printed or wound off-grain, or the artwork may not align with the selvages.
Fix: Trim conservatively and base the borders on the panel’s actual dimensions. Do not sacrifice important artwork for a nominal measurement.
The quilt top is wavy or out of square
Cause: Borders may have been stretched, cut to different lengths, or attached without measuring the changing quilt top.
Fix: Measure each edge in three places, average the measurements for each border pair, and match the ends and centers when pinning. Correct a problem before adding the next pair.
Best Value

- ARTS AND CRAFTS STAPLE: Fiskars Easy Action Micro-Tip Scissors (No. 5) are perfect for cutting details out of fabric including silk, oil cloth, polyester, cotton, crepe, felt, and more
- PRECISION ART SUPPLIES: Micro-Tip blades provide unmatched cutting precision, especially on intricate details and tight patterns
- LONG LASTING AND RELIABLE: High-grade, precision-ground stainless steel blades stay sharp longer and cut all the way to the tip; Fiskars craft supplies and materials are built to last
- COMFORTABLE AND CONVENIENT: Easy Action spring-assisted handle gently opens after each cut to help reduce hand fatigue; Easy-open thumb lock provides safe storage and transportation; The SoftGrip handle enhances comfort and control
- QUALITY TOOLS FOR ARTS AND CRAFTS: From scissors and cutting mats, rotary and paper cutters, to classroom essentials, scissors for kids, and quilting and scrapbooking supplies, Fiskars crafting tools are designed to help you do what you do best: express yourself
The borders overwhelm the image
Cause: A border may be too wide or visually busy for the panel.
Fix: Choose a quieter fabric or narrower border, or add a narrow contrast border to separate the artwork from a wider frame.
Frequently Asked Questions
How do I know how long to cut a quilt border?
Measure the edge in three places and average those measurements. Cut the border pair to that length, attach it, then repeat the measuring process for the next pair.
Windows Errors? Fix Them Before They Spread
Repair common Windows errors and clear accumulated junk for a smoother, more stable PC - no reinstall needed.Free scan · no reinstallCrashes, No Sound, or Screen Glitches?
Random freezes, missing sound and display glitches usually trace back to one bad driver. Find and replace yours safely.Free scan · under a minuteShould I use a quarter-inch seam allowance?
Use the allowance specified by your pattern. A quarter-inch seam is used in some quilting patterns, including the Utah State University Extension example, but it is not a universal requirement.
Can I use scissors instead of a rotary cutter?
Yes. A rotary cutter and mat are practical options for straight cuts, but fabric scissors can also be used. Measure carefully whichever method you choose.
How much extra backing and batting do I need?
The required overhang depends on your quilting method, frame, or longarm setup. Follow that setup’s instructions and leave enough extra material to quilt and trim the edges afterward.
What is the best batting for a panel quilt?
There is no single best choice. Consider the quilt’s use and care, hand or machine quilting, the product’s stitching interval, and the loft you want; check the batting label for care and spacing guidance.
Quick wins for a faster PC:
Scan for outdated or missing drivers - takes under a minuteDriver Scan →Repair Windows errors before they cause bigger problemsFix Now →Fix the driver behind crashes, sound loss and screen glitchesFind Drivers →Quick Recap

Product prices and availability are accurate as of the date/time indicated and are subject to change. Any price and availability information displayed on Amazon at the time of purchase will apply.




