PC Slower Than It Used to Be?
Quick wins for a faster PC:
Clear out junk files and repair common Windows errorsFree Scan →Fix the driver behind crashes, sound loss and screen glitchesFind Drivers →Outbyte PC Repair · freeA free scan shows the junk files, broken settings and background clutter dragging Windows down - then fixes them in one click.
Run a Free PC Scan →ThatPainter is reader-supported. When you buy through links on our site, we may earn an affiliate commission. Learn More
The quickest way to create a gradient in current Photoshop desktop is to select the target layer or area, press G to choose the Gradient tool, pick a preset and gradient type, then click and drag across the canvas. For design work you expect to revise, use Layer > New Fill Layer > Gradient instead: it keeps the gradient editable and separate from your original pixels.
The quickest way to add a gradient
- Open your image or create a Photoshop document.
- Select the layer where the gradient should appear in the Layers panel. Make a selection first if the gradient must stay inside a particular area.
- Choose the Gradient tool or press G. If it is not visible, click and hold the Paint Bucket tool in the toolbar and choose Gradient.
- Click the gradient preview in the Options bar and select a preset.
- Choose a gradient type: Linear, Radial, Angle (also called Angular in some older or localized interfaces), Reflected, or Diamond.
- Turn on Dither to help reduce visible banding. Turn on Reverse if the colors are in the wrong order.
- Click and drag across the canvas, then release. The starting point, ending point, direction, and length of the drag control the result.
With no active selection, the Gradient tool applies the gradient across the active layer. With a selection active, Photoshop restricts it to that selection. This is the direct pixel-painting method described in Adobe’s current Gradient tool documentation.
For editable work: create a Gradient Fill layer
A Gradient Fill layer is usually the better choice for backgrounds, overlays, illustrations, and composites because you can change its colors, angle, scale, and opacity later without repainting the original image.
The Tool Desk
Outbyte PC Repair FREEClear out junk files and repair common Windows errorsFree Scan →Outbyte Driver Updater FREEScan for outdated or missing drivers - takes under a minuteDriver Scan →- Select Layer > New Fill Layer > Gradient.
- Enter a name and confirm the layer options.
- Use the Properties panel or the on-canvas gradient controls to choose the colors, type, angle, scale, and position.
- Re-edit the gradient at any time by selecting the fill layer again.
Unlike painting directly onto a pixel layer, this workflow keeps the gradient as separate fill content. You can also add a layer mask to control exactly where it is visible. See Adobe’s guide to fill layers for the current desktop interface.
#1 Best Overall
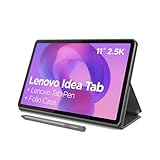
- POWER YOUR STUDY, FUEL YOUR PLAY – Discover smarter learning with the Lenovo Idea Tab. Stay campus-ready with all-day battery life, AI-powered apps to enhance your work, and sharp graphics for tv marathons with friends.
- SMOOTH, POWERFUL, IMMERSIVE – The MediaTek Dimensity 6300 processor is more powerful than ever, with the AI-enhanced multitasking you need to stay ahead.
- CIRCLE IT, SEARCH IT – Use your Lenovo Tab Pen or fingertip to circle items for instant search results or to translate other languages without switching apps. Circle to Search with Google ensures answers are only a circle away.
- SHARP VIEW, CLEAR SOUND – Experience sharp visuals and immersive sound for study sessions and streaming breaks. With 72% NTSC and quad Dolby Atmos-tuned speakers you can enjoy your study breaks with vivid videos and crystal-clear sound.
- LEVEL UP YOUR STUDY – Write, organize, sketch, and calculate with four learning apps built to match your flow. Lenovo AI Note, Squid, Nebo, and MyScript Calculator help you stay clear, focused, and ready for every study session.
Customize the gradient’s colors
Click the gradient preview to open the preset picker. A preset is the fastest starting point, but you can build a custom gradient by editing its stops:
- Select a color stop and change its color.
- Drag a stop along the gradient line to change where that color begins or ends.
- Click along the line to add another color stop, allowing a gradient with three or more colors.
- Adjust the midpoint between two stops to give one color more visual space or make the transition faster.
- Use transparency stops when you need a color to fade into the underlying artwork.
- Drag a stop away from the gradient line to remove it.
- Save the finished gradient as a preset if you expect to reuse it.
For a gradient that already exists, use the Properties panel or on-canvas controls. Changing settings in the Options bar is primarily for gradients you create next; it does not automatically update an existing gradient. Adobe explains these controls in its gradient-editing documentation.
Control direction, length, and angle
The point where you begin dragging is the gradient’s starting point; where you release is its ending point.
Do these 3 things before closing this tab:
1Scan for outdated or missing drivers - takes under a minute2Repair Windows errors before they cause bigger problems3Fix the driver behind crashes, sound loss and screen glitches- Drag in a different direction to change the angle.
- Use a longer drag for a more gradual transition.
- Use a shorter drag for a more compressed, abrupt transition.
- Hold Shift while dragging to constrain the direction to 45-degree increments.
- For an existing editable gradient, drag its on-canvas line to reposition it or change its direction and length.
What the five gradient types do
| Type | Best for | Result |
|---|---|---|
| Linear | Backgrounds, skies, bands, and fades | A straight-line transition |
| Radial | Glows, spotlights, sunbursts, and vignettes | A circular transition from a center point |
| Angle (or Angular) | Rotational and sweeping effects | A transition that rotates around the starting point |
| Reflected | Symmetrical highlights and mirror-like effects | A linear gradient reflected on both sides |
| Diamond | Geometric highlights and stylized backgrounds | A diamond-shaped transition |
These are the five types listed in Adobe’s current Photoshop desktop documentation. Older releases or regional interfaces may use slightly different labels.
Rank #2
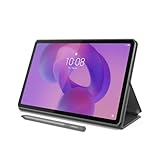
- POWER YOUR STUDY, FUEL YOUR PLAY – Discover smarter learning with the Lenovo Idea Tab. Stay campus-ready with all-day battery life, AI-powered apps to enhance your work, and sharp graphics for tv marathons with friends.
- SMOOTH, POWERFUL, IMMERSIVE – The MediaTek Dimensity 6300 processor is more powerful than ever, with the AI-enhanced multitasking you need to stay ahead.
- CIRCLE IT, SEARCH IT – Use your Lenovo Tab Pen or fingertip to circle items for instant search results or to translate other languages without switching apps. Circle to Search with Google ensures answers are only a circle away.
- SHARP VIEW, CLEAR SOUND – Experience sharp visuals and immersive sound for study sessions and streaming breaks. With 72% NTSC and quad Dolby Atmos-tuned speakers you can enjoy your study breaks with vivid videos and crystal-clear sound.
- LEVEL UP YOUR STUDY – Write, organize, sketch, and calculate with four learning apps built to match your flow. Lenovo AI Note, Squid, Nebo, and MyScript Calculator help you stay clear, focused, and ready for every study session.
Apply a gradient to only part of an image
Use a selection for a quick, temporary boundary
- Create a selection with a marquee, lasso, object-selection, or another selection tool.
- Choose the Gradient tool and drag inside the selection.
- Choose Select > Deselect when finished.
The gradient follows the selection boundary, not necessarily the visible edge of an object. A selection is useful for a one-off result, but changing it later can be inconvenient.
Use a Gradient Fill layer and mask for flexible editing
Create the Gradient Fill layer first, then add or use its layer mask. Paint on the mask with black to hide the gradient, white to reveal it, and gray for partial transparency. This is the more revisable method when the boundary needs refinement.
Use a shape’s gradient fill
For a button, logo, card, or other geometric object, create or select a shape layer and choose Fill > Gradient from the Contextual Task Bar, Options bar, or Properties panel. Photoshop also supports gradient strokes on shape layers, so the gradient remains tied to the shape rather than being painted as unrelated pixels. See Adobe’s shape fill and stroke guide.
Recommended Free Tools
Put a gradient on text
For editable text, keep the type layer intact and use a clipped Gradient Fill layer above it: create the gradient, place it directly above the text layer, then choose Layer > Create Clipping Mask. The gradient will show only through the text. A text-layer Gradient Overlay can also work for a straightforward effect, while converting the text to a selection is better reserved for a raster workflow.
Rank #3
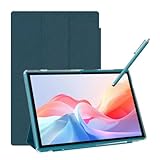
- 【Multi-function Configuration】Android 15 portable tablet with stylus and foldable protective case. You can enter text directly using a stylus, easy response to various scenarios, making your work and study get twice the result with half the effort.
- 【Android 15 Tablet】10 inch Tablet PC is equipped with the latest Android 15.0 system, built-in powerful Quad-core processor, 32GB ROM 8GB RAM(Including 5GB expansion), 1024GB expansion, support Wi-Fi, Bluetooth, GPS and more, enough memory allows you to store more favorite e-books, movies, music, pictures, videos, games
- 【Broad Vision and Responsiveness】The Android tablet uses a 10.1 inch 1280*800 full HD IPS display, which can present a clearer picture effect and richer colors, bringing you a more realistic viewing experience, bringing you clearer and brighter Image. Equipped with 10.0-inch capacitive touch, five-point capacitive touch G+G, to ensure smoother motion in movies and games
- 【Long Battery Life】 The Android tablets powered by a 6000mAh battery, can stand by 360 hours and continuous use up to 6-8 hours, easily charge via the 5V2A Type-C port. Super power and long battery life, say goodbye to the trouble of insufficient power and give you a full sense of security.
- 【Coexistence of Beauty and Strength】 Our Android tablet equipped with a protective leather case. With a slim design, wear-resistant and resistant to falling, a delicate feel, unique texture, easy to carry, and more comfortable to hold with one hand. It's a good companion for your leisure and entertainment, as well as the best gift for various festivals and birthdays.
Make the gradient smoother and reduce banding
Banding appears as visible stripes instead of a continuous blend. Try these fixes in order:
- Enable Dither in the Gradient tool’s Options bar. It can reduce banding but does not guarantee a perfect result.
- Make the transition longer by dragging farther or moving color stops farther apart.
- Use a suitable color mode and bit depth for the image and its intended output, especially when making large, subtle tonal transitions.
- Check the exported file, not just the Photoshop canvas. Reduced bit depth and compression can make banding more obvious.
- If stripes remain, add a very small amount of texture or noise as a finishing step. Keep it subtle so it does not become visible grain.
JPEG compression can worsen smooth gradients, so use an appropriate export format when the design requires clean, continuous color.
Gradient tool versus Gradient Fill layer
| Method | Advantages | Trade-off |
|---|---|---|
| Gradient tool on a pixel layer | Fastest for a one-off raster effect | Changes pixels directly and is harder to revise |
| Gradient Fill layer | Editable, maskable, and non-destructive | Adds a separate layer and requires slightly more setup |
| Shape Fill > Gradient | Keeps the gradient connected to a vector shape | Best for shape-based artwork |
| Layer mask with a gradient | Reveals or conceals an image gradually | Requires understanding mask behavior |
| Gradient Overlay | Convenient for text and layer effects | Less flexible for complex multi-object compositions |
If you are unsure which method to choose, use a Gradient Fill layer. Use the Gradient tool directly on pixels only when speed matters more than later editing.
The Tool Desk
Outbyte Driver Updater FREEScan for outdated or missing drivers - takes under a minuteDriver Scan →Outbyte PC Repair FREEClear out junk files and repair common Windows errorsFree Scan →Why the gradient is not working
It appears on the wrong part of the image
- Check that the intended layer is selected.
- Choose Select > Deselect in case an old selection is restricting the result.
- Confirm the layer is visible and unlocked.
- Check whether a mask or clipping mask is limiting the effect.
- Look at the layer order: a gradient below opaque artwork may be hidden.
- Make sure you did not apply it to an empty transparent layer when you intended to modify visible artwork.
The Gradient tool is missing
It may be grouped with the Paint Bucket tool. Click and hold that toolbar group, then choose Gradient.
Rank #4

- DIVE INTO THIS DISPLAY: All of your fun content pops on the 10.9" screen. Catch up on plans for the day while you cook breakfast, scroll your social feed in the evening or read an article in bed. Vision Booster adjusts the brightness to your environment
- BATTERY FOR LONG-LASTING ENTERTAINMENT: Enjoy long-lasting fun. Finish your favorite series or book with a battery that can last up to 16 hours.¹ Need energy quick? Get a full charge in about two hours with Super Fast Charging.²
- WRITE, DRAW, DO IT ALL: S Pen is mightier than your average writing tool. The responsive design and intuitive integration with intelligent features make drawing, jotting down notes and even doing math easier than ever
- SPACE TO KEEP WHAT MATTERS MOST: More storage means deleting less apps, photos, videos and files. Galaxy Tab S10 Lite comes with up to 256GB³ of storage. And if you need even more, you can add up to 2TB with a microSD card.⁹
- THE POWER OF ENHANCED PERFORMANCE: Galaxy Tab S10 Lite boasts an Exynos 1380 processor that lets you stream, scroll, note, search and even multitask with ease
The colors are backwards
Enable Reverse in the Options bar, or drag in the opposite direction.
The transition is too abrupt
Drag a greater distance, move the color stops farther apart, or adjust the midpoint between the stops.
The gradient is invisible
A transparent-to-color preset may be blending into transparency or a similar background. Also check that the layer is above the artwork it should affect, that its opacity is not reduced, and that a mask is not hiding it.
Free tools Windows power users keep installed
One-click scans. No signup required.
I cannot edit the gradient
If you painted directly on a pixel layer, the gradient is not independently editable like a Gradient Fill layer. Undo if possible, or rebuild the effect on a new Gradient Fill layer and use a mask to reproduce the boundary.
Best Value

- [LATEST ANDROID 16 SYSTEM] Experience the cutting-edge Android 16 OS with enhanced privacy controls and ultra-smooth multitasking. Featuring 24GB RAM (3+21) and 64GB ROM storage, this tablet handles educational apps, business software, and streaming with zero lag.
- [2-IN-1 VERSATILE LAPTOP MODE] Seamlessly transform your tablet into a high-productivity workstation. The comprehensive bundle includes a responsive Bluetooth keyboard and a silent wireless mouse, paired with a premium folding leather case that offers 360-degree protection and multiple viewing angles.
- [OPTIMIZED FOR STUDENTS & PROS] Perfect for online learning, digital note-taking, and remote collaboration. The high-sensitivity capacitive stylus allows for precise sketching and annotation, while dual HD cameras provide crystal-clear video quality for Zoom meetings and virtual classrooms during travel.
- [ULTRA-FAST WIFI6&PD CHARGING] Stay connected anywhere with high-speed dual-band WiFi for lag-free streaming and rapid file downloads. Equipped with a PD fast charging kit, this tablet significantly reduces recharge time, making it the ideal companion for long-haul business trips and outdoor use.
- [COMPLETE BUNDLE & One-YEAR WARRANTY] What's in the box: 10" Android 16 Tablet, Bluetooth Keyboard, Wireless Mouse, Stylus Pen, Protective Leather Case, and PD Fast Charger. Enjoy peace of mind with our One-year brand warranty, 24/7 technical support, and a 30-day worry-free return policy.
Gradient fill versus Gradient Map
A Gradient Fill adds a gradient as content: for example, a blue-to-orange background or a glow over artwork. A Gradient Map remaps the existing tones of an image to gradient colors, typically assigning different colors to shadows, midtones, and highlights. Use Gradient Map when you want to recolor an image according to its tonal structure, not simply place a color transition across the canvas.
FAQ
How do I create a gradient in Photoshop?
Select a layer or area, choose the Gradient tool with G, select a preset and type, then drag across the canvas. For a gradient you can revise later, create a Gradient Fill layer instead.
How do I make a gradient editable after applying it?
A gradient painted directly onto a pixel layer is not independently editable like a Gradient Fill layer. Use the Properties panel or on-canvas controls to edit an existing Gradient Fill layer.
What’s actually slowing this PC down?
Pick the symptom - the matching free tool is one click away.
Why does my Photoshop gradient have stripes?
Enable Dither to help reduce banding. If stripes remain, check the document’s bit depth and export settings, and inspect the exported file because compression can make banding more visible.
How do I put a gradient inside a shape or text?
For a shape, use its Fill > Gradient control. For editable text, place a Gradient Fill layer above the type layer and create a clipping mask so the gradient shows through the text.
What is the difference between Gradient Fill and Gradient Map?
Gradient Fill adds a color transition as content. Gradient Map recolors existing image tones according to a gradient, typically mapping different colors to shadows, midtones, and highlights.
Quick Recap

Product prices and availability are accurate as of the date/time indicated and are subject to change. Any price and availability information displayed on Amazon at the time of purchase will apply.




