PC Slower Than It Used to Be?
Quick wins for a faster PC:
Clear out junk files and repair common Windows errorsFree Scan →Fix the driver behind crashes, sound loss and screen glitchesFind Drivers →Repair Windows errors before they cause bigger problemsFix Now →Outbyte PC Repair · freeA free scan shows the junk files, broken settings and background clutter dragging Windows down - then fixes them in one click.
Run a Free PC Scan →ThatPainter is reader-supported. When you buy through links on our site, we may earn an affiliate commission. Learn More
The short answer: On an empty wall, hang a picture so the center of the complete frame is about 57–60 inches above the finished floor. Use 58 inches on center as a practical default. Above furniture, however, measure from the furniture instead: leave about 6–8 inches above a sofa, 4–8 inches above a console or credenza, and 7–10 inches above a headboard.
To find the exact hook or screw height, use this formula:
As an Amazon Associate I earn from qualifying purchases.
Hook height = desired center height + (frame height ÷ 2) − hanging drop
The hanging drop is the distance from the top of the frame to the point where the wire, D-ring, or other hardware actually rests on the wall hanger. That calculation—not the position of the nail alone—is what puts the picture at the correct height.
#1 Best Overall

- EFFORTLESS ORGANIZATION: Our 303pcs Heavy Duty Picture Hanging Kit boasts an exceptional design with categorized compartments, saving you precious time that would otherwise be spent searching for the right hardware. Plus, when you're done using it, everything neatly tucks away, eliminating any post-project mess. Can replace picture hanging strips.
- TAILORED WEIGHT OPTIONS: Say goodbye to one-size-fits-all solutions! Our Heavy Duty Picture Hangers come with a variety of weight options (10LB, 20LB, 30LB, 45LB, 75LB), ensuring that whatever the size of your frame, we've got the perfect match to tackle your hanging needs. Various accessories help you decor your walls in bathroom, living room, bedroom.
- UNCOMPROMISING DURABILITY: Crafted from high-strength steel, our Heavy Duty Picture Hanging Kit guarantees not only longevity but also exceptional stability and security once your artwork is on the wall. Your frames will stay right where you want them, worry-free.
- VERSATILE HARDWARE ASSORTMENT: Experience the convenience of choice with our Wall Hanging Kit. Packed with a rich assortment of hardware, including Heavy Duty Wall Hooks, Sawtooth hangers, Picture Wire, D Rings, Hardware Nails, and Eye Hooks, you'll have all the options you need for various hanging projects, tailored to your preferences. Can replace picture hanging strips.
- NEATLY PACKAGED DELIGHT: When you choose us, you're not just getting hardware; you're getting an elegantly organized experience. Every Heavy Duty Wall Hook, Sawtooth, Picture Wire, D Ring, Hardware Nail, and Eye Hook is neatly arranged in a stylish plastic container. It's not just about hanging art; it's about adding a touch of sophistication to your entire hanging process.
The default rule: 58 inches on center
For a single picture on an otherwise empty wall, measure from the finished floor to the vertical center of the entire framed object. A useful target is 58 inches, with 57–60 inches serving as a sensible range.
This is a design convention, not a building code or universal museum law. Institutional hanging guides from Purdue University and the Minneapolis College of Art and Design use 58 inches, while home-design guidance variously recommends 57 inches, 57–60 inches, or approximately 60 inches. The consistent idea is comfortable eye-level viewing—not one scientifically exact number.
Use the lower end of the range for a shorter household or a more intimate room. Move slightly higher when most viewers are tall, when the wall is in a narrow passage, or when the lower edge would interfere with circulation. Do not automatically raise a small picture because the ceiling is high. In most rooms, larger artwork or a taller grouping solves a tall-wall problem better than placing the existing art near the ceiling.
What “on center” means
The target applies to the center of the complete outside frame, not:
- the top edge of the frame;
- the bottom edge;
- the center of the printed image or mat;
- the nail, screw, or picture hook; or
- the geometric center of the wall when furniture creates a more important visual axis.
For a pair, triptych, or gallery wall, treat the complete arrangement as one visual object. Find its highest and lowest outside edges, including the spaces between pieces, and place the midpoint of that overall bounding box at the chosen height.
On a blank wall, mark 58 inches, then center the frame around that mark. Horizontally, center it on the usable wall zone—not necessarily the entire wall if a door, window, fireplace, built-in, or piece of furniture establishes a different composition.
Do these 3 things before closing this tab:
1Fix the driver behind crashes, sound loss and screen glitches2Clear out junk files and repair common Windows errors3Scan for outdated or missing drivers - takes under a minuteWhen furniture is below the picture, use the furniture rule
A sofa, bed, console, desk, mantel, or credenza is usually the room’s visual anchor. In those situations, a strict floor measurement can leave the picture floating too high or disconnected from the object below it. Measure the gap from the top of the furniture to the bottom of the frame instead.
| Location | Recommended starting point | What to measure from |
|---|---|---|
| Empty wall | Frame center at 57–60 inches | Finished floor |
| Above a sofa | 6–8 inches; up to 10 inches when needed | Top of sofa back |
| Console, credenza, sideboard, or dresser | 4–8 inches | Top of furniture |
| Above a desk | About 7–10 inches | Desktop, or the top of the monitor if it dominates the arrangement |
| Above a headboard | 7–10 inches | Top of headboard |
| Above a mantel | 4–8 inches as a design starting point | Top of mantel, subject to fireplace requirements |
| Gallery wall above furniture | 6–10 inches from furniture to the lowest frame | Top of furniture to lowest frame |
| Hallway | Start at 57–60 inches on center | Finished floor, adjusted for circulation |
| Staircase | Follow the stair slope | Diagonal visual centerline, not a level floor measurement |
These ranges overlap because the right gap depends on the furniture height, frame size, depth, seating position, traffic, and visual scale. Published recommendations range from roughly 4 to 12 inches; the table gives useful starting points rather than rigid laws.
How high to hang a picture above a sofa
Start with 6–8 inches between the sofa back and the bottom of the frame. Use closer to 8–10 inches if the sofa has a tall back, people recline against it, the frame is deep, or children and pets could contact the artwork.
Center the picture or grouping over the sofa—not automatically over the entire wall. If the sofa is offset because of a doorway, window, or sectional arrangement, the furniture’s center usually creates the stronger alignment.
Crashes, No Sound, or Screen Glitches?
Random freezes, missing sound and display glitches usually trace back to one bad driver. Find and replace yours safely.Free scan · under a minuteWindows Errors? Fix Them Before They Spread
Repair common Windows errors and clear accumulated junk for a smoother, more stable PC - no reinstall needed.Free scan · no reinstallDo not apply the 57–60-inch floor-center rule if it creates an obvious gap. For example, if a sofa back is 40 inches high, a frame whose center is at 57 inches has its center only 17 inches above the sofa. That may be appropriate for a tall frame, but it can make a short picture appear oddly detached or leave an unbalanced relationship between the frame and sofa. Set the bottom edge first, then check the resulting center and overall scale.
How high to hang a picture above a bed or headboard
Place the bottom of the frame or the lowest piece in a gallery wall approximately 7–10 inches above the headboard. Treat the whole grouping as one unit and center it over the bed or headboard.
Rank #2

- Wide Assortment: 220-piece picture hanging kit includes 24 sets of 10lb picture hangers, 14 sets of 30lb picture hangers, 4 sets of 50lb picture hangers, 3 sets of 100lb picture hangers, 2 sets of 80lb, and 2 sets of 120lb picture hangers, 8 sets of D-rings, steel wire, screw eye hooks, and sawtooth hangers
- Durable Construction: Crafted from high-quality steel
- Convenience: Organizational storage case included
- Complete picture hanging kit with galvanized wire and sawtooth hangers, supports 10lb-120lb of wall décor and art
The total width of the art should generally be about two-thirds of the bed or headboard width. A single small frame often disappears above a large bed; combine several pieces or choose a wider work if necessary.
Secure anything hung above a bed especially well. Avoid heavy, fragile, or poorly anchored objects over sleeping areas. A properly selected mechanical hanger, direct-mounted D-rings, or a French cleat is preferable to an adhesive system for substantial or valuable work.
How high to hang art above a console, dresser, credenza, or desk
For a console, credenza, sideboard, or dresser, begin with 4–8 inches between the furniture and the frame. Use the smaller gap when the furniture is tall or the frame is small; use more space when very low furniture or a large frame would otherwise look cramped.
Above a desk, the desktop is not always the most useful reference. If a monitor is prominent, measure from the top of the monitor because the picture should relate visually to the monitor rather than float above it. Leave enough room for desk use, lamps, shelves, and the user’s normal posture.
Center the art over the furniture even if the furniture is not centered on the wall. A picture centered on the wall can look wrong when the console or dresser is visibly offset.
How high to hang a picture above a fireplace mantel
As a design starting point, place the bottom of the artwork approximately 4–8 inches above the mantel, and choose art or a grouping roughly two-thirds of the mantel or fireplace surround’s width. The fireplace architecture overrides the ordinary 57–60-inch center rule.
Recommended Free Tools
Important: the 4–8-inch design gap is not a fire-safety clearance. The fireplace manufacturer’s installation manual and applicable local requirements control. Clearances vary by fireplace, fuel type, mantel material, and model. For example, one cited Heat & Glo installation manual specifies a model-specific minimum clearance of 20 inches above the fireplace opening for a combustible mantel. That example must not be applied to every fireplace or treated as a clearance for artwork.
Before hanging art above an active fireplace, check the manual, measure the actual heat zone, and consider whether heat, soot, humidity, or vibration could damage the frame or artwork. Design advice from This Old House and Veranda is useful for proportion, but it does not replace the appliance instructions.
Hallway picture height
A hallway is usually viewed while standing and while moving, so begin at 57–60 inches on center. Framebridge suggests 60–66 inches for hallway frames, while its general gallery guidance retains approximately 57 inches. That difference reflects context rather than a settled universal standard.
Raise the picture only when close-range viewing, a low lower edge, or circulation makes it appropriate. Do not put a frame where it narrows the walking path, catches clothing, or conflicts with a door swing. In public or commercial circulation paths, the U.S. Access Board’s guidance limits wall-mounted objects with leading edges between 27 and 80 inches above the floor to a maximum 4-inch projection and calls for at least 80 inches of headroom. Those are accessibility rules for covered public environments, not a universal requirement for private-home decoration, but they are useful safety benchmarks in shared or busy spaces.
What’s actually slowing this PC down?
Pick the symptom - the matching free tool is one click away.
Dining rooms and rooms viewed primarily while seated
There is no single mandatory dining-room height. First identify the dominant viewing position:
- On an empty wall that is mostly seen while standing, use the normal 57–60-inch center range.
- Above a buffet or sideboard, use the furniture-gap rule.
- On a wall experienced mainly by seated diners, lower the composition modestly so it is comfortable from the chair rather than optimized only for standing viewers.
An accessible-exhibition guide from Miami-Dade Arts gives average seated eye height as 48 inches and standing eye height as 61 inches in an exhibition context. Those figures explain why a dining-room composition may benefit from a lower center; they are context for inclusive design, not a required residential measurement.
Rank #3
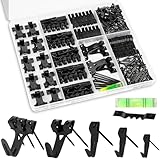
- EFFORTLESS ORGANIZATION: Our 385pcs Heavy Duty Picture Hanging Kit boasts an exceptional design with categorized compartments, saving you precious time that would otherwise be spent searching for the right hardware. Plus, when you're done using it, everything neatly tucks away, eliminating any post-project mess. Can replace picture hanging strips.
- TAILORED WEIGHT OPTIONS: Say goodbye to one-size-fits-all solutions! Our Heavy Duty Picture Hangers come with a variety of weight options (10LB, 20LB, 30LB, 45LB, 75LB), ensuring that whatever the size of your frame, we've got the perfect match to tackle your hanging needs. Various accessories help you decor your walls in bathroom, living room, bedroom.
- UNCOMPROMISING DURABILITY: Crafted from high-strength steel, our Heavy Duty Picture Hanging Kit guarantees not only longevity but also exceptional stability and security once your artwork is on the wall. Your frames will stay right where you want them, worry-free.
- VERSATILE HARDWARE ASSORTMENT: Experience the convenience of choice with our Wall Hanging Kit. Packed with a rich assortment of hardware, including heavy duty picture hangers, Sawtooth hangers, Hardware Nails, you'll have all the options you need for various hanging projects, tailored to your preferences.
- NEATLY PACKAGED DELIGHT: When you choose us, you're not just getting hardware; you're getting an elegantly organized experience. Every Heavy Duty Wall Hook, Sawtooth, Hardware Nail, is neatly arranged in a stylish plastic container. It's not just about hanging art; it's about adding a touch of sophistication to your entire hanging process.
How to hang pictures on a staircase
A staircase wall is not a flat rectangle, so do not measure every frame from the main floor as though each one belongs on a level horizontal line.
- Use painter’s tape to create a diagonal line that follows the slope of the stairs.
- Use that line as the visual centerline for the gallery.
- Arrange the frames so the composition ascends with the stairs.
- Keep the spaces consistent, while allowing slightly more separation if the slope or frame sizes make the layout easier to read.
- Check the arrangement from both the bottom and top of the stairs.
Framebridge’s staircase gallery guidance uses this taped-slope approach. Do not balance an ordinary ladder on stair treads. Use a stair-rated ladder, a properly secured professional setup, or a qualified installer.
Do these 3 things before closing this tab:
1Fix the driver behind crashes, sound loss and screen glitches2Clear out junk files and repair common Windows errors3Scan for outdated or missing drivers - takes under a minuteHow to calculate the exact hook or screw height
Once you know where the frame’s center belongs, calculate the hardware position:
Hook height = desired center height + (frame height ÷ 2) − hanging drop
Measure the complete outside height of the frame. Then pull the wire taut and measure from the top of the frame to the point where the wire will rest on the hook. For a D-ring, sawtooth hanger, or other direct-mount system, measure to the actual point that sits on the wall hardware. The Purdue hanging guide expresses the same calculation at a 58-inch center:
½ frame height + 58 − drop = nail height
Example: wire-hung frame
Suppose the frame is 24 inches high and the taut wire rests 2 inches below the top:
58 + (24 ÷ 2) − 2 = 68 inches
Install the hook at 68 inches above the finished floor. The frame will then be centered at 58 inches.
Example: D-rings
Suppose a frame is 30 inches high and its D-rings are 4 inches below the top. For a 58-inch center:
58 + (30 ÷ 2) − 4 = 69 inches
The top of the frame will be at approximately 73 inches and its bottom at approximately 43 inches. For two D-rings, measure and mark the left and right hardware positions separately, confirm the horizontal spacing, and use a level. Two independently supported points reduce tilting, but both must be installed into hardware appropriate for the wall and frame weight.
Formula when furniture controls the height
Above furniture, set the bottom edge first:
Bottom of frame = top of furniture + chosen gap
Then:
Top of frame = bottom of frame + frame height
If you need the hook height afterward, use the frame’s actual hanging drop and the resulting frame center in the first formula. This prevents the common mistake of placing the hook at the desired art-center height.
How large should the picture be?
Above furniture, make the total art width—one frame or the complete grouping—approximately two-thirds of the furniture’s width. Some design guidance allows a grouping to reach roughly 75 percent when the room, furniture, and surrounding architecture support it. Two-thirds is the safer starting proportion, not a hard limit.
The rule applies to the outside width of the entire arrangement, including the spaces between frames. A small picture above a large sofa, bed, console, or fireplace can look accidental even when it is hung at exactly the right height. If one work is too small, use a larger frame, add complementary pieces, or choose a more substantial grouping rather than raising the small picture.
Rank #4

- THE ORIGINAL GO HANG IT! Easy picture hanging with zero measuring required. Our patented positioning system marks your nail holes accurately on the first try, so you're not guessing, patching drywall, or rehanging crooked frames. Works with sawtooth, wire, and D-ring picture hangers.
- INNOVATIVE MAGNETIC KEY SYSTEM. Our patented MagneKeys stay securely in the tool until you need them. When you're ready to hang, insert a key into the hanger on the back of your frame, hold the frame where you want it on the wall, and press. The key marks exactly where your nail goes. Works with our single-notch precision hangers, sawtooth hangers, and D-hooks. For wire hanger frames, built-in positioning hooks let you mark your nail placement just as easily.
- BUILT-IN LEVEL FOR A STRAIGHT HANG. No need to dig through your toolbox for a separate level. The detachable level is built right in, so you can make sure every frame is perfectly straight before a single nail goes in the wall. It's especially helpful for frames with multiple hanging points and for getting that perfect gallery wall where every piece lines up.
- COMPLETE 85-PIECE HARDWARE KIT. Includes 2 Single-Notch Precision Hangers, 24 self-tapping screws, picture hooks rated at 10, 20, and 30 lbs, 6 D-hooks, 8 ft of hanging wire, 20 nails, and a storage case to keep it all together. Invented in the USA.
- PERFECT GIFT FOR EVERY OCCASION. Whether it's weddings, housewarmings, graduations, or for the DIY enthusiast in your life, Go Hang It! is the must-have tool and gift for anyone who hangs pictures. It extends to fit everything from small photo frames to large wall art, so one kit handles a whole house worth of hanging.
High ceilings do not automatically require higher art. Framebridge recommends retaining approximately 57 inches on empty walls even in high-ceiling rooms, while Martha Stewart allows a modest adjustment in rooms above 8 feet. The practical compromise is to preserve comfortable eye-level viewing and add visual height through a larger work, a vertical composition, or a gallery wall.
For extremely large artwork—Martha Stewart specifically discusses work taller than 120 inches—the ordinary center rule may put the bottom edge too close to the floor or the top edge too close to the ceiling. In that unusual case, the source recommends keeping the bottom roughly a foot above the floor. Treat that as an attributed exception for oversized installations, not a rule for ordinary home pictures.
Quick wins for a faster PC:
Fix the driver behind crashes, sound loss and screen glitchesFind Drivers →Clear out junk files and repair common Windows errorsFree Scan →Scan for outdated or missing drivers - takes under a minuteDriver Scan →Gallery walls, pairs, and triptychs
A gallery wall is one composition. Do not center the middle frame unless the arrangement is symmetrical and the middle frame actually represents the group’s center.
- Lay out every frame and measure the overall top, bottom, left, and right edges.
- Include the gaps between frames when finding the arrangement’s bounding box.
- For an empty wall, place the bounding-box center at approximately 57–60 inches.
- Above furniture, place the bottom of the lowest frame about 6–10 inches above the furniture.
- Center the full width over the sofa, bed, console, or other anchor.
Useful spacing ranges are:
- 2–3 inches: a compact, cohesive gallery wall;
- 2–5 inches: a broader starting range for mixed layouts;
- 3–4 inches: a practical gap for a vertical column or larger frames.
Measure spacing between the outer frame edges, not between the image windows or mats. Keep gaps consistent unless a deliberately graduated or asymmetrical composition calls for a different treatment. Avoid letting four frame corners meet at exactly one point; slight changes in frame position usually make the arrangement look more intentional.
Pairs and triptychs follow the same rule. Treat the pieces and their gaps as one combined composition, use the group’s overall center, and align their outer edges or centerlines according to the chosen design. Small errors are especially visible with identical frames, so measure rather than estimate.
A no-regret installation method
- Measure the setting. Record the wall width, furniture width and height, frame dimensions, door swings, windows, switches, outlets, and normal sightlines.
- Choose the controlling rule. Use 57–60 inches on center for an empty wall. Use a furniture gap when furniture or a mantel is the dominant anchor. Use a custom alignment for panel molding, shelving, stair slopes, or seated viewing.
- Check scale. Aim for approximately two-thirds of the furniture width, adjusting when the architecture or room supports a wider grouping.
- Make templates. Trace the outside of each frame onto kraft paper or newspaper. Mark the top, bottom, centerline, and hardware positions.
- Arrange on the floor. Set the templates out with the intended spacing. Measure the overall width and height, not only the position of one frame.
- Tape the templates to the wall. Check the view from standing and seated positions, from the sofa or bed, and from the room’s main entrance.
- Check practical clearances. Confirm that frames do not hit doors, switches, windows, lamps, vents, chair backs, or circulation paths. Above a fireplace, verify the appliance manual before drilling.
- Mark the hardware. Use the frame-specific formula for a wire, D-ring, or sawtooth hanger. Mark two-point hardware separately.
- Select wall-appropriate hardware. Identify whether the wall is drywall, plaster, masonry, brick, tile, wallpaper, or another substrate. Use a stud when practical, or a correctly rated anchor when no stud is available.
- Install and level. Hang the frame, check it from several viewpoints, and adjust until the composition is level and aligned.
- Stabilize the frame. Small rubber bumpers or suitable stabilizers at the lower corners can reduce shifting and wall contact.
This template-first process is also recommended in the Home Depot picture-hanging guide. It is slower than guessing once, but much faster than repairing several misplaced holes.
Outdated Drivers Are Slowing You Down
One free scan finds every outdated or missing driver and matches the right update for your exact hardware.Free scan · exact hardware matchWindows Errors? Fix Them Before They Spread
Repair common Windows errors and clear accumulated junk for a smoother, more stable PC - no reinstall needed.Free scan · no reinstallHardware and safety: choose for the wall and the consequence of failure
Studs, anchors, and wall material
A stud is generally preferred when the position works, but a suitable anchor can be appropriate when no stud is available. A drywall-rated hanger is not automatically suitable for plaster, masonry, tile, brick, or a hollow wall. Match the fastener to both the substrate and the actual weight of the complete framed object, including glazing and hardware.
For heavy, oversized, valuable, or unusually deep art, consider a professional installer or a French-cleat system. Home Depot describes French-cleat systems in its guide as handling frames from approximately 50 to 400 pounds depending on the system; that is a product-category range, not a promise for every cleat.
Wire, D-rings, and direct mounting
A properly measured wire is convenient, but it can shift and tilt if the frame is wide or heavy. The AIG art-installation guide identifies D-rings used with wall hooks as more secure than wire used with wall hooks and recommends screw-and-anchor designs over generic adhesive hangers for more demanding installations.
Use two independently installed hanging points for frames designed for them. Do not assume that two hangers automatically double a product’s weight rating. For example, 3M’s CLAW listings include 15-, 25-, 45-, and 65-pound versions and specifically warn that using two does not automatically double the supported weight. The frame must have two separate hanging points, and the object must remain within the package’s maximum claim.
Adhesive hangers and removable options
Adhesive strips are best reserved for light, low-consequence objects on suitable, properly prepared surfaces. Manufacturer ratings vary by product. Current U.S. Command listings show examples ranging from 1 pound for small picture-strip sets to 3 pounds for medium sets, 4 pounds for large sets, 5 pounds for sawtooth sticky hangers, and 8 pounds for wire-back sticky hangers. Product packaging, surface instructions, and current manufacturer limits control; these capacities should not be generalized to every Command product.
Do not use adhesive hardware for heavy or valuable art, over a bed where failure could injure someone, or on a wall surface that the manufacturer excludes. Renters can also consider picture rails, cable-hanging systems, picture ledges, or secured shelves. Leaning art avoids drilling but is not automatically safer: it can fall when bumped, especially near children, pets, stairs, or busy walkways.
Common mistakes and how to fix them
The picture is too high
Check the center of the complete frame, not the nail. On an empty wall, the center should generally be near 57–60 inches. If the picture is above furniture, check the gap from the furniture to the bottom edge instead. A picture can be mathematically centered on the wall and still be too high for the sofa or console below it.
Best Value

- Perfect Picture Hanging Kits: 310Pcs Accessories Including Wire, Hooks, Nails, etc. In A Hardware Box
- Essential Hardware Kit Picture Hanging Kit, Ideal For Home Projects And Decorative Items
- Helpful For You To Hang Up Pictures, Photos, Posters, Framed Maps, Framed Postcards, Paintings In Home, Office, Workplace, Or Anywhere You Need To Hang Artwork
- Heavy Duty Picture Hanger Hooks Are Rated At 10lb, 20lb, 30lb, 50lb, 100lbs. They Are Matched Perfectly With The Nails In The Box, Making It Easy To Hang Pictures Of Different Sizes On The Wall.
- Packaged In A Safe, And Hard Box For Easy Storage
The 57-inch rule puts a large picture too close to the floor
Use the furniture, architecture, or practical floor clearance as the controlling reference. For exceptionally large work, a bottom edge about a foot above the floor may be more balanced than a strict center rule. For ordinary tall walls, consider larger art or a taller grouping rather than moving a small frame upward.
The art looks too far above the sofa or bed
Lower it until the bottom edge is approximately 6–8 inches above the sofa or 7–10 inches above the headboard. Recheck from the normal seated position. The furniture relationship takes priority over a floor-based center measurement.
The gallery wall looks lopsided
Measure the outermost edges of the whole arrangement. Recalculate the bounding-box center and total width. Do not use the center of one frame unless the layout is symmetrical. Also check whether the group is centered over the furniture rather than the wall.
The frame keeps tilting
Use two-point hardware for a wide or heavy frame, confirm that both fasteners are level, and consider small stabilizing bumpers. A wire can shift on a single hook; direct-mounted D-rings or a cleat may provide better control.
There is no stud where the picture belongs
Choose an anchor rated for the wall type and object weight, or shift the layout so a stud can be used. For heavy or valuable pieces, use a cleat, an appropriate structural fastening system, or professional installation rather than relying on an undersized generic anchor.
Free tools Windows power users keep installed
One-click scans. No signup required.
You rent and cannot drill
Use a picture rail, cable system, picture ledge, secured shelf, or a removable adhesive product that is explicitly rated for the complete object and your wall surface. Follow removal instructions carefully. A lightweight picture may be suitable; a valuable or heavy frame generally is not.
The mantel is too high
Do not force a 4–8-inch design gap if it conflicts with the fireplace’s required clearance or leaves the art crowded against the ceiling. Check the appliance manual, then consider a smaller frame, art on an adjacent wall, or a different decorative arrangement.
Final hanging checklist
- Measure the complete outside frame, not only the image or mat.
- Choose between the floor-center rule and the furniture-gap rule.
- Use 58 inches as the empty-wall starting point, within the 57–60-inch range.
- For a grouping, calculate the center of the entire bounding box.
- Check that the art is approximately two-thirds of the furniture’s width.
- Use paper templates before drilling.
- Measure the wire drop or D-ring position and calculate the actual hook height.
- Select hardware for the frame’s weight and the wall’s material.
- Check standing and seated sightlines.
- Confirm that the picture does not protrude into a circulation path.
- Follow the fireplace manual rather than treating a design gap as a safety clearance.
- Use safe access equipment on stairs and seek professional help for heavy, valuable, oversized, or awkwardly located work.
Frequently Asked Questions
Is 57 inches a required picture-hanging height?
No. It is a widely used design convention. Institutional guides commonly use 58 inches, while home-design sources recommend approximately 57–60 inches or 60 inches. Use the range as a starting point and adjust for furniture, viewing posture, household height, architecture, and safety.
Should I measure from the floor or the furniture?
Measure from the finished floor when the wall is empty and the picture is viewed mainly while standing. Above a sofa, bed, desk, console, dresser, or mantel, measure the gap from the furniture to the bottom of the frame instead.
The Tool Desk
Outbyte Driver Updater FREEScan for outdated or missing drivers - takes under a minuteDriver Scan →Outbyte PC Repair FREERepair Windows errors before they cause bigger problemsFix Now →How do I find the nail height for a wire-hung picture?
Use: desired center height + half the frame height − hanging drop. For example, a 24-inch-tall frame with a wire resting 2 inches below the top, centered at 58 inches, needs a hook at 68 inches.
How far apart should gallery-wall frames be?
Use about 2–3 inches for a compact arrangement, or roughly 2–5 inches as a broader starting range. Measure between the outside edges of the frames and keep the spacing consistent unless the layout is deliberately asymmetrical.
The Bottom Line
For most empty walls, put the center of the complete framed picture at about 58 inches above the finished floor. Above furniture, ignore the floor rule when necessary and set the bottom edge by the relationship below it: usually 6–8 inches above a sofa, 4–8 inches above a console, and 7–10 inches above a headboard. Then calculate the hook position from the frame height and hardware drop. The best height is the one that keeps the art comfortable to view, correctly scaled, securely installed, and visually connected to the room.
Quick Recap

Product prices and availability are accurate as of the date/time indicated and are subject to change. Any price and availability information displayed on Amazon at the time of purchase will apply.

