Quick wins for a faster PC:
Do these 3 things before closing this tab:
1Fix the driver behind crashes, sound loss and screen glitches2Clear out junk files and repair common Windows errors3Scan for outdated or missing drivers - takes under a minuteRepair Windows errors before they cause bigger problemsFix Now →Scan for outdated or missing drivers - takes under a minuteDriver Scan →Clear out junk files and repair common Windows errorsFree Scan →
ThatPainter is reader-supported. When you buy through links on our site, we may earn an affiliate commission. Learn More
To add piping to a pillow, wrap a fabric strip around welt cord, baste the covered cord to one pillow panel, then sew the second panel over it with the seam close beside the cord. First decide how the pillow will open: a removable overlapping back or zipper needs to be planned before you sew the perimeter; a stuffed pillow needs an opening for turning and filling.
Choose the pillow closure before you start
Piping is cord enclosed in fabric and caught in the seam around a pillow’s edge. The assembly depends on whether you want to remove the cover or stuff a finished pillow.
As an Amazon Associate I earn from qualifying purchases.
Recommended Free Tools
| Construction | How it works | Best fit |
|---|---|---|
| Stuffed pillow | Leave an opening in the perimeter seam, turn the pillow right side out, add stuffing, then hand-stitch the opening closed. | A pillow that is not intended to have a removable cover. |
| Overlapping back | Prepare the back as overlapping panels, then sew it to the front with piping between the layers. | A removable cover without a zipper. See AllPeopleQuilt’s overlapping-back instructions. |
| Zipper | Install the zipper in the cover construction before closing the piped perimeter. | A removable cover with a zippered opening. Brother’s 2025 cushion-cover tutorial pairs piping with an invisible zipper. |
Use the closure method supported by your pattern, and make sure the opening is in place before sewing the final perimeter seam.
Gather supplies and calculate the strip width
You’ll need pillow fabric, welt cord, matching thread, fabric shears, pins or clips, and a zipper foot or compatible piping foot. Include a pillow form if you’re making an insert-style cover. A zipper foot is used in both Hobby Lobby’s piping guide and AllPeopleQuilt’s tutorial; Brother notes that a compatible piping foot is another option for stitching close to the cord. Check that any specialty foot fits your sewing machine.
#1 Best Overall

- Quality Material: our cotton piping cord is made from quality cotton, ensuring a natural and soft feature; The quality of the cotton ensures reliability and strength, making the cord ideal for extensive use in various projects
- Color and Size: the color of the piping cord for sewing is exactly as shown in the picture; Giving a natural and neutral appearance, it's the nice choice for many projects; The cord measures approximately 1/4 inches in diameter and is about 46 yd in length, providing plenty of material for your craft needs
- Convenient Packaging: the cotton piping cord comes in a roll format for ease of use; No more need to worry about knots disrupting your crafting experience, the roll packaging ensures the cord remains neat and convenience use
- Wide Application: the versatility of the welting cord makes it the ideal component for a variety of crafts and projects; You can use it for crochet, knitting, weaving, or even as a trim in garments, cushions, or curtains
- Ideal Gift: the upholstery piping cord makes for an ideal gift for crafting enthusiasts; It's a token of love for people with an interest in crafting; Its natural color blends with different designs, making it a useful and thoughtful present
Work out the strip width from the cord and seam allowance rather than copying a measurement from a different project:
Strip width = (cord width + seam allowance) × 2
For example, AllPeopleQuilt’s calculation uses 3/8-inch cord and a 1/4-inch seam allowance: (3/8 + 1/4) × 2 = 1 1/4 inches. Published project dimensions vary: Hobby Lobby uses 2-inch strips with quarter-inch cording, while JOANN’s outdoor-fabric pillow project specifies 1 3/4-inch strips. These are project examples, not universal sizes.
Free tools Windows power users keep installed
One-click scans. No signup required.
Rank #2

- Professional grade Cotton Piping Welt Cord direct from the United States manufacturer. This extra-smooth piping is far superior to imported cording found in craft stores and online.
- Comes perfectly wound on easy-to-use cardboard tube. Dispenses easier than product shipped in bags. Ships flat.
- Perfect for pillows and other soft welt application.
- Washable when encased in fabric.
- Made in USA with domestically grown 100% cotton filler with polyester braid - Thank you for supporting American manufacturers and farmers.
Make the piping
Cut and join the fabric strips
Cut fabric strips on the bias—the diagonal direction across the fabric—so they have some give when eased around corners or curves. If one strip is not long enough to cover the pillow perimeter, join strips diagonally with right sides together. Trim the seam allowance and press the join open to reduce bulk.
Enclose the cord
- Fold a strip lengthwise around the cord with the wrong side facing out and the raw edges aligned.
- Fit the machine with a zipper foot or compatible piping foot. Position the needle to stitch close beside the cord, but not through it.
- Stitch along the length to hold the cord inside the fabric. Leave the ends available to join neatly when you apply the piping around the pillow.
Sewing into the cord can keep the pillow seam from sitting snugly beside it, so adjust the foot or needle position as needed to sew close without piercing the cord.
Rank #3

- Quality Material: our cotton piping cord is made from quality cotton, ensuring a natural and soft feature; The quality of the cotton ensures reliability and strength, making the cord ideal for extensive use in various projects
- Color and Size: the color of the piping cord for sewing is exactly as shown in the picture; Giving a natural and neutral appearance, it's the choice for many projects; The cord measures approximately 1/4 inches in diameter and is about 9.3 yd in length, providing plenty of material for your craft needs
- Convenient Packaging: the cotton piping cord comes in a roll format for ease of use; No more need to worry about knots disrupting your crafting experience, the roll packaging ensures the cord remains neat and convenience use
- Wide Application: the versatility of the welting cord makes it the ideal component for a variety of crafts and projects; You can use it for crochet, knitting, weaving, or even as a trim in garments, cushions, or curtains
- Ideal Gift: the upholstery piping cord makes for an ideal gift for crafting enthusiasts; It's a token of love for people with an interest in crafting; Its natural color blends with different designs, making it a useful and thoughtful present
Baste piping to the first pillow panel
- Place the pillow front right side up.
- Lay the piping around its perimeter with the raw edges of the piping aligned to the panel’s raw edge. Begin on a straight side, not at a corner.
- At corners, ease the piping around the turn. If its seam allowance resists lying flat, make small clips in the seam allowance only; stop before the stitching line.
- When the piping reaches its starting point, finish the cord join before proceeding around the remaining edge.
Join the piping ends
One straightforward finish is to trim the cord ends so they meet, fold the fabric edge at one piping end under, and overlap that folded end over the other. The exact fabric treatment can vary with the project: JOANN’s instructions describe an angled overlap, and Brother’s 2025 tutorial opens the fabric at both ends, joins the fabric as for quilt binding, then trims the cord ends so they just meet. Follow the method that best suits your strip and pattern, keeping the cord ends butted rather than bulky where they meet.
Quick Recap
Best Value
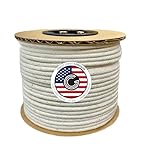
- Professional grade Cotton Piping Welt Cord direct from the United States manufacturer. This extra-smooth piping is far superior to imported cording, with twice the density, for cord that holds its shape, making better looking projects that look great for years.
- Comes perfectly wound on easy-to-use cardboard spool.
- Perfect for pillows and other soft welt application.
- Washable when covered in fabric. Hand wash or delicate cycle.
- Made in USA with domestically grown 100% cotton filler with polyester braid - Thank you for supporting American manufacturers and farmers.
Rank #4

- Package Inclusion: your crafting journey just got upgraded; The package includes 1 roll of piping cord, expertly packaged and ready to kickstart any crafting, sewing, or binding project you have in mind
- Quality: immerse yourself in the exquisite standard of cotton material applied to create the welting cord for upholstery; Naturally colored, this item stays true to the feature of cotton, giving you a product as quality and reliable as possible
- Dimensions: experience the balance between size and convenience with our cotton cord, boasting a diameter of about 0.2 inch/ 5 mm and length of approximately 9.2 m/ 10.06 yd; These precise measurements cater to your various project needs
- Versatile Applications: whether you're an aspiring designer or a seasoned seamstress, our upholstery piping cord is designed for widespread use; From cushion making to garment design, this one product will meet numerous tailoring requirements
- Ideal Gift: offer the promise of creativity to your loved ones with our welting cord; Whether they're into DIY, craft projects, or professional sewing, this natural and quality piping cord serves as the thoughtful gift
Sew the pillow layers together
- Place the second panel over the first, right sides together, so the piping is sandwiched between them and all raw edges align.
- Sew around the perimeter close to the piping, using the zipper foot or compatible piping foot to guide the seam beside the cord.
- Leave the planned opening for a stuffed pillow, or complete the overlap or zipper construction for a removable cover.
- Turn a stuffed pillow right side out through its opening, insert the form or stuffing, and hand-stitch the opening closed. Turn a removable cover right side out and fit it over the pillow form.

Product prices and availability are accurate as of the date/time indicated and are subject to change. Any price and availability information displayed on Amazon at the time of purchase will apply.




