Recommended Free Tools
PC Slower Than It Used to Be?
Free scan · Windows 10 & 11
Outdated Drivers Are Slowing You Down
Free tools Windows power users keep installed
One-click scans. No signup required.
Free scan · exact hardware match
Windows Errors? Fix Them Before They Spread
Free scan · no reinstall
ThatPainter is reader-supported. When you buy through links on our site, we may earn an affiliate commission. Learn More
English paper piecing (EPP) is a hand-piecing method in which fabric is wrapped around individual paper or cardstock templates and then sewn to other prepared shapes along their folded edges. The paper keeps every patch accurate while you work and is removed after the surrounding seams are secure.
You do not need a sewing machine for traditional EPP. With a few paper hexagons, fabric scraps, a fine needle, and thread, you can make a small flower, coaster, pincushion, mug rug, or quilt block almost anywhere. This guide covers the complete process—from printing templates and choosing a seam allowance to basting, whipstitching, curves, paper removal, finishing, and troubleshooting.
Do these 3 things before closing this tab:
1Scan for outdated or missing drivers - takes under a minute2Clear out junk files and repair common Windows errors3Fix the driver behind crashes, sound loss and screen glitchesWhat is English paper piecing?
In EPP, the paper template represents the finished shape of the fabric patch. You cut the fabric slightly larger than the template, fold the excess fabric over the paper, and temporarily secure those folded edges with thread or glue. Once several shapes are prepared, you place them right sides together and hand-stitch along the folded fabric edges.
#1 Best Overall

- 𝑩𝒊𝒓𝒕𝒉𝒅𝒂𝒚 𝑮𝒊𝒇𝒕𝒔 𝑰𝒅𝒆𝒂𝒔: This sewing kit is terrific gifts for people who travel frequently, mother, grandmother, backpacker, adults, kids and teen girls! The emergency kit is also suitable for both men and women, beginners and professionals alike, and it is definitely something that everyone needs in their life
- 𝑴𝒆𝒆𝒕 𝑩𝒂𝒔𝒊𝒄 𝑺𝒆𝒘𝒊𝒏𝒈 𝑵𝒆𝒆𝒅𝒔: This sewing kit includes all the necessary tools for basic sewing - thread, needles, scissors, buttons, thimbles, measuring tape, threader, seam ripper, safety pins and other sewing accessories - all neatly packaged and ready for use, college dorm room essentials for teen girls boys
- 𝑺𝒊𝒎𝒑𝒍𝒆 𝑺𝒆𝒘𝒊𝒏𝒈 𝑺𝒕𝒂𝒓𝒕𝒆𝒓 𝑲𝒊𝒕: Whether you are a beginner or a professional tailor, you can easily use this kit. With this sewing tool kit, you don't have to go to a tailor for basic repairs – you can be self-sufficient and handle small repairs on your own, saving you money and time and making your life easier
- 𝑻𝒓𝒂𝒗𝒆𝒍 𝑬𝒔𝒔𝒆𝒏𝒕𝒊𝒂𝒍 𝑪𝒐𝒎𝒑𝒂𝒏𝒊𝒐𝒏: All sewing accessories are securely fastened with elastic bands in a convenient zippered case to keep everything tidy and you can use it whenever you need it. The compact and lightweight design makes it easy to carry, and you can put the travel sewing kit in your handbag or suitcase for emergencies
- 𝑬𝒏𝒋𝒐𝒚 𝑻𝒉𝒆 𝑭𝒖𝒏 𝒐𝒇 𝑯𝒂𝒏𝒅 𝑺𝒆𝒘𝒊𝒏𝒈: You can use this mini sewing kit with your child to sew their stuffed toys or cute pet clothes by hand. You can also use it to teach your kids to make beautiful handicrafts, unleash their creativity, and enjoy happy family time in their spare time
The paper is not sewn into the finished patchwork. It is a temporary form that supports the fabric, keeps the shape stable, and helps adjoining edges line up. Remove each paper only after the edges that depend on it have been joined and stabilized.
The method is also described as piecing over paper, mosaic patchwork, or template piecing. Museum collections document paper-based patchwork made with reused letters, newspapers, advertisements, music, and other papers. EPP is commonly associated with English or British patchwork traditions, including surviving late-eighteenth-century examples, but an exact single origin date is not settled. Historical materials are useful context, not automatically suitable modern supplies; unstable or acidic paper can damage a new quilt. See the Victoria and Albert Museum’s history of quilting and patchwork, the Charleston Museum’s paper-template-piecing overview, and the International Quilt Museum’s documented example.
EPP versus FPP: what does “paper piecing” mean?
“Paper piecing” is an ambiguous phrase. English paper piecing and foundation paper piecing both use paper, but they are different construction methods.
| Method | What the paper does | How fabric is joined | Typical equipment | Is paper reusable? |
|---|---|---|---|---|
| English paper piecing (EPP) | Shapes and temporarily stabilizes individual patches | Prepared fabric shapes are joined along their folded edges, usually by hand | Needle and thread; glue is optional | Usually, if the paper is not pierced or badly damaged |
| Foundation paper piecing (FPP) | Provides printed sewing lines and acts as a foundation for the block | Fabric is sewn directly through the printed foundation, commonly by machine | Usually a sewing machine, rotary cutter, and printed foundation | Usually not, because it is sewn through and torn away later |
| Ordinary hand piecing | No paper foundation | Fabric patches are sewn along marked or measured seam lines | Needle and thread | Not applicable |
In EPP, you cover separate paper shapes before joining them. In FPP, the paper normally carries the block’s sewing lines and remains under the fabric while you sew the seams. The Brother paper-piecing comparison and this Quilt Museum technique sheet illustrate the distinction.
What supplies do you actually need?
Minimum EPP kit
- Paper or cardstock templates: Buy pre-cut EPP papers or print and cut your own.
- Fabric: Quilting cotton and clean fabric scraps are easy places to start.
- A fine, sharp hand-sewing needle: Choose one that passes comfortably through the folded fabric.
- Fine, strong thread: Use a single strand for joining unless your pattern specifies otherwise.
- Fabric scissors or small snips: You need to cut fabric and trim thread.
Helpful but optional supplies
- Water-soluble fabric glue and a fine-tip glue pen
- Acrylic cutting templates
- Clips or small appliqué pins for holding prepared pieces together
- A thimble or needle threader
- A small iron or pressing tool
- A hole punch or pre-punched papers to make removal easier
- A transparent template, fussy-cutting mirror, or light box for motif placement
Glue, acrylic rulers, special needles, and branded papers can make a project more convenient, but none is required for traditional EPP. The Paper Pieces beginner guide, A Quilting Life supply guide, and Missouri Star’s introduction all show variations on a basic kit.
Choose a first EPP project
Hexagons are the usual beginner recommendation because they have straight edges, recognizable corners, and a forgiving range of layout options. They are especially familiar from Grandmother’s Flower Garden designs. That makes them a practical starting point, not a rule about what EPP must be.
For a first project, choose one small unit such as:
Do these 3 things before closing this tab:
1Clear out junk files and repair common Windows errors2Scan for outdated or missing drivers - takes under a minute3Repair Windows errors before they cause bigger problems- A six-petal hexagon flower
- A mug rug or coaster
- A pincushion or small pouch motif
- A single quilt block
- A small appliquéd panel
Squares, diamonds, triangles, pentagons, jewels, clamshells, apple cores, and other shapes work well too. Start with straight-edged shapes before attempting a large curved sampler, tiny pieces, or a complex star with multiple inset seams. The Paper Pieces beginner information and Sue Daley’s shape discussion show how broad the technique can be.
Prepare the templates and fabric
1. Check the printed scale
If your templates come from a digital pattern, print at the scale specified by the designer. A setting such as 100% or Actual Size is often required, but the pattern’s own instructions take precedence. Print the test square or measure a known dimension before cutting a full batch.
Do not try to correct a wrongly printed template by changing the fabric seam allowance. If the test measurement is wrong, stop, reprint, and check again. A small scale error repeated across many pieces can produce mismatched edges, uneven units, and a block that is the wrong size. See Julia Wachs Designs’ printing guidance and Electric Quilt’s template-printing instructions.
2. Choose pre-cut or homemade papers
Pre-cut papers save time and provide consistent dimensions, which is valuable when a project contains dozens or hundreds of repeated pieces. Their drawback is cost.
Quick wins for a faster PC:
Scan for outdated or missing drivers - takes under a minuteDriver Scan →Clear out junk files and repair common Windows errorsFree Scan →Fix the driver behind crashes, sound loss and screen glitchesFind Drivers →Homemade templates are inexpensive and useful for testing a design. Trace the shapes onto sturdy paper or cardstock and cut accurately. Thin, distorted, or inconsistently cut papers can make otherwise careful sewing inaccurate. An acrylic template may help you cut fabric consistently, but it is a cutting aid—not a replacement for the removable paper piece.
3. Decide on the fabric allowance
Cut the fabric larger than the paper on every side. The exact amount is pattern-dependent:
- ¼ inch: a common allowance that uses less fabric and creates less bulk.
- Scant ⅜ inch or ⅜ inch: used by some EPP makers when they want more fabric to handle, particularly with curves or fabrics that fray easily.
Choose the allowance specified by the pattern and use it consistently. Do not switch halfway through a project: the paper edge, not the outer edge of the fabric, determines the finished shape.
The difference affects fabric consumption. In one Inklingo example using 1-inch hexagons, a particular layout fits approximately 270 shapes per yard with a ¼-inch allowance versus 192 with a ⅜-inch allowance—about 40% more shapes in that layout. This is an example, not a universal fabric-yield calculation for every shape or cutting arrangement. The Inklingo EPP tutorial explains the comparison.
Rank #2
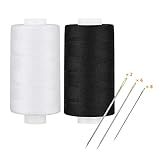
- Sometimes we don't need so many items in a sewing project kits, thread and needle is enough for daily repair and mending
- Affortable ALL PURPOSE QUALITY THREAD from Simthread, it is important to choose the RIGHT THREAD to your fabric (clothes)
- Perfect thread for "everyday " sewing... and you can never have enough black or white thread!
- This all purpose thread polyester thread works well with machine or hand sewing and is great on all types of fabric
- For daily repairing clothes such as garment, jackets and jeans
4. Cut and position the fabric
Place the paper template on the wrong side of the fabric. Center it so the allowance is reasonably even on all sides, then cut around the paper using the allowance you selected. The fabric does not need to be perfectly centered for ordinary scraps, but every corner must have enough material to fold over and cover the paper.
5. Consider fussy cutting
Fussy cutting means deliberately positioning a motif inside the finished shape instead of cutting randomly from the fabric. Repeating the same placement can produce mirrored, kaleidoscopic, or secondary designs.
For reliable fussy cutting:
- Choose a motif large enough to fit inside the finished paper shape.
- Pay attention to the direction of stripes, florals, words, or other directional prints.
- Cut pieces one at a time when identical motif placement matters.
- Mark orientation on the fabric’s wrong side if the print can easily rotate.
- Keep the fabric facing the same direction as you wrap each paper.
Acrylic or transparent templates and fussy-cutting mirrors are optional aids. Fussy cutting is a design choice, not a requirement for EPP; random scraps work just as well for a first practice piece. See this Quilt Museum fussy-cutting example and the Paper Pieces overview.
How to prepare one EPP piece
- Place the paper: Put the template on the wrong side of the fabric.
- Check the allowance: Make sure enough fabric extends beyond every paper edge.
- Fold the first edge: Fold the fabric over the paper and crease it with a finger or light pressing.
- Make a clean corner: Fold the adjoining edge so the corner is covered without a bulky flap.
- Secure the fold: Use thread or a small amount of water-soluble glue.
- Continue around the shape: Fold each edge, forming crisp corners as you go.
- Inspect the back: The paper should remain flat, and the fabric should hug it without bubbles, gaps, or loose corners.
- Press lightly if useful: A finger press, small iron, or regular iron can settle the folds once the piece is secure.
At a corner, fold the point or first side consistently, then fold the adjoining sides over it. If a corner is not covered, the paper was probably off-center, the allowance was cut too narrowly, or the folding order was inconsistent.
Free tools Windows power users keep installed
One-click scans. No signup required.
Choose a basting method
Basting holds the fabric around the paper temporarily. There is no single universally correct method. Your choice depends on whether you want to reuse the papers, how quickly you want to prepare pieces, and whether you are working with curves.
| Method | Best fit | Main advantage | Main drawback | Paper reuse |
|---|---|---|---|---|
| Fabric-only thread basting | Reusable papers and traditional handwork | Does not pierce the paper; basting thread usually does not need to be removed before paper removal | Can be slower and may need extra stitches on long or curved edges | Usually easiest |
| Through-paper thread basting | A very firm temporary hold | Strong stabilization while wrapping and sewing | Every basting stitch must be removed before the paper can come out; paper may be damaged | Less likely |
| Glue basting | Fast preparation, curves, or many pieces | Quick and smooth when used sparingly | Too much adhesive can gum the needle or make removal difficult | Depends on the glue and how aggressively it was used |
Option A: fabric-only thread basting
With this variation, the needle passes through the folded fabric, not the paper. Catch the corners and add a stitch along a long edge if the fold needs more support. Some makers use only corner catches; others add short basting stitches along each side.
Because the paper remains unpierced, it is usually easier to reuse. The basting thread can often stay in the seam allowance, although you should remove it if it is visible, interferes with joining, or the pattern instructs you to do so. Use a contrasting thread if you want temporary stitches to be easy to find. Guides from A Quilting Life, Missouri Star, AccuQuilt, and The Sewing Directory describe fabric-only approaches.
Option B: thread basting through the paper
Here, the needle passes through both the fabric and paper. It makes a firm package, and one published beginner workflow uses basting stitches of approximately ¼ inch. The trade-off is removal: you must cut or pull out those stitches before the paper can be removed, and the holes may weaken the paper so it cannot be reused.
Crashes, No Sound, or Screen Glitches?
Random freezes, missing sound and display glitches usually trace back to one bad driver. Find and replace yours safely.Free scan · under a minutePC Slower Than It Used to Be?
A free scan shows the junk files, broken settings and background clutter dragging Windows down - then fixes them in one click.Free scan · Windows 10 & 11This is a legitimate method choice rather than a mistake. Use it when firm stabilization matters more than paper reuse, and keep the basting thread distinct from the thread you use to join the pieces. AllPeopleQuilt’s EPP sequence demonstrates through-paper basting, while several other instructors prefer not to pierce their papers.
Option C: glue basting
- Place the paper template on the wrong side of the fabric.
- Apply a thin line or a few small dots of water-soluble glue to the paper, just inside its edge.
- Keep the exposed fabric seam allowance free of glue.
- Fold the fabric over the paper and press it into place with your finger.
- Use only enough adhesive to hold the fold.
Applying glue to the paper rather than directly to the fabric helps keep the seam allowance clean. Glue placed on or beyond the edge can make stitching difficult and may gum the needle. If the needle begins dragging or collecting residue, stop, use less glue, and clean or replace the needle. Sue Daley’s glue-basting advice gives the same caution.
Choose a needle and thread
Start with a fine, sharp hand needle and fine, strong thread. The best combination is the one that moves smoothly through the folded fabric without shredding, excessive resistance, or visible stitches on the front. Test it on a scrap before preparing an entire project.
- Use single-strand thread for joining unless your pattern says otherwise.
- A contrasting thread is convenient for temporary basting because it is easy to see and remove.
- A neutral or matching thread helps joining stitches blend into the seam.
- Silk thread is one option because it can blend into fabric; fine polyester is another option favored by some makers because it resists shredding as it passes across paper.
- Size 11 milliners needles are a specific preference recommended in Sue Daley’s instructions, not a universal EPP requirement.
If the needle is hard to pull through, the thread frays, or the stitches appear on the front, change the needle-thread combination rather than pulling harder or tightening the stitches.
How to join two prepared pieces with a whipstitch
The whipstitch is the clearest joining stitch for beginners and the most common EPP default. It passes diagonally over the seam edge while catching a small amount of each folded fabric edge.
- Place the pieces right sides together. The paper shapes should be on the outside, facing away from each other.
- Align the edges. Match the two paper edges and the folded fabric edges from corner to corner.
- Hold the pieces. Use a clip or place a pin away from the immediate stitching path. Avoid shifting the aligned edges as you begin.
- Start near a corner. One published method begins about ⅛ inch from the corner. Secure the thread with a small knot or another method appropriate to your pattern.
- Take a small stitch. Catch only a tiny bite of the folded fabric edge on one piece, then the other. Do not pierce the paper.
- Repeat along the seam. Keep the stitches close enough to secure the seam, but do not pull so tightly that the fabric puckers or the paper edges buckle.
- Finish at the opposite corner. Secure the thread with a small knot, backstitch, or the method specified by the pattern.
Think of the needle as traveling through the seam allowance only. If stitches show on the front, make them smaller and catch less fabric. If the seam puckers, relax the thread tension and check that the paper edges were aligned before sewing. The AllPeopleQuilt tutorial demonstrates the corner start, single-strand joining thread, and fabric-only whipstitching.
Other joining stitches
- Whipstitch: the easiest default; diagonal stitches cross over the seam edge.
- Flat-back stitch: an alternative that can produce a flatter seam appearance.
- Ladder stitch: another low-visibility option for selected constructions.
Terminology and exact motions can vary between designers, so learn the stitch from a close-up illustration or demonstration rather than relying only on its name. Paper Pieces’ stitch guide covers whip, flat-back, and ladder stitches.
Rank #3

- Complete Sewing Kit-The travel sewing kit contains all the necessary tools that are required for performing basic repairs-a scissor, threads (18 colors), 30 sewing needles, shirt buttons, seam ripper, needle threader tools and a foldable tape measure.
- Lightweight and Portable - You no longer need a bulky sewing basket or sewing box, the small sewing kit weighs only 6oz and is compact enough to fit in your bag, travel case, office desk drawer or car .You will always be prepared for any hand sewing emergencies.
- Easy to Use -Everything is kept in place with handy elastic bands, so you can easily access whatever you need. You can be your tailor whenever with just a single unzipping!
- A Practical Gift - This sewing repair kit makes a great and considerate present for any one like daughter, mother, grandmother, students, backpacker, traveler, or even a sewing beginner. take it as a gift to them, sure they will love it, and much appreciated with your gift.
- MARCOON SERVICE:We are dedicated to providing the product of high-quality and affordable price for our customers. If you are unsatisfied with the product, please contact us immediately via email, our after-sales service team will provide you with a satisfactory solution for you within 24 hours!
An appliqué stitch is different: it is normally used to attach a completed EPP unit to a background, not to join ordinary neighboring EPP pieces.
Make a small hexagon flower
A simple flower is a useful first exercise because it lets you practice preparation, layout, repeated seams, corners, and joining a new piece to an existing unit.
- Prepare the papers. Use one center hexagon and six matching petal hexagons, or follow the number in your pattern.
- Cut the fabric. Cut each piece with the pattern’s chosen allowance. For fussy cutting, position each motif before cutting.
- Baste every shape. Keep the paper flat and the corners covered.
- Lay out the flower. Check color, print direction, motif placement, and the orientation of every piece before stitching.
- Join the petals to the center. Sew one complete shared edge at a time with a small whipstitch. Keep the right sides together while joining.
- Add the next petal. Align its edge with the center and, where applicable, with the neighboring petal. Sew each required edge in the pattern’s order.
- Check the front frequently. Look for open holes, shifted points, or puckering before continuing.
- Press lightly. Keep the papers in place while the unit is being built so the shape remains supported.
For a larger flower or a more complex arrangement, mark the layout with a quick photograph or a numbered sketch. This is especially useful when directional prints or fussy-cut motifs must remain in a particular orientation.
Corners, inset pieces, and Y-seams
Ordinary EPP corners are handled by folding the fabric consistently and keeping the paper edges aligned. Do not pull the joining thread so tightly that a sharp point collapses.
An inset piece or Y-junction needs more planning. Follow the pattern’s sewing order, sew one edge at a time, and stop and secure at the meeting point rather than forcing one continuous seam around several directions. Turn the work and inspect the front as you go. This helps reveal a small hole or pucker before it becomes difficult to correct.
What’s actually slowing this PC down?
Pick the symptom - the matching free tool is one click away.
Some star and pie-shaped units must be assembled in a particular sequence—often by joining halves and then bringing them together through the center—to avoid a hole at the junction. That is a pattern-specific construction issue, not a rule that applies to every EPP star. Follow the designer’s diagrams and the construction warnings in the Sue Daley EPP instructions.
How to sew curved EPP shapes
Curved EPP is possible, but straight-edged shapes are a better place to learn the basic handling. Pre-cut curved papers or accurate templates make the process more predictable.
For a concave curve
- Clip or notch the seam allowance carefully so it can spread around the curve.
- Do not cut into the finished seam line.
- Ease the allowance gradually with several small adjustments rather than making one large fold.
- Use a small amount of glue if that helps the curve stay smooth during preparation.
- Practice with one or two shapes before cutting the entire project.
If the curve develops pleats, the clips may be too shallow, the fabric may not have been eased evenly, or the paper may not be sitting flat. Unwrap and correct the preparation before joining. Julia Wachs Designs’ curved-EPP guidance discusses clipping concave allowances, and this Sue Daley curved-EPP demonstration shows glue-basting techniques.
When should you remove the papers?
Do not remove a paper while an exposed edge still needs to be joined.
Special offer. See more information about Outbyte and uninstall instructions. Please review EULA and Privacy policy.
Remove a template when all of its relevant edges have been sewn to adjoining pieces, or when the finished unit has been sufficiently stabilized by its construction. Removing it too early can allow the fabric edge to distort and make accurate joining much harder.
Removing a thread-basted paper
- Turn the unit to the back.
- If the basting went through the paper, cut or pull out those basting stitches first.
- If the basting caught fabric only, remove it only if it interferes with the next step or remains visible.
- Pull the paper out through the least-constrained opening.
- If needed, use a blunt needle, stiletto, or the blunt end of a tool through a punched hole to lift the paper. Avoid tearing the seam.
Removing a glue-basted paper
- Gently peel the fabric away from the paper.
- Work slowly around the edges instead of yanking the template.
- If adhesive has been over-applied and the paper is stuck, use steam or slightly dampen the area only if that is safe for the fabric and compatible with the glue manufacturer’s instructions.
- Pull the paper through the least-constrained opening and reshape the unit gently.
Press the unit while it is still supported if the pattern recommends it, then press again after the papers are removed. Store intact, unpierced papers for reuse if they remain flat and clean.
Before the quilt is finally quilted or washed, remove all ordinary paper and temporary foundations. A specialty dissolvable or leave-in foundation may have different instructions, so follow that product’s directions rather than treating ordinary cardstock and specialty foundation material as interchangeable.
Finish a completed EPP unit
Piecing an EPP unit and attaching that unit to a quilt are separate steps. Once the unit is stable and the papers have been removed as directed, common finishing options include:
- Hand appliqué: Position the unit on a background and use an appliqué stitch around its edge.
- Machine appliqué: Use a straight, zigzag, blanket, or other suitable stitch according to the fabric and desired appearance.
- Join it to other pieced units: Treat the completed shape as part of a larger quilt construction when the pattern calls for it.
- Use it as a finished object: EPP motifs work on bags, pillows, pincushions, garments, and other home accessories.
Some patterns attach an EPP unit to the background before every paper is removed, while others require complete paper removal first. Follow the pattern’s sequence. Hand and machine attachment of finished EPP units are both documented in A Quilting Life’s guide and Tales of Cloth’s hand- and machine-appliqué instructions.
A reliable beginner workflow
- Select a simple hexagon or other beginner-friendly pattern.
- Confirm the template scale with a test square or known measurement.
- Cut or obtain consistent paper templates.
- Cut fabric around each template using the specified allowance, commonly ¼ inch or ⅜ inch.
- Center each paper on the wrong side of its fabric.
- Baste with thread or glue.
- Lay out the prepared shapes to verify color, orientation, and fussy-cut placement.
- Join neighboring pieces right sides together.
- Use small, relaxed whipstitches along the folded edges without piercing the paper.
- Press lightly while the papers remain in place.
- Continue adding pieces in the pattern’s construction order.
- Remove papers only after the corresponding edges are stabilized.
- Press the completed unit.
- Appliqué or join the unit as directed.
- Remove all ordinary paper before final quilting or washing.
Troubleshooting EPP problems
My shapes do not line up
Likely cause: The templates were printed at the wrong scale, cut inconsistently, or prepared with different allowances.
Rank #4

- Package Includes: This leather repair kit includes 1pcs 32 yards sewing waxed thread and 7 pcs different shapes leather hand sewing needles, upholstery needles and threads very great for canvas, leather, carpets, sails, sacks, etc.
- High-Quality Waxed Thread: Leather sewing waxed thread is 150D 1mm thick and 32 yards per spool, excellent quality, and carpet thread doesn't come apart easily after fastening!
- Multifunction Flat Waxed Thread:1mm waxed thread is strong and easy to use, great for all kinds of jewelry and craft making, especially for your macrame project, friendship bracelets, or leather working.
- Upholstery Repair Needles: 7 Pieces of upholstery needles come in a variety of sizes and shapes for different uses, leather needles for hand sewing, great for sewing Leather, blankets, thicker fabric, canvas, tarpaulin, making bags, repairs baskets, sofas, furniture and wig making etc.
- DIY Leather Hand Sewing Accessories: The leather hand-sewing needles will help you penetrate the leather easily, and these hand-sewing needles are easy to thread yarn through even without a threader. Very easy and convenient to handle.
Fix: Stop before cutting more fabric. Reprint at the pattern’s specified scale, measure the test square, and compare the paper edges. Do not compensate by changing the seam allowance.
The fabric does not cover a corner
Likely cause: The paper was off-center, the allowance was too narrow, or the corner was folded in the wrong order.
Recommended Free Tools
Fix: Recut the fabric if possible. Center the paper more carefully, fold the point or first corner consistently, and fold the adjoining sides over it. Use a larger allowance on later pieces only if the pattern permits it.
My glue gums the needle
Likely cause: Too much glue was used, glue was spread onto the fabric, or adhesive reached the paper edge and exposed seam allowance.
Fix: Apply a thin line or small dots just inside the paper edge. Keep the seam allowance clean, and clean or replace the needle if residue has accumulated.
The paper will not come out
Possible causes: The edge was not fully stabilized, through-paper basting remains, too much glue was used, or the fabric was pressed tightly around the template.
The Tool Desk
Outbyte Driver Updater FREEFix the driver behind crashes, sound loss and screen glitchesFind Drivers →Outbyte PC Repair FREERepair Windows errors before they cause bigger problemsFix Now →Fix: Cut basting stitches that pass through the paper, gently peel glue-basted fabric away, and use steam or slight dampening only when safe for the fabric and adhesive. Never yank the paper; you can distort the seam or tear the fabric. The Sue Daley removal instructions cover stubborn glued papers.
My stitches show on the front
Likely cause: The stitches are too large or are catching too much of the folded fabric.
Fix: Take smaller stitches and catch only a tiny bite of each folded edge. A neutral thread can also make joining stitches less noticeable, but stitch size and placement matter most.
My seams pucker
Likely cause: The joining thread was pulled too tightly, the paper edges were not aligned, curved fabric was eased unevenly, or an inset seam was sewn in an unsuitable order.
Fix: Unpick only the affected seam, realign the paper edges, and resew with relaxed tension. For curves, clip the concave allowance and distribute the ease gradually. For Y-seams, follow the pattern’s construction sequence.
My curves have pleats
Fix: Carefully clip the concave seam allowance without reaching the finished seam line, then ease the fabric around the paper in several small movements. Glue basting may make curved preparation easier for some shapes. Practice before committing to the full project.
My fussy-cut prints are misaligned
Fix: Make a complete layout before sewing, mark orientation on the wrong side, cut identical motifs one at a time, and preserve the same direction as you wrap each piece.
My star has a hole in the center
Likely cause: The unit was assembled in an order that did not close the central junction.
What’s actually slowing this PC down?
Pick the symptom - the matching free tool is one click away.
Fix: Check the pattern’s construction diagram. Some star and pie-shaped designs require joining halves in a particular sequence before closing the center; do not assume every point can be sewn in a circular order.
Best Value

- Perfect Heavy Duty Sewing Kit: This fully-packed sewing kit contains all the necessary tools to sew for most of your sewing needs. You will get: 25* Hand Sewing Needles, 12* Upholstery Thread, 1* Inch Ruler, 1* Scissors, 1* Thimble, 3* Awl Tool, 2* Seam Ripper, 1* Threader.
- Upholstery Needle for Hand Sewing: Sewing kit Include 25pcs sewing needles of various sizes and functions. Such as sack needles, carpet needles, curved needles, straight upholstery needles, triangle leather stitching needles, curved mattress needles, big eye needles, etc.
- Sewing Thread: 12 colors sewing thread, made of high quality material, very smooth and durable. 12 rolls of sewing thread, each 50M, strong and not easy to break. And comes with an inch ruler, threader and thimble to make sewing more efficient and easier.
- Sewing Awls: leather stitching kit contains 3 type awls with different functions, long straight awl for punching holes, scratch awl for enlarging the hole, can wear 1-9mm holes, hook awl for hooking the thread and sewing, perfect sewing awl Combination does not require you to purchase separately.
- Storage Bag: The upholstery repair sewing kit comes with a storage bag, a compact design, easy to carry around. Sewing thread and sewing tools are stored separately on both sides for easier access and less clutter. A design suitable for both beginners and professionals.
Which EPP choices should you make?
Pre-cut papers or homemade templates?
Buy pre-cut papers when repeated accuracy and time savings matter, especially for a large project. Make your own when you are testing a design, using an unusual shape, or working within a small budget. Whichever route you choose, consistency matters more than the source of the paper.
¼ inch or ⅜ inch?
Use ¼ inch when the pattern specifies it, you want less bulk, or fabric economy matters. A scant ⅜ inch can give more fabric to handle and may help with curves or fraying fabrics. It is not automatically more accurate. The paper edge controls the finished size, and changing the allowance after starting can make pieces inconsistent.
Thread or glue?
Choose fabric-only thread basting when paper reuse and freedom from adhesive are priorities. Choose through-paper basting when a very firm temporary hold is more important than easy paper reuse. Choose glue basting when fast preparation or curved folds are the priority, while using the smallest amount that works. These are practical trade-offs rather than experimentally established universal performance rankings.
Full EPP or a hybrid approach?
Full EPP suits makers who enjoy portable hand sewing or need accurate irregular shapes. A hybrid approach can reduce the hand stitching required for a large quilt: make the decorative unit with EPP, then attach it to a background by machine appliqué. The unit is still EPP because its individual shapes were prepared over removable papers and joined along their folded edges.
What makes EPP worth learning?
EPP is portable, quiet, and forgiving of short sewing sessions. The templates provide a stable shape for accurate hand assembly, including shapes that can be awkward to cut and join by ordinary methods. It also makes controlled fussy cutting possible and turns small scraps into deliberate geometric designs.
Its trade-off is time. Every piece must be cut, wrapped, basted, joined, and eventually emptied of paper. Piece count, shape size, curves, and construction complexity matter more than any promised completion schedule. Start with a small unit, test your needle and basting method, and let accuracy come from consistent templates and relaxed stitching rather than from forcing the fabric into place.
Frequently Asked Questions
Can I do English paper piecing without a sewing machine?
Yes. Traditional EPP is prepared and joined by hand with a needle and thread; glue is optional. A sewing machine may be used later to appliqué a completed EPP unit to background fabric, but machine work is not required for the EPP construction itself.
Are hexagons the only EPP shape?
No. Hexagons are a common beginner choice because their straight edges and corners are relatively easy to handle. EPP also uses squares, diamonds, triangles, pentagons, jewels, clamshells, apple cores, curves, and many irregular shapes.
Should I baste through the paper?
You can, but you do not have to. Through-paper basting holds firmly but requires the basting stitches to be removed before the paper comes out and may prevent paper reuse. Fabric-only thread basting avoids piercing the paper, while glue basting is another temporary option.
Can I reuse EPP papers?
Often, yes—especially when you use fabric-only basting and remove the paper gently. Reuse depends on the paper’s quality, whether it was pierced, how much glue was applied, and whether it remains flat and undamaged.
When should I remove the papers?
Leave each paper in place until all edges that depend on it have been joined and stabilized. Remove through-paper basting first, gently peel glue-basted fabric, and take out ordinary paper before final quilting or washing unless the pattern specifically uses a specialty leave-in or dissolvable foundation.
Recommended Free Tools
Can I use fabric scraps for EPP?
Yes. Scraps are particularly useful for small hexagons and color experiments. Make sure each scrap is large enough to cover the paper with the required allowance, and check directional motifs before cutting.
What seam allowance should I use for EPP?
Follow the pattern. A ¼-inch allowance is common; some makers use a scant ⅜ inch or ⅜ inch for extra handling room, curves, or fraying fabrics. Choose one measurement and use it consistently throughout the project.
Can I use curves in EPP?
Yes, but curves require more preparation than straight edges. For concave curves, clip the seam allowance without cutting into the finished seam line, then ease the fabric gradually around the paper. Practice on a small sample first.
The Bottom Line
The essential EPP rule is simple: wrap fabric around accurate removable papers, join the prepared shapes with small stitches that catch fabric rather than paper, and leave each paper in place until its edges are no longer needed. Start with a small hexagon unit, use the pattern’s seam allowance consistently, and test your needle, thread, and basting method before scaling up.
The Tool Desk
Outbyte Driver Updater FREEScan for outdated or missing drivers - takes under a minuteDriver Scan →Outbyte PC Repair FREEClear out junk files and repair common Windows errorsFree Scan →Quick Recap

Product prices and availability are accurate as of the date/time indicated and are subject to change. Any price and availability information displayed on Amazon at the time of purchase will apply.




