Do these 3 things before closing this tab:
The Tool Desk
Outbyte PC Repair FREERepair Windows errors before they cause bigger problemsFix Now →Outbyte Driver Updater FREEFix the driver behind crashes, sound loss and screen glitchesFind Drivers →1Clear out junk files and repair common Windows errors2Scan for outdated or missing drivers - takes under a minute3Repair Windows errors before they cause bigger problems
ThatPainter is reader-supported. When you buy through links on our site, we may earn an affiliate commission. Learn More
Paint failures are usually symptoms, not isolated surface defects. The durable repair is to find and correct the moisture, heat, contamination, or adhesion problem; remove only paint that has lost its bond; clean and dry the surface; smooth the transition; then use a compatible primer and finish coat when the surface or coating system requires one. If the work may disturb paint in a U.S. home built before 1978, address lead-paint safety before scraping or sanding.
What peeling, blistering, and poor adhesion mean
The appearance of a failed coating provides useful clues, but it does not prove a single cause. Inspect the substrate, the surrounding paint, and possible water or heat paths before choosing a repair method.
As an Amazon Associate I earn from qualifying purchases.
Recommended Free Tools
Peeling paint
Sherwin-Williams describes peeling as loss of adhesion between a coating and the surface beneath it or between two coating layers. Peeling can follow water entering through failed joints, roof or wall leaks, excess indoor humidity, or application over a dirty, wet, glossy, or weakly bonded surface. A small peeled patch can sit inside a larger area where the remaining film is only marginally attached.
Blistering or bubbling paint
A blister is a lifted bubble in the paint film. Heat and moisture are common contributors. Painting on a hot surface in direct sun, coating a damp wall, early exposure to dew or rain, high humidity, poor preparation, and damp basement conditions are all listed as possible causes. If a blister exposes bare substrate, moisture moving through that surface is a useful lead; if it exposes an earlier paint layer, heat or intercoat adhesion may be involved. Treat these as troubleshooting clues rather than conclusive tests.
#1 Best Overall
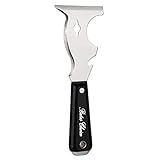
- Bates paint scraper tool 10 in 1 easy to use and convenient.
- A must have tool in your home, Rust-resistant steel blade with wood grip designed .
- This is a multi purpose tool and is ideal for home improvement projects like applying joint compound, puttying windows, scraping paint, removing loose putty, removing loose paint, removing vinyl or paper wall covering.
- Patching dents cracks holes in plaster with soft grip designed to last for long jobs without hand discomfort
- Package includes: 10 in 1 paint scraper tool
Paint that will not stick
New paint has little to grip when the underlying surface is dirty, wet, chalky, loose, or hard and glossy. A slick surface may need cleaning, rinsing, safe gloss dulling, and—in some cases—a bonding primer made for that substrate. Primer cannot compensate for water intrusion or a coating that is still failing underneath.
Safety checks before disturbing the coating
Consider lead in older U.S. homes
In the United States, homes built before 1978 are more likely to contain lead-based paint. Scraping and sanding can release hazardous dust and chips. The U.S. Environmental Protection Agency (EPA) recommends lead-safe work practices and advises homeowners to use an EPA- or state-certified lead-safe contractor for applicable renovation work.
Do not assume that a small visible patch is automatically exempt from lead-safety requirements. Rules depend on the project and location. If lead paint is possible, obtain project-specific guidance before removing the coating.
Use the least disturbing method that will work
- For a small damaged area, EPA guidance recommends fixing the paint without sanding when possible.
- If sanding is necessary, wet the area first, sand only the minimum area needed, and clean up thoroughly.
- Do not dry-sand an older coating simply to make the repair faster.
- Stop and obtain professional advice if the work will create substantial dust, involves widespread failure, or you cannot establish a safe method.
Diagnose the cause before you scrape
- Map the failure. Note whether damage is concentrated around a window, ceiling, exterior joint, bathroom, basement, roof line, gutter, or other transition. Record whether the film is lifting from the substrate or separating between paint layers.
- Look for an active moisture route. Check failed or missing caulk, roof and wall leaks, clogged or overflowing gutters, siding too close to bare ground, condensation, damp masonry, and humid interior spaces. Water can travel away from the point where it first enters.
- Check the surrounding adhesion. Test the paint immediately around the visible defect using a small, controlled check that is safe for the coating and substrate. Do not assume the intact-looking border is sound; a visible repair can be smaller than the weak area.
- Identify the substrate and existing coating. Wood, masonry, drywall, metal, and previously painted surfaces can require different cleaners, primers, and finish products. Follow the label and technical data for the actual substrate.
- Decide whether the surface can be made sound. If the substrate is wet, crumbling, structurally damaged, or repeatedly exposed to water, repair that condition first. Repainting over it only hides the symptom temporarily.
A quick decision guide
Use the pattern to decide what to investigate first, then confirm it by inspecting the building and product requirements.
- Wet wall, ceiling, basement, or substrate exposed inside a blister: prioritize leaks, condensation, drainage, damp masonry, or indoor humidity. Do not prime until the material is dry.
- Blisters on a sun-heated exterior and between paint layers: investigate heat, direct-sun application, and intercoat adhesion. Recoat only under conditions permitted by the finish label.
- Failure at a window, trim joint, roof line, or siding edge: inspect caulk, flashing, gutters, and other joints for a water pathway.
- New paint sliding or peeling from a hard glossy surface: clean, rinse as directed, remove loose material, dull the gloss only when safe, and consider a compatible bonding primer.
- Failure beyond the visible patch: expand the inspection and adhesion check. Removing only the obvious chip may leave a weak film that fails again.
- Any older coating that may contain lead: choose a lead-safe removal plan before selecting a scraper or sanding method.
How to fix peeling paint
Use this sequence after you have identified the likely source of failure. The order matters: preparation cannot make a wet or unstable surface reliable.
1. Stop the water or humidity problem
Repair the leak, restore gutter drainage, replace failed exterior caulk, correct a roof or wall defect, or address the indoor humidity source. If moisture is migrating through a wall, the repair may require both an exterior correction and better interior ventilation. Wait until the surface is genuinely dry; coating over damp material traps the problem beneath the new film.
2. Remove only loose or detached coating
Use a scraper or putty knife only where the paint has lost its bond and where the method is safe for the substrate and any potential lead coating. The objective is not to strip every layer automatically. Remove loose, cracked, or lifting material until the remaining edges are attached well enough to support the repair.
Rank #2

- 【Multipurpose】5pcs Spackling Knives Different Sizes Are Available, Perfect for Putty, Wallpaper, Applique, Backing, Repair, Paint, Plaster, Including Drywall, Plaster, Baking, Spackling, Patching, Stucco and Much More, Can Be Used to Repair All Kinds of Dents, Cracks, Holes, Spackle Tool Suitable for Any Work Project
- 【Will Not Corrode】Putty Knives Use of High-quality Stainless Steel Material, not Rust, Solid Corrosion Resistance, Easy To Clean, no Need To Worry About Deformation And Breakage. Is The Perfect Metal Scraper Tool
- 【Comfortable Grip】The Handle Part Is A Perfect Combination Of Soft Rubber And Plastic, Retains Sturdiness And Durability While Ensuring A Comfortable Grip. Also Designed With Holes For Easy Storage
- 【Family Essentials】What You Get: 1inch Putty Knife, 2inch Putty Knife, 3inch Putty Knife, 4inch Putty Knife, And 5inch Putty Knife; come With 5 Different Sizes Meet Your Different Using Requirements, can Be Used As Paint Scraper Tool, Wallpaper Remover, Drywall Knife Set And Most
- 【Customer Commitment】our Commitment to Rerdeim Has Always Been Committed To Providing Customers With Higher Quality Products And A Comfortable Customer Experience. If You Have Any Concerns Or Questions About This Product, Please Feel Free To Contact Us
3. Clean the exposed and surrounding surface
Remove dirt, residue, chalk, and other contaminants using a cleaning method compatible with the substrate and coating. Rinse when the product instructions require it, and allow the area to dry completely. A clean surface is necessary for primer and paint to adhere.
4. Smooth the edge into sound paint
After loose material is gone, smooth ridges and rough transitions so the finish coat will not highlight a sharp step. Where sanding is appropriate, use the minimum safe amount; do not sand an older coating when lead-safe guidance rules it out. If the substrate itself is damaged, repair it with a compatible material and let that repair cure according to its instructions.
5. Prime when the system calls for it
Primer may be appropriate over a repaired substrate, exposed areas, stained or porous material, or a surface whose coating instructions require it. Choose by substrate and existing coating, not by the word “peeling” alone. A primer is not a substitute for correcting leaks or removing unstable paint.
6. Recoat under the product’s conditions
Apply the specified finish only after the surface is clean, dry, and sound. Follow the coating label for temperature, humidity, recoat interval, film thickness, and compatible undercoats. Protect the fresh film from dew, rain, condensation, and other conditions identified by the manufacturer as harmful.
Surface-preparation details that prevent repeat failure
Drying is part of the repair
A surface can feel dry at the top while remaining damp beneath the film or inside masonry. Give cleaned areas, repaired joints, and patched substrate the drying or curing time specified by the relevant product. If dampness, condensation, or humidity persists, find that source instead of relying on a longer wait followed by the same coating.
Feather, do not create a hard ridge
Loose paint leaves a step between the exposed substrate and intact coating. A gradual, secure transition is easier to hide and less likely to telegraph through the finish. Do not widen the repair merely for appearance if doing so would disturb sound, potentially lead-containing paint; balance cosmetic blending with the safest practical method.
Clean beyond the visible chip
Residue, chalk, grease, and cleaner film can extend beyond the peeled area. Prepare the surrounding sound paint as well as the exposed spot, rinse when directed, and let everything dry. A primer or finish applied over invisible contamination can fail even when the surface looks smooth.
Rank #3

- Sturdy Design: The blade and handle in our drywall knife are processed in one piece, which is very sturdy. Stainless steel blade has superior load-bearing performance for a long time to use
- Comfortable Grip: The handle part is a perfect combination of soft rubber and plastic, and using an ergonomic design. Our putty scraper tool makes full use of the elasticity of rubber to make you hold comfortably
- Anti-Rust Quality: Compared with carbon steel material, our stainless steel spackle knife tool is far stronger in terms of corrosion resistance. The rust-free blade makes you more enjoyable to work in home improvement jobs
- Various Sizes: Our joint knife covers four sizes of width, 2", 3", 4", 5". The small size is suitable for applying adhesives, and drywall tape. The large size is ideal for applying putty, plaster, and other home improvement materials
- Widely Apllication: It’s more effortless to apply putty, plaster, cement, and concrete with a putty knife scraper. You can repair and fill the cracks in drywall, ceiling, ceramic tile. In addition, it's perfect for removing paint, sticky objects, and wallpaper
Match every layer
The substrate, old coating, primer, and finish form one system. Product labels and technical data may limit which surfaces a coating can cover or require a particular undercoat. When those instructions do not establish compatibility, ask the coating manufacturer or a qualified professional rather than guessing.
How to fix blistering or bubbling paint
Determine whether heat or moisture is more likely
Blisters on sun-heated exterior surfaces may point toward heat, especially when the bubble separates paint layers. Blisters that expose the substrate or occur on damp walls, ceilings, basements, or humid rooms raise concern about moisture moving through the surface. Either pattern can have more than one contributing cause, so inspect the building rather than relying on appearance alone.
Correct the underlying condition
Repair leaks, failed caulking, drainage problems, damp masonry, or ventilation deficiencies before repainting. In a bathroom, improve removal of shower moisture where appropriate. In a basement or other persistently humid area, determine why humidity remains high instead of sealing it under another coat.
“Determine and repair any cause of excess moisture before repainting.” — Sherwin-Williams, Blistering
Free tools Windows power users keep installed
One-click scans. No signup required.
Special offer. See more information about Outbyte and uninstall instructions. Please review EULA and Privacy policy.
Remove and feather the blisters
- Follow the lead-safety precautions above before disturbing an older coating.
- Remove bubbles and other paint that is no longer attached. Do not leave a hollow blister under the new finish.
- Smooth the perimeter so the transition from exposed area to intact paint is gradual.
- Clean the surface and let it dry fully.
- Prime and repaint only when the substrate and remaining coating meet the product requirements.
If blisters return after the water or heat issue has been addressed, stop recoating and reassess the substrate, vapor or moisture path, surface preparation, and coating compatibility.
Exterior moisture: common entry paths and repairs
Exterior peeling often reflects how water reaches or remains behind the coating. Inspect the entire nearby assembly, not just the paint chip.
- Worn or missing caulk: Remove failed caulk, repair the joint, and install a compatible replacement according to the product instructions.
- Roof or wall leaks: Repair the leak and any damaged materials before preparing the paint.
- Clogged or misdirected gutters: Restore drainage so water does not repeatedly wet the wall or trim.
- Siding too close to bare ground: Correct the condition that allows ground moisture to contact the siding or coating.
- Rain, condensation, or dew during application: Recoat only when the surface and weather meet the coating label’s requirements.
- Indoor moisture migrating outward: Address the interior humidity source as well as the exterior symptom.
The correct repair follows the actual pathway. Scraping and repainting a wall while the gutter, roof, joint, or ground contact remains unchanged will not restore durable adhesion.
Rank #4
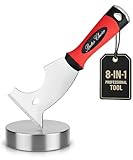
- Bates 8-in-1 paint scraper is a versatile tool designed to meet a wide range of needs for painting, patching, and repair projects.
- Crafted from durable stainless steel, the multi-function blade can be used for scraping paint, spreading compound, opening cracks, and more.
- Its contoured, soft-grip handle provides maximum comfort and control during extended use, reducing hand fatigue on tough jobs.
- The built-in metal hammer end is perfect for setting nails or tapping surfaces, adding extra functionality to your toolkit.
- Ideal for professional painters, DIYers, and homeowners, this all-in-one tool combines strength, comfort, and convenience in one compact design.
Interior moisture: where to look
Cooking, showering, humidifiers, and high basement or foundation humidity can add enough moisture to contribute to peeling or blistering. A bathroom with a shower may need an exhaust fan or better use of existing ventilation. Persistent basement humidity requires investigation of its source rather than repeated painting.
The Tool Desk
Outbyte Driver Updater FREEScan for outdated or missing drivers - takes under a minuteDriver Scan →Outbyte PC Repair FREEClear out junk files and repair common Windows errorsFree Scan →- Identify the room, season, and activity associated with the failure.
- Check ventilation around kitchens, bathrooms, laundry areas, and humidifiers.
- Investigate basement, foundation, plumbing, and wall moisture when damage is recurring or localized.
- Correct the humidity or leak source and allow the affected materials to dry.
- Remove failed paint, clean, prepare, prime when appropriate, and test nearby adhesion before finishing.
Why paint will not stick to a glossy surface
Hard, slick gloss gives a new coating little surface profile to grip. The repair is a preparation branch, not a reason to apply an arbitrary “universal” primer.
- Clean the surface. Remove grease, dirt, wax, and other contaminants with a compatible cleaner.
- Rinse when required. Cleaner residue can interfere with adhesion, so follow the cleaning product and coating instructions.
- Remove loose or checked paint. New paint cannot stabilize material that is already detached.
- Let the surface dry. Do not abrade or coat a damp substrate.
- Dull the gloss where safe and appropriate. A sanding sponge or block can help on suitable surfaces, but do not sand an older coating when lead-safe guidance makes that method unsuitable.
- Use a compatible bonding primer if the surface remains slick. Select one specifically approved for the substrate and existing coating, and follow its technical data.
- Test adhesion around the repair. Confirm that the prepared area and surrounding paint can support the new finish before committing to a large recoat.
Common mistakes that make failure return
- Painting over the symptom: A fresh coat cannot stop water entering through a roof, gutter, joint, wall, or damp foundation.
- Coating a damp surface: Moisture can remain trapped and weaken the new film.
- Working in bad weather: Direct sun on a hot surface, early dew, rain, condensation, or high humidity can undermine the application.
- Removing too little: Leaving hollow blisters, lifting edges, or marginally bonded paint creates a weak base.
- Removing too much: Unnecessary stripping or sanding can enlarge the repair and create avoidable dust, especially where lead is possible.
- Skipping cleaning: Dirt, chalk, grease, wax, or cleaner residue can defeat otherwise compatible primer and paint.
- Choosing primer by habit: A bonding primer belongs on a clean, sound, still-slick surface only when its instructions approve that substrate and coating.
- Ignoring adjacent areas: A small visible defect may be the first opening in a larger adhesion failure.
Choosing tools and materials by the failure condition
| Option | Use it when | Limits and cautions |
|---|---|---|
| Scraper or putty knife | Paint is loose, cracked, or lifting and must be removed to reach a sound edge. | Use only a safe method for the substrate and coating. Potential lead paint changes the removal procedure. |
| Sanding sponge or block | Edges need smoothing or a suitable glossy surface needs controlled dulling. | Do not sand where lead-safe guidance makes it inappropriate. Remove the minimum material needed. |
| Bonding primer | The cleaned, sound substrate remains hard and slick and the product is compatible with it. | It cannot replace cleaning, gloss preparation, moisture correction, or removal of failing paint. |
| Standard stain-blocking or substrate primer | The substrate or coating system’s instructions call for priming after repair. | Choose for the actual substrate and existing coating; no single primer fits every repair. |
When a patch is not a complete repair
Get qualified help when the source of moisture cannot be located, the substrate is deteriorating, failure is widespread, or the project may disturb lead paint. A certified lead-safe contractor is the appropriate choice for relevant renovation work in the United States. Specialty advice may also be needed when several incompatible coating layers are present or the product instructions do not establish a compatible system for the substrate.
Persistent recurrence is evidence that the condition beneath the paint has not been resolved. Repeating the same scrape-and-recoat cycle without reassessing water, humidity, heat, adhesion, or substrate damage usually treats the visible symptom rather than the failure.
A practical final inspection
- The moisture, leak, drainage, heat, or ventilation cause has been corrected.
- Loose and detached paint has been removed using a method appropriate to the coating and lead risk.
- The surface is clean, dry, and free of unstable edges.
- Nearby adhesion has been checked rather than assumed.
- Any primer used is compatible with the substrate, existing coating, and finish.
- The finish was applied under the coating manufacturer’s stated conditions.
- The area is monitored for returning bubbles, dampness, cracking, or renewed lifting.
Frequently Asked Questions
How do I fix peeling paint?
Find and correct the leak, humidity, failed joint, or surface-preparation problem first. Then remove only loose paint with a method appropriate to the substrate and any lead risk, clean and dry the area, smooth the edges, prime when the coating system calls for it, and recoat under the product’s stated conditions.
Quick wins for a faster PC:
Repair Windows errors before they cause bigger problemsFix Now →Scan for outdated or missing drivers - takes under a minuteDriver Scan →Clear out junk files and repair common Windows errorsFree Scan →Why is my paint bubbling or blistering?
Heat and moisture are common contributors. Direct sun on a hot surface, damp substrate, rain or dew soon after application, high humidity, inadequate preparation, and damp basement conditions can all contribute. A blister that exposes the substrate points toward moisture as a useful lead; one separating paint layers may involve heat or intercoat adhesion, but appearance alone is not conclusive.
Why won’t new paint stick?
The surface may be dirty, wet, chalky, loose, or hard and glossy. Clean and rinse as directed, remove unstable coating, let the surface dry, dull gloss only when safe, and use a compatible bonding primer if the sound surface remains slick. Primer will not make a wet or failing base reliable.
Best Value

- Versatile Cleaning Power: Our razor blade scraper set is your all-in-one solution for effective cleaning. This non-retractable tool, featuring a rubber handle, is perfect for glass, stovetops, and windows. With 15 extra SK5 steel razor blades, it's a plastic scraper tool that never misses a spot
- Built-in Convenience: Experience ultimate convenience with the built-in blade storage of our razor scraper tool. Easily switch between tasks, from sticker removal to paint scraping. The hanging hole adds portability, making this plastic razor blade scraper a handy companion for all your cleaning needs
- Precision and Durability: Crafted with precision, the razor blade scraper tool is designed for durability and longevity. The plastic scraper, along with the top-quality SK5 steel razor blades, ensures efficient and long-lasting performance. Your go-to glass scraper for pristine surfaces every time
- Effortless Sticker and Residue Removal: Tackle stubborn stickers and residue effortlessly with our razor scraper. The non-retractable design provides stability, while the plastic razor blades delicately remove unwanted materials without damaging surfaces. The ultimate sticker scraper tool for a clean, clear finish
- Professional-Grade Glass Scraper: Elevate your cleaning routine with a professional-grade glass scraper. This razor blade scraper set is ideal for glass top stoves, windows, and more. Its non-retractable design, combined with the plastic razor blades, delivers precision and efficiency in every swipe. Upgrade to a cleaner, clearer space
Should I scrape all the old paint off?
Usually no. Remove only loose, cracked, lifting, or detached material until you reach a sound edge. Unnecessary stripping can enlarge the repair and create dust; older coatings may also require lead-safe controls.
Can I paint over a blister after popping it?
No. Correct the likely heat or moisture condition, remove paint that is no longer attached, smooth the perimeter, clean and dry the surface, then prime and repaint only when the substrate and remaining coating meet the product requirements.
PC Slower Than It Used to Be?
A free scan shows the junk files, broken settings and background clutter dragging Windows down - then fixes them in one click.Free scan · Windows 10 & 11Outdated Drivers Are Slowing You Down
One free scan finds every outdated or missing driver and matches the right update for your exact hardware.Free scan · exact hardware matchDo I need primer after repairing peeled paint?
Sometimes. Primer may be appropriate over exposed, porous, stained, or repaired substrate, or whenever the coating instructions require it. Select it for the actual substrate and existing coating; a generic primer cannot replace moisture correction or removal of unstable paint.
Can I sand peeling paint in a pre-1978 home?
Do not dry-sand automatically. Homes built before 1978 are more likely to contain lead paint. EPA guidance recommends fixing small damaged areas without sanding when possible; if sanding is necessary, wet the area, use the minimum needed, and clean up thoroughly. Project-specific rules may require an EPA- or state-certified lead-safe contractor.
What if the paint fails again after I repaint?
Stop repeating the same patch. Reassess water pathways, indoor humidity, heat, substrate damage, nearby adhesion, surface preparation, and compatibility between coating layers. Recurrence usually means the underlying condition was not corrected.
When should I hire a professional?
Seek qualified help when you cannot locate the moisture source, the substrate is crumbling or structurally damaged, failure is widespread, several coating layers may be incompatible, or removing the paint could create lead dust. A certified lead-safe contractor is appropriate for relevant renovation work in the United States.
Do these 3 things before closing this tab:
1Clear out junk files and repair common Windows errors2Fix the driver behind crashes, sound loss and screen glitches3Repair Windows errors before they cause bigger problemsThe Bottom Line
Fix the cause before the coating: stop water and humidity, account for heat and weather, remove only failed paint, prepare a clean and dry sound surface, and choose primer and finish products for the actual substrate. Treat lead risk seriously in older U.S. homes, and get qualified help when the source or safe removal method is uncertain.
Quick Recap

Product prices and availability are accurate as of the date/time indicated and are subject to change. Any price and availability information displayed on Amazon at the time of purchase will apply.

