Quick wins for a faster PC:
Repair Windows errors before they cause bigger problemsFix Now →Scan for outdated or missing drivers - takes under a minuteDriver Scan →Clear out junk files and repair common Windows errorsFree Scan →
ThatPainter is reader-supported. When you buy through links on our site, we may earn an affiliate commission. Learn More
Peeling, bubbling, and blistering Sherwin-Williams paint are adhesion failures. A lasting repair is not another coat over the damage: find and stop the moisture, heat, contamination, or compatibility problem; let the surface dry; remove every loose section; smooth and clean the edges; prime exposed areas when needed; and repaint under the finish product’s label conditions.
The correct method depends on where the blister stops. A blister that reaches the underlying wall, wood, or masonry usually indicates moisture escaping from that substrate. A blister limited to an earlier paint layer points more often to intercoat adhesion or preparation failure. The distinction determines whether scraping alone is enough or whether the wall first needs moisture investigation.
As an Amazon Associate I earn from qualifying purchases.
The Tool Desk
Outbyte PC Repair FREERepair Windows errors before they cause bigger problemsFix Now →Outbyte Driver Updater FREEFix the driver behind crashes, sound loss and screen glitchesFind Drivers →What peeling, bubbling, and blistering mean
Sherwin-Williams describes bubbles as “a loss of adhesion and lifting of the paint film from the underlying surface.” The paint film has separated from the material below it or from an earlier coat, leaving a raised pocket. Peeling is the same failure after the film has cracked or detached farther; blistering emphasizes the swollen, bubble-like stage.
Paint can look intact at the center of a defect while being hollow around it. Recoating over that unstable film traps the problem and usually produces another visible failure. The repair therefore has two parts: correct the cause and rebuild a sound coating system.
#1 Best Overall
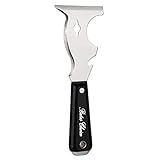
- Bates paint scraper tool 10 in 1 easy to use and convenient.
- A must have tool in your home, Rust-resistant steel blade with wood grip designed .
- This is a multi purpose tool and is ideal for home improvement projects like applying joint compound, puttying windows, scraping paint, removing loose putty, removing loose paint, removing vinyl or paper wall covering.
- Patching dents cracks holes in plaster with soft grip designed to last for long jobs without hand discomfort
- Package includes: 10 in 1 paint scraper tool
Why the cause matters
- Moisture migration: Water can move through a damp basement wall, an exterior wall with seepage, a roof or plumbing leak, failed caulk, condensation, or high indoor humidity. Rain or dew that reaches uncured exterior paint can also break adhesion.
- Heat blistering: Applying paint in direct sunlight to a very warm surface can make the film skin over while the material below remains hotter or releases vapor, producing bubbles.
- Contamination or poor preparation: Dust, grease, wax, silicone, a wet surface, or a glossy surface that was not dulled can prevent the new film from bonding.
- Coating incompatibility: An earlier layer may have marginal adhesion, or a latex and oil/alkyd system may not have been prepared and primed appropriately for one another.
- Insufficient drying or curing: A coat exposed to humidity, water, cold, or severe weather before it has dried and cured can fail even when the surface initially looked smooth.
How to diagnose a Sherwin-Williams paint blister
Start with a small damaged area and inspect the layers rather than guessing from the surface appearance. Sherwin-Williams’ troubleshooting guidance uses the depth of the blister as the key clue:
“If blisters go down to the substrate (e.g. the surface that is painted), the cause is likely to be moisture escaping from the surface.”
Free tools Windows power users keep installed
One-click scans. No signup required.
Special offer. See more information about Outbyte and uninstall instructions. Please review EULA and Privacy policy.
Blister reaches drywall, plaster, wood, masonry, or metal
If lifting exposes the actual substrate, investigate water before doing cosmetic work. Check the opposite side of the wall, the ceiling above, nearby plumbing, exterior-wall penetrations, roof and wall joints, and areas where caulk has failed. In a basement or bathroom, consider condensation and ventilation as well as a visible leak. A dry-looking patch can still be the endpoint of moisture moving through the assembly, so do not seal it and assume the issue is solved.
Blister stops at an earlier paint coat
When the substrate remains covered and the failure is between paint layers, the likely issue is weak intercoat adhesion, gloss, contamination, or an incompatible system. Remove the loose coating, sand the remaining surface dull, clean it, and allow adequate drying before recoating. If adjacent paint lifts easily during testing, expand the removal area until the remaining film is sound.
Rank #2

- 【Multipurpose】5pcs Spackling Knives Different Sizes Are Available, Perfect for Putty, Wallpaper, Applique, Backing, Repair, Paint, Plaster, Including Drywall, Plaster, Baking, Spackling, Patching, Stucco and Much More, Can Be Used to Repair All Kinds of Dents, Cracks, Holes, Spackle Tool Suitable for Any Work Project
- 【Will Not Corrode】Putty Knives Use of High-quality Stainless Steel Material, not Rust, Solid Corrosion Resistance, Easy To Clean, no Need To Worry About Deformation And Breakage. Is The Perfect Metal Scraper Tool
- 【Comfortable Grip】The Handle Part Is A Perfect Combination Of Soft Rubber And Plastic, Retains Sturdiness And Durability While Ensuring A Comfortable Grip. Also Designed With Holes For Easy Storage
- 【Family Essentials】What You Get: 1inch Putty Knife, 2inch Putty Knife, 3inch Putty Knife, 4inch Putty Knife, And 5inch Putty Knife; come With 5 Different Sizes Meet Your Different Using Requirements, can Be Used As Paint Scraper Tool, Wallpaper Remover, Drywall Knife Set And Most
- 【Customer Commitment】our Commitment to Rerdeim Has Always Been Committed To Providing Customers With Higher Quality Products And A Comfortable Customer Experience. If You Have Any Concerns Or Questions About This Product, Please Feel Free To Contact Us
Peeling around joints, corners, or edges
Edges concentrate movement and water entry. Examine caulk at trim, windows, siding joints, and penetrations. Also look for a roof or wall leak and for interior moisture sources. Replacing failed caulk without correcting water behind the wall will not restore adhesion.
Isolated spot or widespread failure
A single, stable patch can often be repaired after its cause is corrected. Bubbles appearing across a room, along a whole exterior elevation, or in several unrelated locations suggest a broader moisture, preparation, or coating-system problem. Widespread failure deserves a more extensive investigation before repainting.
Safety and preparation before you scrape
- Keep water away from electrical equipment while investigating leaks or washing surfaces.
- Use eye protection, gloves, and a suitable dust mask or respirator for scraping and sanding. Follow the equipment manufacturer’s instructions and provide ventilation.
- If an old coating could contain lead or another hazardous material, stop ordinary dry sanding and follow the applicable local testing, containment, and disposal requirements.
- Protect floors, furnishings, plants, and nearby finished surfaces. Scraped chips and sanding dust should be collected rather than spread through the room or yard.
- Read the current technical data sheet and label for every primer and finish. Product names, allowable conditions, and directions can change.
Step-by-step repair for peeling, bubbling, or blistering paint
1. Find and repair the moisture or other source
Repair the leak, seepage, condensation, failed caulk, or ventilation problem before removing large areas of paint. Replace deteriorated caulk where appropriate. If moisture is entering through an exterior wall or roof, the exterior repair is part of the paint repair. Do not use primer or finish paint as a substitute for waterproofing or a plumbing repair.
2. Let the assembly dry completely
Wait until the substrate and the paint that will remain are fully dry. Drying the surface you can touch is not proof that moisture has left the wall, wood, or masonry below. Continue ventilation and moisture control as appropriate, and follow the coating label’s requirements for a dry surface and acceptable humidity.
Rank #3

- Sturdy Design: The blade and handle in our drywall knife are processed in one piece, which is very sturdy. Stainless steel blade has superior load-bearing performance for a long time to use
- Comfortable Grip: The handle part is a perfect combination of soft rubber and plastic, and using an ergonomic design. Our putty scraper tool makes full use of the elasticity of rubber to make you hold comfortably
- Anti-Rust Quality: Compared with carbon steel material, our stainless steel spackle knife tool is far stronger in terms of corrosion resistance. The rust-free blade makes you more enjoyable to work in home improvement jobs
- Various Sizes: Our joint knife covers four sizes of width, 2", 3", 4", 5". The small size is suitable for applying adhesives, and drywall tape. The large size is ideal for applying putty, plaster, and other home improvement materials
- Widely Apllication: It’s more effortless to apply putty, plaster, cement, and concrete with a putty knife scraper. You can repair and fill the cracks in drywall, ceiling, ceramic tile. In addition, it's perfect for removing paint, sticky objects, and wallpaper
3. Remove every loose, cracked, or blistered section
Use a paint scraper to lift all material that is detached, cracked, or hollow-sounding. Work beyond the visible bubble until the edge is firmly bonded. A scraper is for removing unstable paint, not for gouging sound drywall, wood, or masonry. If the coating keeps releasing under light pressure, continue investigating the cause rather than burying it under new paint.
4. Feather the edges and dull glossy paint
Use a sanding sponge or fine-grit sandpaper to taper the transition from bare substrate to intact coating. The goal is a smooth, gradual edge that will not telegraph through the new finish. Sand glossy surrounding paint until it is uniformly dull so the next coat can grip. Remove all sanding residue before proceeding.
Recommended Free Tools
5. Clean contaminants and allow another full dry-down
Wash the repair area with an appropriate detergent or cleaning process for the substrate and contamination present. Remove dust, grease, wax, silicone residue, and other bond-breaking material. Rinse or wipe as the cleaning method requires, then let the area dry completely. Never paint over cleaner residue, loose dust, or damp material.
6. Spot-prime exposed or water-damaged areas
Primer is needed wherever scraping exposes the substrate and wherever the surface needs a compatible, sealed base. Choose by substrate and exposure rather than by color alone:
Rank #4
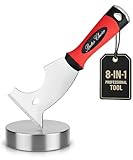
- Bates 8-in-1 paint scraper is a versatile tool designed to meet a wide range of needs for painting, patching, and repair projects.
- Crafted from durable stainless steel, the multi-function blade can be used for scraping paint, spreading compound, opening cracks, and more.
- Its contoured, soft-grip handle provides maximum comfort and control during extended use, reducing hand fatigue on tough jobs.
- The built-in metal hammer end is perfect for setting nails or tapping surfaces, adding extra functionality to your toolkit.
- Ideal for professional painters, DIYers, and homeowners, this all-in-one tool combines strength, comfort, and convenience in one compact design.
| Situation | Sherwin-Williams primer examples named in the guidance | Use considerations |
|---|---|---|
| Interior drywall, plaster, or wood repair | Premium Wall & Wood Primer | Use on properly prepared, dry interior areas; verify the current label for the exact substrate. |
| Interior work needing an oil-based or undercoater approach | Multi-purpose interior oil-based primer/undercoater | Confirm compatibility with the existing and planned finish, ventilation, and cleanup requirements. |
| Exterior wood | Exterior Oil-based Wood Primer | Apply only to dry, prepared wood and within the product’s exterior temperature and weather limits. |
| Exterior concrete or masonry | Loxon Concrete & Masonry Primer/Sealer | Use on suitable, clean, dry masonry; address ongoing water entry first. |
| Exterior mixed or difficult substrates | All Surface Enamel Primer | Check the label for the specific surface and the finish coat selected. |
Allow the primer to dry for the label-specified time. A stain-blocking primer may be appropriate when water damage leaves discoloration, but it does not eliminate an active leak and should be used only where its label supports the substrate and finish system.
7. Repaint with a compatible finish
Select a finish compatible with the primer and the sound surrounding coating. Follow the product label for temperature, humidity, ventilation, recoat interval, and cure conditions. Apply thin, even coats rather than overloading the repair. Keep the application out of direct hot sunlight and away from rain, dew, or other exposure prohibited by the label. Do not shorten the recoat or cure interval because the surface feels dry.
What’s actually slowing this PC down?
Pick the symptom - the matching free tool is one click away.
8. Test adhesion before expanding the repair
Sherwin-Williams advises testing adhesion in a 6–12 inch radius around peeled areas before committing to a large repaint. After the surface is prepared, check whether the surrounding film remains firmly attached using a small, controlled test consistent with the coating manufacturer’s guidance. If the adjacent paint lifts or continues to blister, stop and enlarge the investigation and removal area.
Independent reader supportYour contribution helps us test, update, and keep practical guides available for everyone.Choose the repair approach by substrate and exposure
The same bubble requires different decisions on drywall, wood, masonry, and metal. Use the following framework before buying materials or starting a broad repaint.
Best Value

- Versatile Cleaning Power: Our razor blade scraper set is your all-in-one solution for effective cleaning. This non-retractable tool, featuring a rubber handle, is perfect for glass, stovetops, and windows. With 15 extra SK5 steel razor blades, it's a plastic scraper tool that never misses a spot
- Built-in Convenience: Experience ultimate convenience with the built-in blade storage of our razor scraper tool. Easily switch between tasks, from sticker removal to paint scraping. The hanging hole adds portability, making this plastic razor blade scraper a handy companion for all your cleaning needs
- Precision and Durability: Crafted with precision, the razor blade scraper tool is designed for durability and longevity. The plastic scraper, along with the top-quality SK5 steel razor blades, ensures efficient and long-lasting performance. Your go-to glass scraper for pristine surfaces every time
- Effortless Sticker and Residue Removal: Tackle stubborn stickers and residue effortlessly with our razor scraper. The non-retractable design provides stability, while the plastic razor blades delicately remove unwanted materials without damaging surfaces. The ultimate sticker scraper tool for a clean, clear finish
- Professional-Grade Glass Scraper: Elevate your cleaning routine with a professional-grade glass scraper. This razor blade scraper set is ideal for glass top stoves, windows, and more. Its non-retractable design, combined with the plastic razor blades, delivers precision and efficiency in every swipe. Upgrade to a cleaner, clearer space
| Decision factor | What to determine | Resulting action |
|---|---|---|
| Substrate | Drywall or plaster, wood, masonry, or metal | Select cleaning, sanding, primer, and repair materials labeled for that material. |
| Failure depth | Does the defect reach the substrate or stop at a previous coat? | Substrate exposure requires moisture assessment and suitable primer; intercoat failure may require removal, deglossing, and cleaning without a broad moisture repair. |
| Exposure | Interior living area, bathroom or kitchen, basement, or exterior | Account for steam, condensation, damp air, weather, and ventilation when correcting the cause and choosing the finish. |
| Coating compatibility | Known latex, alkyd/oil, or unknown layers | Use a compatible primer system and follow the label. Unknown layers call for a small adhesion test before a large repaint. |
| Severity | One isolated spot or failure across many areas | Repair a stable isolated defect locally; obtain a broader moisture or coating investigation when failure is widespread. |
Common scenarios and the right response
Bathroom or kitchen bubbling
Steam and repeated condensation can keep a wall damp even without a plumbing leak. Confirm that exhaust ventilation is working and that moisture is not entering through a joint or penetration. Once the wall is dry, remove loose paint, clean any residue, prime exposed areas, and repaint under the finish label’s humidity and ventilation requirements.
Basement wall blistering
Basement walls can receive moisture from the surrounding ground or from interior condensation. A blister that reaches masonry is a reason to investigate moisture movement before coating. Do not rely on a topcoat to hold back water pressure or conceal recurring dampness.
Outdated Drivers Are Slowing You Down
One free scan finds every outdated or missing driver and matches the right update for your exact hardware.Free scan · exact hardware matchWindows Errors? Fix Them Before They Spread
Repair common Windows errors and clear accumulated junk for a smoother, more stable PC - no reinstall needed.Free scan · no reinstallExterior wall or trim peeling
Inspect failed caulk, joints, roof and wall transitions, and areas exposed to rain or dew. Heat from direct sun can also blister a coating applied to a hot surface. Schedule application within the label’s weather and temperature limits, and allow every coat to dry and cure before exposure.
Paint over a glossy or greasy surface
If the substrate is sound but the new layer released, remove loose paint, sand the gloss to a dull finish, clean away grease, wax, silicone, and dust, and let the surface dry. Prime if the substrate is exposed or the selected system requires it, then apply the compatible finish.
How to prevent the failure from returning
- Keep surfaces clean, dry, and properly prepared before every coat.
- Control moisture in kitchens, bathrooms, basements, and exterior walls; ventilation is part of the paint system in these locations.
- Maintain caulk at joints and penetrations, and investigate any new staining, dampness, or peeling promptly.
- Do not paint in direct hot sun or during rain, dew, high humidity, or temperatures outside the product label’s limits.
- Use primer and finish products intended to work together, especially when changing between latex and oil/alkyd coatings.
- Allow each coat to dry and cure for the label-specified interval before recoating or exposing it to severe conditions.
- Use thin, even applications; excessive film thickness can slow drying and contribute to failure.
When a professional moisture investigation is warranted
Get qualified help when water continues to appear, when the affected area expands after a careful repair, or when paint is failing on multiple walls or ceilings. A professional can trace concealed leaks, assess masonry or wood moisture, distinguish condensation from seepage, and determine whether the substrate itself needs repair. Extensive coating failure may also involve structural movement or an incompatible multi-layer system that a small patch cannot resolve.
Manufacturer guidance is not a substitute for diagnosing active leaks, structural moisture, hazardous old coatings, or widespread failure. Before application, verify the current Sherwin-Williams technical data sheet and label for the exact primer and finish, including surface preparation, temperature, humidity, recoat, ventilation, and cure requirements.
Free tools Windows power users keep installed
One-click scans. No signup required.
Quick Recap

Product prices and availability are accurate as of the date/time indicated and are subject to change. Any price and availability information displayed on Amazon at the time of purchase will apply.

