Free tools Windows power users keep installed
One-click scans. No signup required.
Do these 3 things before closing this tab:
1Repair Windows errors before they cause bigger problems2Fix the driver behind crashes, sound loss and screen glitches3Clear out junk files and repair common Windows errorsThatPainter is reader-supported. When you buy through links on our site, we may earn an affiliate commission. Learn More
A paint sprayer produces a smooth finish only when the surface, coating, equipment, settings and hand movement agree. Most defects blamed on “bad paint” actually come from skipping preparation, using the wrong tip, spraying at an inconsistent distance, laying on too much material or ignoring the product and sprayer manuals. Prepare the work, test on scrap, spray in controlled overlapping passes, and adjust only within the limits specified for your exact coating and model.
As an Amazon Associate I earn from qualifying purchases.
Why a sprayed finish goes wrong
Spraying atomizes liquid into a fan of droplets. The finish depends on how those droplets leave the tip, travel through the air and settle on the substrate. A change in any part of that chain changes the result: dust can become permanent texture, a worn tip can make the fan uneven, and a slow pass can leave a sag before you notice it.
Quick wins for a faster PC:
Clear out junk files and repair common Windows errorsFree Scan →Fix the driver behind crashes, sound loss and screen glitchesFind Drivers →Airless and HVLP equipment do not share one universal pressure, tip, thinning ratio or working distance. A setting that works for one model or coating can produce overspray, poor atomization or runs on another. Treat the sprayer manual and the coating label or technical data sheet as the controlling instructions; general numbers are starting points only when they match your equipment.
#1 Best Overall

- Life changing paint sprayer: this paint sprayer requires less thinning compared to finish max or other hand-held paint sprayers
- Easy to use for eager Painters: fast and easy setup, multiple spray settings and quick cleaning make this sprayer a top pick for do-it-yourselfers
- Lightweight: despite having more power than the finish max, this paint sprayer is still lightweight in the user’s hand
- Spray everything with less thinning: ideal for spraying a smooth finish on fences, decks, furniture, cabinets, crafts, dressers or anything you want
- Best purchase you will ever make: save money by using this paint sprayer to tackle all of your household painting and staining projects
Prepare the surface and spray area first
Clean, dry and repair the substrate
Surface preparation is part of the finish, not a separate chore. Remove dirt, grease and loose material, then allow the surface to dry. Repair holes, cracks and damaged areas, and sand rough spots as appropriate for the substrate and coating. A sprayer lays down a thin, even film; it will not hide dust, ridges, chipped edges or sanding scratches.
Wagner’s 5700 manual calls for a spray area that is clean and free of dust. Graco likewise identifies cleaning, drying, repairs and sanding as fundamental preparation steps. If a defect can be felt with your hand before spraying, expect it to remain visible afterward.
Mask everything outside the target
Atomized paint travels beyond the visible fan. Cover floors, hardware, windows, adjacent walls and anything else that must remain clean. Seal masking edges so air movement cannot lift them. Outdoors, consider wind: a light breeze can carry droplets onto cars, siding or neighboring surfaces. Do not rely on a narrow spray pattern as a substitute for protection.
Recommended Free Tools
Control the environment
Temperature and drying conditions affect flow and sagging. Cold conditions are among the causes of runs and sags identified by PPG in its refinish guidance. Follow the coating manufacturer’s temperature, humidity and ventilation limits rather than improvising with extra thinner or pressure. Keep the work area well ventilated and prevent dust-producing activity while the wet film is exposed.
Test the material and pattern before the project
Fill the sprayer only after the work area is ready, then make a test pass on representative scrap or an inconspicuous area. Wagner recommends practicing on scrap or cardboard; ScotchBlue recommends a test spray and a check on a small area. Use the same substrate, dilution (if permitted), tip and distance you intend to use on the project.
Rank #2

- 【4 Nozzles & 3 Spray Patterns】VONFORN 700W paint sprayer includes 4 nozzle sizes (1.0mm, 1.5mm, 2.0mm, 3.0mm) to accommodate various DIY projects on surfaces such as furniture, fences, walls, doors, and garden sets. It supports 3 adjustable spray patterns: horizontal, vertical, and circular, making it suitable for a wide variety of application scenarios
- 【Dust Blowing & Convenient Cleaning】Before spraying, use the matching dust blowing joint to clear dust and debris from the surface for a smoother finish. After use, simply connect the cleaning connector to a faucet to flush out residual paint inside the tube, enabling quick and efficient cleaning
- 【Easy to Use & Clean】This paint sprayer features tool-free assembly, allowing even beginners to get started quickly with the included manual. To maintain optimal performance, we include a cleaning brush and a nozzle needle to remove residue, enabling thorough cleaning after every project
- 【Adjustable Flow Control】This paint sprayer features a flow control knob that allows you to fine-tune the paint output to fit various project needs. Regulating the flow helps achieve a consistent finish while supporting efficient paint usage during operation
- 【What You Will Get】Package includes: 1 × Paint Sprayer, 4 × Nozzle Sizes, 5 × Paint Filters, 1 × Viscosity Cup, 1 × Nozzle Cleaning Needle, 1 × Cleaning Brush, 1 × Dust Blowing Joint, 1 × Cleaning Connector, 1 × Pot Lid, and 1 × User Manual. If you have any problems with our paint sprayer, please don't hesitate to reach out to us, and we will answer it within 24 hours
Look at the fan from several angles. A good pattern should apply material evenly across its width without heavy stripes, spits or dry edges. Confirm that the coating is compatible with the sprayer and that the selected tip is supported. If the pattern is wrong, stop and diagnose it before touching the finished surface. Change only one approved variable at a time so you know what solved the problem.
Use the correct distance, angle and overlap
Keep the gun square to the surface
Hold the gun perpendicular to the work, not tilted or aimed with a bent wrist. An angle changes the distance from one side of the fan to the other, producing uneven wetness. Keep the nozzle-to-surface distance steady for the entire pass and reposition your body instead of reaching and flexing your wrist.
Distance is model-specific
The following figures are instructions for particular equipment, not universal rules:
| Source and equipment | Working distance stated | Overlap stated | How to use the figure |
|---|---|---|---|
| Graco airless technique guidance | About 30 cm (approximately 12 inches) | About 50% | Apply only when it agrees with your airless model and coating instructions. |
| Wagner SprayTech 5700 manual | 6–8 inches, depending on desired pattern size | At least 50% | Specific to the referenced 5700 manual; do not transfer it to another sprayer. |
| ScotchBlue Easy Clean sprayer FAQ | 6–8 inches | Not stated | Product-specific guidance; verify the paint label and sprayer instructions. |
Moving too close concentrates material and encourages runs. Moving too far allows droplets to dry before they land, creating a rough or dry-spray texture. Measure or mark a practice distance if maintaining it by eye is difficult.
Start moving before you trigger
Begin the pass, then pull the trigger while the gun is already moving. Release the trigger just before the end of the pass and continue moving briefly. This keeps the fan from depositing a heavy blob at the start or finish. Never pause with the trigger held open.
Rank #3

- Professional non-bleed Spray Gun with Adjustable Pattern Fan Control
- 1.3mm Air cap set installed
- 1Qt Bottom Feed Cup
- Metal Turbine case with handy gun holder
- 25ft Hose includes air control valve to reduce overspray and bounce back
Overlap each pass consistently
Use the overlap specified for your equipment; the cited Graco and Wagner instructions call for about 50% or at least 50%. Consistent overlap prevents stripes and thin lanes. Keep each pass parallel to the previous one instead of arcing your arm.
Do these 3 things before closing this tab:
1Repair Windows errors before they cause bigger problems2Scan for outdated or missing drivers - takes under a minute3Clear out junk files and repair common Windows errorsBuild coverage with controlled coats
Do not chase opacity with one heavy pass
Excess material per coat, a close or slow pass, low pressure and insufficient flash time are all listed by PPG as causes of runs and sags. A wet film can look acceptable for several seconds and then flow downward. Use the coating’s recommended fluid control, pressure and reducer or hardener, and apply a controlled coat rather than trying to finish in one pass.
Allow the specified flash time
Flash time is the interval the coating needs before another coat. Temperature, humidity, film thickness and the product chemistry affect it. Follow the product data sheet; do not use a fan, heat source or extra solvent to force a schedule the manufacturer does not permit.
Wagner’s 5700 guidance describes a thin wet first coat followed by a second, slightly heavier coat after drying. That sequence is an example for that equipment and material, not a prescription for every paint. If the label specifies a different number of coats or recoat window, the label controls.
Recognize an overloaded coat early
Runs and sags show as vertical curtains, beads or thick edges. Stop adding material to the area. Depending on the coating system and the stage of cure, PPG describes removing a sag with solvent and refinishing, or sanding a cured run or sag smooth before polishing. Those corrections are not interchangeable across products: consult the relevant technical data sheet before using solvent or abrasives.
What’s actually slowing this PC down?
Pick the symptom - the matching free tool is one click away.
Rank #4
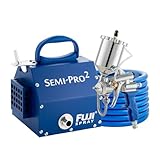
- Professional non-bleed Spray Gun with Adjustable Pattern Fan Control
- 1.3mm Air cap set installed
- 400cc Gravity Cup
- Metal Turbine case with handy gun holder
- 25ft Hose includes air control valve to reduce overspray and bounce back
Choose and maintain the tip, filters and material
Match the tip to both paint and sprayer
Check the paint maker’s application recommendation and the tip sizes your sprayer can support. An oversized tip can demand more flow than the machine can maintain at pressure. A tip that is too small for a thick material can restrict flow and produce a weak or distorted fan. Capacity, pressure and fluid viscosity must be considered together.
Diagnose a distorted fan
Low pressure, a clogged or worn tip, restricted filters and an oversized tip can all distort the pattern. A worn tip commonly produces a diminished fan and uses more paint. If the fan has tails, spits or an uneven center, stop spraying and inspect rather than compensating by moving closer.
Strain and clean when the instructions call for it
Strain material when the coating or equipment instructions require it. Clean the tip, filters and strainer after use; dried debris can cause the next session’s clog or poor pattern. Relieve pressure and follow the exact maintenance sequence in your model manual before removing a tip, filter or guard. A cleaning method written for another model may be unsafe or may damage parts.
Independent reader supportYour contribution helps us test, update, and keep practical guides available for everyone.Do not use thinning or maximum pressure as universal fixes
Material thickness and machine capacity determine whether a coating can be atomized correctly. Graco advises using the lowest pressure that produces a good pattern to reduce overspray, while warning that paint thickness and equipment capacity matter. Increasing pressure to the maximum can create more overspray and accelerate tip wear without correcting a restriction.
Outdated Drivers Are Slowing You Down
One free scan finds every outdated or missing driver and matches the right update for your exact hardware.Free scan · exact hardware matchPC Slower Than It Used to Be?
A free scan shows the junk files, broken settings and background clutter dragging Windows down - then fixes them in one click.Free scan · Windows 10 & 11ScotchBlue’s Easy Clean sprayer accepts water-based paints and notes that thinning may be needed when flow is restricted, but directs users to the product instructions and a test spray. That does not authorize thinning every paint. Some coatings must not be thinned, and the wrong reducer can change drying, adhesion or gloss. Check the paint label, sprayer manual and test pattern before adding anything.
Best Value

- Paint Grids Rapid 1000W High‑Efficiency Performance: Experience the power of a 1000W motor designed for consistent, professional‑grade coverage. This HVLP spray gun atomizes paint into a fine mist, ensuring a smooth, brush‑free finish on any surface. The advanced high‑power output significantly cuts down project time, making it a reliable choice for both large‑scale house painting and delicate furniture restoration.
- Paint Grids Versatile 3‑Pattern & 4‑Nozzle Configuration: Tailor your spray to the task with 3 adjustable modes: vertical, horizontal, and circular. This tool comes equipped with 4 precision copper nozzles (0.8mm to 2.5mm), allowing you to handle everything from thin stains and sealers to thicker latex paints. The metallic tips provide superior durability and spray consistency compared to standard plastic alternatives.
- Paint Grids Precision Flow & Width Customization: Take full command of your DIY projects with the integrated flow control and width adjustment knobs. By fine‑tuning the output, you can minimize paint waste and prevent messy overspray. Whether you are coating intricate cabinet corners or wide fence panels, the adjustable settings ensure optimal utilization and a flawless layer every time.
- Paint Grids Optimized Maintenance & Quick Disassembly: Engineered for hassle‑free upkeep, the entire unit can be taken apart without additional tools. The detachable design allows for deep cleaning of the fluid path and nozzles. We provide a specialized cleaning brush and clogging needle to ensure that leftover residue is easily removed, keeping the sprayer in peak condition for your next job.
- Paint Grids Complete DIY Kit for Immediate Use: This comprehensive package provides everything needed to start your home improvement journey. Inside, you will find the 1000W sprayer, a high‑volume container, 4 durable copper nozzles, protective gloves, and essential measuring tools like a viscosity cup and filter funnels. The user‑centric design ensures a comfortable grip for long‑term painting sessions.
Fix common defects by symptom
Runs or sags
- Likely causes: too much material, a slow or close pass, low pressure, inadequate flash time or cold conditions.
- Immediate action: stop loading the area and let the coating reach the stage specified for repair.
- Repair: use the coating maker’s approved solvent or sanding procedure; PPG’s solvent-removal and cured-sanding options apply to the appropriate refinish systems, not automatically to household paint.
Dry, rough or sandy finish
- Likely causes: excessive distance, fast movement, unsuitable pressure or material that is drying before it reaches the surface.
- Check: verify the model’s distance and pressure range, coating temperature limits and permitted reducer.
- Correction: make another test pass after one approved adjustment; do not simply move closer and flood the surface.
Striped, narrow or uneven fan
- Likely causes: clogged or worn tip, restricted filter, low pressure or an unsupported tip size.
- Correction: stop, relieve pressure, clean the prescribed components and inspect the tip for wear. Replace it if the manual’s inspection criteria indicate wear.
- Prevention: strain material when required and clean the system immediately after spraying.
Heavy edges or blotchy overlap
- Likely causes: inconsistent distance, arcing wrist, pausing while triggered or insufficient overlap.
- Correction: hold the gun square, start moving before triggering, keep the distance constant and overlap the next pass by the amount specified for the sprayer.
Airless or HVLP: choose by the job, not by a universal “best” setting
Airless and HVLP systems atomize paint differently, so compare them by the project and the coating rather than by a single pressure number. Before choosing or changing equipment, check:
- Whether the coating is approved for that technology and whether thinning is allowed.
- Supported tip sizes and the sprayer’s pressure or flow capacity.
- How precisely the pattern and fluid output can be controlled for the surface.
- Overspray and masking requirements for the location.
- Cleanup steps, replacement tips and filters, and the availability of model-specific parts.
Manufacturer instructions describe operation for their own products; they do not establish a head-to-head performance ranking. Select the system that meets the coating’s requirements and the scale of the work, then follow its manual instead of importing settings from another machine.
Protect yourself and finish the cleanup
Spray creates airborne droplets and can expose skin and eyes to coating chemicals. ScotchBlue requires its sprayer to be used in a well-ventilated area and calls for suitable eye, skin and respiratory protection according to paint-maker guidelines. Choose protective equipment from the coating’s safety information; there is no single respirator recommendation that fits every paint.
Keep hands away from the spray, even when the fan looks weak. Before maintenance, shut down and relieve pressure exactly as the manual directs. Collect masking and contaminated waste according to local rules. Flush and store the sprayer, tip, filters and hoses using the approved cleaning material and sequence. A clean system is part of the next job’s finish quality.
Quick Recap
A repeatable checklist for a smooth finish
- Read the coating label, technical data sheet and exact sprayer manual.
- Clean, dry, repair and sand the substrate as appropriate.
- Mask adjacent surfaces and account for wind or ventilation.
- Confirm coating compatibility, tip size, filters and permitted thinning.
- Test on representative scrap or an inconspicuous spot.
- Set the model-specific distance and the lowest pressure that produces a sound pattern.
- Hold the gun perpendicular, start moving before triggering and keep passes parallel.
- Overlap consistently—about 50% where the applicable Graco or Wagner guidance specifies it.
- Apply controlled coats and observe the required flash and recoat times.
- Stop at the first sign of a distorted pattern, run or sag; diagnose before continuing.
- Relieve pressure, clean the tip, filters and strainer, and store the equipment as directed.

Product prices and availability are accurate as of the date/time indicated and are subject to change. Any price and availability information displayed on Amazon at the time of purchase will apply.

