Outdated Drivers Are Slowing You Down
Windows Errors? Fix Them Before They Spread
Repair common Windows errors and clear accumulated junk for a smoother, more stable PC - no reinstall needed.Free scan · no reinstallOutdated Drivers Are Slowing You Down
One free scan finds every outdated or missing driver and matches the right update for your exact hardware.Free scan · exact hardware matchOutbyte Driver Updater · freeOne free scan finds every outdated or missing driver and matches the right update for your exact hardware.
Scan My Drivers Free →ThatPainter is reader-supported. When you buy through links on our site, we may earn an affiliate commission. Learn More
A successful thrift-store chest makeover starts before the first coat of paint: confirm that the chest is structurally sound, clean it thoroughly, check the old finish for safety concerns, and decide whether the original wood deserves to remain visible. Some chests need only cleaning and a hardware adjustment; others are better candidates for a carefully prepared painted finish. The right route depends on the chest in front of you, not on a universal makeover formula.
Start by deciding whether the chest is worth saving
Take the chest outside or into a well-ventilated work area and inspect it from every side. Look at the back, underside, drawer bottoms, joints, feet and the areas around the hardware. You are trying to separate a sound project with cosmetic problems from a piece whose damage will consume more time and money than it is worth.
As an Amazon Associate I earn from qualifying purchases.
What’s actually slowing this PC down?
Pick the symptom - the matching free tool is one click away.
Check the structure
- Press gently on each corner and side. Excessive movement, twisting or a cabinet that will not sit level can indicate loose joints or deeper structural damage.
- Inspect the back and underside for cracked panels, missing fasteners, swollen board and patchwork repairs.
- Look for water staining, a musty odor, soft wood, bubbling veneer or darkened edges. Extensive veneer loss and heavy water damage are warning signs; the thrift-furniture buying guidance cautions that these problems may not be worthwhile for most buyers.
- Check for evidence of insects, such as small exit holes, fine dust or fresh-looking frass. Do not bring a suspect piece into your living space until the problem has been assessed.
Test every drawer and runner
Open each drawer fully, then close it several times. A drawer that binds in one spot may need cleaning or a minor adjustment; a box that racks, has a broken bottom or pulls away from its joints needs more substantial repair. Confirm that the drawer fronts are secure and that the chest does not tip when a loaded drawer is opened. Photograph or label drawers before removing them so they return to their original positions.
Identify what the chest is made of
Do not assume that weight or appearance proves a chest is solid wood. Examine an unfinished edge at the back, underside or inside a drawer. Solid wood normally shows continuous grain around an edge, while veneer has a thin decorative layer over another material. Manufactured board may have a uniform, compressed-looking core. A veneered or composite chest can still be an excellent painting project; the distinction mainly affects how aggressively you can sand and whether preserving the visible surface is worthwhile.
#1 Best Overall

- Restor-A-Finish is a unique finish-penetrating formula that restores wood finishes while blending out minor scratches, blemishes and abrasions
- Available in nine colors to match almost any wood finish tone; Neutral, Maple-Pine, Golden Oak, Cherry, Walnut, Mahogany, Dark Walnut, Dark Oak, and Ebony Brown
- With a simple wipe-on, wipe-off process, most finished wood surfaces that seem to need a complete refinishing job can be restored in a few minutes
- Removes white heat rings and water marks, sun fade, oxidation, smoke damage and most other blemishes
- Restor-A-Finish restores the finish without removing any of the existing finish
Assess the existing finish
Ask whether the original finish is attractive, stable and compatible with the way you will use the chest. A dull but intact finish may respond to cleaning and gentle maintenance. Peeling, alligatored or heavily stained coating may require a new finish. If you can preserve a useful original surface, doing so avoids unnecessary stripping and keeps more of the chest’s character.
Choose a makeover route before buying supplies
There are three practical decisions: preserve the wood, paint the chest, and reuse, refinish or replace the hardware. Make each choice from the material and condition you documented rather than from a trend.
| Decision | Choose this route when | Main caution |
|---|---|---|
| Preserve the existing wood or finish | The surface is stable, the grain or patina is desirable, and cleaning or small repairs can solve the visible problems. | Avoid aggressive sanding that removes veneer or an original surface you intended to keep. |
| Apply a painted finish | The finish is unattractive or too damaged to preserve, and the chest can be made sound and clean first. | Old paint may contain lead; assess the risk before sanding, scraping or stripping. |
| Reuse or refresh hardware | Pulls and knobs are complete, secure and visually compatible after cleaning. | Hardware that looks acceptable may still have loose screws, damaged threads or mismatched spacing. |
| Replace hardware | Pieces are missing, broken, unsafe to use or unsuitable for the intended design. | Measure the existing hole spacing before ordering; there is no universal pull size. |
Clean the chest before refinishing
Cleaning is preparation, not an optional final touch. Dirt, wax, cooking residue and furniture polish can prevent a new coating from bonding and can spread contaminants into your sanding dust. Refinishing guidance from West Virginia University Extension and furniture-paint project guidance both begin with cleaning or degreasing.
- Remove every drawer and take off pulls, knobs, plates and other detachable hardware. Put screws and parts from each location in labeled bags.
- Vacuum loose dust from the cabinet, drawer cavities, runners and underside. Use a soft brush around joints and carved details.
- Wash the surfaces with a cleaner appropriate for the existing finish, working in small sections. Do not soak veneer, end grain or swollen board.
- Rinse or wipe away cleaner residue as directed by the product, then allow the chest to dry completely.
- Inspect again under good light. Cleaning often reveals loose veneer, hairline cracks, old filler and stains that were hidden by grime.
Keep the removed hardware separate while it dries. Clean metal gently and test a small hidden area before using an abrasive or chemical treatment; an aged finish may be part of the piece’s character.
Rank #2

- ANTIQUE FURNITURE RESTORATION – Minwax Antique Furniture Refinisher is a low viscosity, amber-colored blend of solvents and wood conditioners that will help you restore and refinish antique furniture.
- GENTLE FORMULA – This antique wood refinishing formula contains natural wood oils that penetrate and condition wood. It can be used to dissolve varnish, shellac, and/or lacquer on all type of wood surfaces without harming the wood.
- EASY TO APPLY – With no scraping, no sanding, and no mess, it’s easy to apply this wood refinish in just a few steps.
- VERSATILE – You can use Minwax Furniture Refinisher for a variety of projects. It will help you gently dissolve years of built-up wood finishes but will still leave the wood’s warm glow undisturbed.
- A BRAND YOU CAN TRUST – Minwax is America’s leading brand of wood finishing and wood care products. Since 1904, we have been inspiring consumers to Keep on Finishing. We offer consumers a complete line of products to meet every wood finishing need.
Make small repairs while the chest is clean
Hardware and drawer fixes
Tighten loose screws and replace stripped fasteners with a correctly sized equivalent. If a drawer rubs, check for debris, a loose runner or a slightly displaced guide before altering the wood. A small adjustment is preferable to removing material unnecessarily. Replace a damaged drawer bottom only when you can support it securely and keep the drawer square.
Veneer and surface damage
Press down lifted veneer only if the substrate beneath it is sound and the repair will lie flat. Missing veneer, broad bubbling and soft areas require skills and materials beyond a quick cosmetic makeover. If those defects are widespread, choosing another chest may be the more practical decision.
Free tools Windows power users keep installed
One-click scans. No signup required.
Odor and moisture
A persistent damp smell, staining that returns after drying or visibly swollen board indicates a moisture problem rather than ordinary dirt. Let the chest dry in a controlled, ventilated place and investigate the source before finishing. Paint can hide a stain while leaving the underlying damage unresolved.
Handle old paint as a lead-safety question
Never treat unknown old paint as harmless because it looks intact or because the chest is small. The U.S. Environmental Protection Agency states: “Any renovation, repair, or painting (RRP) project in a pre-1978 home that has lead-based paint can easily create dangerous lead dust.” Its DIY guidance emphasizes containment, dust reduction, careful cleanup and keeping non-workers away. Antique and vintage furniture can also contain lead, according to the Centers for Disease Control and Prevention.
Rank #3
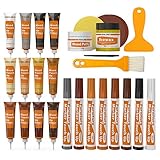
- KIT INCLUDES our most powerful wood repair compounds, so you can repair all levels of damage to wood furniture by yourself. Includes 12 touch up fillers, 8 touch up markers, 1 wood putty, 1 beewax, 2 brushes, 2 sandpaper, 1 sponge and 1 scraper
- RESTORE ALL KINDS OF DAMAGES such as scratches, chips, cracks, holes and discoloration on wooden floors, doors and furniture like desks, chairs, beds, wardrobes, bookcases, cabinets, wooden crafts and many more
- EASY TO USE: Apply the filler into the cracks, and then smooth the surface with scraper. The markers can be used to touch up the superficial scratches or to draw wood grain
- UNIQUE COLORS: The touch up fillers are available in 12 colors: White, Black, Light Gray, White Maple, Yellow Maple, Deep Pine, Earthy Yellow, Yellow Teak, Red Cherry, Cedar, Dalbergia, Walnut. The touch up markers come in 8 colors: White, Gray, Oak, Maple, Cherry, Walnut, Mahogany, Black
- Tips for mixing colors: You can mix the desired wood filler color according to the color chart. When mixing colors, first add the lighter repair filler, then gradually add the darker wood repair filler, observing the color changes until you achieve the desired shade
The U.S. Consumer Product Safety Commission identifies movable furniture such as chests and dressers among covered furniture articles and lists a lead limit of 0.009 percent (90 parts per million) for paint and similar surface coatings. That is a regulatory limit, not proof that a particular thrift-store chest is lead-free.
Before sanding, scraping or stripping
- Determine what is known about the chest’s age and previous location, but do not use an age estimate as a safety test.
- Consider professional lead testing or advice when the coating is old, layered, chalky or otherwise uncertain.
- If lead may be present, isolate the work area with heavy plastic sheeting, keep children and pets away, and prevent dust from traveling into the home.
- Use dust-minimizing methods recommended by the EPA, such as wet-dry sandpaper or a sanding sponge where appropriate, and HEPA vacuuming for cleanup. Follow the current EPA instructions rather than improvising a dry-sanding routine.
- Read and follow the chemical stripper manufacturer’s handling, ventilation and disposal directions. A stripper is not automatically safer than sanding.
The EPA’s lead-safe renovation pamphlet page identifies its latest pamphlet as updated in March 2026. Check that current guidance and applicable local rules before disturbing a suspect coating.
Free tools Windows power users keep installed
One-click scans. No signup required.
Prepare the surface for a painted makeover
Once the chest is clean, dry and structurally sound, prepare only as much as the material requires. The goal is a sound, dull, residue-free surface—not removal of every trace of the original finish.
- Remove loose flakes or failing material using a method appropriate to the finish and your lead-safety assessment.
- Scuff-sand stable glossy areas lightly if the coating and safety conditions permit. Veneer edges and thin decorative layers need a gentle touch.
- Fill small holes, dents and abandoned hardware openings with a compatible filler. Let it dry, then level the repair without cutting through surrounding veneer.
- Repair or secure loose trim and joints before priming or painting.
- Vacuum and wipe away all preparation dust. Allow the surface to dry before coating.
- Mask runners, drawer interiors or areas that must remain unpainted. Remove masking before the coating fully hardens if the product instructions call for it.
Use furniture or chalk paint deliberately
Furniture paint, including chalk paint, is a supported option for a prepared thrifted chest, not a prescription for every piece. West Virginia University Extension presents chalk paint as an introductory restoration approach, and a furniture upcycling guide describes painted makeovers with appropriate preparation. Choose a product based on the surface, the level of wear the chest will receive and the finish you want.
Rank #4

- Restor-A-Finish is a unique finish-penetrating formula that restores wood finishes while blending out minor scratches, blemishes and abrasions
- Available in nine colors to match almost any wood finish tone; Neutral, Maple-Pine, Golden Oak, Cherry, Walnut, Mahogany, Dark Walnut, Dark Oak, and Ebony Brown
- With a simple wipe-on, wipe-off process, most finished wood surfaces that seem to need a complete refinishing job can be restored in a few minutes
- Removes white heat rings and water marks, sun fade, oxidation, smoke damage and most other blemishes
- Restor-A-Finish restores the finish without removing any of the existing finish
When paint is a sensible choice
- The existing coating is unattractive or too compromised to preserve.
- Repairs have made the surface visually uneven and a unified color will hide those transitions.
- You want a deliberate change in style and accept that the original wood will no longer be the focal point.
When to pause before painting
- The chest has unusually good grain, veneer or patina that cleaning could restore.
- Damage is structural, damp or pest-related rather than merely cosmetic.
- You have not resolved the possibility of lead-containing paint.
Apply the chosen coating according to its label, including recommended tools, recoat interval, ventilation and curing time. Thin, even coats generally make it easier to avoid runs on drawer fronts and drips along edges. Paint removable drawers separately, keeping them supported so wet edges do not stick to the cabinet.
Independent reader supportYour contribution helps us test, update, and keep practical guides available for everyone.Refinish or replace the drawer hardware
Lay out every pull, knob and screw and decide whether the set can be reused as a coherent group. Cleaning may be enough when the hardware is complete and the finish suits the chest. Refinishing is reasonable when the pieces are sound but visually tired and the product is rated for that material.
Quick wins for a faster PC:
Scan for outdated or missing drivers - takes under a minuteDriver Scan →Repair Windows errors before they cause bigger problemsFix Now →Replace hardware when it is missing, unsafe to grip, badly damaged or impossible to make consistent. Measure the center-to-center distance between mounting holes on each drawer, record the screw length and check the back of the drawer for obstructions. Compare those measurements with the replacement hardware before purchasing. A pull that looks right but does not match the spacing will require new holes or leave old holes exposed.
Reassemble and check the finished chest
- Wait until the coating is dry and has reached the product’s stated cure stage before reinstalling hardware or stacking drawers.
- Use the labeled screws and return each drawer to its original opening.
- Open and close every drawer slowly. Look for paint buildup on edges, rubbing at runners or hardware that loosens under normal use.
- Confirm that the chest remains stable and does not tip when a drawer is extended.
- Wipe away any remaining dust from the work area and dispose of contaminated materials according to local requirements, especially when lead was a possibility.
Common failure points and the better response
Paint peels soon after the makeover
The usual causes are grease, wax, moisture, a glossy surface or insufficiently cured previous coating. Stop adding layers, identify the weak area, clean it again and correct the preparation problem before recoating. Do not assume a thicker coat will solve poor adhesion.
Best Value

- SCRATCHES HAPPEN: Nicks and discoloration appear on finished wood and veneer. Wipe on either scratch remover and wipe off excess immediately to camouflage the damage on finished wood and veneer.
- COCONUT OIL FORMULA: Both scratch removers are 0% VOC and coconut oil-based. The dark remover suits walnut, mahogany, and cherry; the light remover suits maple, oak, and pine.
- Repair and Restore: Use our tinted Fill Sticks to fill deep scratches and gouges, with the ability to top coat with varnish or paint for a lasting repair.
- WIPE ON, WIPE OFF: Apply each scratch remover, wipe off excess right away, then let dry 15 to 30 minutes. Rub fill sticks into gouges and scrape excess with a credit card.
- FIVE TOOLS, ONE KIT: Furniture polish and cleaner, dark and light scratch removers, four wax fill sticks and a microfiber cloth tackle nicks, scratches and gouges on wood furniture and floors.
Drawers stick after painting
Paint on runners and mating edges can change clearances. Remove the drawer, let the coating cure, and check exactly where contact occurs. Correct only the interfering area and avoid sanding unknown old paint without appropriate containment and dust controls.
The new pulls do not fit
Recheck the hole spacing and screw length rather than forcing the hardware. If the spacing differs, either return the pulls, use a backplate that legitimately covers the old holes, or plan a measured repair before drilling.
The chest looks worse after cleaning
Cleaning can expose stains, veneer loss and mismatched repairs that grime had concealed. Reassess whether preserving the surface is still practical. A painted finish can unify minor cosmetic differences, but it should not be used to conceal active moisture damage or an unresolved safety issue.
A practical decision checklist
- Is the cabinet stable, square enough to use and free of active moisture or pest concerns?
- Do all drawers open, close and remain attached to their runners?
- Are the back, underside and drawer bottoms sound?
- Is the original wood or finish worth preserving after cleaning?
- Have you separated and assessed every piece of hardware?
- Have you measured hole spacing before considering replacement pulls?
- Have you addressed the possibility of lead before disturbing old paint?
- Is the work area contained, ventilated and inaccessible to children and pets?
- Will your selected paint and preparation method match the chest’s material and expected wear?
If the answers are yes, proceed in this order: inspect, clean, repair, choose the finish, prepare safely, paint or preserve, then reinstall and test the hardware. That sequence protects the chest’s useful qualities while giving you a clear point to stop when damage or safety risks exceed the scope of a simple makeover.
Quick Recap

Product prices and availability are accurate as of the date/time indicated and are subject to change. Any price and availability information displayed on Amazon at the time of purchase will apply.

