PC Slower Than It Used to Be?
Do these 3 things before closing this tab:
1Repair Windows errors before they cause bigger problems2Scan for outdated or missing drivers - takes under a minute3Clear out junk files and repair common Windows errorsA free scan shows the junk files, broken settings and background clutter dragging Windows down - then fixes them in one click.
Run a Free PC Scan →Free scan · Windows 10 & 11
ThatPainter is reader-supported. When you buy through links on our site, we may earn an affiliate commission. Learn More
To join bias tape strips, overlap them at right angles with right sides together and raw edges aligned. Mark a diagonal across the overlap, sew on the line, trim the seam allowance, and press it open. This diagonal join is standard sewing guidance because it makes a less bulky, less noticeable join than a straight seam.
Join bias tape strips step by step
- Arrange the strips. Lay one strip right side up. Place the end of the second strip across it at a right angle, right side down, aligning the raw edges at the overlap. Pin the layers so they do not shift.
- Mark the stitch line. Draw a diagonal from corner to corner across the overlap. Sewing.org’s guidance is to match the seamlines and sew at an exact 45-degree angle; American Patchwork & Quilting’s tutorial also marks a diagonal across the strips.
- Sew the join. Stitch directly on the marked line. SINGER’s instructions for its strip-making method specify sewing corner to corner with a 1/4-inch seam allowance.
- Trim and press. Trim the seam allowance. American Patchwork & Quilting specifies trimming to 1/4 inch, then pressing the seam allowance open.
- Continue to the required length. Repeat the same join with additional strips. If you are making double-fold bias tape, press the long edges toward the center, then fold the strip in half and press again.
Why use a diagonal join?
A diagonal seam distributes the join across the width of the tape rather than placing one straight seam across it. American Patchwork & Quilting describes the diagonal join as less bulky and less noticeable than a straight seam; Sewing.org calls it the most inconspicuous seam. These are sewing recommendations, not results from a quantified comparison.
#1 Best Overall

- QUICKLY MAKE BIAS BINDING: The Jeimier 5 sizes professional Bias Tape Makers out of any fabric to match your binding quilts projects. Make your own bias tape in minutes
- BETTER THAN BY HAND: Easy to use for making almost bias tape you choose to make, once you get the hang of it. This Bias Tape Tools will save you lots of time
- TYPES OF BIAS TAPE MAKERS: It is important to note the Jeimier bias binding maker comes in 5 widths. The binding maker for quilting, 1/4" 3/8" 1/2" 3/4" 1". Elevate your binding and quilting performance
- MAKE QUILTS POP: One easy motion creates any length bias tape without fumbling with creases. If you ever tried to make bias binding you know how difficult it is. This binding maker makes it easy
- CONDUCIVE TO QUILTING SIZES: Use 12 mm width with this 6 mm bias tape folding tool. Use 18 mm width with this 9 mm bias tape tool. Use 24 mm width with this 12 mm bias binding maker. Use 36 mm width with this 18 mm bias quilting maker. Use 46 mm width with this 25 mm bias tape maker. The Jeimier 5 sizes of bias tape making tool help you take any size you want. Elevate your binding and quilting performance. Since the bias tape maker's dimensions are in millimeters, you need to convert them to inches
| Join type | Bulk and visibility | Alignment |
|---|---|---|
| Diagonal seam | Recommended as less bulky and less noticeable than a straight seam; no measured difference is published. | Overlap the strips at right angles, align raw edges, then sew corner to corner across the overlap. |
| Straight crosswise seam | Described by the cited sewing guidance as bulkier and more noticeable than a diagonal join; no measured difference is published. | Runs straight across the width of the tape. |
Do you need a bias tape maker?
No. A sewing machine is used to stitch the diagonal joining seam, but a bias tape maker is optional: it helps form and press homemade tape and is not needed to join strips. Bias bars are also optional aids for forming or pressing tape.
Quick Recap
Best Value

- YICBOR Fabric Bias Tape Maker 6mm 9mm 12mm 18mm 25mm
- A precision tool that folds fabric into perfect halves automatically
- Suitable for sewing project, arts and crafts, perfect for making bias especially great in sewing and quilting
Rank #4
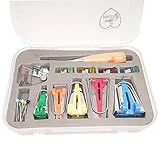
- DIY Bias Tapes in Minutes-If you are making bias tape for appliqué or any sewing project, this sewing tools is for you! Choose the fabric pattern you like, Easily DIY your own bias tape to make quilt binding seams, sewing, serging, crafting, fishing,and little projects,like placemats, bibs, armhole, neckline, applique and so on.
- Bias Tape Set-- Included 5x Bias Tape Makers (Green 6mm, Orange 9mm,Yellow 12mm, Red 18mm, Blue 25mm) + 1x Bias Binding Foot+ 1x Awl+ 10x Ball Point Straight Pins, the smaller Sewing clips are perfect for those hard to reach spots as well as using them to mark where not to sew. And the large clips are perfect and strong enough to hold together several layers of leather.
- Bias Binding Foot-- Snap-on adjustable bias tape binding foot, fits all low shank snap on singers, domestic sewing machine,they are sturdy and useful for all types of crafts.
- Make Single/ Double Fold Bias Binding--1/4'' Bias Tape Maker, 1/2'' Bias Strip= 1/4'' Single Fold Bias Tape= 1/8'' Double Fold Bias Tape, Single-fold bias tape can be ironed in half lengthwise to make double-fold bias tape,it's a really handy addition to the sewing tool kit.
- Make Bias Tape--These work great for making bias tape. Cut your fabric strips the same size as the large opening, cut a point on one end and feed through while you iron.Make your own bias tape. Not only is it economical, but you can also quickly make the colors or patterns you need for your project!If you are not familiar a quick YouTube video will do the trick.
Rank #3

- Bias tape makers set of 5 sizes :1/4" 3/8" 1/2" 3/4" 1" Set ( 6mm 9mm 12mm 18mm 25mm)
- A precision tool that folds fabric into perfect halves automatically ,the sewing binding tool Easy to use, quick, precise, economical. Perfect for creating your own bias tapes in minutes
- Make any fabric into an accent, border or trim. Its fast, economical and perfectly coordinated. Pull the fabric through and iron--folds it perfectly, ready for sewing on or gluing
- Using Directions: Size 6mm: fit for cut the fabric 12mm widths; Size 9mm: fit for cut the fabric 18mm widths; Size 12mm: fit for cut the fabric 24mm widths; Size 18mm: fit for cut the fabric 36mm widths; Size 25mm: fit for cut the fabric 46mm widths
- HOW TO USE:1.To cut bias strips first cut across the fabric at a 45° angle then cut strips parallet to this freshly cut edge in the width you need.2.Wrong side up feed bias strip into wide end of tape maker use awl to pull fabric through.3.Pin end of strip to ironing board Pull tape maker and press in folds keep iron close to tape maker.
Rank #2
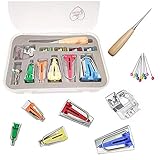
- Bias Tape Maker Kits OF 5 Sizes 1/4"(6MM) 3/8"(9MM) 1/2"(12MM) 3/4"(18MM)1"(25MM)
- You will get 4pcs craft clips ,1pc binder foot and awl ,10pcs quilting pins, 5 different size bias tape maker
- The binder foot will fit for Brother, Babylock, Janome, Kenmore, Singer and many more sewing machines that use a snap on foot.
- Bias tape maker can be widely used in various leathercraft, tailor patchwork, DIY and much more

Product prices and availability are accurate as of the date/time indicated and are subject to change. Any price and availability information displayed on Amazon at the time of purchase will apply.

