Recommended Free Tools
Windows Errors? Fix Them Before They Spread
Free scan · no reinstall
Crashes, No Sound, or Screen Glitches?
Free scan · under a minute
PC Slower Than It Used to Be?
Free scan · Windows 10 & 11
ThatPainter is reader-supported. When you buy through links on our site, we may earn an affiliate commission. Learn More
To make bias binding, cut woven fabric diagonally at a true 45-degree angle, join the strips to the required length, press the long edges into single-fold or double-fold tape, and sew it around the raw edge. The diagonal cut gives the strip flexibility to follow curves such as necklines, armholes, scallops, and rounded corners. Before cutting, distinguish raw strip width from pressed tape width and finished visible width; they are not interchangeable.
What bias binding is—and why it follows curves
The lengthwise grain runs parallel to the selvage; the crosswise grain runs perpendicular to it. True bias is the diagonal direction at approximately 45 degrees to both. Bias binding is a narrow woven-fabric strip cut on that diagonal and folded to finish or decorate an edge. A different diagonal angle may have some give, but not the same amount as true bias. The NIST apparel glossary provides the technical distinction.
| Term | Meaning |
|---|---|
| Bias tape | Often a flat or pre-folded bias strip. |
| Bias binding | Often a strip used to encase a raw edge. |
The terms are frequently used interchangeably. A homemade strip can also be used for garment binding, quilt edges, Hong Kong seam finishes, casings, ties, decorative trim, or custom piping.
#1 Best Overall

- QUICKLY MAKE BIAS BINDING: The Jeimier 5 sizes professional Bias Tape Makers out of any fabric to match your binding quilts projects. Make your own bias tape in minutes
- BETTER THAN BY HAND: Easy to use for making almost bias tape you choose to make, once you get the hang of it. This Bias Tape Tools will save you lots of time
- TYPES OF BIAS TAPE MAKERS: It is important to note the Jeimier bias binding maker comes in 5 widths. The binding maker for quilting, 1/4" 3/8" 1/2" 3/4" 1". Elevate your binding and quilting performance
- MAKE QUILTS POP: One easy motion creates any length bias tape without fumbling with creases. If you ever tried to make bias binding you know how difficult it is. This binding maker makes it easy
- CONDUCIVE TO QUILTING SIZES: Use 12 mm width with this 6 mm bias tape folding tool. Use 18 mm width with this 9 mm bias tape tool. Use 24 mm width with this 12 mm bias binding maker. Use 36 mm width with this 18 mm bias quilting maker. Use 46 mm width with this 25 mm bias tape maker. The Jeimier 5 sizes of bias tape making tool help you take any size you want. Elevate your binding and quilting performance. Since the bias tape maker's dimensions are in millimeters, you need to convert them to inches
When to use bias binding
Use bias binding when the strip needs to flex or ease around a shape, including necklines, armholes, scalloped or circular edges, curved quilt borders, bound seams, casings, ties, and piping. Straight-grain binding uses less fabric and is usually suitable for a genuinely straight edge. Bias is useful for curves, flexibility, or a diagonal fabric effect; it is not automatically stronger or better.
Choose fabric and gather the tools
Best fabrics for beginners
Lightweight or medium-weight, tightly woven fabric is easiest to handle. Quilting cotton is a good starting choice; cotton lawn, shirting, lightweight linen, and similar wovens also work. Match the binding’s weight and laundering behavior to the project when possible. Heavy fabric can be bulky, loose weaves can fray or distort, and silk or rayon may be slippery. Soft fabric may be easier to control after light starching. See guidance from Sewing.org, Minerva, and Threads.
- Napped fabric: keep the nap running consistently across joined strips.
- Stripes and plaids: plan the joins if you want the pattern to match.
- Slippery silk or rayon: use sharp tools, handle gently, and test first.
- Knits: use a knit-specific method; woven-bias instructions do not automatically apply.
Tools
Gather fabric, a rotary cutter and mat or sharp scissors, a clear ruler with a 45-degree guide, a removable marker, an iron and pressing surface, thread, pins or clips, and a sewing machine or hand-sewing supplies. A tape maker, bias bars, small iron, starch, seam gauge, or small mat for inside a fabric tube can help but is optional. Follow the tape maker’s instructions: its labeled size does not necessarily equal the raw strip width. For example, the Dritz/Prym guide specifies raw strip widths of 7/8 inch for one 1/2-inch maker and 1 3/4 inches for one 1-inch maker.
What’s actually slowing this PC down?
Pick the symptom - the matching free tool is one click away.
Decide the width before cutting
Label the measurement you need:
- Raw strip width: width cut from fabric before pressing.
- Pressed tape width: width after folding the long edges.
- Finished visible width: portion visible after the binding wraps around an edge.
- Tape-maker size: a tool-specific designation; check its instructions.
As a planning rule, a 2-inch raw strip makes approximately 1-inch single-fold tape or 1/2-inch double-fold tape. Actual results vary with fabric thickness, folds, seam allowances, and the tool.
Standalone tape-width planning table
These simplified formulas are starting points: single-fold raw width is about twice the desired pressed tape width; double-fold raw width is about four times the desired final folded width.
| Desired tape | Approximate raw strip width |
|---|---|
| 1/4-inch single-fold | 1/2 inch |
| 1/2-inch single-fold | 1 inch |
| 3/4-inch single-fold | 1 1/2 inches |
| 1-inch single-fold | 2 inches |
| 1/4-inch double-fold | 1 inch |
| 3/8-inch double-fold | 1 1/2 inches |
| 1/2-inch double-fold | 2 inches |
| 3/4-inch double-fold | 3 inches |
These are generic figures, not universal specifications. Check the tape-maker instructions rather than assuming the 2× or 4× rule is exact.
Width for binding that wraps around an edge
For double-fold binding around an edge, include the seam allowances:
PC Slower Than It Used to Be?
A free scan shows the junk files, broken settings and background clutter dragging Windows down - then fixes them in one click.Free scan · Windows 10 & 11Crashes, No Sound, or Screen Glitches?
Random freezes, missing sound and display glitches usually trace back to one bad driver. Find and replace yours safely.Free scan · under a minuteRank #2
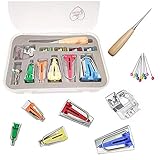
- Bias Tape Maker Kits OF 5 Sizes 1/4"(6MM) 3/8"(9MM) 1/2"(12MM) 3/4"(18MM)1"(25MM)
- You will get 4pcs craft clips ,1pc binder foot and awl ,10pcs quilting pins, 5 different size bias tape maker
- The binder foot will fit for Brother, Babylock, Janome, Kenmore, Singer and many more sewing machines that use a snap on foot.
- Bias tape maker can be widely used in various leathercraft, tailor patchwork, DIY and much more
Raw strip width = 4 × desired finished visible width + 2 × seam allowance
With a 1/4-inch seam allowance, use these planning widths:
| Finished visible width | Raw strip width |
|---|---|
| 1/4 inch | 1 1/2 inches |
| 3/8 inch | 2 inches |
| 1/2 inch | 2 1/2 inches |
| 5/8 inch | 3 inches |
| 3/4 inch | 3 1/2 inches |
A 1/2-inch standalone double-fold tape may start with a 2-inch strip; a 1/2-inch visible edge binding with two 1/4-inch seam allowances may need 2 1/2 inches. The Sewing.org guide covers edge-binding calculations, while Seamwork explains the simpler tape-width approach. Add width for thick fabric, batting, or multiple layers, and test a sample before cutting a full batch.
Calculate how much binding you need
Measure every edge to be bound. Add the sides of a rectangle, but use a flexible tape measure for curves and irregular edges. Add length for corners, joining ends, starting and stopping, handling loss, and a test section. One Sew4Home example adds 10–12 inches to a 144-inch quilt perimeter; treat that as an example, not a universal allowance.
Estimate a starting square for continuous binding
- Determine required finished length, including extra allowance.
- Determine the raw strip width.
- Multiply length by raw strip width and take the square root.
- Round up and add allowance for seams, squaring, and waste.
Starting square side ≈ √(required length × raw strip width) + allowance
For 120 inches of binding, a 1/2-inch finished visible edge, and a 1/4-inch seam allowance, the raw strip width is 4 × 1/2 + 2 × 1/4 = 2 1/2 inches. The area estimate is 120 × 2 1/2 = 300 square inches; √300 is about 17.3 inches. Round up and add about 3 inches for joining and waste, for a starting square of approximately 21 inches. This is an estimate, not a guaranteed yield. The American Patchwork & Quilting guide demonstrates the square-root approach.
Method 1: Make continuous bias binding from a square
This method makes a long strip with fewer separate joins. Two seams turn the square into a tube, then a continuous spiral cut produces the strip. The tube must be offset correctly.
Rank #3

- HONEYSEW Bias Tape Maker Sewing Quilting Tools
- Create your own bias tape with the HONEYSEW bias tape maker. Simple and Easy. Your creation will look professional with clean finished product from homemade napkins, handbag, bibs and etc
- Bias Tape Maker Set Of 4 6MM 12MM 18MM 25MM top quality
- Prepare the fabric. Prewash and dry it if the finished item will be washed and the fabric may shrink. Press flat; follow care instructions for fabric that should not be washed.
- Square the fabric. Remove selvages and cut an accurate square. An uneven square can distort the layout; do not stretch it.
- Cut on the bias. Fold corner to corner or use a ruler’s 45-degree guide, then cut the diagonal into two triangles.
- Join the triangles. Place right sides together along their short straight edges, sew a 1/4-inch seam, and press open. The result is a parallelogram.
- Mark strip lines. On the wrong side, mark parallel lines at the raw strip width. Mark 1/4-inch seam lines along the top and bottom edges first so the strip lines meet the intended seam path.
- Number the edges. Offset the bottom-edge sequence by one strip. For example, the top edge is 0, 1, 2, 3, 4; the bottom edge begins 1, 2, 3, 4, 5.
- Form the tube with the offset. Bring the straight-grain edges together, right sides facing. Do not match corners directly. Align top 1 to bottom 1, top 2 to bottom 2, and so on; match top 0 to the raw edge at the other end. The tube should look skewed. The lines should cross diagonally around it. The Sew4Home tutorial illustrates the geometry.
- Sew the tube seam. Pin carefully and sew along the marked seam line, handling bias edges gently. A shorter stitch may help secure the seam, but a particular machine setting is not required.
- Press the seam open. Rotate the tube as needed; a flatter seam makes cutting smoother.
- Cut the spiral. Start at zero and follow one marked line continuously around the tube. Use scissors, or a rotary cutter with a small mat inside a sufficiently large tube. Do not skip a line or cut across the tube.
- Trim the end. Remove any final section narrower than the intended strip. Save usable pieces. This method is efficient, but seam allowances and uneven ends still create some waste.
Method 2: Cut and join individual bias strips
Individual strips are simpler for short lengths, scraps, directional prints, or projects where you want control over pattern placement.
- Square the fabric and find the 45-degree direction.
- Cut strips at the chosen raw width, keeping the fabric flat and unstretched.
- Place two strips right sides together, with their ends crossing as required for a diagonal join.
- Sew across the join, using the project’s seam allowance; 1/4 inch is common for small binding.
- Press the seam open and trim the projecting dog-ears.
- Continue joining strips until the length exceeds the measured edge plus your allowance.
Diagonal joins distribute bulk and are less conspicuous than straight joins. Match stripes or plaids deliberately and keep nap consistent. See American Patchwork & Quilting and Seamwork.
Fold and press the binding
Single-fold bias tape
Single-fold tape has both long raw edges folded toward the wrong side. To fold it by hand:
- Fold the strip in half lengthwise and press a temporary center crease.
- Open the strip and fold each long raw edge toward the center crease; press.
- If using stitch-and-flip application, make one folded edge slightly narrower than the other.
A tape maker or bias bar can make folds faster and more consistent, but is optional.
Double-fold bias tape
Double-fold tape is single-fold tape folded in half lengthwise again. The center fold wraps over the project edge, while the folded long edges conceal it. Keep one side slightly wider if desired, and place the wider side underneath when applying so the final stitching can catch it. A tape maker generally produces single-fold tape; fold that tape in half for double-fold. The Dritz guide explains its tool sizing.
The Tool Desk
Outbyte PC Repair FREERepair Windows errors before they cause bigger problemsFix Now →Outbyte Driver Updater FREEFix the driver behind crashes, sound loss and screen glitchesFind Drivers →Attach bias binding to an edge
Test on a scrap with the same fabric, layers, seam allowance, and curve. Check the finished width and reverse-side coverage before sewing the full edge.
Method A: stitch, flip, and finish
- Open the narrower folded edge and place it against the raw edge, right sides together.
- Stitch along the crease made by the fold.
- Press the binding away from the seam and wrap it over the raw edge.
- Hand-stitch the folded edge or stitch in the ditch from the opposite side.
Ensure the second folded edge extends far enough to be caught by the final stitching. If the reverse edge is exposed, the binding may be too narrow, the seam allowance too large, or the stitch line misplaced.
Rank #4

- COMPLETE BIAS TAPE SET: This bias tape maker set of 4 sizes, including 6mm,12mm,18mm, 25mm binding makers; four fixing clips, a wooden awl, 50 pieces of positioning pins, and one adjustable bias binder foot, which can meet your needs for making bias tapes.
- VERSATILE: The sewing awl can take the cloth strip and untie the cloth strip knot. With four different fabric bias tapes, you can choose which one you need according to the situation. And you can secure the tissue or the cloth with the bead needles.
- BOX: You can put all of the bias tape maker tools into it, which can not only save space, but also prevent any loss. This convenient binder maker kit helps you fold fabric into perfect halves automatically and can help you make bias tapes in minutes instead of hours.
- WIDE COMPATIBILITY: Works with a variety of fabric types including cotton, silk, and linen, making these tools suitable for quilting, garment making, and crafts.
- USAGE: 1. Make cloth strip: Based on the width which you need, cut pieces of parallel cloth strips at a 45-degree angle. 2. Let the back of the bias tape face upward, insert the cloth strip into the wide mouth, and use an awl to pull the cloth strip from the head of the bias tape. 3. Position the needle to fix the pulled cloth strip on the ironing plate. When you are pulling the bias tape, let the iron be close to the head part of the bias tape, which can make the pulled cloth strip be shaped immediately.
Method B: encase the edge
- Keep the double-fold tape folded and place the raw edge between its folds.
- Put the wider fold underneath.
- Stitch from the right side through all layers, using a straight or suitable decorative stitch.
Position carefully so the stitching catches the underside fold. See the American Sewing Guild and Sewing.org application guide.
Independent reader supportYour contribution helps us test, update, and keep practical guides available for everyone.How to sew bias binding around curves
Bias helps a strip follow a curve but does not prevent puckering by itself. Gently pre-shape it with steam and press it dry before stitching.
Quick wins for a faster PC:
Scan for outdated or missing drivers - takes under a minuteDriver Scan →Repair Windows errors before they cause bigger problemsFix Now →- Do not pull the binding or project edge while sewing.
- Sew slowly and guide the tape gradually around the curve.
- Use a narrower binding for a tight curve if the design allows.
- Pin or clip sparingly to avoid stretching the tape.
- Test on a matching scrap.
On necklines and armholes, place the join away from the most visible or bulky area when possible. See the Sewing.org guide and Minerva’s application guidance.
Join and finish the ends
Continuous necklines, armholes, and circular edges
Leave free binding at the start and end. Near completion, join the ends with a diagonal seam rather than simply overlapping them. Press the seam open, trim excess bulk, and sew the remaining section.
Quilt and blanket edges
Start on a side, leaving a tail for the final join. Sew around the perimeter, handle corners carefully, then join the tails diagonally and press the seam open. The Utah State University Extension guide covers quilt binding. Allow for the quilt top, batting, backing, seam allowance, and desired visible width; thick edges may need more width than garment binding.
Free ends
For a tie or other free end, turn the end under and stitch it, hand-finish it, or knot it to suit the design. The American Sewing Guild describes common applications.
Recommended Free Tools
Which method should you choose?
| Method | Advantages | Limitations | Best for |
|---|---|---|---|
| Continuous square and tube | Long strip with fewer joins; efficient fabric use | Requires careful marking and a one-strip offset | Quilt perimeters and other long lengths |
| Individual strips | Easy to control pattern placement; works with scraps | More joins and handling | Short lengths, small pieces, stripes, and plaids |
| Purchased bias tape | Ready to use and consistently folded | Fewer choices of color, fiber, width, and weight | Utility work or time-sensitive projects |
A rectangle can work with a rectangle-specific continuous layout, or you can cut and join individual strips. Do not substitute a rectangle into the square-and-tube instructions without recalculating the layout and yield.
Best Value

- Bias Tape Set for Sewing:5 different size binding maker 1/4" 3/8" 1/2" 3/4" 1" (6mm 9mm 12mm 18mm 25mm),4pcs craft clips ,1pcs binder presser foot and wooder awl ,10pcs Bead Head Pins
- Practical Bias Tape Maker Kits with Instruction:Make bias tapes in minutes,make any fabric into an accent, border or trim. It's fast, economical and perfectly coordinated. Pull the fabric through and iron--folds it perfectly, ready for sewing on or gluing
- Bias Maker Kits can be widely used in various leathercraft, tailor patchwork, DIY ,making baby clothes, bib.Make stems and vines for Applique,strips for quilt as go quiltmaking ,bias tape for celtic or stained glass applique and bag handles
- Bias Tape Maker,include The binder presser foot for Brother, Babylock, Janome, Kenmore, Singer and many more sewing machines ,so you can buy this binding tape maker kit
- Fabric Bias Tape Maker tools kit with box easy to store.You can make bias in minutes whenever you want .
Troubleshooting bias binding
| Problem | Likely cause | What to do |
|---|---|---|
| Continuous cut makes separate loops | Tube edges matched directly instead of being offset | Unpick the seam, realign the numbered lines one strip apart, and resew. |
| Jog where spiral crosses tube seam | Strip lines and seam allowance were misaligned | Redraw the seam lines, align the numbered edges, and press the seam open. |
| Strip width varies | Fabric stretched, layers shifted, or cutting was inaccurate | Use a ruler, cut a single layer where possible, and avoid pulling the fabric. |
| Binding puckers on curves | Uneven stretching, no pre-shaping, or tape too wide | Steam-shape, sew slowly, reduce tension, and test a narrower width. |
| Raw fabric shows after stitching | Binding too narrow, seam allowance too large, or underside fold missed | Test the width, place the wider fold underneath, and adjust the stitch line. |
| Join is bulky | Straight-across join or untrimmed dog-ears | Use a diagonal join, press open, and trim excess. |
| Fabric shreds | Loose weave, excessive handling, or unsuitable fabric | Try light starch, reduce handling, or choose a more stable woven fabric. |
| Tape maker jams or tape twists | Incorrect raw width, bulky seam, jagged leading edge, or angled feeding | Check tool instructions, trim the leading edge square, flatten seams, and feed straight. |
| Quilt binding does not cover the back | Width did not account for batting, layers, or seam allowance | Add width and test the first section before continuing. |
FAQ
Can I make bias binding without a tape maker?
Yes. Mark the raw strip width with a ruler, fold and press the long edges by hand, and use a seam gauge or bias bar for consistency if helpful.
How wide should a 1/2-inch double-fold binding strip be?
For standalone double-fold tape, start with approximately a 2-inch raw strip using the generic 4× rule. For a 1/2-inch finished visible edge with two 1/4-inch seam allowances, start with approximately 2 1/2 inches. Test the result and check tool instructions.
Why did my continuous bias binding become separate loops?
The tube edges were probably matched directly instead of offset by one strip. Unpick the seam and realign the numbered lines so the cutting path forms a continuous spiral.
Free tools Windows power users keep installed
One-click scans. No signup required.
Is bias binding necessary for a straight edge?
No. Straight-grain binding is often more economical for a genuinely straight edge. Use bias when the edge curves, needs flexibility, or benefits from a diagonal fabric effect.
Can I use knit fabric for bias binding?
Do not automatically apply woven-bias instructions to knits. Knit binding has different stretch and recovery behavior, so follow a knit-specific pattern or method.
How do I keep bias binding from puckering?
Do not stretch the tape while cutting or sewing. Steam-shape it around the curve, sew slowly, choose an appropriate width, and test the fabric and method on a scrap.
Can I join bias strips with straight seams?
You can, but diagonal joins generally distribute bulk better and are less conspicuous. Press the seam open and trim projecting dog-ears.
Should I prewash the fabric?
Prewash, dry, and press it when the finished project will be washed and the fabric is likely to shrink. Otherwise follow its care instructions.
The Bottom Line
Cut woven fabric on the true 45-degree bias, label every width as raw or finished, add length for joins and handling, and test the folded tape before applying it. Use the continuous square method for long lengths, individual diagonal-joined strips for short or pattern-sensitive pieces, and offset the tube by one strip when making a continuous spiral.
Quick Recap

Product prices and availability are accurate as of the date/time indicated and are subject to change. Any price and availability information displayed on Amazon at the time of purchase will apply.




