PC Slower Than It Used to Be?
What’s actually slowing this PC down?
Pick the symptom - the matching free tool is one click away.
A free scan shows the junk files, broken settings and background clutter dragging Windows down - then fixes them in one click.
Run a Free PC Scan →Free scan · Windows 10 & 11
ThatPainter is reader-supported. When you buy through links on our site, we may earn an affiliate commission. Learn More
As an Amazon Associate I earn from qualifying purchases.
To make continuous bias binding, cut a fabric square into two triangles, join them into a parallelogram, mark parallel lines at your chosen strip width, sew the piece into an offset tube, and cut one uninterrupted spiral. The one-strip-width offset at the tube seam is what makes the cut continuous; aligning the edges without that offset will not work.
Plan the width and length first
Choose the cut width from your project instructions and the amount of tape you need before cutting fabric. Bias binding is especially useful on curved edges because the diagonal grain flexes around the curve. It is also used for quilt edges, jacket trim and craft edges.
#1 Best Overall

- QUICKLY MAKE BIAS BINDING: The Jeimier 5 sizes professional Bias Tape Makers out of any fabric to match your binding quilts projects. Make your own bias tape in minutes
- BETTER THAN BY HAND: Easy to use for making almost bias tape you choose to make, once you get the hang of it. This Bias Tape Tools will save you lots of time
- TYPES OF BIAS TAPE MAKERS: It is important to note the Jeimier bias binding maker comes in 5 widths. The binding maker for quilting, 1/4" 3/8" 1/2" 3/4" 1". Elevate your binding and quilting performance
- MAKE QUILTS POP: One easy motion creates any length bias tape without fumbling with creases. If you ever tried to make bias binding you know how difficult it is. This binding maker makes it easy
- CONDUCIVE TO QUILTING SIZES: Use 12 mm width with this 6 mm bias tape folding tool. Use 18 mm width with this 9 mm bias tape tool. Use 24 mm width with this 12 mm bias binding maker. Use 36 mm width with this 18 mm bias quilting maker. Use 46 mm width with this 25 mm bias tape maker. The Jeimier 5 sizes of bias tape making tool help you take any size you want. Elevate your binding and quilting performance. Since the bias tape maker's dimensions are in millimeters, you need to convert them to inches
| Planning example | Square size | Stated strip yield | Source qualification |
|---|---|---|---|
| 1 1/2-inch strips | 14 inches | 110 inches | American Sewing Guild chart, 2025; planning example, not a universal yield guarantee |
| 2 1/2-inch strips | 18 inches | 110 inches | American Sewing Guild chart, 2025; planning example, not a universal yield guarantee |
For traditional quilt binding, guidance from the Sewing & Craft Alliance places the usual cut width at 2 1/4 to 2 1/2 inches, with batting thickness affecting the choice. Sew4Home likewise notes that a quilt may need extra cut width to cover the batting. There is no single finished-width conversion that suits every project, so follow the pattern or binding instructions when they specify a measurement.
Gather fabric and tools
- A square of woven fabric large enough for the required length and width
- Fabric scissors for cutting the spiral
- A clear quilting ruler for accurate line spacing
- A removable fabric marking pencil or pen; avoid marks that can disappear under pressing
- Sewing machine, thread and pins
- Iron and ironing surface
- Optional: a bias tape maker for even folding
American Sewing Guild cautions that heat-removable marks may vanish during pressing. Use a marking tool that remains visible through pinning and stitching, and test it on a fabric scrap first.
Rank #2
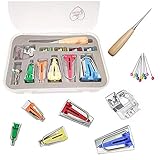
- Bias Tape Maker Kits OF 5 Sizes 1/4"(6MM) 3/8"(9MM) 1/2"(12MM) 3/4"(18MM)1"(25MM)
- You will get 4pcs craft clips ,1pc binder foot and awl ,10pcs quilting pins, 5 different size bias tape maker
- The binder foot will fit for Brother, Babylock, Janome, Kenmore, Singer and many more sewing machines that use a snap on foot.
- Bias tape maker can be widely used in various leathercraft, tailor patchwork, DIY and much more
Make the continuous strip
1. Cut the square diagonally
- Place the square flat and cut from one corner to the opposite corner, creating two triangles.
- Put the triangles right sides together. Align their short straight-grain edges.
- Sew that edge with a 1/4-inch seam allowance to form a parallelogram.
- Press the seam open.
2. Mark parallel cutting lines
- Work on the wrong side of the parallelogram.
- Draw lines parallel to the long bias edges.
- Space every line by the intended strip width. For 2 1/2-inch binding, measure 2 1/2 inches between lines.
Keep the ruler aligned and carry each line all the way across the fabric so the intersections will be easy to identify at the tube seam. Accuracy here determines the finished tape width.
3. Sew the offset tube
- Bring the two short ends together with right sides facing.
- Shift one end down by exactly one marked strip width. This offset is the essential geometry of the method.
- Match the marked line intersections at the intended 1/4-inch seam line, rather than matching only the raw fabric edges. Pin at each matching point.
- Sew the tube seam with a 1/4-inch allowance and press it open.
The sewn tube will not lie flat because of the offset; that is normal. If the lines meet directly with no one-width shift, unpick the seam and realign it. Without the offset, the cut path stops or produces separate sections instead of one spiral.
Rank #3

- Bias tape makers set of 5 sizes :1/4" 3/8" 1/2" 3/4" 1" Set ( 6mm 9mm 12mm 18mm 25mm)
- A precision tool that folds fabric into perfect halves automatically ,the sewing binding tool Easy to use, quick, precise, economical. Perfect for creating your own bias tapes in minutes
- Make any fabric into an accent, border or trim. Its fast, economical and perfectly coordinated. Pull the fabric through and iron--folds it perfectly, ready for sewing on or gluing
- Using Directions: Size 6mm: fit for cut the fabric 12mm widths; Size 9mm: fit for cut the fabric 18mm widths; Size 12mm: fit for cut the fabric 24mm widths; Size 18mm: fit for cut the fabric 36mm widths; Size 25mm: fit for cut the fabric 46mm widths
- HOW TO USE:1.To cut bias strips first cut across the fabric at a 45° angle then cut strips parallet to this freshly cut edge in the width you need.2.Wrong side up feed bias strip into wide end of tape maker use awl to pull fabric through.3.Pin end of strip to ironing board Pull tape maker and press in folds keep iron close to tape maker.
4. Cut the spiral
- Locate the appropriate marked line at the tube opening and begin cutting through one fabric layer.
- Follow that line around the tube with fabric scissors.
- When the cut crosses the tube seam, move onto the next parallel line and continue cutting without breaking the strip.
- Continue around the tube until the entire piece has become one long strip.
A detailed tutorial recommends a shorter stitch length because the scissors cross the sewn seam. Handle the bias gently while cutting; pulling or stretching it can distort the strip. A rotary cutter is practical only when the tube is wide enough to position a cutting mat safely inside it. Otherwise, scissors give better access and control.
Press and use the binding
Press the continuous strip into the form your project requires: single-fold or double-fold. A bias tape maker is optional, but it can help produce an even fold along a long strip. Attach the prepared tape according to the quilt, garment or craft project’s binding instructions.
Rank #4

- HONEYSEW Bias Tape Maker Sewing Quilting Tools
- Create your own bias tape with the HONEYSEW bias tape maker. Simple and Easy. Your creation will look professional with clean finished product from homemade napkins, handbag, bibs and etc
- Bias Tape Maker Set Of 4 6MM 12MM 18MM 25MM top quality
Choosing the right method and width
Continuous bias versus separate strips
| Consideration | Continuous method from a square | Individually cut bias strips |
|---|---|---|
| Long runs | Creates one long strip with no end-to-end diagonal joins during preparation. | Requires joining multiple strips when one piece is not long enough. |
| Preparation | Requires careful marking, an offset tube seam and spiral cutting. | Uses a more familiar cut-and-join workflow but involves more seams for a long run. |
| Best fit | Useful when you want a long uninterrupted run and can manage the tube geometry. | Useful when you prefer simpler layout and joining or need only a short amount. |
The available guidance does not establish a controlled time or fabric-waste advantage for either approach, so choose based on the required length, your comfort with marking and tube handling, and the fabric width available.
Width decisions for quilts and other projects
- Use the project’s specified cut width whenever one is provided.
- For quilt binding, account for batting thickness; a thicker quilt may need a wider cut.
- Consider how many layers the finished fold must cover and whether the edge is straight or curved.
- Do not assume that a stated cut width produces the same finished width in every application.
Optional rectangle variation
The same offset-tube principle can be adapted to a rectangle. Generations Quilt Patterns describes a rectangle variation: mark the parallel guides, bring the short ends together with the one-width offset, sew the tube, and follow the lines as a spiral. The square method is the straightforward starting point when the required dimensions fit a square.
Best Value

- Bias Tape Set for Sewing:5 different size binding maker 1/4" 3/8" 1/2" 3/4" 1" (6mm 9mm 12mm 18mm 25mm),4pcs craft clips ,1pcs binder presser foot and wooder awl ,10pcs Bead Head Pins
- Practical Bias Tape Maker Kits with Instruction:Make bias tapes in minutes,make any fabric into an accent, border or trim. It's fast, economical and perfectly coordinated. Pull the fabric through and iron--folds it perfectly, ready for sewing on or gluing
- Bias Maker Kits can be widely used in various leathercraft, tailor patchwork, DIY ,making baby clothes, bib.Make stems and vines for Applique,strips for quilt as go quiltmaking ,bias tape for celtic or stained glass applique and bag handles
- Bias Tape Maker,include The binder presser foot for Brother, Babylock, Janome, Kenmore, Singer and many more sewing machines ,so you can buy this binding tape maker kit
- Fabric Bias Tape Maker tools kit with box easy to store.You can make bias in minutes whenever you want .
Troubleshooting the geometry
The cut becomes separate strips
The tube ends were probably matched without the one-strip-width offset, or the line intersections were aligned at the raw edges instead of the 1/4-inch seam line. Open the tube seam, shift one end by one marked width, repin the intersections and resew.
The strip width changes
Check that the guide lines are parallel and equally spaced. Re-measure from line to line on the wrong side before sewing the tube. Uneven marking produces uneven tape even when the seam is correctly offset.
The bias stretches while cutting
Support the tube rather than pulling on the emerging strip, use sharp fabric scissors and shorten the machine stitch length where the seam will be crossed. Let the strip rest flat before pressing it into folds.
Free tools Windows power users keep installed
One-click scans. No signup required.
The marks disappear
Heat-removable ink can vanish during ironing. Choose a marking pencil or pen that remains visible through construction, and test its removability and pressing behavior on a scrap before marking the project fabric.
Quick Recap
Key checks before you start cutting
- The square size is appropriate for the required length; published yields are planning examples, not guarantees.
- The marked spacing equals the desired cut width.
- One tube end is offset by exactly one strip width.
- Line intersections are matched at the 1/4-inch seam line.
- The tube’s not-flat shape is expected after offset sewing.
- You have a safe way to cut through one layer around the entire tube.





