Crashes, No Sound, or Screen Glitches?
The Tool Desk
Outbyte Driver Updater FREEScan for outdated or missing drivers - takes under a minuteDriver Scan →Outbyte PC Repair FREEClear out junk files and repair common Windows errorsFree Scan →Outbyte Driver Updater · freeRandom freezes, missing sound and display glitches usually trace back to one bad driver. Find and replace yours safely.
Find the Right Drivers →ThatPainter is reader-supported. When you buy through links on our site, we may earn an affiliate commission. Learn More
To make a linocut, draw or transfer a design onto a linoleum block, carve away the areas that should remain the paper color, roll relief ink onto the raised surface, and press paper against it by hand or with a press. Proof the block before making an edition so you can correct weak lines, stray marks, and uneven areas.
What a linocut does
Linocut is a relief-printing process. The uncarved, raised parts of the block receive ink and print; the grooves and cleared areas do not receive ink, so they remain the paper color. Think of the block as a stamp in which you remove everything you do not want to print.
Materials and tools
- Mounted or unmounted linoleum block
- Linoleum carving tools or gouges: smaller profiles for detail and larger profiles for clearing broad areas
- Relief-printing ink
- Brayer (roller)
- Smooth inking plate or palette
- Graphite paper or a soft pencil for transferring the drawing
- Scrap or butcher paper for proofs, followed by good printmaking paper for the edition
- Bench hook or another stable, non-slip way to hold the block
- Clean spoon, baren, or similar smooth tool if printing by hand
The Museum of Fine Arts Boston supply list specifically names RGM Linoleum Knives and the Flexcut Lino + Relief Printmaking Set as lino-cut relief-printing options. Choose tools that fit your hand and include both fine and broad gouges.
Recommended Free Tools
Plan the design before cutting
Design for the final print
Draw with the positive shapes and paper-colored negative space in mind. Areas left raised will print, while areas you remove will not. Simple, high-contrast shapes are easier to cut and proof than a drawing built from delicate tonal shading.
#1 Best Overall

- [Custom-Cut Bundle] This bundle includes 10 high-quality, soft rubber blocks measuring 4" x 6" x 0.24", the thickness allows for double-sided carving, and the blocks can be cut into custom sizes to suit all your carving needs—whether for stamps, prints, or more. Start your creative journey today!
- [Flexible & Durable Material] Professionally crafted for easy carving, these rubber blocks are soft enough for intricate details yet tough enough to resist warping and scratches. Perfect for stamps, signatures, and printmaking projects.
- [Safe & User-Friendly] Made from TPR material, these blocks contain no harsh additives. They offer a smooth carving experience while delivering crisp prints, making them ideal for both beginners and professionals.
- [Easy Design Transfer] Sketch directly, use carbon paper, or transfer with graphite paper—our blocks adapt to your preferred method. Compatible with water-based and oil-based inks, they unlock endless artistic possibilities on any surface.
- [Perfect Gift Idea] Great for family crafts, classroom activities, and DIY enthusiasts! This set makes a wonderful holiday or special occasion gift, creating lasting memories through shared creativity.
Reverse lettering and directional details
Anything that must read in a particular direction—lettering, numbers, arrows, or an asymmetrical profile—has to be reversed on the block. Transfer a reversed drawing or flip the original before tracing; otherwise the finished print will be backward.
Transfer the drawing to the block
- Place graphite paper on the block with its graphite side facing the lino.
- Put the drawing on top and trace every important contour with a pencil.
- Lift one corner without shifting the papers to check that the lines transferred.
- Reinforce key contours with a soft pencil if they are faint, and mark the areas to be removed before carving.
If the drawing disappears while you work, stop and re-mark the essential contours. A clear cutting map prevents accidental removal of a raised shape.
Rank #2

- Perfect for Beginners & Pros - Discover the ideal linocut block for all skill levels with Bobblebro's Relief Printing Linoleum. Made from soft rubber, these 4x6 inch blocks are easy to carve, making them perfect for beginners and seasoned artists alike. Whether you're creating stamps or intricate designs, these linoleum blocks for printmaking ensure precision and comfort
- Artist-Friendly Soft Texture - Our linocut blocks are specially designed with a soft texture that offers effortless carving while maintaining fine detail capabilities. This artist-friendly feature makes them a top choice for stamp making kits and block printing projects, allowing you to explore your creativity without frustration
- Versatile Design Transfer Options - Create your designs with ease using carbon paper, graphite transfer paper, or by drawing directly on the surface. These rubber blocks for carving are compatible with both water-soluble and oil-based inks, offering endless creative possibilities for your printmaking supplies
- 12-Piece Value Pack - Stock up with our generous 12-block pack, each measuring 4x6 inches. Perfect for classrooms, multiple projects, or experimenting with different techniques, this linocut kit provides exceptional value for both hobbyists and professionals
- Safe & Precise Carving - Ensure clean, precise lines by securing your linocut block with a bench hook while carving. This safe carving practice guarantees stability and control, making your relief printing projects smoother and more enjoyable
Carve the block safely
Set up a stable work position
Secure the lino on a bench hook or non-slip surface. Keep the hand holding the block behind the gouge, never in front of its travel path.
Quick wins for a faster PC:
Clear out junk files and repair common Windows errorsFree Scan →Fix the driver behind crashes, sound loss and screen glitchesFind Drivers →Use controlled cuts
Direct every cut away from your body and work slowly, especially when starting a line or changing direction. Use a larger gouge to clear broad negative areas and a smaller tool for narrow channels, edges, and detail. Lino can crumble and may not hold extremely fine lines; softer lino cuts readily, while harder lino can support finer detail but requires more force.
Rank #3
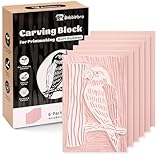
- Perfect for Beginners & Pros - Discover the ideal linocut block for all skill levels with Bobblebro's Relief Printing Linoleum. Made from soft rubber, these 4x6 inch blocks are easy to carve, making them perfect for beginners and seasoned artists alike. Whether you're creating stamps or intricate designs, these linoleum blocks for printmaking ensure precision and comfort
- Artist-Friendly Soft Texture - Our linocut blocks are specially designed with a soft texture that offers effortless carving while maintaining fine detail capabilities. This artist-friendly feature makes them a top choice for stamp making kits and block printing projects, allowing you to explore your creativity without frustration
- Versatile Design Transfer Options - Create your designs with ease using carbon paper, graphite transfer paper, or by drawing directly on the surface. These rubber blocks for carving are compatible with both water-soluble and oil-based inks, offering endless creative possibilities for your printmaking supplies
- 6-Piece Value Pack - Stock up with our generous 6-block pack, each measuring 4x6 inches. Perfect for classrooms, multiple projects, or experimenting with different techniques, this linocut kit provides exceptional value for both hobbyists and professionals
- Safe & Precise Carving - Ensure clean, precise lines by securing your linocut block with a bench hook while carving. This safe carving practice guarantees stability and control, making your relief printing projects smoother and more enjoyable
Carve negative space, not the image
Leave the shapes that should print raised. Remove the surrounding negative space deeply enough that it will not pick up stray ink, but avoid carving into the raised forms you need.
Make a proof before the edition
Brush or wipe away loose crumbs, then make a first impression on scrap or butcher paper. The proof shows whether lines are too weak, unwanted marks remain, and additional clearing is needed. Keep this first proof and annotate the changes you make; it becomes a practical record for repeating the image later.
Rank #4

- Bulk Soft Rubber Blocks: This set includes 16pcs high-quality soft pink rubber Carving blocks, measuring 4" x 6" x 0.2". They can be cut into custom-sized stamps to meet all your engraving needs - whether for stamp making, printing or handicrafts
- Flexible and Durable Material: These engraving linocut blocks are made of high-density rubber, with a smooth texture and great durability. You can easily cut and engrave linoleum block into any custom shape or design, suitable for making stamps, signatures and printmaking projects
- Diverse Design Transfer Options: You can use carbon paper, graphite transfer paper, or directly hand-draw on the surface. Our rubber stamps are compatible with water-based and oil-based inks, and are compatible with most oilcloth cutting knives and laser engraving machines, providing unlimited creative possibilities for your print making materials
- Safe and User-Friendly, Beginner-Friendly: The light pink color tone enables you to clearly see linoleum engraved lines, providing a smooth engraving experience, reducing errors, and achieving clear printing results. Whether you are a beginner or an experienced artist, you can easily get started
- Ideal Creative Gifts: Perfect for family DIY handicrafts, classroom activities and art projects. Linoleum Blocks for Printmaking Supplies are ideal choices for festivals and special occasions. They are thoughtful and inspiring gifts for art lovers, students and craft enthusiasts
Ink the block
- Squeeze a small amount of relief ink onto the smooth inking plate.
- Roll the brayer through it until the roller carries a thin, even film.
- Roll over the raised block surface in several directions, keeping ink off the carved recesses as much as possible.
- Inspect the block before printing. Excess ink in grooves will fill paper-colored areas and make the image muddy.
A thin, even film is more controllable than a heavy layer. If the print looks muddy, reduce the ink film and clean ink from the carved recesses before the next impression.
Print without a press
- Place the paper carefully onto the inked block, taking care not to slide it.
- Burnish the back of the paper with a clean spoon, baren, or another smooth tool, applying steady pressure across the entire design.
- Peel the paper away steadily from one edge.
- Let the print dry flat according to the ink manufacturer’s directions.
Hand printing costs less and is suitable for beginners, but pressure and paper placement can vary. A press applies more uniform pressure and is useful when you need consistent impressions or a larger edition.
Best Value

- 【Rubber stamps for Printmaking】Our soft rubber linocut blocks suit new starters and professional artists. 4x6 inch size is effortless to carve for stamps and elaborate patterns, bringing stable precision for all relief printing creations. 25% Thicker Premium Soft Rubber Blocks
- 【25% Thicker Premium Soft Rubber Blocks】 Features solid 8mm thickened construction with 25% thicker base. Soft texture allows delicate cutting, anti-scratch and anti-deformation, keeping fine details intact without accidental piercing.
- 【Multiple Transfer Ways & Wide Ink Compatibility】 Draw patterns directly or transfer via carbon/graphite paper. Works well with water-based and oil-based inks, supporting diverse printmaking styles to realize unlimited creative ideas.
- 【Large Value Multipack for Various Scenarios】 Sufficient quantity to meet classroom teaching, multiple DIY projects and technique trial demands. Cost-effective for hobbyists, art students and professional printmakers to create freely.
- 【Ideal Creative Gift 】Made of skin-friendly TPR without harmful additives for safe carving. Perfect for parent-child crafts, school art lessons, a thoughtful handmade gift for art lovers on all holidays.
Correct common proofing problems
- Unwanted dark marks: Find the raised scraps that are printing and clear them during the next carving pass.
- A line is too dark: Deepen or widen the surrounding negative space, then proof again.
- Weak or broken lines: Check that the raised line is wide and continuous enough for the lino and your ink film.
- Muddy open areas: Use less ink and remove ink that has collected in recesses.
- Misplaced or incomplete transfer: Stop cutting, realign the drawing if possible, and redraw the key contours.
Print a consistent edition
- Continue only after the proof shows the image you want.
- Prepare the same paper size and placement for every impression.
- Apply a comparable amount of ink each time.
- Use the same hand-burnishing route and pressure, or keep the press settings unchanged.
- Allow prints to dry flat and handle them with clean, dry hands.
Consistency depends on controlling ink thickness, pressure, and registration rather than simply repeating the carving.
Make a multicolour linocut
Use separate blocks
One block can carry each colour. This preserves every colour plate, but each sheet must be aligned accurately as it passes through the blocks. Plan overlaps, margins, and registration marks before carving.
Use a reduction linocut
A reduction print uses one block: print one colour, carve away more material, print the next colour, and continue. Because each later cut removes material, the block cannot be restored for an earlier colour. This method demands a firm sequence and enough planned impressions for the entire edition.
What’s actually slowing this PC down?
Pick the symptom - the matching free tool is one click away.
In either approach, make registration guides and test the colour order on proofs. Later colours cannot repair a raised area that was removed too early.
Separate blocks or reduction: which fits?
| Method | What happens | Main advantage | Main constraint |
|---|---|---|---|
| Separate blocks | Each colour has its own carved plate | Colour plates remain available for future prints | Every colour requires careful registration |
| Reduction | One block is progressively carved after each colour | One block can create a layered colour image | Later cuts permanently remove the earlier plate |
Hand printing or press printing?
| Option | Best for | Trade-off |
|---|---|---|
| Hand rubbing | Beginners, low-cost setups, and small prints | Pressure and registration can vary between impressions |
| Printing press | More uniform pressure and repeatable editions | Requires access to suitable equipment and setup |
Clean up and store the work
Follow the ink manufacturer’s cleaning directions. Wipe the block, brayer, plate, and tools promptly so ink does not harden in grooves or on roller surfaces. Let prints dry flat, and store the carved block so its raised edges are not crushed or scratched.
Quick Recap

Product prices and availability are accurate as of the date/time indicated and are subject to change. Any price and availability information displayed on Amazon at the time of purchase will apply.




