ThatPainter is reader-supported. When you buy through links on our site, we may earn an affiliate commission. Learn More
The easiest way to make a first stained-glass project is the copper-foil method. You cut a simple pattern from sheet glass, wrap each piece with adhesive copper foil, then solder the foiled edges together. Start with a small, mostly flat sun catcher, ornament, plant stake, or geometric panel—not a window or lampshade.
This guide covers the complete beginner workflow: choosing a pattern, cutting and fitting glass, applying foil, soldering safely, cleaning, finishing, and fixing common problems.
What you need to make a first stained-glass project
Stained glass involves sharp glass, heated metal, flux fumes, and often lead solder, so set up your workspace before you begin. A practical beginner tool list includes:
- Safety equipment: safety glasses, closed-toe shoes, protective clothing, good ventilation, and local fume extraction for soldering.
- Glass tools: a stained-glass glass cutter, running pliers, and breaker/grozer pliers.
- Pattern tools: paper, pencil or marker, straightedge, pattern or foil shears, and a heat-resistant work surface.
- Foiling supplies: adhesive copper foil, usually 7/32-inch or 1/4-inch for beginner work, plus a fid or burnisher.
- Soldering supplies: a stained-glass soldering iron, iron stand, stained-glass solder, flux, flux brush, and brass tip cleaner.
- Optional tools: a glass grinder, push pins or horseshoe nails, sickle stone, patina, polishing compound, and hanging hardware.
A stained glass starter kit can simplify the initial shopping list, but compare the contents carefully. Kits vary: some include a grinder and soldering iron, while others contain only basic cutting, foiling, and soldering supplies. You still need to confirm that the kit includes suitable safety equipment and that its iron has enough thermal capacity for stained-glass work. Delphi’s current starter-kit listing is one example of a bundle containing a grinder, 100-watt soldering iron, cutter, pliers, solder, foil, flux, burnisher, marker, safety glasses, and a pattern.
For a first project, you do not need every optional tool. A grinder is convenient, but simple designs can be shaped with careful scoring, breaking, and grozing. The essential combination is a cutter, pliers, foil, burnisher, iron, solder, flux, and a safe workspace.
#1 Best Overall

- This kit is designed for anyone that's looking to get into the art of Stained Glass without making a large investment on necessary supplies. Create a stunning piece with ease!
- Kit Includes: - 25 Pre-Cut Stained Glass Pieces - Copper Foil - 4 ft. Piece of 50/50 Solder - Jump Rings - Metal Chains - 2oz. Water Flux - Flux Brush - Burnishing Tool - Pattern Sheet & Instructions
- Finished Piece: Approx. 3.5”W X 1.75”H
- A Soldering Iron is required for assembly. (Sold Separately)
Choose the copper-foil method
There are several ways to construct stained glass. The copper-foil method, also called the Tiffany method, wraps adhesive-backed copper around the edge of every glass piece. Solder bonds the exposed foil on adjacent pieces. The Stained Glass Association of America defines copper foil both as an adhesive-backed copper material and as the technique of wrapping glass edges before soldering them together. Its stained-glass dictionary explains the terminology.
Copper foil is a good first method because it works well for small decorative objects and allows curved shapes that are more difficult to construct with lead came. It is not automatically the right method for a large architectural window, exterior installation, or lampshade. Those projects require different structural planning, framing, and installation knowledge.
Do these 3 things before closing this tab:
1Fix the driver behind crashes, sound loss and screen glitches2Repair Windows errors before they cause bigger problems3Scan for outdated or missing drivers - takes under a minuteStep 1: Pick a beginner-friendly pattern
Choose a pattern with broad, connected shapes and a manageable number of pieces. Good first subjects include geometric designs, leaves, simple flowers, small animals, and abstract sun catchers.
Avoid designs that depend on long exact curves, narrow points, sharp inside corners, many tiny fragments, or a large unsupported area. A small, flat project gives you more control while you learn how glass scores and breaks.
Before cutting anything:
- Print or draw the design at its final size.
- Make at least two copies.
- Keep one copy intact as the assembly board.
- Number every piece on the intact pattern.
- Add an orientation mark—such as a small arrow or “top” mark—to every template.
- Plan the outer border and hanging method before cutting glass.
The orientation marks matter when you use textured, streaked, or directional glass. Without them, a piece can technically fit while its texture points the wrong way.
If you want more guided projects and ready-made templates, a beginner stained glass pattern book may be useful. Choose one that includes tool guidance, safety information, and full-size or clearly scaled patterns rather than patterns alone.
Quick wins for a faster PC:
Repair Windows errors before they cause bigger problemsFix Now →Scan for outdated or missing drivers - takes under a minuteDriver Scan →Step 2: Make accurate templates
Cut the second paper pattern into individual templates. The cutting line must be removed to leave room for the foil and solder joint. Dedicated pattern or foil shears remove a narrow strip between adjoining pieces. If you use ordinary scissors, cut between the printed lines rather than cutting directly along the intended glass edge.
Label each template with its number and orientation mark. If the design includes directional texture or grain, note which way it should face.
Arrange the templates on the sheet of glass before marking. This helps you estimate how much glass you need, reduce waste, and keep directional textures consistent. Leave enough room between templates to score and break without running into a neighboring mark.
Rank #2

- 【What You Get】:8" Mosaic Glass Cuttitl llrs x1, 8" glass running plier x1, 6" Glass Breaker Pliers x1,150W soldering iron x1,desoldering pump x1,5 multiple soldering tips, solder wire 2mm*3pcs(100g),soldering iron stand x1,tweezers x1,wire stripper cutter x1,Screwdriver x2,sponge cleaning pad x 4,Handmade zipper bag x 2,bone knife x2,pistol type oil fed glass cutter x1,with 3 interchangeable heads (2-6,6-12, 12-20mm)oil drip tubes x1,Tungsten Carbide Tip Scriber x1,copper foil tape(7mm*20M)*2pcs,cut-proof gloves*2pcs,110V Glass Grinder x1,5/8" + 1" Diamond Grinder Bit x2,Finger Cots x 10,Goggles x1,English description says x1,Diamond Hand File for Glass Polishing x 1,Flux Paste x 1.
- 【Oil Feed Glass Cutter Set】- Features automatic oil dispensing system keep the wheel lubrication while you cut. 3 Glass cutter heads are suitable for cutting glass of 2-6mm, 6-12mm, 12-20mm thickness respectively.MEETDUMPL,Unique pistol grip design.Easy to grasp and reduce fatigue.And with the Scriber you can cut sharp, accurate lines on hard materials.
- 【Running and Breaking Pliers】- Glass Running Plier has Adjustable set screw allows you to control the amount of pressure applied, set screw is easy to adjust, meetdumpl and properly tapped; you can use them on different thicknesses of glass. MEETDUMPL,Glass Breaking Pliers are quality designed to help break glass along a score line or can be turned over and used a grozers to nibble glass away from the edges.
- 【150W Soldering Iron with ON/OFF Button】- !!!Note: The soldering iron is suitable for melting 1mm solder wire, and solder wire that is too thick cannot be melted.A high-definition LCD screen display, which indicates the temperature status more clearly, so you don't worry about finding the right temperature and you can really tell how hot it is and accurately control the heat. Superior professional soldering iron has 5 multiple tips replacement, MEETDUMPL Heat and impact resistant design of screw thread.Adjustable Temperature from 356℉-968℉.Heat up fast,meetdumpl and work great.Standard dual spring soldering iron holder with sponge.
- 【Stained Glass Kit Widely Application】The glass cutting tools is not only for glass fusing, breaking small pieces of glass for crafts, cutting glass for window panes and for most glass projects.MEETDUMPL Soldering iron tools widely used for welding circuit board, appliance repair,meetdumpl You can take it anywhere and you will be able to find the tools you need in the carry bag.Delicate Gifts to Send: you can share the glass running breaking pliers and class cutter kit with your friends, family members, colleagues, relatives, neighbors, loved ones, and other DIY lovers, showing your love and support for them.
Step 3: Select and mark the glass
Use glass intended for cold stained-glass work. Do not assume that every colored or decorative glass is interchangeable with kiln-forming glass. Bullseye distinguishes glass recommended for cold applications such as stained glass, mosaic, copper foil, and leaded work from glass intended for kiln processes; its FAQ explains those application distinctions.
What’s actually slowing this PC down?
Pick the symptom - the matching free tool is one click away.
Place each template on the appropriate side of the glass. Trace around it with a suitable marker, and identify the waste side of each line. Your score should remove the waste rather than cut into the finished outline.
For textured glass, decide whether the textured surface will face the front or back and use that choice consistently. Make a test score on scrap glass before cutting an important piece. Glass behaves differently depending on its texture, thickness, and shape.
Step 4: Score and break the glass
Hold the cutter much like a pen. Starting at one edge, make one continuous, light score from edge to edge. You are creating a controlled fracture line, not carving a deep groove. Heavy pressure can produce a rough score and make the glass break unpredictably. Delphi’s beginner instructions likewise recommend a light, continuous score and caution against pressing too hard.
For more guidance on selecting a stained glass cutter and running pliers for glass, look for tools specifically intended for stained glass rather than general household pliers. The tool does not replace technique: keep the cutter moving smoothly and score on the waste side of the line.
Free tools Windows power users keep installed
One-click scans. No signup required.
Opening a score
- Position running pliers over the score according to the tool’s markings or instructions.
- Squeeze gently to open the score rather than forcing the glass with your fingers.
- Use breaker/grozer pliers for smaller separations or controlled removal of excess glass.
- Keep your hands and face away from the intended break path.
Do not try to force a complex shape apart in one movement. Break it into sensible score lines, especially around curves and narrow sections. A complicated shape may need several cuts that remove waste progressively.
If an edge is slightly oversized, refine it gradually with grozing or a glass grinder. The goal is a clean, accurate fit—not a perfectly polished edge. Remove too much and the foil joint becomes unnecessarily wide; leave too much and neighboring pieces will be pushed apart.
Step 5: Fit and refine every piece
Before foiling, place the cut pieces on the intact pattern. Check that the design lies flat and that the gaps between pieces are reasonably consistent. Small variations are normal, but do not rely on solder to fill large gaps. If a piece is badly oversized or undersized, recut it or refine it before assembly.
At this stage, check:
- Every piece has the correct number and orientation.
- Curves meet without forcing the glass.
- The outside edge follows the intended shape.
- The panel lies flat on the pattern.
- There are no cracks that will worsen during handling or heating.
Step 6: Apply copper foil
Clean and dry each piece before foiling. Dirt, oil, and moisture can reduce adhesion.
Rank #3
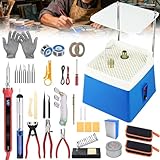
- What You Get includes: 100w soldering iron, interchangeable soldering iron tips (5 pcs), desoldering pump, 2 rolls solder wire-1mm (100g), iron holder with sponge, wire strippers, wire stripper cable (2 pcs), tweezers (2 pcs), soldering iron tip cleaning ball, copper foil tape-7mm x 20m (2 rolls), gloves, diamond hand file for glass polishing,etcartifact.
- stain glass grinderKit Upgrade:adjustabletemperature soldering iron with lcd display:100 w soldering iron reaches working temperature in 30secondsadjustable from 200°c to 450°c size glass cutting toolset cutter with two interchangeable tips (3-12 mm and 6-19 mm); specialized pliers and a tungsten carbide scribe adapt to various glass thicknesses and shapes.
- Portable Glass Grinder: stain glass grinder machine features a powerful motor,running at 4200 rpm,two diamond grinder bits 5/8,Automatic water rinsing function,and a transparent acrylic baffle,shieldcan help you grind and shape all your glass pieces accurately and quickly.
- Glass Cutting Tool Set:an 8-inch adjustable pliers, an 8-inch roller glass cutter, and a 6-inch breakaway pliers. Each tool features an adjustable tension screw for fine-tuning pressure, enabling clean, controlled cuts through glass of varying thicknesses. Ergonomic cushioned handles reduce hand fatigue and enhance grip, enabling smooth, precise cuts for stained glass, mosaic, and DIY projects.
- glass grinders for stained glass: Kryztlyn wide range of applications, not only for glass crafts, but also for circuit board soldering, portable design, ideal for friends, family or colleagues interested in DIY crafts or stained glass projects, and give them as gifts to each other.
- Center the copper foil along the glass edge so it extends evenly onto the front and back faces.
- Press the adhesive side firmly against the edge as you work around the perimeter.
- Fold the foil over the front and back faces without stretching it excessively.
- Burnish the foil flat using a fid, wooden tool, or burnisher.
- Burnish the outside edge first, then both faces.
- Inspect for wrinkles, tears, lifted sections, or exposed glass.
Foil width affects both appearance and ease of application. Delphi identifies 7/32-inch as a common choice and notes that 1/4-inch foil is easier to center. Its beginner guidance recommends 7/32-inch, 1.5-mil foil as an accessible starting point. A copper foil tape for stained glass search can help you compare widths, thicknesses, and backing colors; choose a width appropriate to your glass and the visual weight of the design.
Keep the foil centered and tightly burnished. Foil is not merely decorative: loose or wrinkled foil can create uneven solder lines and weak joints. Fold corners neatly, and where practical, keep foil seams on the same side or in less visible positions.
Step 7: Reassemble the pattern
Return every foiled piece to its numbered position on the intact pattern. Use push pins, horseshoe nails, or temporary stops around the perimeter to prevent movement. Do not place pins where the soldering iron could contact them unexpectedly.
Confirm that the panel is flat and that the foil lines meet consistently. Apply a small amount of flux to the exposed foil immediately before soldering. Flux helps solder wet and bond to the metal, but it is not a substitute for clean, well-burnished foil.
Step 8: Tack-solder the panel
Before running full seams, place small tack-solder points at strategic intersections. Tack solder locks the arrangement together while allowing you to correct alignment.
- Apply a little flux to an intersection.
- Touch the iron and a small amount of solder to the foil.
- Let the tack cool briefly.
- Check that the pieces have not shifted or lifted.
- Add more tack points until the panel is stable.
If the panel shifts, stop and reposition it before continuing. Full seams will not reliably correct a design that was misaligned during tacking.
Step 9: Solder the seams
Use an iron designed for stained glass. Many general-purpose electrical or craft soldering irons do not have enough wattage or thermal capacity to heat a stained-glass joint consistently. Bullseye’s soldering guidance identifies the need for a stained-glass iron, stand, flux, fume extraction, ventilation, handwashing, and protective equipment.
Before soldering, read the instructions for your iron, flux, and solder. A stained glass soldering iron and 60/40 solder are common beginner supplies, but the product’s instructions should determine the working temperature and compatible materials.
Recommended Free Tools
Conventional 60/40 stained-glass solder is 60% tin and 40% lead. Canfield lists a melting range of 361–376°F for its 60/40 solder and calls it a commonly used alloy for copper foil and came seams. Lead solder requires careful hygiene and contamination control. Lead-free solder can be preferable for objects that will be handled frequently or by children, but lead-free formulas do not all behave the same way; follow the manufacturer’s instructions and confirm compatibility with your flux and foil.
How to run a seam
- Flux only the section you are about to solder.
- Heat the foil briefly with the iron.
- Feed in enough solder to form a controlled bead.
- Move steadily along the seam rather than dwelling in one place.
- Allow overheated areas to cool before returning to them.
- Work in manageable sections.
Solder the front seams first. Turn the project over carefully once the front is stable, then solder the back seams. If the design requires it, tin the outer perimeter as well.
Rank #4

- Value Pack: A total of 24 colors transparent stained glass sheets in various colors.
- Glass Size: Each sheet measures 6 x 4 inches (approx. 15 x 10 cm), about 1/8 inch thick.
- Easy to Cut: Use a glass cutter or wheeled nippers for accurate cutting, ideal for mosaic hobbyists and professionals.
- Spectrum: Unleash your creativity with our 24 transparent stained glass sheets. Enjoy excellent light penetration and a rainbow of colors for your projects.
- Versatile & Inspiring: Our stained glass variety pack offers endless creative possibilities for mosaic enthusiasts. Perfect for home decor, Tiffany lampshades, windows, doors, murals, and more mosaic crafts.
Do not bridge large gaps with solder. A wide solder bridge is weak, unattractive, and likely to distort the project. Recut or refine the glass instead.
Step 10: Clean, inspect, and finish
Flux residue should be removed after soldering according to the flux manufacturer’s directions. Depending on the product, this may involve cleaner, water, a soft brush, or a cloth. Do not leave corrosive residue on the solder or foil.
Crashes, No Sound, or Screen Glitches?
Random freezes, missing sound and display glitches usually trace back to one bad driver. Find and replace yours safely.Free scan · under a minutePC Slower Than It Used to Be?
A free scan shows the junk files, broken settings and background clutter dragging Windows down - then fixes them in one click.Free scan · Windows 10 & 11Inspect both sides under good light. Look for:
- Cold joints where solder has not properly bonded to the foil.
- Pinholes or visibly incomplete seams.
- Sharp solder projections.
- Loose, torn, or lifted foil.
- Cracks in the glass.
- Sections that became detached during turning or cleaning.
Repair a weak joint only after cleaning and drying the area. Add a small amount of flux and reheat carefully. If foil has lifted, do not simply cover the loose section with solder; remove or replace the foil as needed.
Patina and polishing
Patina is optional. It changes the color of the solder, commonly toward copper or black, and should be applied only after the soldering is complete and the surface is clean. Wear gloves and eye protection, and follow the patina label exactly.
After the patina has reacted as directed, clean and polish the project gently. Avoid aggressive abrasion that could damage the foil, solder, or glass surface.
Hanging the finished piece
Attach a loop, chain, or other hanging hardware appropriate to the object’s weight and intended location. A decorative copper-foil piece is not automatically a structural or weatherproof window. For outdoor or load-bearing installations, use an appropriate frame and seek advice from an experienced stained-glass professional.
What’s actually slowing this PC down?
Pick the symptom - the matching free tool is one click away.
Safety: glass, heat, fumes, and lead
Glass cutting produces sharp fragments. Soldering adds hot tools, molten metal, flux fumes, and—when leaded solder is used—potential lead contamination.
OSHA recognizes lead exposure as a hazard in leaded glass, solder, and stained-glass window removal or repair. Lead can enter the body through inhalation of dust or fumes and through accidental ingestion from contaminated hands, clothing, and surfaces. The risk is not limited to the moment the iron is hot.
Best Value

- Complete 31PCS Stained Glass Tool Kit: This stained glass starter kit with glass scoring & cutting set, grinding & edge finishing set, soldering tools, protective & auxiliary tools for DIY crafts — stained glass kits
- Stained Glass Starter Kit Glass Cutting Set: Includes a pistol-grip glass cutter for smoother scoring, a glass scoring pen and three glass pliers for different glass shapes. Easy to control and beginner-friendly, this practical stained glass kit supports clean, accurate DIY cuts
- Stain Glass Tools and Supplies: Stained glass soldering set includes a temperature-display soldering iron (180 – 500°C), 5 interchangeable tips, 2 rolls of 40% tin/60% lead solder for fast melting and smooth flow, flux and essential accessories ideal for stained glass kits
- All-in-One Stained Glass Kit: Includes a black erasable marker and masking tape for easy layout, plus gloves, safety glasses, and a protective mask for safer crafting — delivering a smoother, better experience for stained glass kits
- Thoughtful Gift for Glass Lovers: This stained glass kits for adults includes two storage bags for easy organization and travel, perfect for sharing creative moments with friends and family and enjoying the joy of handmade stained glass kits
- Work in a dedicated, well-ventilated area.
- Use local fume extraction positioned to draw fumes away from your breathing zone—not toward your face.
- Do not eat, drink, smoke, or store food in the work area.
- Wash your hands thoroughly after handling solder, foil, flux, tools, or contaminated surfaces.
- Keep work clothes and cleaning materials separate from household items.
- Keep children and pets away from glass fragments, hot tools, flux, solder, patina, and lead-contaminated dust.
- Do not sweep dry debris. Use damp wiping or a properly equipped HEPA vacuum where lead dust may be present.
OSHA’s lead-safety guidance and its discussion of precleaning with HEPA vacuums or damp wiping are workplace-oriented, so do not treat them as a complete household safety plan. Also follow your product labels, safety data sheets, and applicable local requirements.
Pregnant people and anyone especially vulnerable to lead exposure should avoid lead soldering and seek professional health guidance. Delphi’s class guidance also advises against solder or lead work during pregnancy. If lead exposure is a concern, choose a genuinely lead-free workflow where compatible, and verify the solder and other materials through their safety data sheets.
Beginner troubleshooting
| Problem | Likely cause | What to do |
|---|---|---|
| The score will not break | Too much pressure, an incomplete score, or unsuitable break direction | Make one light continuous score and use running pliers to open it. Do not repeatedly scratch over the same line. |
| Edges do not fit | The piece is oversized, or the score followed the wrong side of the line | Refine gradually with grozing or a grinder. Recut badly shaped pieces. |
| Foil lifts | Dirty or damp glass, poor burnishing, or excessive heat | Clean and dry the glass, center the foil, burnish it firmly, and avoid overheating. |
| Solder beads up | Dirty foil, insufficient flux, or an iron without enough heat capacity | Check cleanliness and flux, then use a stained-glass iron appropriate to the job. |
| Solder is rippled | Inconsistent movement or reheating too much area | Use a steady iron movement and add only the solder needed for the seam. |
| The panel shifts | Insufficient tack solder or inadequate temporary stops | Stop, realign the pieces, then add tack points before running full seams. |
| Solder looks dull or discolored | Flux residue, oxidation, or an unfinished surface | Clean the residue first. Consider patina only after the joint is sound and clean. |
What makes a good first project?
A successful first project is less about artistic complexity than about controllable construction. Choose a design that:
- Has roughly a small number of broad pieces rather than dozens of tiny ones.
- Fits comfortably on your work surface.
- Can remain flat while you tack and solder it.
- Does not require structural strength or weatherproofing.
- Uses glass colors and textures that do not need difficult matching.
Once you can score clean lines, fit pieces without force, keep foil centered, tack a panel accurately, and run consistent seams, you can move to more curved designs and more involved finishing.
When a class or studio makes sense
A supervised beginner copper-foil stained-glass class can be a sensible option if you do not have a safe workspace, want someone to demonstrate scoring and soldering, or would rather use studio equipment before buying a grinder and iron. Availability, pricing, and partner programs vary by location, so check directly with local studios or community art centers. A class is particularly valuable for learning how much pressure to use while scoring, how to control solder temperature, and how to manage fumes and lead hygiene.
Frequently Asked Questions
Is stained glass difficult for a complete beginner?
The basic copper-foil workflow is learnable, but scoring and breaking glass require practice. Begin with a small, flat design with broad shapes, and expect to use scrap glass while learning how light scoring and running pliers work.
Can I make stained glass without a grinder?
Yes. A grinder is useful for accurate edge refinement, but a simple first project can be completed with a cutter, running pliers, breaker/grozer pliers, and careful fitting. Do not force pieces together or use solder to fill large gaps.
Is lead solder safe for stained glass?
Lead solder requires strict hygiene and contamination control. Use ventilation and local fume extraction, keep food away from the workspace, wash hands thoroughly, separate work clothing, and keep children and pets away. People who are pregnant or especially vulnerable to lead exposure should avoid lead soldering and seek professional guidance.
What size copper foil should a beginner use?
7/32-inch is a common beginner choice, while 1/4-inch is easier to center on the glass. The correct width depends on the glass thickness and the visual width of the solder lines you want. Center and burnish the foil evenly on both faces.
Can a copper-foil stained-glass panel be used as a window?
Not automatically. Small decorative copper-foil pieces are not necessarily structural or weatherproof. A window, exterior installation, lampshade, or large unsupported panel needs specialized design, framing, and installation knowledge.
Recommended Free Tools
The Bottom Line
For the best first experience, make a small copper-foil project with a simple pattern, score each piece lightly and continuously, fit the glass before foiling, burnish the foil thoroughly, and tack-solder before running full seams. Treat ventilation, eye protection, cleanup, and lead hygiene as part of the craft—not optional extras.
Quick Recap





