Windows Errors? Fix Them Before They Spread
Free tools Windows power users keep installed
One-click scans. No signup required.
Outbyte PC Repair · freeRepair common Windows errors and clear accumulated junk for a smoother, more stable PC - no reinstall needed.
Fix My PC Now →ThatPainter is reader-supported. When you buy through links on our site, we may earn an affiliate commission. Learn More
You can make an existing kitchen feel newly finished without moving walls or replacing every cabinet. Start by clearing and cleaning what is already there, then change the most visible layer—paint, hardware, lighting, the sink area, backsplash, or a controlled display shelf. The nine updates below are options, not a ranked formula: the best choice depends on your room, cabinet condition, available skills, and local rules.
Keeping the existing layout and sound cabinets usually limits the work to surfaces and fixtures. That can make the project more focused, but compatibility still matters. Measure hole spacing, sink openings, light power requirements, and backsplash substrates before ordering anything.
As an Amazon Associate I earn from qualifying purchases.
Do these 3 things before closing this tab:
1Repair Windows errors before they cause bigger problems2Scan for outdated or missing drivers - takes under a minute3Clear out junk files and repair common Windows errorsWhat “remodeled” can mean in a limited refresh
A cosmetic refresh changes what you see and touch while leaving the kitchen’s footprint intact. Painting cabinet doors, changing knobs, adding puck lights, or installing a new backsplash can alter the room’s color, contrast, and focal points without claiming to be a full remodel. Cabinet condition, moisture, ventilation, and the quality of previous work determine whether a particular update is practical.
Plumbing, electrical, mechanical, or structural work is a different category. A new faucet may be a straightforward replacement when the sink and supply lines are compatible; relocating plumbing or adding a hardwired circuit can require additional planning and permits. Treat “DIY” as a question about your tools, experience, time, and ability to follow local inspection requirements—not as a guarantee that every task is easy.
#1 Best Overall
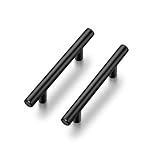
- 365-Day Evaluation: We believe you'll find value in your Ravinte handles. Use them for a full year, and if they don't meet your needs, we're here to help
- MODERN: Functional & elegant, These matte black pulls suitable for different styles of cabinets, wardrobe, chest and cupboard
- Enduring & STRONG: 30 bar pulls made of stainless steel finished with classic matte black coordinates well with other appliances and accessoriess
- Simple look: The black cabinet handles have a wide appeal across a range of kitchen cabinet doors and drawers The matte black handles have a clean and timeless look that works with farmhouse, vintage, traditional and transitional styles
- MEASUREMENT: Hole centers(CC):3 Inch(76mm), Total Length:5 inch(127mm), Diameter:1/2 inch(12mm) Projection:1-1/4 inch(32mm)
The following nine ideas are distinct variations supported by current retailer guidance. None has a universally measured “highest impact” or return, so choose by the surface you want to change and the amount of installation work you can safely handle.
1. Clear counters and clean cabinet fronts first
Decluttering is the no-cost starting point in Lowe’s Budget-Friendly Kitchen Makeover, updated April 23, 2026. Remove items that do not belong on the counter, group the appliances you use daily, and wipe cabinet doors, handles, backsplash, and the area around the range and sink. A clean, open surface makes later color or hardware changes easier to judge.
A practical reset
- Empty one counter and one cabinet section at a time so you can see what is actually stored there.
- Clean grease from cabinet faces with a method safe for the existing finish, then let surfaces dry.
- Repair loose hinges, swollen edges, or peeling laminate before applying paint or adhesive products.
- Take photographs in daylight; they provide a useful before reference when you compare finishes later.
This step does not require buying organizers or new décor. It can reveal that the kitchen feels dated mainly because of visual noise or dirty, dull surfaces.
2. Repaint cabinet doors and faces
When the boxes and doors are structurally sound, paint changes a large, repeated surface. Lowe’s recommends using paint with primer and considering a washable finish for kitchen cabinetry. Remove doors and hardware, label each piece, clean off grease, lightly abrade glossy areas, and repair chips before priming. Follow the coating manufacturer’s recoat and curing instructions; a finish that is dry to the touch may still need more time before doors are rehung.
Where paint is a poor fit
- Water-damaged particleboard, delaminating laminate, or failing veneer can telegraph through a new coat.
- Door profiles with many grooves require careful prep to avoid visible drips and uneven coverage.
- Painting in a dusty or poorly ventilated area can trap debris and extend curing time.
Use a washable finish where regular cooking soil is expected, and test the full preparation and color on one inconspicuous door before committing to every cabinet.
Rank #2

- 365-Day Evaluation: We believe you'll find value in your Ravinte handles. Use them for a full year, and if they don't meet your needs, we're here to help
- If you're replacing your handle, measure and ensure the center to center hole spacing of the current handle is 3 Inches Installing new cabinet handles, drill two holes with center to center spacing of 3 Inches
- ENDURING & STRONG: 30 bar pulls made of stainless steel finished with classic satin nickel coordinates well with other nickel appliances and accessoriess
- Simple look: The Brushed Nickel cabinet handles have a wide appeal across a range of kitchen cabinet doors and drawers The Satin Nickel handles have a clean and timeless look that works with farmhouse, vintage, traditional and transitional styles
- MEASUREMENT: 3 Inch(76mm), Total Length:5 inch(127mm), Diameter:1/2 inch(12mm) Projection:1-1/4 inch(32mm)
3. Replace knobs and pulls
Hardware is a small detail repeated across the room, so changing its finish or shape can make familiar cabinets read differently. Before purchasing pulls, measure the distance between the centers of the existing screw holes; a new size may require filling and redrilling, while knobs often use a single hole. Check screw length against the door or drawer thickness and keep a sample installed long enough to test grip and clearance.
Free tools Windows power users keep installed
One-click scans. No signup required.
Installation checklist
- Count and measure existing holes, recording center-to-center spacing for every door and drawer type.
- Make a cardboard or scrap-wood drilling template so each new piece lands at the same height.
- Protect the finished face with painter’s tape while drilling, and use a bit suited to the cabinet material.
- Tighten until secure without crushing a thin door or stripping the screw.
Hardware is usually a contained project, but inconsistent spacing is highly visible. If your existing pieces are in good condition, cleaning them thoroughly may be enough; replace only when the new proportion or finish supports the room’s palette.
4. Add under-cabinet puck lights
Under-cabinet puck lights put illumination on counters and dark corners, changing both function and the evening appearance of the kitchen. Plan the light locations before sticking or mounting anything: center them over work zones rather than hiding every light at the cabinet edge. Products may be plug-in, battery-powered, or hardwired, and those installation types have different requirements.
Fit and safety checks
- Confirm the cabinet underside has enough depth for the fixture and its cable or battery compartment.
- Check the power source, cord path, switch location, and heat clearance in the product instructions.
- Keep wiring away from sinks, heat, and moving doors; use listed components and do not improvise connections.
- Hardwired installations can involve electrical code and permit questions, so use a qualified electrician when appropriate.
Choose a color temperature and brightness that let you see food preparation without making the room’s existing bulbs look mismatched. The visual effect is localized rather than a claim that every corner will become brighter.
5. Use rope lighting at the kickplate for an ambient effect
Lowe’s also suggests rope lighting along a dark kickplate as an optional ambient or night-light treatment. It is not a required kitchen feature and may not suit a room that already has abundant lighting. The strip should be rated for the location, protected from impact and moisture, and routed so it does not interfere with toe space, cleaning, or cabinet doors.
Do these 3 things before closing this tab:
1Scan for outdated or missing drivers - takes under a minute2Repair Windows errors before they cause bigger problems3Fix the driver behind crashes, sound loss and screen glitchesRank #3
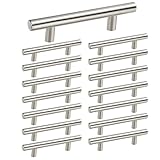
- Measurements: 3 inch Center to Center with 5 in Overall Length..Please measure your cabinet HOLE CENTERS is 3in before you purchase cabinet handles.
- Material: homdiy cabinet pulls made of high quality Stainless Steel with brushed nickel finished,hollow construction but durable and hard to get rusty
- Simple But Classic: This brushed nickel cabinet pulls are simple but depending on your application, can be very key in bringing the design together. The arc of this nickel handle is round and it has no corners, which can effectively prevent your child from bumping and injured.
- SCREWS: Free screws of 1in(25mm)& 1.57in(40mm) included are suitable for board thickness of cabinets.If you need other length screws, please feel free to contact us !
- PERFECT SERVICE: Best quality and service is our goal, If you are not satisfied with this brushed nickel drawer pulls, please contact us. We promise to leave you without any worries, please buy with confidence.
Decide whether the effect fits
- Choose this idea when you want a low-level glow, not task lighting for chopping or cooking.
- Mock up the route with removable tape first to check sightlines from nearby rooms.
- Use the supplied controller and mounting method; avoid pinching the cable under flooring or trim.
Because this is a visible-light detail near the floor, tidy cable management matters as much as the light itself.
6. Create one open-shelf moment
Removing the doors from one or two selected cabinets can create a small open-shelf display without rebuilding the whole kitchen. Display a restrained group of everyday dishes, glasses, or a plant so the opening looks intentional. Keep the shelves and cabinet interior clean; open storage shows dust and visual clutter more readily than closed doors.
Trade concealed storage for display
Mark the doors you plan to remove and store the hardware so the change is reversible. Check that the exposed shelf edges and interior finish are in good condition, and consider edge banding or paint where raw material is visible. Do not remove doors from cabinets used to hide awkward, rarely sorted items unless you are willing to maintain the display. The gain is an architectural pause in a run of cabinetry; the cost is less concealed storage.
7. Refresh the sink area with a compatible faucet
A faucet is a small fixture with a strong focal position. Lowe’s specifically advises checking the number of holes in the existing sink before choosing one. Measure the hole pattern, deck thickness, clearance to the backsplash, and the locations of supply connections. A faucet designed for one hole may not cover a three-hole sink without an appropriate escutcheon, and a replacement that does not match the existing connections can turn a simple swap into plumbing work.
Quick wins for a faster PC:
Fix the driver behind crashes, sound loss and screen glitchesFind Drivers →Repair Windows errors before they cause bigger problemsFix Now →Scan for outdated or missing drivers - takes under a minuteDriver Scan →Replacement sequence
- Shut off the water supplies and open the old faucet to relieve pressure.
- Photograph the connections, then confirm the new faucet’s hole arrangement and included adapters.
- Remove the old fixture, clean the deck, and install the gasket and mounting hardware exactly as directed.
- Reconnect supplies, turn water on slowly, and check every joint for leaks while the cabinet remains accessible.
If shutoff valves, supply lines, or the sink deck are corroded or damaged, stop and have the condition assessed rather than forcing a cosmetic replacement.
Rank #4

- 365-Day Evaluation: We believe you'll find value in your Ravinte handles. Use them for a full year, and if they don't meet your needs, we're here to help
- If you're replacing your handle, measure and ensure the center to center hole spacing of the current handle is 5 inches Installing new cabinet handles, drill two holes with center to center spacing of 5 inches
- Size of cabinet hardware: Overall Length: 5-1/2 inch; Width: 1/2 inch;Thickness:1/2 inch;Projection: 1-2/5 inch; Screw-hole center: 5 inch
- Reliable design& fine touch: With advanced technique, the drawer pulls is made to be long lasting, accompanied with good looking and fine touch
- Simple look: The black cabinet handles have a wide appeal across a range of kitchen cabinet doors and drawers The matte black handles have a clean and timeless look that works with farmhouse, vintage, traditional and transitional styles
8. Change the backsplash
A backsplash occupies a prominent band between counter and cabinet, so a new color or pattern can reset the kitchen’s palette. Peel-and-stick backsplash is one grout-free option mentioned by Lowe’s, but it is suitable only when the existing surface is sound, clean, dry, and compatible with the product instructions. Conventional tile or panel systems require more preparation, cutting, sealing, and cleanup.
Prepare before choosing material
- Measure each wall section, including outlets, corners, windows, and the area behind the range.
- Check the product maker’s requirements for substrate smoothness, paint condition, heat exposure, and moisture.
- Resolve loose tile, grease, or peeling paint before applying an adhesive panel.
- Plan how the new surface meets countertops and cabinets so exposed edges receive the specified trim or sealant.
Do not assume a grout-free product eliminates all installation skill: crooked starting lines, trapped air, or an unsuitable substrate can remain visible and shorten service life.
9. Shift the palette with wall paint or a limited accent
Wall paint changes more square footage than a single accessory and can either unify new cabinet color or provide contrast around a sink or dining nook. Lowe’s advises keeping trend colors to smaller accents when you want them to be easier to change. Test samples on the actual wall because daylight, cabinet undertones, counters, and flooring alter how a color reads.
The Tool Desk
Outbyte PC Repair FREERepair Windows errors before they cause bigger problemsFix Now →Outbyte Driver Updater FREEScan for outdated or missing drivers - takes under a minuteDriver Scan →Paint for a durable kitchen finish
- Wash the wall, repair holes, and dull glossy areas so the new coating can bond.
- Prime stains, repairs, or dramatic color changes with a primer appropriate to the surface.
- Cut in carefully at cabinets, trim, and backsplash; protect counters and appliances before rolling.
- Allow the stated cure time before scrubbing or reinstalling switch plates and accessories.
A single accent wall, the breakfast area, or the inside of an open shelf can deliver color without committing the entire room to a short-lived trend.
Independent reader supportYour contribution helps us test, update, and keep practical guides available for everyone.How to choose among the nine options
Use the target, surface, effort, compatibility, and budget uncertainty as your decision framework. The descriptions below reflect what each option changes; they do not establish a universal impact ranking.
Best Value
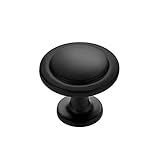
- 365-Day Evaluation: We believe you'll value these cabinet knobs. Use them for a full year, and if they don't meet your needs, we're here to assist
- EURO-STYLE: The cabinets knobs is an ideal way to beautify an entire room Make cabinet hardware a part of your home décor today
- Size of round Knobs:Diameter 1-1/4“ ; Base Diameter: 3/4" ; Height: 7/8"
- Reliable design& fine touch: With advanced technique, the door pulls are made to be long-lasting, accompanied with good looking and fine touch
- Simple look: The Black cabinet knobs have a wide appeal across a range of kitchen cabinet doors and drawers The Matte Black knobs have a clean and timeless look that works with farmhouse, vintage, traditional and transitional styles
| Option | Primary visible change | Key checks | Installation character |
|---|---|---|---|
| Clear and clean | Counter and cabinet presentation | Safe cleaners; damaged surfaces | No-cost maintenance task |
| Cabinet paint | Large door and face surfaces | Material condition; primer; cure time | Prep-intensive finish work |
| New knobs or pulls | Repeated touch points and finish | Hole spacing; screw length | Small hardware installation |
| Under-cabinet puck lights | Localized task illumination | Power type; clearance; wiring | Mounting plus possible electrical work |
| Kickplate rope light | Low-level ambient glow | Routing; moisture and impact protection | Decorative lighting installation |
| Open shelf | One display section | Storage trade-off; exposed finish | Door removal and styling |
| Faucet | Sink focal point | Sink-hole count; connections; clearance | Plumbing fixture replacement |
| Backsplash | Wall band between counter and cabinet | Substrate; heat; moisture; product directions | Adhesive, panel, or tile installation |
| Wall or accent paint | Room-wide or selected color field | Cleaning; primer; neighboring undertones | Surface preparation and painting |
For a painting-led refresh, combine cleaning, cabinet or wall paint, and hardware only after confirming the existing surfaces are repairable. Add lighting, a faucet, or a backsplash when those focal areas—not the cabinet color—are what make the room feel unfinished.
What a refresh may cost
Published figures are planning context, not personalized quotes. Lowe’s kitchen planning guide, updated December 23, 2022, gives a broad $1,500–$10,000 refresh range. Its potential scope includes hardware, painted or basic cabinets, counters and backsplash, a sink and faucet, lighting, window treatments, and possibly a basic appliance; the guide says square footage, layout, and material costs change the total. Read the range as dated retailer guidance rather than a current guaranteed price: Lowe’s kitchen budget guide.
What’s actually slowing this PC down?
Pick the symptom - the matching free tool is one click away.
The Home Depot’s separate Kitchen Remodel Cost Guide reports national averages for a 200-square-foot kitchen, sourced to Hanley Wood Market Intelligence: $24,000 for a minor remodel, $69,000 for a major remodel, and $136,000 for an upscale remodel. Those figures vary by location and describe broader remodel scopes; they do not price any one of the nine tweaks or promise what your kitchen will cost.
Material size, labor, access, repairs, and local rates can move your budget outside either reference. Get itemized quotes when plumbing, electrical, structural work, or extensive surface repair is involved.
Permits, safety, and when to call a professional
Permit requirements depend on where you live and what changes. San José’s guidance, updated April 13, 2026, lists painting, cabinet resurfacing, new flooring, and new countertops as cosmetic work that does not require a permit there: City of San José kitchen and bathroom minor remodels. The same page describes a minor remodel involving new electrical, plumbing, or mechanical work only when fixture locations and quantities are not changed, and it excludes structural changes from that scope.
That local rule is not a nationwide exemption. Before work, ask your city or county building department whether a permit, licensed trade, inspection, or special product approval applies. Stop and seek professional help if you find water damage, unsafe wiring, gas work, structural movement, or supply valves that will not shut off. For any task involving circuits or hardwired lighting, follow electrical code and use a qualified electrician when your experience does not cover the work.
Outdated Drivers Are Slowing You Down
One free scan finds every outdated or missing driver and matches the right update for your exact hardware.Free scan · exact hardware matchWindows Errors? Fix Them Before They Spread
Repair common Windows errors and clear accumulated junk for a smoother, more stable PC - no reinstall needed.Free scan · no reinstallA low-risk sequence for a weekend-by-weekend refresh
- Reset the room: clear counters, clean fronts, and photograph the existing condition.
- Choose the dominant surface: decide whether cabinets, walls, the backsplash, or the sink area is the main visual problem.
- Test compatibility: measure hardware holes and faucet openings; inspect paint, backsplash substrate, and light power options.
- Complete dusty prep first: repairs, cleaning, sanding, and priming should precede final painting or adhesive installation.
- Install in a controlled order: paint before fitting new hardware, mount lights before styling shelves, and test plumbing before closing access.
- Reassess before adding more: once the primary change is complete, live with it long enough to see whether another tweak solves a real problem.
This sequence keeps cosmetic decisions separate from fixture and trade work, making it easier to stop at a finished point instead of turning a limited refresh into an unplanned remodel.
What these tweaks can—and cannot—promise
Paint, hardware, lighting, shelving, a faucet, and a backsplash can make a kitchen look more coordinated and current when they are correctly fitted and maintained. Available guidance does not establish a measured percentage increase in resale value, a guaranteed time saving, or a ranking that applies to every layout. Judge success by the specific problem you set out to solve: stained cabinet fronts, poor work-surface light, a mismatched sink fixture, a tired wall color, or cluttered storage.
Quick Recap

Product prices and availability are accurate as of the date/time indicated and are subject to change. Any price and availability information displayed on Amazon at the time of purchase will apply.

