Windows Errors? Fix Them Before They Spread
Outbyte PC Repair · freeRepair common Windows errors and clear accumulated junk for a smoother, more stable PC - no reinstall needed.
Fix My PC Now →ThatPainter is reader-supported. When you buy through links on our site, we may earn an affiliate commission. Learn More
The best backyard BBQ area starts with how you actually cook and host, not with a shopping list. Decide the occasions you want to support, set a realistic budget, map prep–cook–serve–clean movement, then select a grill and materials that fit the site and the appliance manual. Finish with worktop space, storage and seating only after the safety and utility decisions are clear. A portable grill and folding table can be a sensible first phase; a permanent kitchen is an option when the layout, budget, permits and utility work justify it.
The four-step plan at a glance
- Define use and budget: design for quick family meals, occasional entertaining or frequent cooking before choosing amenities.
- Map the space and workflow: measure the patio or yard and arrange prep, cooking, serving and cleanup zones around the people using them.
- Choose the grill and site materials: use the exact appliance manual to establish clearances, ventilation, construction and access requirements.
- Add comfort features and coordinate specialist work: provide worktops, storage and seating, then bring in qualified help for gas, electrical, plumbing, structural and permit work.
“Ultimate” does not have to mean a fully built island on day one. A well-planned portable setup can prove the workflow before you commit to construction.
As an Amazon Associate I earn from qualifying purchases.
Recommended Free Tools
Step 1: Decide how you will cook and host, then set the budget
Start with real occasions, not aspirational features
Write down the situations the BBQ area must handle. A household that cooks a few burgers on weeknights needs a different arrangement from one that hosts large gatherings or grills several times a week. Your answers determine how much counter space, storage, seating, refrigeration or utility infrastructure is worthwhile.
- Quick family meals: prioritize a reliable grill position, a small landing surface for trays and utensils, and an easy route to the indoor kitchen or dining area.
- Larger gatherings: allow more room for guests to circulate without crossing the hot-work area. Separate serving and seating from the grill operator’s working space.
- Frequent cooking: plan durable work surfaces, protected storage and a layout that avoids carrying ingredients and hot food long distances.
Andrew Fulchino Jr. of FLC Corp, quoted by Angi, puts the sequence plainly: “Taking the time to consider key factors before building an outdoor kitchen can help you design a space that fits your lifestyle, backyard, and budget.”
#1 Best Overall

- Premium Stainless Steel Frame For Durability: Designed with a rust-resistant stainless steel frame, this outdoor grill combines exceptional durability with a stylish, modern design. The easy-to-clean surface makes maintenance a breeze
- High-End 304 Stainless Steel Grates: This BBQ gas grill boasts premium stainless steel grates that are both durable and non-stick, preventing rust and cracks. They offer exceptional heat distribution and easy cleanup after every session
- 5 High-Output 10,000 BTU Burners: Designed with five 10,000 BTU burners, this patio grill heats up quickly, ensuring rapid cooking for all your favorite grilled dishes. Whether you're cooking for a crowd or a family, cook without any delays
- Versatile Rear Burner: The 13,000 BTU rear burner in this grill provides added cooking flexibility, perfect for rotisserie cooking or warming dishes. It ensures even heat distribution while allowing you to cook multiple items simultaneously.
- Spacious Cooking Surface For Large Gatherings: This propane grill offers 750 square inches of total cooking space, making it the choice for grilling a variety of dishes at once. It ensures you can easily feed a crowd during outdoor parties
Set a ceiling before you choose appliances
List the money available for the entire project, not just the grill. Include the base or island, worktops, storage, lighting, seating, delivery, site preparation, utility connections, permits and professional labor where applicable. Keep a contingency for changes discovered when a patio, wall or service line is opened.
Published Angi estimates illustrate how widely scope can change the price. They are dated 2026 estimates from a commercial contractor marketplace, not guaranteed local quotes or independently verified market averages:
Recommended Free Tools
| Project description | Published estimate | How to interpret it |
|---|---|---|
| Custom outdoor-kitchen installation | $5,520–$22,150 | Angi’s 2026 estimate in a design overview; the final figure depends on the chosen scope and appliances. |
| Modular outdoor-kitchen design | About $5,000 or less | Angi’s 2026 estimate for modular designs; confirm what modules, delivery and installation are included. |
| Professional outdoor-kitchen construction | $1,000–$40,000; average around $13,600 | A separate Angi 2026 guide with a different scope from the design overview, so it should not be combined with the figures above. |
Use the numbers as planning bands rather than promises. A small portable arrangement can avoid much of the construction and utility cost, while a permanent kitchen may require a base, plumbing, electrical work, gas connections and permits.
Divide the budget into phases
A phased budget protects the project from premature upgrades. Reserve first for a safe grill location, a stable surface, weather-appropriate materials and enough landing space to handle hot food. Add storage, lighting, a sink, refrigeration or built-in appliances only when the everyday workflow proves that they are useful. This approach also lets you stop at a complete portable setup instead of treating a future expansion as mandatory.
Step 2: Map the space and the four activity zones
Measure what you have before drawing cabinets
Measure the usable patio or yard, including walls, doors, steps, slopes, property boundaries and paths that people already use. Mark fixed features such as windows, fences, trees, drains and utility access. Record the proposed grill’s actual footprint only after you have selected a model; an island designed around a generic grill can fail when the real appliance, lid movement or service access is checked.
Sketch the area from above and show where ingredients enter, where people sit, and where cooked food leaves the grill. Keep the operator’s working position out of the main traffic route. A good plan minimizes backtracking without forcing guests to pass close to heat, smoke, fuel connections or sharp corners.
Organize prep, cook, serve and clean
Angi identifies four activity zones. Treat them as linked work areas rather than four pieces of furniture:
Rank #2
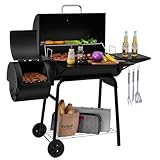
- 823 Square Inches: Includes 475 sq. in. porcelain-enameled steel wire cooking grates, 151 sq. in. chrome-plated warming rack and 197 sq. in. offset smoker
- Tasty Smoke Flavors: The offset smoker is firmly attached to charcoal grill to ensure good circulation of heat and smoke. Easy to open side door to add charcoal and remove ashes; air vent stokes fire instantly
- Adjustable Lifting Rack: The two-level height-adjustable charcoal pan ensures enhanced control over cooking temperatures by adjusting the distance between the food and the heat source
- Temperature Monitor: The easy-to-read lid thermometer helps you maintain the ideal cooking temperature for a wide range of foods, giving you confidence in your grilling results
- Ample Space: Front and side tables offer workspace for seasonings and grilling tools. The bottom shelf provides extra storage space and holds up to only 20 lb. accessories when they are evenly distributed
- Prep: provide a stable surface for ingredients, tools and trays. Put it close enough to the grill that prepared food does not travel through the seating area.
- Cook: locate the grill where the operator has safe access, can open the lid fully and can move away quickly if needed.
- Serve: create a landing point for finished food that is accessible to diners but does not make guests reach over the cooking area.
- Clean: plan where dirty plates, waste and utensils go. A route to an indoor sink may be adequate for a starter setup; a permanent kitchen may justify plumbing only after local requirements are understood.
The zones do not need separate rooms or counters. In a compact yard, one folding table can support prep and serving at different times. What matters is that the sequence works for the people who will use it.
A low-commitment starter arrangement
Angi’s low-budget example uses a portable grill, a folding table and an ice bucket. It is an example of a workable starting point, not a universal code requirement or a specification for every grill. Place the table so it is not trapped between the hot appliance and a wall, and keep the ice bucket where guests can reach it without entering the cooking position. Follow the portable grill’s own operating and clearance instructions.
Check circulation before you buy
- Walk the proposed route while carrying a tray and while another person is seated nearby.
- Open the grill lid, doors and drawers on the same drawing; note where they project into paths.
- Keep the service route usable when the area is busy, not just when it is empty.
- Leave access for cleaning, maintenance and any shutoff that must be reached quickly.
- Plan smoke and wind direction with neighboring windows, doors and seating in mind.
Step 3: Choose the grill and materials around the site
Choose portable or permanent construction deliberately
A portable grill is the simplest way to test the location and workflow without fixing an island to the patio. You can add a folding work surface, weather-resistant storage and movable seating as your use becomes clearer. A permanent kitchen can provide integrated counters and utilities, but it commits you to construction, service access and code compliance.
Compare the options on these practical axes:
- Footprint and workflow: a portable unit can move as the seating or season changes; a built-in installation must be planned around the final appliance and its service clearances.
- Initial commitment: movable equipment permits a smaller first phase; permanent work adds a base, finishes and potentially utility construction.
- Weather exposure: either setup needs materials and storage suited to sun, rain, humidity, wind and temperature changes at your site.
- Maintenance: a movable grill can be repositioned for cleaning or protection; a built-in unit needs accessible components and a plan for keeping surrounding surfaces clean.
Read the exact owner’s and installation manual first
Do not set island dimensions, roof clearances or ventilation details from a generic diagram. The selected appliance’s manual controls the relevant installation rules, and local regulations may add requirements. Check the manual before fixing the grill position, building walls or routing fuel and electrical services.
The manufacturer guides in the available examples show why model-specific instructions matter. The Summit built-in guide says the location should account for wind exposure, nearby traffic paths, gas-supply routing and room to evacuate. It requires noncombustible construction and adjacent work areas for that covered built-in installation. The Spirit safety guide says that specific grill must remain freestanding and gives its own operating instructions. Those examples apply to the named grill types, not to every appliance.
Never transfer a clearance number, construction detail or built-in assumption from one model to another. If the manual is unclear, contact the manufacturer or a qualified installer before construction. Check local fire, building, fuel-gas and electrical rules as well.
Do not assume a roof or pergola makes grilling safe
A patio cover, pergola, awning or other overhead structure is not automatically safe above a grill. Combustible construction, trapped heat, smoke, grease and wind can change the risk. Verify the appliance’s required overhead and side clearances, the structure’s materials and any local restrictions together. If those conditions cannot be met, relocate the grill rather than treating the cover as decoration.
Rank #3

- [Dual Fuel Ready] This 6-burner built in grill head operates on liquid propane (LPG) and features a natural gas convertible design. Easily adapt your fuel supply to match your outdoor kitchen setup using a conversion kit (sold separately)
- [Versatility & Capacity] Offers a total of 860 sq.in. of cooking space, featuring a 620 sq.in. primary area with 2 cast iron grates and an extra heavy-duty cast iron griddle plate. Includes a 240 sq.in. warming rack for buns and sides, making it ideal for large family gatherings and hosting 10+ guests
- [Heavy Duty Stainless Steel] Constructed from stainless steel to deliver superior weather resistance and rust protection in harsh outdoor environments. Featuring a robust construction with a double-walled hood for efficient heat retention, while the smooth metallic finish allows for effortless wipe-down cleaning
- [6-Burner Multi-Zone Heating] Features 6 stainless steel burners totaling 60,000 BTUs (10,000 BTU each) for consistent heat across the surface. This built-in gas grill head provides precise multi-zone temperature control, letting you high-heat sear steaks and slow-roast delicate sides simultaneously
- [Easy Slide-out Cleanup] Features a removable front grease tray that slides out completely for quick disposal of drippings. Keep your counter area spotless and reduce post-cooking maintenance with this simple, tool-free cleaning solution
Plan ventilation, access and utilities as a system
Built-in work must leave room for air movement, operation and service. Gas routing, electrical circuits, plumbing, drainage and shutoffs should be coordinated before walls or counters close them in. Make sure a technician can reach components without dismantling the entire island. Keep an unobstructed route away from the cooking position so people can evacuate quickly if a problem occurs.
Select materials for the actual outdoor exposure
Choose surfaces and storage that tolerate the site’s weather and cleaning routine. Durable outdoor materials are useful only when their joints, supports and hardware are also suitable for exposure. Protect food and utensils from rain and pests, and avoid creating ledges that collect grease or standing water. The appliance manual and local code determine where noncombustible construction is required; a visually attractive finish cannot substitute for that requirement.
Independent reader supportYour contribution helps us test, update, and keep practical guides available for everyone.Step 4: Add useful comforts and bring in the right help
Add features in the order the workflow proves you need them
After the grill position and four zones work on paper, add comforts that remove a real inconvenience:
- Worktop space: give hot trays and prepared ingredients a landing surface that does not interfere with lid movement or circulation.
- Storage: keep tools, fuel-related accessories and weather-sensitive items close, but do not block required ventilation or service access.
- Seating: place chairs and stools outside the operator’s working path and away from heat and smoke.
- Lighting: make controls, food surfaces and walking routes visible after dark; electrical work must follow applicable rules.
- Waste and cleaning: provide a defined place for rubbish and dirty items so cleanup does not spill into prep or serving.
Resist adding every possible appliance at once. Each new appliance consumes counter, storage, power, fuel or water capacity and creates another maintenance point.
Do these 3 things before closing this tab:
1Clear out junk files and repair common Windows errors2Scan for outdated or missing drivers - takes under a minute3Repair Windows errors before they cause bigger problemsKnow when a project needs professional coordination
A permanent build may involve a structural base, plumbing, electrical work, gas connections, permits or other code requirements. Angi recommends professional coordination for relevant installation work. Use qualified trades for services they are licensed to perform in your location, and confirm who is responsible for inspections and final sign-off before work starts.
Ask an installer to document utility routes, shutoffs, access panels and the appliance model used for the design. If the plan changes to a different grill, recheck the manual rather than assuming the previous clearances still apply.
Build in stages without wasting the first phase
- Test phase: place the portable grill and folding table in the proposed zone, then cook and host enough times to reveal traffic, smoke and storage problems.
- Improvement phase: add durable worktop space, protected storage and seating where the test exposed a genuine need.
- Permanent phase: only after the workflow is proven, design a base or island around the exact appliance, utilities, clearances and local approvals.
This sequence keeps the first purchase useful even if you never build a permanent kitchen. If you do expand, the portable equipment can remain a backup or a separate cooking station when the main area is busy, provided its own manual and local rules are followed.
Rank #4

- [Dual Fuel Ready] This 4-burner built in grill head operates on liquid propane (LPG) and features a natural gas convertible design. Easily adapt your fuel supply to match your outdoor kitchen setup using a conversion kit (sold separately)
- [Versatile Grate & Griddle] Our grill stands out with two rust-resistant matte cast iron grates and an ADDITIONAL cast iron griddle plate. This combo layout lets you handle high-heat steak searing on grates while cooking breakfast classics, fajitas, or sides on the flat-top surface
- [Spacious 40,000 BTU Heat Profile] Delivers 40,000 BTUs of consistent heat across 653 sq.in. of total cooking space. Includes a 471 sq.in. primary grilling area for direct heat and a 182 sq.in. secondary warming rack to keep dishes at ideal serving temperatures
- [Heavy Duty Stainless Steel] Designed for those who take grilling seriously, our Stainless Steel Grill offers unmatched durability and corrosion resistance. Its robust construction and easy-to-clean surface make it the ideal centerpiece for any outdoor kitchen island
- [Easy Slide-out Cleanup] Features a removable front grease tray that slides out completely for quick disposal of drippings. Keep your counter area spotless and reduce post-cooking maintenance with this simple, tool-free cleaning solution
Common planning mistakes and their fixes
Buying the grill before measuring the site
Why it fails: the lid, doors, service space or required clearances may collide with walls and traffic. Fix: measure the site, shortlist the appliance, then draw its full operating and maintenance envelope from the manual before ordering materials.
The Tool Desk
Outbyte Driver Updater FREEScan for outdated or missing drivers - takes under a minuteDriver Scan →Outbyte PC Repair FREEClear out junk files and repair common Windows errorsFree Scan →Treating a generic clearance as universal
Why it fails: built-in and freestanding grills can have different construction and placement rules. Fix: use the exact owner’s or installation manual and local regulations; do not copy dimensions from another model.
Putting guests through the cooking position
Why it fails: people carrying drinks and children moving through the area can interfere with the operator and approach hot surfaces. Fix: map prep, cook, serve and clean routes and place seating and serving access outside the operator’s path.
Assuming an overhead cover solves weather and safety
Why it fails: a cover can introduce combustible surfaces, trapped smoke and heat, or conflicts with manufacturer requirements. Fix: verify the structure, ventilation and clearances together for the selected appliance.
Underbudgeting utilities and approvals
Why it fails: gas, electrical, plumbing, foundations and inspections can cost more than the visible cabinets. Fix: identify utility and permit needs during the budget stage and obtain local estimates before committing to a permanent layout.
Free tools Windows power users keep installed
One-click scans. No signup required.
Adding storage where it blocks service access
Why it fails: a sealed island can make shutoffs, burners, wiring or plumbing unreachable. Fix: preserve access panels and a clear maintenance route in the drawing and confirm them with the installer.
Final checklist before you build
- The intended occasions and cooking frequency are written down.
- The total project budget includes equipment, surfaces, utilities, labor, permits and a contingency.
- The patio or yard has been measured, including doors, paths, fixed objects and service access.
- Prep, cook, serve and clean zones form a workable sequence for the actual household.
- The selected grill’s owner’s or installation manual has been reviewed before construction.
- Clearances, ventilation, noncombustible requirements and evacuation access match that appliance and local rules.
- Any cover, pergola or built-in structure has been evaluated rather than assumed safe.
- Materials, storage and hardware suit the site’s weather exposure and cleaning routine.
- Gas, electrical, plumbing, structural and permit work has a qualified plan where required.
- The design can start with a portable grill and folding table without making future improvements impossible.
The ultimate backyard BBQ area is the one that lets your household cook, serve and clean comfortably and safely. Start with a measured, portable arrangement if that is what the budget supports; make it permanent only when the workflow and appliance requirements justify the construction.
Quick Recap

Product prices and availability are accurate as of the date/time indicated and are subject to change. Any price and availability information displayed on Amazon at the time of purchase will apply.

