Outdated Drivers Are Slowing You Down
Outbyte Driver Updater · freeOne free scan finds every outdated or missing driver and matches the right update for your exact hardware.
Scan My Drivers Free →ThatPainter is reader-supported. When you buy through links on our site, we may earn an affiliate commission. Learn More
Restore a vintage mid-century dining table and chairs by treating each piece as a separate conservation problem: identify the materials and finish, stabilize structure, clean gently, and only then decide whether a cosmetic upcycle is justified. The safest result is usually the least destructive one. A sound original finish can often be refreshed; stripped veneer, unstable joints, or failing upholstery need a more cautious repair plan.
Start with an inspection, not sandpaper
A dining set is not one material or one condition. The table may combine a thin wood veneer, a wood or composite substrate, edging, fasteners, and several finish layers. Each chair can have different joinery, a different surface coating, and upholstery that should not be soaked or treated like bare timber. Photograph every item before moving it, then inspect the table and each chair individually.
As an Amazon Associate I earn from qualifying purchases.
Do these 3 things before closing this tab:
1Fix the driver behind crashes, sound loss and screen glitches2Repair Windows errors before they cause bigger problems3Scan for outdated or missing drivers - takes under a minuteRecord what you can establish
- Look underneath the table and seats for labels, repairs, screw heads, staples, exposed end grain, or a thin decorative layer over a different board.
- Check whether the tabletop is flat or has lifted edges, bubbles, cracks, open seams, or areas that sound hollow when tapped very lightly with a fingertip.
- Inspect aprons, legs, stretchers, corner blocks, and chair joints for movement. A loose joint is a structural defect, not a surface blemish.
- Examine the finish in raking light for cloudy patches, scratches, crazing, water marks, tackiness, or areas where the coating is lifting.
- On chairs, identify whether seats are solid wood, a removable panel, woven material, or upholstered. Look for broken webbing, compressed padding, loose fabric, and failed staples before choosing a cleaning method.
Specialist workflows described by MPF Conservation put disassembly as needed, inspection, cleaning, repair, and finish selection in that order. That sequence is a useful framework, but it is not a universal do-it-yourself recipe: the correct intervention depends on the construction and damage found on your set.
Decide whether to preserve, repair, or refinish
Use four questions before buying supplies: How much original material will this option retain? Can the intervention be reversed or treated later without extra damage? Is it compatible with the actual substrate and coating? Is the defect cosmetic or structural? A modern-use upcycle can legitimately favor a new color or tougher surface, but that is a different objective from conserving an original object. Make that choice deliberately rather than assuming every old finish should be removed.
#1 Best Overall

- Restor-A-Finish is a unique finish-penetrating formula that restores wood finishes while blending out minor scratches, blemishes and abrasions
- Available in nine colors to match almost any wood finish tone; Neutral, Maple-Pine, Golden Oak, Cherry, Walnut, Mahogany, Dark Walnut, Dark Oak, and Ebony Brown
- With a simple wipe-on, wipe-off process, most finished wood surfaces that seem to need a complete refinishing job can be restored in a few minutes
- Removes white heat rings and water marks, sun fade, oxidation, smoke damage and most other blemishes
- Restor-A-Finish restores the finish without removing any of the existing finish
| Condition or goal | Least-destructive starting point | Why it fits |
|---|---|---|
| Finish is stable, with dust and light grime | Gentle dusting, controlled damp cleaning, then buffing | Retains original coating and avoids introducing an incompatible product |
| Minor dullness or superficial marks | Document, test a small hidden area, and use restrained maintenance | Some marks belong to the object’s history; aggressive polishing can alter sheen or build residue |
| Loose chair joint or moving table component | Structural assessment and appropriate reglue or repair | Movement can worsen and is not solved by a new topcoat |
| Small, localized veneer lift | Protect the area and obtain advice before attempting adhesive work | Veneer is thin and can split, stain, or be sanded through easily |
| Large areas of lifting veneer, damaged substrate, or widespread finish failure | Furniture conservator or experienced restorer | Extent and construction determine a safe repair; concealment may destroy original evidence |
| Modern opaque-color makeover after condition is documented | Proceed only when preserving the original surface is no longer the priority | Paint can be an intentional upcycle, but it is difficult to undo without affecting the underlying finish or veneer |
Why stripping is usually the wrong first move
The Canadian Conservation Institute (CCI) states in its Basic care – Furniture and objects made of wood guidance, published November 14, 2018: “Stripping wooden furniture is not recommended.” CCI explains that original finishes have historical value and, once removed, cannot simply be put back. A finish that looks old may still be sound and may be part of the set’s evidence of age, use, and manufacture.
Stripping also creates practical risks. Solvents, scraping, and sanding can remove color from exposed wood, erase a thin finish layer, soften veneers, round crisp edges, and drive residue into joints. If you later discover that the tabletop is veneered, the remaining surface may be too thin for corrective sanding. Preserve a stable coating whenever its appearance and performance are acceptable.
Recommended Free Tools
Identify the finish before cleaning
Cleaning is not neutral. Lacquer, shellac, varnish, oil, wax, paint, and later synthetic coatings respond differently to water, alcohol, solvents, and abrasion. CCI’s Care of Furniture Finishes guidance advises determining the coating type and its stability before cleaning. On an unidentified set, avoid broad solvent tests and do not assume that a product marketed as “restorer” is harmless.
Rank #2

- ANTIQUE FURNITURE RESTORATION – Minwax Antique Furniture Refinisher is a low viscosity, amber-colored blend of solvents and wood conditioners that will help you restore and refinish antique furniture.
- GENTLE FORMULA – This antique wood refinishing formula contains natural wood oils that penetrate and condition wood. It can be used to dissolve varnish, shellac, and/or lacquer on all type of wood surfaces without harming the wood.
- EASY TO APPLY – With no scraping, no sanding, and no mess, it’s easy to apply this wood refinish in just a few steps.
- VERSATILE – You can use Minwax Furniture Refinisher for a variety of projects. It will help you gently dissolve years of built-up wood finishes but will still leave the wood’s warm glow undisturbed.
- A BRAND YOU CAN TRUST – Minwax is America’s leading brand of wood finishing and wood care products. Since 1904, we have been inspiring consumers to Keep on Finishing. We offer consumers a complete line of products to meet every wood finishing need.
A cautious test method
- Choose a hidden location, such as the underside of an apron or the back of a chair leg.
- Photograph the test spot and note its original sheen and color.
- Use the mildest proposed treatment in a very small area with a clean, soft cloth; stop if color transfers, the surface becomes tacky, turns cloudy, or loses gloss.
- Allow the area to dry fully and compare it in the same light before treating anything visible.
- If the coating reacts unexpectedly, leave the surface alone and consult a conservator or specialist restorer.
CCI cautions that commercial restoration mixtures can contain waxes, oils, or silicones. Those ingredients may build up and interfere with later coatings or repairs. A product that produces an immediate shine is not proof that it is compatible with the finish.
Clean and maintain a stable finish
For furniture already in good finish condition, CCI describes a modest routine: damp dusting followed by buffing, with careful and infrequent waxing when appropriate. “Damp” means a cloth that is barely moistened, not wet enough to leave droplets or a visible trail. Work in small sections, dry any remaining moisture promptly, and keep liquid away from seams, end grain, hardware, and veneer edges.
Basic care sequence
- Remove loose dust with a clean, soft cotton polishing cloth or another soft, lint-free cloth. Do not use a cloth carrying grit from previous projects.
- Wipe a small area with the barely damp cloth only after the finish has passed the hidden-spot test.
- Dry the area with a second soft cloth and check for streaks, softened coating, or color transfer.
- Buff lightly when the surface is dry. Stop when the sheen is even; repeated rubbing can create a polished patch.
- Wax only if the finish is known to tolerate it and maintenance is genuinely needed. Apply sparingly and infrequently rather than building a thick layer.
Keep the set away from prolonged direct sunlight, radiators, damp walls, and rapid humidity changes. Use coasters and mats that do not trap moisture, and lift objects rather than dragging them across the tabletop.
PC Slower Than It Used to Be?
A free scan shows the junk files, broken settings and background clutter dragging Windows down - then fixes them in one click.Free scan · Windows 10 & 11Crashes, No Sound, or Screen Glitches?
Random freezes, missing sound and display glitches usually trace back to one bad driver. Find and replace yours safely.Free scan · under a minuteRank #3
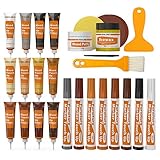
- KIT INCLUDES our most powerful wood repair compounds, so you can repair all levels of damage to wood furniture by yourself. Includes 12 touch up fillers, 8 touch up markers, 1 wood putty, 1 beewax, 2 brushes, 2 sandpaper, 1 sponge and 1 scraper
- RESTORE ALL KINDS OF DAMAGES such as scratches, chips, cracks, holes and discoloration on wooden floors, doors and furniture like desks, chairs, beds, wardrobes, bookcases, cabinets, wooden crafts and many more
- EASY TO USE: Apply the filler into the cracks, and then smooth the surface with scraper. The markers can be used to touch up the superficial scratches or to draw wood grain
- UNIQUE COLORS: The touch up fillers are available in 12 colors: White, Black, Light Gray, White Maple, Yellow Maple, Deep Pine, Earthy Yellow, Yellow Teak, Red Cherry, Cedar, Dalbergia, Walnut. The touch up markers come in 8 colors: White, Gray, Oak, Maple, Cherry, Walnut, Mahogany, Black
- Tips for mixing colors: You can mix the desired wood filler color according to the color chart. When mixing colors, first add the lighter repair filler, then gradually add the darker wood repair filler, observing the color changes until you achieve the desired shade
Handle the set without adding damage
Furniture can be damaged during the very work intended to save it. CCI advises lifting a table by its apron or legs instead of the top, and grasping chairs by the seat rather than the back or arms. Move one piece at a time, keep pathways clear, and support detachable components so they do not twist.
- Do not lift a table by a loose edge, drawer front, or thin overhanging top.
- Do not pull a chair across the floor by its back; that stresses the back posts and their joints.
- Use padded supports when a piece must be turned over, and protect the finish from tools, grit, and metal hardware.
- Keep screws, wedges, and removable upholstery parts labeled by position so reassembly does not force mismatched holes or joints.
Repair chairs according to their construction
MPF Conservation’s chair-restoration examples describe disassembly as needed, inspection, cleaning, repair or reglue work, and finish treatment. That order matters because a chair that rocks, creaks, or opens at a joint needs mechanical correction before surface dressing.
Loose or failed joints
First determine whether movement comes from a joint, a split component, a missing fastener, or a loose seat frame. Do not flood a joint with glue from the outside; that can trap dirt, prevent proper disassembly, and leave a visible repair line. If a joint can be separated without force, document its orientation and seek advice on an adhesive and clamping method suitable for the original construction. A chair used daily must be tested for stability before anyone sits on it.
Rank #4

- Restor-A-Finish is a unique finish-penetrating formula that restores wood finishes while blending out minor scratches, blemishes and abrasions
- Available in nine colors to match almost any wood finish tone; Neutral, Maple-Pine, Golden Oak, Cherry, Walnut, Mahogany, Dark Walnut, Dark Oak, and Ebony Brown
- With a simple wipe-on, wipe-off process, most finished wood surfaces that seem to need a complete refinishing job can be restored in a few minutes
- Removes white heat rings and water marks, sun fade, oxidation, smoke damage and most other blemishes
- Restor-A-Finish restores the finish without removing any of the existing finish
Seats and upholstery
Upholstery may conceal screws, webbing, springs, or a damaged seat frame. Vacuum loose dust through a screen or low-suction attachment rather than saturating fabric. Avoid applying wood cleaners to textiles, foam, or woven seats. If the covering is historically significant or the frame is fragile, an upholsterer familiar with older furniture can remove and replace materials without tearing the substrate.
Free tools Windows power users keep installed
One-click scans. No signup required.
Approach veneer as a thin surface, not solid timber
The Western Australian Museum’s 2017 wood-conservation manual defines veneer as a thin layer of wood attached over a different substrate. That distinction changes every sanding and repair decision. A veneered top can look like solid timber while having only a small amount of wood available for abrasion.
Warning signs
- Edges that reveal a separate core beneath a thin decorative layer.
- Bubbles, tented areas, lifted corners, open seams, or cracking that follows the veneer sheet.
- Dark rings or patches that remain after gentle cleaning and may extend into the substrate.
- Areas that flex or sound hollow compared with firmly bonded sections.
Do not sand through a raised area to make it level, and do not cover uncertain veneer with opaque finish simply to hide movement. The Museum guidance recommends referring large areas of lifting veneer to experts. Extensive delamination, damaged substrate, or a top that has lost its bond requires a repair plan matched to the construction, not a cosmetic shortcut.
Best Value

- SCRATCHES HAPPEN: Nicks and discoloration appear on finished wood and veneer. Wipe on either scratch remover and wipe off excess immediately to camouflage the damage on finished wood and veneer.
- COCONUT OIL FORMULA: Both scratch removers are 0% VOC and coconut oil-based. The dark remover suits walnut, mahogany, and cherry; the light remover suits maple, oak, and pine.
- Repair and Restore: Use our tinted Fill Sticks to fill deep scratches and gouges, with the ability to top coat with varnish or paint for a lasting repair.
- WIPE ON, WIPE OFF: Apply each scratch remover, wipe off excess right away, then let dry 15 to 30 minutes. Rub fill sticks into gouges and scrape excess with a credit card.
- FIVE TOOLS, ONE KIT: Furniture polish and cleaner, dark and light scratch removers, four wax fill sticks and a microfiber cloth tackle nicks, scratches and gouges on wood furniture and floors.
Choose a new finish only after the surface is stable
If the original finish is beyond practical maintenance and the owner’s goal is a modern-use makeover, document the condition before changing it. Remove only what the chosen system requires, protect veneer and edges, and test adhesion and color in an inconspicuous area. A painted finish can be an honest upcycle when preservation is not the goal, but it should not be presented as a neutral restoration.
The Western Australian Museum notes that polyurethane is hard-wearing but difficult to remove without damage and does not recommend it for period or antique furniture. Because this dining set’s existing coating, materials, and historical status are unknown, treat that as a conservation consideration rather than a universal prohibition on every household project. A durable modern coating may suit a heavily used contemporary piece, while it can be an irreversible choice for a period object with a sound original surface.
Recommended Free Tools
Know when to stop and call a specialist
CCI recommends a conservator for extensive repair or cleaning. Seek an experienced furniture conservator or specialist restorer when any of these conditions apply:
- Large sections of veneer are lifting, missing, or separating from the substrate.
- The tabletop or chair frame is structurally distorted, split, or unsafe under load.
- The finish is unstable, sticky, flaking, or reacting to mild cleaning.
- You cannot identify the coating and the visible surface has historical or sentimental importance.
- Previous repairs have introduced unknown adhesives, fillers, silicone, or thick polish layers.
- You want to retain original upholstery, labels, unusual construction, or evidence of manufacture.
Before contacting a professional, provide clear photographs of the top, underside, edges, joints, labels, damage, and any test area. Describe what has already been applied; hidden waxes, oils, and silicones can affect the repair strategy.
A practical project plan
- Document: Photograph every table and chair surface, joint, label, and defect.
- Classify: Separate stable finish, cosmetic wear, structural movement, veneer damage, and upholstery problems.
- Set the goal: Choose preservation, functional repair, or an intentionally modern makeover.
- Test: Identify finish behavior in a hidden spot before cleaning the visible surfaces.
- Stabilize: Address unsafe joints, loose components, and lifting veneer before polishing or painting.
- Clean gently: Use the least-moisture method that the confirmed finish can tolerate.
- Reassess: Let the set dry and settle, then decide whether any further cosmetic treatment is necessary.
- Protect: Control light and moisture, lift rather than drag, and maintain with occasional gentle dusting.
This sequence leaves room for a restrained result: a cleaned, stable set whose age remains visible. It also prevents a common upcycling mistake—making the surface look new while leaving the structure, veneer bond, or upholstery unsafe.
Quick Recap

Product prices and availability are accurate as of the date/time indicated and are subject to change. Any price and availability information displayed on Amazon at the time of purchase will apply.

