PC Slower Than It Used to Be?
Outbyte PC Repair · freeA free scan shows the junk files, broken settings and background clutter dragging Windows down - then fixes them in one click.
Run a Free PC Scan →ThatPainter is reader-supported. When you buy through links on our site, we may earn an affiliate commission. Learn More
You can make a first sheet of handmade paper at home from clean recycled paper, water, a blender reserved for papermaking, and a screened frame. Blend soaked paper into pulp, form a thin layer on the screen, then drain, press, transfer, and dry it. A purchased mould-and-deckle set is convenient, but an improvised screen setup can work too.
What you need to make recycled paper
- Clean scrap paper and water
- A blender dedicated to papermaking, or one retired from food use
- A basin or tub large enough to submerge your frame
- A screened mould and, optionally, a deckle
- A sponge and absorbent towels or papermaking felt
- A flat board or other flat surface for pressing and drying
- Optional: gloves and an apron, especially if using colored paper
For an improvised frame, the Museum of Fine Arts Boston suggests a clean tray or single frame fitted with aluminum window screen; tape can secure the screen. A dedicated mould-and-deckle kit is not essential. The MFA’s handmade-paper activity describes improvised alternatives, while The Eric Carle Museum’s papermaking activity shows a kit arrangement.
Mould and deckle: what each part does
The mould is the screened support that catches the fibers as water drains away. The deckle is a loose frame placed over the mould; it helps contain the pulp and shape the sheet, often producing straighter edges. A screen attached to a frame can make paper without a separate deckle, though the edges may be less regular.
Recommended Free Tools
Choose paper for the result you want
The paper you recycle influences the new sheet’s color, texture, and feel. Use clean paper only: remove staples, plastic, and bound edges, and do not use paper that has been in contact with food. Torn paper should be small enough to soak and blend readily.
#1 Best Overall
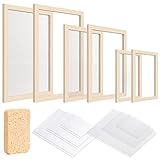
- 【Educational and Fun Experience】: DIY Paper Making Kit is a great choice to spend time with family, which can help users learn about the papermaking process and raise their awareness of saving paper. It provides a fun and engaging DIY activity that can be enjoyed by crafters of all ages. The handmade paper can be used to make cards, nature diaries, labels, stationery, bookmarks, and more
- 【Variety of Sizes】: The paper making kit includes multiple sizes of paper making frames—A4, A5, A6 (5 x 7 inches, 7.5 x 9.8 inches, 9.8 x 13 inches), which makes the paper making frame kit versatile and useful for various paper crafting needs. This variety caters to different preferences and DIY art and craft projects
- 【Sturdiness & Durability Materials】: Caydo paper making frame kit is made of sturdy natural wood and mesh for the frames, and the sponge is made of wood pulp cotton, which has better water absorption. Note: The yarn mesh is not too elastic, so please do not use strong pressure during the process of making paper
- 【Easy to Use & Beginners Friendly】: The paper making kit includes clear instructions, making it beginner-friendly. The process is simple: 1.Place the mesh between two wooden frames of the same size. 2.Insert the frame (mesh-free side up) into prepared pulp. Add glitter or dried flowers if desired. Wait for even pulp coverage. 3.Remove, cover with absorbent paper, and sponge to absorb water. 4.Take the paper off the frame and sun-dry before use
- 【Value for Money】: The paper making kit contains 6 paper frames of 3 sizes A4 A5 A6 (each size frame has a fixed mesh screen), 6 mesh of 3 sizes, 6 absorbent paper of 3 sizes (2 for each size), and 1 sponge to meet your need for different sizes of paper. It is a cost-effective option for enjoying the papermaking process
For a pale, relatively consistent base, the Exploratorium recommends used white photocopy paper and advises against newsprint and glossy paper for that activity. It offers a four-to-one starting ratio of white to colored paper. Treat that as one activity’s color suggestion, not a rule: the MFA allows a wider range of recycled-paper inputs. See the Exploratorium’s handmade-paper activity and the MFA’s material guidance.
How to make paper at home
- Prepare the paper. Tear clean recycled paper into small pieces and soak it in water until softened. Remove staples, plastic, and bound edges first; discard paper that has been used with food.
- Blend the pulp. Put the soaked paper in a blender with plenty of water and blend until it becomes a loose, soupy pulp. Keep the lid secured. Use a blender reserved for papermaking, not food preparation; the Eric Carle Museum says its workshop blender had been retired from food-making and should not be used for food again. Do not blend thread, flowers, or other inclusions—add them to the pulp after blending.
- Prepare the vat. Pour water into a tub deep and wide enough for the mould. Stir pulp into the water to distribute the fibers. A greater proportion of water tends to produce thinner sheets; a denser slurry tends toward thicker ones.
- Form a sheet. For the dip method, lower the mould into the slurry and lift it evenly so fibers settle across the screen. Keep it level and let excess water drain. Alternatively, pour pulp slurry over a screen and allow it to drain. The dip and pour methods are both used in workshop papermaking. The Eric Carle Museum describes both approaches.
- Blot, press, and transfer. With the frame level, use a sponge to draw water through the screen. Press gently, then carefully transfer the wet sheet to felt or a towel. Cover it with another absorbent layer and press with your hands or a rolling pin to remove more water. Handle the sheet gently while it is wet.
- Dry the sheet. Leave the paper flat on an absorbent surface, or transfer it carefully to a suitable drying surface. The American Museum of Natural History says its activity sheet may take a few hours to dry; actual drying time varies with sheet thickness, moisture, and conditions. Follow the AMNH activity instructions.
Dip or pour: which forming method should you use?
| Method | How it works | Best fit |
|---|---|---|
| Dip | Submerge the mould in the pulp-and-water vat, then lift it evenly so fibers collect on the screen. | A straightforward first sheet when you have a tub large enough for the frame. |
| Pour | Pour pulp slurry across a screen and let water drain through. | Small experiments with color or inclusions; add decorative materials after blending. |
Both methods require an even screen and time for excess water to drain. The Eric Carle Museum documents dip and pour techniques in its workshop activity; it does not establish that one method is universally better.
Rank #2

- Package Included: The paper making frames set come in 4 sizes to accommodate different paper making projects. Each set includes a bottom frame with fixed mesh, a top frame without mesh, 2 pieces of single mesh, 2 absorbent papers, and 1 sponge.
- This paper making kit includes 4 sets of screens in different sizes, A4(10"x13.4"), A5(7.5"x 10"), A6(5"x 7"), A7(4"x 5"), for crafting paper at home. The bottom frame has a thickness of 0.59 inches, while the top frame has a thickness of 0.39 inches. The paper making frames have precise inner measurements to ensure a perfect paper-making process every time.
- Premium Material: Our paper making frames are made of natural pine wood and durable mesh material, designed for easy use with cotton pulp materials, and ensure easy and efficient paper creation with the included sponge for water absorption. Perfect for DIY paper making and crafting projects.
- How to Use? Follow simple steps to create your own paper using this kit. Use original wood or cotton pulp materials, or recycle paper, and get creative with decorations like dried flowers, inks, and acrylic paints. Clean the frames after each use for long-lasting durability.
- Educate and entertain kids by showing them the art of making paper while promoting environmental awareness, and enjoy quality family time with this DIY paper making kit. Decorate your handmade paper with dried flowers, leaves, and colors for a personalized touch.
Make the process cleaner and safer
- Contain water around the work area with towels or a covering; wet pulp and drips can spread.
- Colored pulp can stain. Gloves and an apron are useful precautions, particularly with vivid colors.
- Keep non-paper objects out of the blender. Add flowers, thread, or other inclusions after blending instead.
- Keep this beginner method to clean recycled paper and water. Processing raw plant fibers is a different practice: it can involve cooking material to extract cellulose, and some studio processes use caustic solutions. The available account of artist Sarah Strong’s practice does not provide a safe home procedure, protective equipment, ventilation, or disposal instructions, so it is not a basis for attempting chemical cooking at home. Indiana University’s feature on Sarah Strong describes her practice.
Why this method is only one kind of papermaking
Recycling finished paper into pulp is an accessible craft method, not a complete account of papermaking. The Museum of Fine Arts Boston notes that papermaking has been practiced worldwide for two thousand years using plant, tree, textile, and recycled-paper fibers. The Robert C. Williams Museum of Papermaking traces early Chinese paper made from hemp waste and later fibers such as tree bark and bamboo, as well as the spread of papermaking and historical European rag practices. The materials and methods vary across traditions. Read the Williams Museum’s account of early papermaking.
What’s actually slowing this PC down?
Pick the symptom - the matching free tool is one click away.
Quick Recap
Rank #4
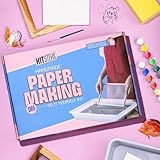
- WHAT'S INCLUDED: This complete paper making kit includes everything you need to get started, including a mould and deckle, a tray, a sponge, paints, seeds, threads and access to a detailed video tutorial. Learn the traditional deckle technique and create endless variations of paper using petals, seeds, threads, and even using paints for colored paper.
- ENDLESS CREATIVE POSSIBILITIES: Turn your handmade paper into beautiful greeting cards, personalized letters, custom stationery, unique art projects, and more! Draw, write, paint, and even print on your own handcrafted paper. This craft kit for adults - men and women, hours of creative fun and a rewarding sense of accomplishment.
- ECO-FRIENDLY FUN FOR ALL: This DIY kit is a great way to teach everyone about recycling and sustainability. It's the perfect art & craft kit for adults and a fun family activity. Make a positive impact on the environment while enjoying a creative and engaging project.
- EASY TO USE & REUSABLE: With our easy-to-follow video tutorial, you'll be making your own paper in no time! The mould and deckle are reusable, allowing you to create countless sheets of paper. Project time: 20 minutes. Drying time: 3-5 hours (depending on climate).
- HELP SAVE TREES: Did you know billions of trees are cut down each year for paper production? This paper making kit empowers you to make a difference by recycling and creating your own paper. Join us in making the world a little greener!
Rank #3

- Package Included: A kit comprising 4 sets of paper-making screens in varying sizes. Each set screen includes 1 bottom frame with a fixed mesh, 1 top frame without mesh, 2 pieces of single mesh, 2 absorbent papers. Whole kit has 1 sponge
- Size(approx.): The overall sizes of the twin paper making frames are as follows: A4 (9.8"x13.4"), A5 (7.5"x 9.8"), A6 (5.5"x 7.7"), and A7 (4.5"x 5.7"). The inner measurements of the frames are A4 (8.3"x11.7"), A5 (5.9"x 8.3"), A6 (4"x 6"), and A7 (3"x 4"). The bottom frame has a thickness of 0.59 inches, while the top frame has a thickness of 0.39 inches
- Material: Made of natural wood and mesh composition, the yarn has limited elasticity; therefore, please avoid applying excessive pressure during the paper-making process
- Fun & Educational Family Activity: An engaging DIY project to bond with kids while teaching them papermaking and the importance of recycling and environmental protection. Use wood pulp, cotton, or recycled paper and personalize with dried flowers, leaves, inks, or paints to create unique, handmade sheets
- Easy Cleanup & Care: Simply rinse the wooden frames and mesh after use and let them air dry for ready reuse; handle with care to preserve the mesh

Product prices and availability are accurate as of the date/time indicated and are subject to change. Any price and availability information displayed on Amazon at the time of purchase will apply.




