The Tool Desk
Outbyte Driver Updater FREEScan for outdated or missing drivers - takes under a minuteDriver Scan →Outbyte PC Repair FREERepair Windows errors before they cause bigger problemsFix Now →
ThatPainter is reader-supported. When you buy through links on our site, we may earn an affiliate commission. Learn More
To sew an accurate 1/4-inch seam, set a reliable edge guide on your own machine, test it with the fabric you plan to use, and measure before piecing a full set of blocks. A quarter inch is common in quilting, but the pattern’s stated seam allowance takes priority.
Ten tips for a consistent 1/4-inch seam
1. Follow the pattern’s seam allowance
Seam allowance is the distance between the stitching line and the fabric’s cut edge. Quilting patterns often call for 1/4 inch, but other projects—or even a particular pattern—may specify a different width. Follow the directions and use the same allowance throughout.
2. Cut the fabric accurately
A seam guide can help you sew parallel to an edge, but it cannot make a crooked cut straight. Take care to cut clean, accurate pieces so the edges can stay aligned as you sew.
Quick wins for a faster PC:
Scan for outdated or missing drivers - takes under a minuteDriver Scan →Repair Windows errors before they cause bigger problemsFix Now →Fix the driver behind crashes, sound loss and screen glitchesFind Drivers →3. Verify the throat-plate marking
The markings on a machine’s throat plate can serve as an edge reference. Don’t assume a printed line is exactly 1/4 inch from the needle: check the distance at the needle position you will use, then align the fabric edge to the verified mark.
#1 Best Overall

- Upgraded Multifunctional Design: Our magnetic seam guide features an innovative polygonal design that excels in edge binding, accurate positioning, edge roll prevention, and crease pressing. Say goodbye to the pitfalls of traditional sewing aids—this guide stays true, even when working with thick fabrics
- Effortless Operation: Simply place the seam guide on the needle plate of your sewing machine and let your fabric slide along it. The guide helps maintain a consistent seam width on every project. Need adjustments? Just lift and reposition the guide with ease
- Secure, Robust Construction: Made from high-strength ABS resin and featuring a powerful magnet, this seam guide is built to last and resist breakage. Its strong magnetic hold ensures the guide remains securely in place, providing edge protection and anti-curling performance for stable, accurate stitching
- Universal Compatibility: Designed to work with most quilting and sewing machine brands, this magnetic seam guide is perfect for beginners, amateurs, and professionals alike. (For machines without a metal plate behind the presser foot, a sticky magnet square may be used to keep the guide firmly in place)
- Ideal Sewing Gift – 3-in-1 Set: Each package contains three beautifully packaged magnetic seam guides in orange, pink, and green. This safe, stable, and versatile accessory makes a perfect gift for sewing enthusiasts on special occasions such as Thanksgiving, Mother's Day, Christmas, Easter, New Year's Day, Valentine's Day, birthdays, and more
4. Consider a compatible quarter-inch foot
A quarter-inch foot is an optional aid, especially for piecing quilt blocks. Some versions have a side guide that the fabric edge can follow; other designs have different visibility and guidance. Check that the foot fits your machine, and verify its edge-to-needle distance with a test seam. Sewing educator Sarina Tariq describes the foot as “most useful in patchwork and sewing quilt blocks” for accurate 1/4-inch (6.4 mm) seams in her SewGuide tutorial. A dedicated foot is not essential if you already have a calibrated plate marking or another stable guide.
5. Make a temporary guide if needed
If your machine lacks a suitable marking or foot, use a stable temporary guide, such as measured tape, to mark where the fabric edge should run. Measure from the needle to the guide rather than placing it by eye, and make sure it won’t shift or interfere with feeding.
Rank #2

- HONEYSEW diagonal seam tape is simply washi tape that is placed on the front plate of your sewing machine to act as a guide while you are sewing diagonal seams
- This is is a nice solution for sewing straight diagonal seams without having to mark any lines, a stitch line in red with a seam allowance on either side
- The red line in the center is aligned with the needle of your machine, and the lines on either side are 1/4 inch to each side from the center of the lines, to represent a 1/4 inch seam allowance, simply place the tape with the red line in front of the needle as the stitch line.
- The seam guide tape is removed cleanly. It is recommended to remove or replace the tape after each item to avoid leaving any residue on your machine.
- Design as a sewing guideline mark tape, ideal for stitching diagonal seams.
6. Test with the project fabric
Sew a sample using the same fabric and setup you intend to use for the project. Measure from the stitching line to the raw edge. If the seam is too wide or narrow, adjust the guide or fabric position and sew another sample before piecing many units.
Recommended Free Tools
7. Keep the fabric edges aligned
Bring the cut edges together before sewing and keep them even as they feed under the foot. Pin or otherwise secure layers that tend to shift. Accurate alignment matters as much as following the guide.
Rank #3

- Includes one Seam Guide Setter and six reusable adhesive Seam Guides for accurate 1/4-inch seam allowances
- Just place a Guide in the Setter, hook it onto your needle, and press the Guide down at the perfect distance to guide your fabric for precise 1/4-inch seams
- The Setter aligns the guide at a scant 1/4-inch to account for the thread and fold when pressed flat, ensuring accurate finished sizes of your project
- The Seam Guides are the perfect height-1/32-inch - for guiding your fabric, ensuring consistent, precise seams and flawless results.
- For Top-Loading Machines - Cut the Guide in half where your bobbin cover opens, so you won’t have to remove it for every bobbin change.
8. Use a straight stitch for ordinary piecing
A straight stitch is the usual choice for basic patchwork seams. Stitch-length and width settings depend on your machine, fabric, and pattern; use appropriate settings for your setup rather than assuming one tutorial’s machine settings apply universally.
9. Use foot markings to help at turns
Markings on a foot can help you judge where a seam should end or where to pivot at a corner. Use them as visual references, while keeping the fabric aligned to your calibrated edge guide.
Rank #4
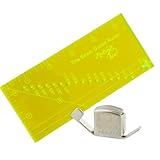
- SET STITCHES ACCURATELY - Use any sewing machine with the Madam Sew Sewing and Quilting Seam Guide Ruler. Performing the duties of several sewing rulers and guides, it helps you measure seam allowances from 1/8” up to 2”. A wonderful sewing accessory to any sewing machine.
- 16 INCREMENTAL HOLES - Will let you create accurate, consistent seams and hems at 1/8”, 1/4",3/8”, 1/2", 5/8”, 3/4", 7/8”, 1”, 1-1/8”, 1-1/4”, 1-3/8”, 1-1/2”, 1-5/8”, 1-3/4”, 1-7/8” and 2”. It is a must-have addition to your quilting supplies and would make a great gift for any enthusiast.
- MULTIFUNCTIONAL QUILTING RULER – This also includes a 1/4" pivot marking point for binding and a 45-degree line for trimming half-square triangles. At 2.5” x 5.5”, this sewing ruler also measures small pieces for home decor projects.
- MAGNETIC SEWING GUIDE - Ensures sewists and quilters of all skill levels can create long straight seams on quilts and garments. A strong anti-slip magnet affixes the magnetic stitch guide to your machine’s needle plate in seconds.
- UNIVERSALLY COMPATIBLE – Our Madam Sew Seam Allowance Rule and Magnetic Seam Guide can be used with all popular brands and models of quilting and sewing machines. Our sewing seam guide and magnet seam guide can be used with Janome, Brother, Singer, Husqvarna, Viking, Kenmore, Babylock and others.
10. Press as directed and check the finished unit
Press the seam allowance the way the pattern specifies, then check that the pieced unit measures as expected. Pressing allowances to one side is common in traditional cotton patchwork, but bulky intersections and construction choices can make another method preferable.
When is a scant 1/4-inch seam appropriate?
A scant quarter inch is slightly narrower than a literal 1/4 inch. Some quilting patterns use it to account for the thread and fabric in a sewn and pressed unit, helping the finished pieces reach their intended size. It is not a universal replacement for a true quarter inch: use it only when the pattern calls for it, and test the sewn-and-pressed result.
Best Value
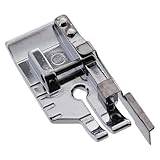
- Use this foot when pivoting, topstitching, or for 1/4" seams.
- Reference markings on the side of the foot for visibility and accuracy.
- Flat bottom ensures that the material will make good contact with the feed dogs.
- Guide on foot makes it easy to obtain a 1/4" seam allowance. Place the edge of the fabric against the guide while you sew.
- This 1/4 inch snap-on foot is compatible with most low shank machines (adapter may be required).
Choosing a guide for your machine
There is no single guide that suits every machine. A verified throat-plate mark or a measured temporary guide may be enough; a compatible quarter-inch foot can provide a convenient edge reference. The useful choice is the one that fits your machine, stays stable, and produces the required seam on a measured test piece.
Quick Recap

Product prices and availability are accurate as of the date/time indicated and are subject to change. Any price and availability information displayed on Amazon at the time of purchase will apply.




