PC Slower Than It Used to Be?
Outbyte PC Repair · freeA free scan shows the junk files, broken settings and background clutter dragging Windows down - then fixes them in one click.
Run a Free PC Scan →ThatPainter is reader-supported. When you buy through links on our site, we may earn an affiliate commission. Learn More
The best Easter egg dye chart is a starting point, not an exact color guarantee. For liquid food coloring, begin with 1 cup of hot water, 1 teaspoon of white vinegar, and about 20 drops of color. Soak for 30 seconds to a few minutes, let the egg dry, and adjust from there. The charts below cover liquid dyes, tablet kits, color mixing, natural dyes, and troubleshooting.
For a dependable starting point, mix 1 cup of hot water with 1 teaspoon of white vinegar and about 20 drops of liquid food coloring. Dip a hard-cooked egg for roughly 30 seconds to make a pastel shade, or leave it in for several minutes for a deeper color. Treat every chart below as a starting formula, not a promise of an exact swatch: dye brands, egg-shell color, temperature, vinegar strength, lighting, and drying time all change the result.
For the most consistent batch, test one egg first. Let it dry completely before adjusting the dye concentration or soaking time.
Recommended Free Tools
Liquid Easter egg dye color chart
Use a heatproof cup or bowl deep enough to cover the egg. Prepare one cup of hot water and add 1 teaspoon of white vinegar. Add the drops shown below, stir, and then adjust the color with time or additional dye.
#1 Best Overall

- With 9 different colors of dye, this kit is perfect for making eggs of every imaginable shade and hue. Also includes a PAAS Magic Crayon to help you make complex and customized designs!
- FUN STYLING: Each decorating kit contains all the appropriate dye tablets, stickers, dippers, egg arounds and egg stands that come with that decorating style! No two eggs have to look the same!
- SAFE: All dye tablets are food safe and proudly made in the USA!
- PARTY FRIENDLY: For a group of children, a classroom or a family that loves to be creative! With this variety of kits there's something for everyone
- 100 YEARS: Be part of a tradition that goes back over 100 years! Great for families!
| Target color | Starting formula per cup | Pastel starting time | Deeper-color guidance |
|---|---|---|---|
| Yellow | 20 drops yellow | About 30 seconds | Leave it in longer for a stronger yellow. |
| Pink or red | 20 drops red | About 1 minute for pink | Red may need several minutes to become saturated. |
| Blue | 20 drops blue | About 30 seconds | About 5 minutes can produce a deeper blue; check frequently. |
| Green | 20 drops green | About 30 seconds | Use a premixed green or make one with yellow and blue. |
| Orange | 17 drops yellow + 3 drops red | About 2–3 minutes | Add red gradually for a warmer, darker orange. |
| Violet | 15 drops blue + 5 drops red | About 1 minute | More blue shifts the result toward blue-violet. |
| Blue-violet | 18 drops blue + 2 drops red | About 1 minute | Increase the red in small increments for a redder violet. |
| Blue-green | 6 drops blue + 14 drops green | About 1–2 minutes | The result depends especially strongly on the brand’s green formulation. |
These ratios are practical starting points for liquid food coloring. Different droppers release different-sized drops, so the ratio matters more than the exact number. If a color is too pale, increase the immersion time first. If it still lacks intensity, add dye to the bath and test again.
How long should an egg stay in the dye?
- Pastels: Use the minimum time in the chart, usually 30 seconds to 2 minutes.
- Standard bright colors: Start at about 3–5 minutes and inspect the egg periodically.
- Dark colors: Many shades need approximately 4–15 minutes, depending on the color and dye concentration.
- Neon shades: Light neon colors may develop in about a minute, while a dark neon green can take considerably longer—up to about 25 minutes in some published formulas.
Always judge the color after the egg dries. A wet egg can look darker or glossier than the finished shell. Increase soaking time before making a large jump in the number of drops; this makes it easier to control the shade.
How to mix Easter egg dye colors
The basic color combinations are:
| Colors mixed | Result | How to shift the result |
|---|---|---|
| Red + yellow | Orange | More yellow makes yellow-orange; more red makes red-orange. |
| Yellow + blue | Green | More yellow makes a yellow-green; more blue makes a blue-green. |
| Red + blue | Violet or purple | More blue makes blue-violet; more red makes red-violet. |
For more controlled variations, try 19 yellow drops plus 1 red for yellow-orange, 17 yellow plus 3 red for orange, 15 blue plus 5 red for violet, or 18 blue plus 2 red for blue-violet. These are dye ratios, not digital color specifications. A physical egg has a curved, glossy, sometimes uneven shell, so a screen swatch or hex code cannot predict the exact result.
For readers who want to mix custom colors instead of using tablets, McCormick food coloring for Easter eggs provides the red, yellow, and blue liquid colors used in these basic mixing examples. It is more useful to think of it as a flexible color-mixing supply than as a guarantee that every egg will match the chart.
Rank #2

- The no-mess, easy-to-clean solution to egg decorating. Add a PAAS Color Tablet, water and vinegar to these unique cups and watch your eggs change color. Children will be delighted to use our magic crayon to personalize their eggs
- CLEAR COLOR CUPS: Allow the little ones to watch as the eggs change color. Approximately 4x3.5.2.5 inches in size
- SAFE: All dye tablets are food safe and proudly made in the USA!
- PARTY FRIENDLY: For a group of children, a classroom or a family that loves to be creative! With this variety of kits there's something for everyone
- 100 YEARS: Be part of a tradition that goes back over 100 years! Great for families!
Tablet-kit dye instructions
Commercial dye tablets use a different formula from liquid food coloring. For the classic PAAS method, dissolve one dye tablet in 1 tablespoon of vinegar and 1/2 cup of room-temperature water. Place a hard-cooked egg in the bath for about five minutes, turning or repositioning it as needed. More time generally produces a deeper color.
- Place one tablet in a cup or dyeing container.
- Add 1 tablespoon of vinegar and 1/2 cup of room-temperature water.
- Wait for the tablet to dissolve.
- Lower the egg into the dye and leave it for about five minutes to start.
- Remove it with a dipper or spoon and let it dry completely before decorating.
Tablet colors are not necessarily interchangeable between brands. If the color of a tablet is unclear, identify or test it before dyeing the rest of the eggs. The PAAS Classic Egg Decorating Kit is the straightforward option for the one-tablet-per-cup method; it includes six food-safe dye tablets, stickers, egg stands, a dipper, and a drying tray.
If you want more premixed colors and additional decorating pieces, the PAAS Deluxe Egg Decorating Kit expands the palette to nine dye tablets. Choose a larger kit for variety and convenience, not because it will reproduce the liquid chart exactly.
Do these 3 things before closing this tab:
1Repair Windows errors before they cause bigger problems2Fix the driver behind crashes, sound loss and screen glitches3Clear out junk files and repair common Windows errorsNatural Easter egg dye color chart
Natural dyes require a separate method. Do not substitute these ingredients for the liquid-food-coloring drop ratios above. Natural color is usually more muted, more variable, and much slower to develop.
Rank #3

- PAAS* Megga Color Cups Egg Decorating Kit includes 12 cups and 12 dye tablets to color a dozen eggs at the same time!
- The no measuring, no mess solution to egg decorating * just add a dye tablet, water and vinegar to these unique cups and watch your eggs change color (vinegar not included)
- The different color dye tablets provide you with vibrant color options to dye dozens of eggs
- Children will be delighted to use the magic crayons to personalize their eggs
- Cups provide an easy clean-up solution for when the fun is over
| Natural material | Typical color | What to expect |
|---|---|---|
| Turmeric | Yellow | Often one of the more immediately visible natural colors. |
| Beets | Pink | May range from soft pink to a stronger pink depending on concentration. |
| Purple cabbage | Blue | Usually benefits from extended soaking. |
| Blueberries | Blue | Results vary with berry concentration and extraction time. |
| Red onion skins | Purple or red | Shade depends on the amount of skin and strength of the extraction. |
| Black tea | Brown | Creates a muted, earthy color. |
| Yellow onion skins | Orange | Usually produces a warm, subdued orange. |
To make a natural dye, simmer the chosen material in water, strain the liquid, add vinegar, and soak the eggs. Plan ahead: strong natural colors often require at least eight hours or overnight, and some recipes call for soaking for up to three days. Prepare natural dye at least a day in advance when vivid color is important. Refrigerate the eggs during extended soaking.
How to get pastel, dark, and layered effects
For pastel eggs
Use the baseline liquid mixture and remove the egg quickly—often after 30 seconds to 2 minutes. Pastels are easier to control by limiting exposure than by heavily diluting the dye bath.
For dark eggs
Start with the standard concentration and extend the soak. Remove, dry, and inspect the egg before adding more time. If the bath is too weak after a long soak, add a few more drops and test one egg rather than changing the whole batch.
What’s actually slowing this PC down?
Pick the symptom - the matching free tool is one click away.
For neon eggs
Neon dyes can intensify unevenly. Check the egg regularly, especially during the first few minutes, and remember that dark neon shades may take substantially longer than light neon shades.
Rank #4

- When you want to dye a lot of Easter eggs, this is your kit! With 6 different colors of food-safe PAAS dye, this family-friendly kit is ideal for making a full spectrum of colored eggs!
- FUN STYLING: Each decorating kit contains all the appropriate dye tablets, stickers, dippers, egg arounds and egg stands that come with that decorating style! No two eggs have to look the same!
- SAFE: All dye tablets are food safe and proudly made in the USA!
- PARTY FRIENDLY: For a group of children, a classroom or a family that loves to be creative! With this variety of kits there's something for everyone
- 100 YEARS: Be part of a tradition that goes back over 100 years! Great for families!
For layered designs
- Dye the egg in the lightest color first.
- Let it dry completely.
- Apply stickers, wax, or rubber bands if the design calls for a resist.
- Dip it into the next color and dry it again before adding another layer.
Layer neighboring hues when possible—for example, green followed by blue or red followed by orange. Overlapping strongly contrasting or complementary colors can produce brownish, muddy results. If you are unsure, test the layering sequence on one egg.
Troubleshooting Easter egg dye
| Problem | Likely cause | Fix |
|---|---|---|
| The color is too pale. | The egg has not had enough exposure to the dye. | Increase soaking time first, then strengthen the bath if necessary. |
| The color is uneven. | The egg was not fully submerged, or dye pooled on the shell. | Use a deeper container, rotate the egg periodically, and dry it on a rack. |
| The egg turned muddy. | Contrasting colors were layered or mixed in excess. | Use neighboring hues and allow each layer to dry before the next dip. |
| The shell has pale spots. | Grease, residue, or an uneven shell prevented the dye from adhering evenly. | Begin with clean, dry eggs and handle them with clean hands or tools. |
| Dye got everywhere. | Small cups and bare-hand handling make spills more likely. | Cover the work surface and use an egg dipper, tongs, or a slotted spoon. |
Supplies checklist
- Hard-cooked eggs
- Liquid food coloring or food-safe dye tablets
- White vinegar
- Hot water for liquid dye, or room-temperature water for the tablet formula
- Heatproof cups or bowls deep enough to submerge an egg
- Egg dipper, tongs, or slotted spoon
- Drying rack, egg stands, or a drying tray
- Paper towels and a protected work surface
- Optional stickers, wax, rubber bands, or other decorating materials
If you already have dye but need better handling, egg dippers and drying trays can make submerging, removing, and drying eggs less messy. Individual accessory quality and availability vary, so select tools that are sturdy, easy to clean, and appropriate for the size of your eggs.
Independent reader supportYour contribution helps us test, update, and keep practical guides available for everyone.Egg-dyeing food-safety rules
Keep decorative eggs separate from eggs you plan to eat. Hard-boil eggs before coloring, keep them refrigerated, and cook them until both the white and yolk are firm. Refrigerated hard-cooked eggs can generally be kept for up to seven days, but that limit does not make an egg safe after it has been hidden, handled extensively, or left at room temperature during an egg hunt.
- Do not eat eggs that have been hidden or played with.
- Do not leave edible eggs at room temperature for an extended period.
- Use only food-safe dye for edible hard-cooked eggs.
- Do not treat craft paint, fabric dye, or non-food markers as edible-egg coloring.
- Use craft products only on hollow shells or plastic eggs unless their labeling specifically indicates food use.
A clean, dry shell usually colors more evenly, but cleanliness does not override time-and-temperature safety. If the eggs are intended for a hunt, use plastic eggs or decorate hollow shells and reserve refrigerated hard-cooked eggs for eating.
Best Value
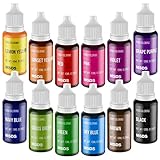
- VIVID COLORS FOR CAKE DECORATING - Comes with 12 virbant color highly concentrated edible food coloring in a wide range of bright vivid colors. Includes: Lemon Yellow, Sunset Yellow, Grass Green, Violet, Grape Purple, Navy Blue, Sky Blue, Red, Brown, Pink, Green and Black. (each color is 0.35 fl.oz). You just need a little bit coloring to get the bright color you want. Colors could be mixed together to create new shades
- FOOD GRADE INGREDIENTS & NO TASTE - Made from safe ingredients, this food grade liquid food coloring set totally meets American food standards, odorless and tasteless, won't alter the taste or texture of any recipe. What's more, it's dairy-free, nut-free, sugar-free and gluten-free, vegetarians can also eat with confidence
- EASY to USE - Highly concentrated liquid food color, with upgraded drop mouth and squeeze bottle design, makes it easy to control your drops and enables accurate mixing. The dosage is controllable, customize your exclusive color. Buy the 12 bottles food coloring with different colors, you will love the homemade baking and crafting experience with this food dye set
- GREAT COLORING EFFECT & STABILITY: Produced by this food coloring set, the food will be bright , and the color will not change when heated and frozen. It can keep the color soft and bright for a long time, and will not evaporate with the water. Use simple colors to make gorgeous food, say goodbye to the dullness of baking
- WIDE APPLICATION - This coloring set can be widely used on cake decoration, frosting, icing, fondant, batter, cookie dough etc; also perfect for Easter eggs, slime, soap, bath bombs and other craft making. This edible coloring set is very suitable for you to decorate your desserts on Valentine's Day, Anniversaries, Birthday, Easter Day, Christmas, Halloween and Thanksgiving Day. Great decorating DIY kit for both beginners and professionals
Frequently Asked Questions
What is the basic recipe for Easter egg dye?
Mix 1 cup of hot water with 1 teaspoon of white vinegar and about 20 drops of liquid food coloring. Dip a hard-cooked egg for about 30 seconds for a pastel shade or several minutes for a deeper color. Test one egg first because dye brands and shells vary.
How much vinegar and water do I use with Easter egg dye tablets?
For a classic tablet dye bath, dissolve one food-safe dye tablet in 1 tablespoon of vinegar and 1/2 cup of room-temperature water. Start with about five minutes of soaking and leave the egg longer for a deeper color.
How can I make dyed Easter eggs darker?
Increase soaking time first. If the color is still too pale, add more dye to the bath, mix well, and test one egg before continuing with the batch.
The Tool Desk
Outbyte Driver Updater FREEFix the driver behind crashes, sound loss and screen glitchesFind Drivers →Outbyte PC Repair FREEClear out junk files and repair common Windows errorsFree Scan →Can I use craft paint or fabric dye on eggs I plan to eat?
Yes, but use only food-safe coloring for hard-cooked eggs you plan to eat. Craft paint, fabric dye, and other non-food products should be reserved for hollow shells or plastic eggs.
Are Easter eggs safe to eat after an egg hunt?
No. Eggs that have been hidden or played with should not be eaten because contamination on the shell can transfer to the edible portion. Keep edible eggs refrigerated instead.
The Bottom Line
Use 1 cup of hot water, 1 teaspoon of white vinegar, and about 20 drops of liquid food coloring as your baseline. Dip for 30 seconds to 2 minutes for pastels and several minutes for deeper shades, testing one egg and letting it dry before adjusting the recipe. For tablets, use one tablet, 1 tablespoon vinegar, and 1/2 cup room-temperature water. Keep eggs refrigerated and never eat eggs that have been hidden or played with.
Quick Recap

Product prices and availability are accurate as of the date/time indicated and are subject to change. Any price and availability information displayed on Amazon at the time of purchase will apply.
Free tools Windows power users keep installed
One-click scans. No signup required.




