The Tool Desk
Outbyte Driver Updater FREEScan for outdated or missing drivers - takes under a minuteDriver Scan →Outbyte PC Repair FREERepair Windows errors before they cause bigger problemsFix Now →
ThatPainter is reader-supported. When you buy through links on our site, we may earn an affiliate commission. Learn More
The right way to preserve fall leaves depends on the result you want. Pressing produces the best flat specimens, glycerin keeps foliage more flexible, and wax-paper ironing is a fast option for sealed crafts. Silica gel helps retain shape, while air-drying is the simplest approach. A microwave can speed up drying, and clear craft sealer can protect a leaf after it has dried—but sealer is not a substitute for drying.
Because leaves differ in species, thickness, maturity, and moisture content, test a few leaves before preserving a whole batch. None of these methods guarantees that autumn color will remain unchanged indefinitely.
Choose the method by the result you want
The best way to preserve fall leaves depends on how you plan to use them:
- For flat leaves: press them in a book or plant press.
- For flexible leaves and foliage: use glycerin.
- For a quick sealed craft: iron leaves between wax paper.
- For retaining three-dimensional shape: use silica gel.
- For the fastest small batch: use a microwave carefully.
- For the simplest rustic decoration: air-dry them.
- For extra surface protection: brush a clear craft sealer over leaves that are already completely dry.
No home method permanently freezes a leaf’s original autumn color. Species, maturity, moisture, handling, light, and storage conditions all affect the result. Think of preservation as slowing deterioration and making the leaf useful for display or crafts—not making it permanently unchanged.
#1 Best Overall

- ✅【Filtration Function】wisedry flower drying container comes with a filterable basket that can effectively separate dried flowers from silica gels and preserve flower shape for effortless enjoyment.
- ✅【Bonus Cleanup Mat】Save you more time, keep your desktop tidy, easy to clean and fold, and you can use this cleanup mat for other crafts occasions. Making cleaning is no longer a chore!
- ✅【Bonus Record Function】Our container for flower drying has month and date record function to record the drying time and never miss the best time to take the flowers out. Also comes with a label and erasable pen, you can note down the names, flowers, and any other information as needed.
- ✅【Durable Material】The container is made of high-quality durable PET plastic to provide stable support for flower drying. Transparent material that allows you to easily see what's inside without having to open it.
- ✅【What You Will Get】1pcs 10L Flower Drying Box, 1 Cleanup Mat, 1 Erasable Pen, and 1 Adhesive Label. (Silica Gel Crystals Not Included)
Before preserving: select and prepare the leaves
Choose clean, intact leaves that are still reasonably fresh. Avoid leaves that are brittle, moldy, heavily damaged, or already decomposing. Leaves with strong color but a little flexibility usually produce better results than leaves that have been on the ground for days.
If the leaves are wet from rain or dew, spread them out and let the surface moisture evaporate before enclosing them in paper, wax paper, a container, or a coating. Trapped moisture is one of the main causes of mold and decay.
Sort leaves by thickness and type. A thin maple leaf may dry in a fraction of the time required by a thick, leathery oak leaf. Processing similar leaves together makes it easier to avoid overdrying some while leaving others damp.
1. Air-dry the leaves
Air-drying requires almost no equipment, but it usually produces curled, brittle leaves rather than flat or flexible foliage.
How to do it
- Wipe away dirt and allow wet leaves to surface-dry.
- Arrange them in a single layer on absorbent paper or a dry, ventilated surface.
- Keep them out of direct sunlight, which can accelerate fading.
- Turn or inspect them periodically so damp areas are not trapped underneath.
- Wait until the leaves are completely dry before storing or crafting with them.
Depending on the leaf and the room’s humidity, drying may take several days or longer. A finished leaf should not feel cool, damp, or flexible because of retained moisture. It should feel dry throughout.
Best for: rustic garlands, temporary table decorations, nature collections, and projects where curling is acceptable.
Trade-offs: air-dried leaves are commonly brittle, their shape is unpredictable, and their color may fade more readily than with glycerin or wax-paper preservation.
Free tools Windows power users keep installed
One-click scans. No signup required.
2. Press leaves in a book or plant press
Pressing is the most dependable all-purpose choice when you want flat leaves for a frame, card, scrapbook, botanical journal, collage, or other two-dimensional artwork. It removes moisture while applying even pressure, so the leaf dries in a controlled shape.
How to press leaves in a book
- Place each leaf between folded newspaper, blotter paper, paper towels, or other absorbent sheets.
- Arrange the leaves so they do not overlap.
- Put the protected leaves inside a heavy book or beneath a flat weight.
- Check the papers after a day or two and replace them if they feel damp.
- Leave the leaves under pressure until they are completely dry—often a few days for thin leaves and a week or longer for thicker material.
Do not place a damp leaf directly against valuable book pages. The leaf’s moisture, pigment, or natural oils can stain paper. A small craft project can use a heavy book, while repeated work or larger leaves is easier with a flower press kit that provides boards, absorbent layers, and even pressure.
How a plant press works
A basic plant press uses rigid boards or frames, absorbent paper, corrugated cardboard to encourage airflow, and straps or rope to maintain pressure. Tighten it evenly rather than crushing one side of the leaf. Replace damp absorbent material during the first part of drying.
Best for: framed specimens, pressed-leaf art, cards, journals, scrapbooks, collages, and herbarium-style displays.
Do these 3 things before closing this tab:
1Scan for outdated or missing drivers - takes under a minute2Repair Windows errors before they cause bigger problems3Fix the driver behind crashes, sound loss and screen glitchesTrade-offs: pressing sacrifices three-dimensional form. The finished leaves are also fragile and can fade or break when repeatedly handled.
Rank #2

- What you will get: This flower drying kit features a 10L premium airtight container, a waterproof cleanup mat, two pairs protective gloves, a plastic scoop, two soft bristle cleaning brush, two erasable pens, a roll of adhesive labels, and a dust mask.The flower drying kit with storage box exclusive built-in filter basket lets you effortlessly separate dried flowers from silica gel crystals with no tedious digging and no mess.
- One step separation filter basket design: The silica gel flower drying container exclusive built in filter basket to provide stable support for flower drying. Simply lift the basket out after drying, and the basket instantly separates dried flowers from silica gel crystals, preserving their natural shape with minimal manual handling. And This container has month and date record function, you to easily track the drying progress and ensure you never miss the perfect moment to remove your flowers.
- 10L large capacity sealed storage container: This container is made of high quality durable PET plastic, dropresistant, washable, and built for long-term repeated use. The transparent material allows you to check the inside situation easily without opening the container, it make you can monitor the flower drying progress at any time. The upgraded airtight locking lid effectively blocks out moisture and air, reducing the risk of silica gel losing effectiveness due to ambient humidity, long lasting results for your floral keepsakes.
- All in one complete flower drying accessory: The flower drying kit comes with a cleanup mat, which helps save your time and keep the desktop tidy, the mat is easy to clean and fold, and it can also be used in other craft occasions. Also comes with a label and erasable pen, you can note down the names, flowers, and any other information as needed. The scoop simplifies silica gel filling and recycling, the brush gently removes residual powder from petals, and the gloves and mask provide reliable protection during the drying process, making it friendly for both beginners and experienced craft lovers.
- Wide application: This flower preservation kit is widely compatible with all mainstream types of silica gel for drying flowers on the market,whether ultra-fine crystals,color indicating silica gel, or coarse particles. It covers the full process from flower drying to cleaning,no additional supplies required. Wide application for bridal bouquet preservation,funeral flower preservation,Valentine’s Day, Mother’s Day,and anniversary flower keepsakes,as well as DIY dried flower decor. It pays attention to every detail of your DIY process,providing more convenience for your craft work.
3. Iron leaves between wax paper
Wax-paper pressing is a quick way to enclose a flat leaf in a thin sealed layer. It can retain flexibility and fall color reasonably well at first, making it useful for garlands, window decorations, and supervised family crafts.
How to use wax paper
- Use a leaf that is clean and surface-dry—not wet or soggy.
- Place it between two sheets of wax paper.
- Cover the wax-paper sandwich with a towel or another protective sheet.
- Press with a warm or medium-hot iron until the wax paper bonds around the leaf.
- Keep the iron moving and inspect the seal as you work.
- Trim around the leaf, leaving a small sealed wax-paper border.
Make a new wax-paper sandwich for each leaf. The border helps keep the seal intact; cutting directly against the leaf can open the edges. Keep the iron away from unattended children and never leave it on while you step away.
Best for: quick crafts, flat ornaments, garlands, classroom projects, and window decorations.
Recommended Free Tools
Trade-offs: the border may be visible, heat can scorch the leaf or paper, and the leaf can still become brittle with age. Wax paper also does not make a wet leaf safe to store; the leaf must be sufficiently dry before sealing.
4. Preserve leaves with glycerin
Glycerin replaces some of the water in plant tissue and can leave foliage softer and more pliable than ordinary air-drying. This is usually the best option when leaves need to bend around a wreath, garland, or arrangement without immediately cracking.
Mature leaves and stems generally absorb glycerin more successfully than very young, delicate growth. Species vary substantially, so test several leaves before committing an entire collection. The finished foliage may become darker, waxier, or slightly tacky.
Option A: absorb glycerin through the stem
- Mix glycerin and water. A commonly used starting ratio is one part glycerin to two parts water by volume.
- Recut the stem ends, or gently split the ends to improve uptake.
- Place the stems in the solution, keeping the leaves above the liquid when possible.
- Let the foliage absorb the mixture over several days or longer.
- Check the leaves periodically for improved pliability.
- Remove the stems from the solution and let excess liquid drain onto absorbent paper.
Option B: soak the leaves
Some foliage can be submerged in a glycerin-and-water solution. A one-to-one mixture is another published starting point for longer soaking, depending on the plant material. These different ratios are not contradictory instructions so much as evidence that glycerin preservation needs adjustment. Leaf thickness, species, maturity, and the desired texture all matter.
Quick wins for a faster PC:
Fix the driver behind crashes, sound loss and screen glitchesFind Drivers →Clear out junk files and repair common Windows errorsFree Scan →- Place suitable leaves in a shallow container of the solution.
- Keep them submerged without crushing or sharply folding them.
- Check them periodically and remove them when they feel pliable.
- Blot away excess solution and let the leaves dry on absorbent paper.
A small bottle of vegetable glycerin for leaf preservation is useful for testing both approaches, but no particular brand is required. Start with a few leaves, record the mixture and soaking time, and adjust before treating more foliage.
Best for: wreaths, garlands, flexible arrangements, and leaves that need to bend.
Trade-offs: glycerin takes longer than microwave drying, may alter the color or surface feel, and does not work equally well with every species. It is generally more suitable for foliage than for delicate flowers.
5. Dry leaves with silica gel
Silica gel is a desiccant that draws moisture from plant material while helping preserve the leaf’s contours. It is especially useful for thicker leaves or leaves whose shape you do not want to flatten immediately.
How to use silica gel
- Cover the bottom of an airtight container with a layer of silica gel.
- Place the leaves in a single layer, without overlapping.
- Gently cover the leaves with more silica gel. Support them rather than pressing down on them.
- Seal the container and check periodically.
- When the leaves are dry, remove them carefully and brush away crystals without bending or crushing the foliage.
Silica gel crystals for drying flowers and leaves can be reused when the product directions allow it, but handle the material carefully and keep it away from children and pets. If using a microwave-assisted silica-gel process, use only a microwave-safe glass or other approved container and follow the desiccant manufacturer’s instructions.
Rank #3
- ✅【Filtration Function】wisedry flower drying container comes with a filterable basket that can effectively separate dried flowers from silica gels and preserve flower shape for effortless enjoyment.
- ✅【Filtration Function】wisedry flower drying container comes with a filterable basket that can effectively separate dried flowers from silica gels and preserve flower shape for effortless enjoyment.
- ✅【Bonus Record Function】Our container for flower drying has month and date record function to record the drying time and never miss the best time to take the flowers out. Also comes with a label and erasable pen, you can note down the names, flowers, and any other information as needed.
- ✅【Durable Material】The container is made of high-quality durable PET plastic to provide stable support for flower drying. Transparent material that allows you to easily see what's inside without having to open it.
- ✅【What You Will Get】1pcs 10L Flower Drying Box, 1 Cleanup Mat, 1 Erasable Pen, and 1 Adhesive Label. (Silica Gel Crystals Not Included)
Best for: retaining contours, drying thicker leaves, and preserving leaves that should not be flattened immediately.
Trade-offs: the leaves may still lose color or become fragile, and careless handling can crush them. Silica gel is not a reason to skip the final dryness check.
6. Microwave-press or microwave-dry the leaves
Microwaving accelerates moisture removal, but it has a narrow margin between drying and scorching. It is most practical for a few leaves when speed matters.
Paper-press method
- Place the leaves between absorbent paper towels or other microwave-safe absorbent material.
- Put the sandwich in the microwave.
- Use reduced power and heat in short intervals.
- Check after every interval and rearrange or replace damp paper if necessary.
- Allow the leaves to cool before deciding whether they are dry.
Residual warmth can make a leaf feel drier than it really is. Cooling is part of the test, not an optional pause.
Silica-gel microwave method
Leaves can also be placed between layers of silica gel in a microwave-safe container. This can help retain shape, but the container, desiccant, and procedure must all be suitable for microwave use.
Never leave the microwave unattended. Stop immediately if you see smoke, scorching, or burning. Do not use metal containers or materials that are not microwave-safe, and do not heat large quantities of dry plant material at once.
Best for: last-minute crafts, demonstrations, and small batches.
Recommended Free Tools
Trade-offs: results vary with leaf thickness and microwave power. Overheating can brown, scorch, ignite, or make the leaves extremely brittle.
Independent reader supportYour contribution helps us test, update, and keep practical guides available for everyone.7. Coat fully dried leaves with Mod Podge or clear craft sealer
A clear craft medium is a finishing step, not a drying method. It can add a protective surface to a leaf that is already completely dry and make it more suitable for a lightly handled ornament, collage, or decorative project.
How to seal dried leaves
- Confirm that the leaf is dry throughout and shows no signs of dampness or mold.
- Brush on a thin, even coat of Mod Podge or another clear craft sealer.
- Let the first side dry completely.
- Turn the leaf carefully and coat the other side.
- Allow the finish to cure fully before stacking or displaying the leaves.
Test the product on an expendable leaf first. Some coatings darken leaves, add a noticeable gloss, remain tacky, or cause curling. A coating can also crack if the underlying leaf bends, and long-term archival performance should not be assumed without controlled testing.
Best for: ornaments, collages, craft projects, and leaves that will be handled lightly.
Trade-offs: the finish may look glossy or artificial, and it cannot correct a damp, mold-prone, or already deteriorating leaf.
Rank #4
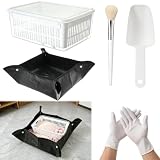
- Package Includes:The set includes all the tools you need for drying and cleaning flowers. Silica gel flower drying container features a waterproof cleaning mat, protective gloves, a plastic spoon,and a soft-bristled cleaning brush, providing a one-stop solution for all your flower drying needs
- One-Step Separation Design:Our flower preservation kit with built-in filter basket instantly separates the flowers from the silica gel crystals, preventing damage to petals and scattering of the silica gel. Simply remove the basket to easily separate the flowers, preserving their natural shape
- Thoughtful Design:The upgraded sealing lid of the flower drying kit effectively isolates moisture and air, reducing the risk of silica gel failure due to humidity and ensuring a stable drying environment for your floral keepsakes
- Superior Materials:The flower drying container is made of thickened and reinforced plastic, making it tough and impact-resistant, less prone to breakage from everyday bumps and knocks. Its smooth surface is easy to clean; simply rinse with water or wipe to remove residual silica gel and flower debris
- Widely applicable:This silica gel flower drying kit is suitable for preserving all kinds of flowers and can be used to make bridal bouquet preservation, funeral flower preservation, Valentine’s Day, Mother’s Day, and anniversary flower keepsakes. It is compatible with most common flower varieties and is an ideal tool for flower lovers to preserve beautiful moments
Which leaf-preservation method should you choose?
| Method | Shape | Flexibility | Speed | Best use |
|---|---|---|---|---|
| Air-drying | Curled or natural | Low | Slow to moderate | Rustic décor |
| Book or plant press | Very flat | Low | Slow | Frames, journals, cards |
| Wax-paper ironing | Flat and sealed | Moderate | Fast | Family crafts and garlands |
| Glycerin | Natural to slightly flattened | High | Slow | Wreaths and flexible arrangements |
| Silica gel | Shape-preserving | Low to moderate | Moderate | Detailed or thicker leaves |
| Microwave | Flat or shape-preserving, depending on setup | Low | Very fast | Quick projects |
| Craft sealer | Depends on the drying method | Low to moderate | Moderate after drying | Finishing and surface protection |
If you are unsure, preserve a small group of leaves by pressing, glycerin, and wax-paper ironing. The comparison will show which method suits that particular species and stage of maturity. A method that works beautifully on a thin maple leaf may produce a disappointing result on a thick oak leaf.
How to store and display preserved leaves
- Wait for complete dryness: never seal or store leaves that still contain moisture.
- Use a cool, dry, dark location: light and heat accelerate fading and deterioration.
- Store flat leaves flat: use paper layers or gentle support to prevent bending.
- Minimize handling: dried leaves become more fragile each time they are moved.
- Avoid trapping moisture: do not put questionable leaves in an airtight container.
For a scientific or long-term collection, record the collection date, location, plant identity if known, and preservation method. Properly pressed, dried, labeled, and mounted herbarium specimens can remain useful for decades or even centuries, but an ordinary household craft leaf should not automatically be called archival or permanent.
For valuable specimens, photograph or scan them when possible so you can reduce unnecessary handling. Display them away from strong direct sunlight and inspect them occasionally for fading, curling, mold, or insect damage.
Safety checklist
- Supervise children directly when using an iron, microwave, hot wax, sprays, or powdered desiccants.
- Keep the iron moving and unplug it when finished.
- Use only microwave-safe containers and materials.
- Never microwave leaves in metal.
- Do not leave microwave drying unattended.
- Stop heating if smoke, scorching, or burning begins.
- Keep silica gel and other desiccants away from children and pets.
- Work in a ventilated area when using sprays or strong-smelling sealers.
Common problems and fixes
The leaves grew mold
They were probably enclosed before their surface or interior moisture had left. Discard moldy leaves rather than sealing them, and restart with clean, surface-dry material. Replace damp pressing paper more often and avoid airtight storage until the leaves are fully dry.
The leaves cracked immediately
Air-drying, pressing, silica gel, and microwave drying can all produce brittle foliage. For a flexible result, test glycerin instead. Handle dried leaves by their edges and support them from underneath.
The color faded or turned brown
Color changes are affected by species, maturity, heat, moisture, and light. Reduce direct sunlight, use shorter microwave intervals, and test multiple preservation methods. No method guarantees the original fall color indefinitely.
The sealed leaf curled or feels tacky
The coating may have been applied too heavily, or the leaf may not have been fully dry. Test a thinner coat on a new, completely dry leaf and allow each side to cure before handling.
The glycerin-treated leaves are dark or waxy
That texture is a known trade-off of glycerin treatment and may vary by species. Adjust the ratio or soaking time on a small test batch, and choose a different method if the surface is unsuitable for your project.
Frequently Asked Questions
What is the best way to preserve fall leaves flat?
Press leaves in a book or plant press. Protect each leaf between absorbent paper, apply even pressure, replace damp paper, and leave the leaves pressed until completely dry. Thin leaves may take a few days; thicker leaves may need a week or longer.
How do you preserve leaves so they stay flexible?
Glycerin is usually the best choice for flexible leaves. It can replace some of the water in the leaf tissue and leave foliage pliable for wreaths and garlands, although the color and texture may change and results vary by species.
Can you preserve fall leaves permanently?
No home method keeps fall leaves unchanged forever. Pressing, glycerin, wax paper, silica gel, microwave drying, air-drying, and sealers can slow deterioration or protect leaves for a project, but light, handling, species, moisture, and storage eventually affect color and condition.
Free tools Windows power users keep installed
One-click scans. No signup required.
Can you microwave fall leaves to dry them?
Allow wet leaves to surface-dry first, then use short, reduced-power intervals and check after each interval. Use only microwave-safe materials, never use metal, and stop immediately if smoke or scorching appears.
The Bottom Line
For most projects, press leaves when you need a flat specimen, use glycerin when you need flexible foliage, and choose wax-paper ironing for a fast sealed craft. Use silica gel to retain shape, microwave drying only when speed is worth the extra risk, air-drying when rustic curling is acceptable, and clear sealer only after the leaves are fully dry.
Quick Recap

Product prices and availability are accurate as of the date/time indicated and are subject to change. Any price and availability information displayed on Amazon at the time of purchase will apply.




