Windows Errors? Fix Them Before They Spread
Do these 3 things before closing this tab:
1Clear out junk files and repair common Windows errors2Scan for outdated or missing drivers - takes under a minute3Repair Windows errors before they cause bigger problemsRepair common Windows errors and clear accumulated junk for a smoother, more stable PC - no reinstall needed.Free scan · no reinstall
Outdated Drivers Are Slowing You Down
One free scan finds every outdated or missing driver and matches the right update for your exact hardware.Free scan · exact hardware match
ThatPainter is reader-supported. When you buy through links on our site, we may earn an affiliate commission. Learn More
Block setting is the arrangement of finished quilt blocks that forms the quilt top. For square blocks, compare a straight setting, a sashed or alternate-block setting, and an on-point setting before committing. The right choice depends on the block’s geometry and direction, the visual effect you want, and the extra cutting and alignment work you are prepared to do.
Block setting is the way finished quilt blocks are arranged to create the quilt top. For most square blocks, the main choices are a straight setting, a straight setting with sashing or alternate blocks, and an on-point setting. None is universally best: choose according to the block’s shape and direction, the visual effect you want, and how much additional cutting and alignment you are willing to do.
The Tool Desk
Outbyte PC Repair FREEClear out junk files and repair common Windows errorsFree Scan →Outbyte Driver Updater FREEFix the driver behind crashes, sound loss and screen glitchesFind Drivers →Before sewing anything together, make a small layout with several finished blocks. View it from a distance, rotate blocks in different directions, and compare photographs or sketches. A setting that looks ordinary in one block may reveal a strong secondary design when four, nine, or more blocks are placed together.
At a glance: which setting should you choose?
| Setting | Visual effect | What changes in construction | Good choice when… |
|---|---|---|---|
| Straight, block to block | Dense, continuous field; adjoining corners may form secondary motifs | Blocks are joined in horizontal rows and vertical columns | The interaction between repeated blocks is part of the design |
| Straight with setting squares | Regular spacing and a clear grid | Plain squares are inserted between pieced blocks | You want each block to stand apart without adding another pieced design |
| Straight with alternate blocks | Alternating rhythm and greater pattern variety | A second block design or alternate unit is added | You are making a sampler or want fewer main pieced blocks in the finished top |
| Straight with continuous sashing | Framed rows and columns; strong horizontal and vertical structure | Measured strips are placed between blocks | The blocks are busy or need visual separation |
| Sashing with cornerstones | A pronounced lattice, sometimes with a secondary motif | Sashing strips meet at separate cornerstone squares | You want the framework between blocks to be an active design element |
| On point | Diagonal movement; square blocks appear as diamonds | Blocks are arranged in diagonal rows with setting and corner triangles | You want to change the character of a familiar block or create more movement |
The major setting types and their construction consequences are also summarized in this overview of block setting options.
#1 Best Overall

- Features: Unique designs pre-cut quilting fabric
- Package: 50 pcs fabric squares
- Material: Our high quality, 100% cotton fabric is soft and breathable
- Size:10" x 10". All fabrics are trimmed by hand, which result in some raw edge and may have 0.5-1cm deviation exist.
- Easy to work with: These quilting squares are ideal for many sewing projects including quilts, cushion covers, costumes, wallets, purses, baby clothes, kids’ bedding, hand puppets, tablecloths and more.
1. Straight setting: the simplest arrangement
In a straight setting, the blocks remain square to the quilt: their edges are parallel with the quilt’s outside edges, and they are joined in aligned rows and columns. This is usually the most straightforward setting to plan and assemble.
You can place the blocks directly beside one another, or add setting squares, alternate blocks, or sashing. With no extra units between them, repeated blocks create a continuous surface. The points where four block corners meet may form chains, stars, diamonds, crosses, or other larger motifs even though no separate secondary block was sewn.
When block-to-block setting works best
- The blocks have been finished to the same size.
- The block corners and colors are intended to interact.
- You want the quilt to feel cohesive and relatively dense.
- You want the fewest additional setting pieces.
Direction matters. A symmetrical block may look identical after rotation, while an asymmetrical block can create an entirely different quilt when selected blocks are turned. Lay out every block before sewing rows and mark its intended orientation with a photograph or chart.
2. Straight setting with setting squares
Plain setting squares create breathing room between pieced blocks. They preserve the regular rows-and-columns structure but make each block easier to see as an individual unit. The squares can produce a checkerboard effect, a formal grid, or a quieter background around highly detailed blocks.
This option is especially useful for sampler quilts, where the blocks may differ substantially in color, scale, or visual complexity. A consistent setting-square fabric can help unify them. The contrast between the block fabric and the setting-square fabric determines whether the grid is subtle or dominant.
Setting squares also change the amount of fabric and the finished dimensions. They are not merely decorative filler: calculate their number and finished size as part of the layout before cutting.
Free tools Windows power users keep installed
One-click scans. No signup required.
3. Straight setting with alternate blocks
An alternate block takes the place of a plain setting square or occupies a regular position in the grid. It may be a simple pieced unit, a solid block, or a second design that complements the main block.
Rank #2
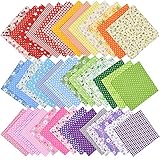
- 42 pieces 9.8 inches x9.8 inches (25cm x 25cm), fabric patchwork in 6 different color series, 7 pieces in each color, the sufficient quantity and bright colors will meet your various sewing needs in daily life,
- Material: 100% High Quality Cotton which is sweat and absorb moisture, environmentally friendly, soft, soft and breathable and it is safe for our health, suitable for all seasons. Color is Red/Pink/Yellow/Green/Blue/Purple.
- Vivid pattern design: we provide you 42 different floral patterns on patchwork bundles, which allow you to choose and mix them to decorate different fabric, the patterns are colorful and elegant, will enhance the whole effect.
- the set of quilting squares are easy to sew on. The precut squares are convenient for you to make various crafts or small quilting projects.
- Wide range of uses: Suitable for bag, wallet, purse, baby clothes, quilting patchwork, kids bedding, quilts, costumes, hand puppets, face masks, tablecloths, decorations, doll dresses, tissue holders, patchwork quilts for presents, quilt blocks, pillow covers, cushion covers and any DIY sewing craft projects.
Alternating two block types creates a stronger rhythm than repeating one block throughout. It can also reduce the number of main blocks needed, although the actual count depends on the quilt’s dimensions and the chosen arrangement. Treat that as a planning advantage, not a fixed rule.
Alternate blocks are a good solution when:
- a repeated main block would make the quilt too visually busy;
- you want to introduce a second color or motif;
- you are combining blocks from a sampler;
- you want the spaces between blocks to participate in the overall pattern.
Check the value pattern, not only the individual block designs. A low-contrast alternate block may quietly connect the quilt, while a high-contrast one can become the dominant pattern.
4. Straight setting with sashing
Sashing consists of strips placed between blocks. It can run between every block, surround groups of blocks, or be pieced into a more elaborate framework. Continuous sashing creates uninterrupted horizontal and vertical lines. Sashing separated by cornerstones creates a lattice in which each strip meets a square unit at the intersections.
Quick wins for a faster PC:
Fix the driver behind crashes, sound loss and screen glitchesFind Drivers →Clear out junk files and repair common Windows errorsFree Scan →Scan for outdated or missing drivers - takes under a minuteDriver Scan →Continuous sashing
Continuous sashing is a clean choice when you want strong rows and columns. The strips can be narrow and quiet or wide enough to become a major part of the composition. A dark sashing fabric may frame light blocks dramatically; a low-contrast fabric may simply separate them.
Sashing with cornerstones
Cornerstones add a square at each sashing intersection. They may match the sashing, contrast with it, or contain a small pieced motif. When their color and placement align with block components, the lattice can create stars, chains, or other secondary designs. Electric Quilt’s sashing reference describes straight, on-point, and variable-point layout controls that can help when comparing these structures.
The main sashing trade-off
Sashing makes individual blocks easier to read, but it can interrupt a pattern that would have appeared where neighboring blocks touch. If the corners of your blocks already create a chain or star, insert a strip of paper between sample blocks and see whether the motif disappears. If the blocks compete with one another, the same interruption may be exactly what the quilt needs.
Sashing also adds cutting, seam matching, and pressing decisions. Measure the finished block rather than relying on an assumed size, and keep the sashing width consistent. Cornerstones add more seam intersections, so accurate cutting and a carefully planned assembly order matter.
Windows Errors? Fix Them Before They Spread
Repair common Windows errors and clear accumulated junk for a smoother, more stable PC - no reinstall needed.Free scan · no reinstallCrashes, No Sound, or Screen Glitches?
Random freezes, missing sound and display glitches usually trace back to one bad driver. Find and replace yours safely.Free scan · under a minuteRank #3

- Pre-cut quilting fabric were made of 100% cotton with a sateen weave.200-thread count
- Cotton fabric squares :10 by 10 inch (25.4cm x 25.4cm) . 50PCS,50 different Patterns. 1 pieces of each pattern
- These quilting squares are ideal for many sewing projects .Fabric bundles are perfect for sewing face mask,potholders,cushion covers, costumes, wallets, purses, baby clothes, kids’ bedding, hand puppets, tablecloths and more.
- Each piece of fabric is very beautiful, and colorful crafts can be made. The incision is clean and even. This sewing material will be very suitable for durable patchwork quilts or other crafts. Easy to handle, cut and glue.
- It is a very good choice for quilting beginners. Little girls will like this pre-cut fabric square very much.Don't be offended if there are half pieces, it's extra and not within 50 pieces.
5. On-point or diagonal setting
An on-point setting turns square blocks 45 degrees so they read as diamonds. Instead of horizontal rows of upright squares, the blocks are assembled in diagonal rows. The same block can look dramatically different in this orientation, and lines that were quiet in a straight setting may begin to move across the quilt.
The open spaces around the perimeter are filled with setting triangles along the sides and corner triangles at the four corners. These pieces must be planned for the selected finished block size and layout. Do not cut arbitrary triangles from fabric and expect the outside edges to behave correctly; the edge geometry is part of the setting design.
Advantages of an on-point setting
- It adds diagonal movement without changing the block pattern.
- It can reveal a secondary design that is hidden in a straight setting.
- It gives a familiar square block a more dynamic character.
- It offers another way to control the proportions and visual direction of the quilt.
What makes it more demanding
- Blocks must be rotated consistently and placed in diagonal rows.
- Setting and corner triangles must be sized for the exact project.
- There are more opportunities for bias edges and alignment problems.
- The perimeter must be planned so the finished top has stable, intentional outer edges.
On-point is most naturally suited to square blocks. Directional or rectangular blocks may require a different treatment, and a block with a strong “up” direction may not look correct after rotation. A detailed on-point setting discussion can help you evaluate the triangle and diagonal-row requirements, but exact cutting sizes should come from a tested pattern or a calculation based on your finished block and chosen layout.
How to find a secondary design
A secondary design is a larger motif created by several ordinary blocks working together. It may come from block corners, color placement, rotation, two alternating block types, or the relationship between sashing and cornerstones. It can be planned deliberately, or it can appear unexpectedly once enough blocks are on the design wall.
What’s actually slowing this PC down?
Pick the symptom - the matching free tool is one click away.
- Lay out several finished blocks. Four blocks are enough to expose some corner interactions; a larger sample gives a more reliable sense of repetition.
- Try every plausible rotation. For asymmetrical blocks, make a small orientation chart so you can reproduce the arrangement.
- Compare straight and on-point versions. Use paper or digital representations if you do not want to move fabric repeatedly.
- Test sashing separately. Place strips of paper or spare fabric between blocks to see which motifs are strengthened or interrupted.
- Step back. Look from across the room or photograph the layout. Distance often reveals value patterns more clearly than close inspection.
- Check the edges. A beautiful center can still produce an awkward border if the chosen arrangement does not resolve cleanly at the perimeter.
Photographing alternatives, making a graph-paper chart, or using quilt-design software makes it easier to compare block order, background color, sashing, and rotation. The planning goal is not to make the design computer-perfect; it is to identify problems before fabric is cut. For digital experimentation, this C&T Publishing layout-planning article illustrates the broader value of testing and documenting arrangements.
A practical workflow for choosing a setting
Step 1: Inspect the blocks
Confirm whether the blocks are square, rectangular, directional, or asymmetrical. Measure several finished blocks. If their sizes vary, decide whether they will be trimmed, framed, or used in a deliberately variable layout before choosing a setting.
Step 2: Decide what should dominate
Ask whether the finished quilt should emphasize individual blocks, the pattern created between blocks, diagonal movement, or a structured lattice. This question usually narrows the choices faster than starting with a favorite setting name.
Rank #4

- Aesthetic Cottagecore Greenery Theme: this fabric bundle includes 20 different prints in a coordinated sage green and greenery color palette; Patterns feature classic gingham checkers, retro polka dots, fresh spring leaves, and delicate florals; Designed to ensure no duplicates, giving you a diverse selection for mix-and-match patchwork projects
- Pre-cut Quilting Fabric: each sage green fabric square is precut to approximately 10 x 10 inches (25.4 x 25.4 cm), standardizing them as quilting layer; This eliminates the need for tedious manual measuring and initial trimming, allowing beginners and experienced quilters alike to start sewing immediately
- Resistant Poly-cotton Material: our sage green patchwork squares are made from polyester , known for its strength, softness, and comfort; The breathability of polyester makes it ideal for use in many applications, ensuring your project will stand the test of time
- Easy to Modify and Customize: these green fabric squares for quilting are suitable for crafts, DIY, sewing, purses, patchwork, quilting, and other sewing projects; You can use them to make holiday decorations, or to create anything you can think of, like doll clothes, pillows, quilts and clothes
- Versatile Holiday Craft Supplies: the versatility of this floral green fabric scrap goes far beyond traditional quilting; Let your imagination run wild and use these squares to design stylish coin purses, custom doll clothes, decorative throw pillows, festive tablecloths, or scrapbooking accents; Perfect for summer sewing projects and personalized gifts
Step 3: Make a mini layout
Use several blocks, not one. Compare at least a block-to-block straight arrangement with one sashed or alternate-block arrangement. Add an on-point test if the blocks are square and their direction remains acceptable when rotated.
Step 4: Check value and color from a distance
Squint at the layout or convert a photograph to grayscale. This can reveal whether the setting fabric disappears, whether the sashing dominates, and whether a planned secondary design is actually visible.
Step 5: Plan the added units
Count setting squares, alternate blocks, sashing strips, cornerstones, setting triangles, and corner triangles. Determine the finished dimensions of each unit and account for seam allowances according to the pattern or method you are using.
Step 6: Record the arrangement
Number the blocks on a photo, sketch the layout on graph paper, or save a digital version. This is particularly important when asymmetrical blocks are rotated or when diagonal rows must be assembled in a specific order.
Step 7: Assemble in manageable units
For a straight setting, organize blocks into labeled rows. For an on-point setting, organize the diagonal rows and perimeter triangles before stitching. Press consistently and check intersections as you go rather than waiting until the entire top is joined.
Planning and cutting tools that genuinely help
A reference book is useful when you are comparing several arrangements or need examples of setting blocks and triangles. Quilter’s Mix & Match Blocks specifically covers choosing blocks and adding sashing, borders, setting blocks, and setting triangles. It is a reference option, not a requirement; a tested pattern and careful graph-paper plan may be enough for a simple layout.
For measurements at the cutting table, a portable quilter’s reference guide can be convenient. The cited C&T Publishing reference includes quilt settings, yardage, cutting information, and piecing references; product contents and availability can change, so check the current edition before buying.
Best Value

- Sewing Clips Pack for 100,9 Colors,Plastic Jar Packag
- Made of High-Quality ABS Material and Strong Spring Metal Sheet
- Clip Opens Wide to 11mm(0.43''),Clips Size :27mm(1.06'')X10mm(0.39'')X13mm(0.51'')(LxWxH)
- Non-Slip Design Easily Holds Multiple Layers of Fabric in Place
- For Sewing Quilts, Diy, Quilting, Binding,etc
Accurate cutting is especially important for sashing strips and on-point triangles. A 6 × 24 quilting ruler and rotary cutter, used with a suitable cutting mat, is a practical category of tool for measuring and cutting strips, squares, triangles, and other basic shapes. No single brand or model is automatically best for every quilter, and safe rotary-cutter technique remains essential.
Common mistakes to avoid
- Choosing from one block only: secondary designs appear through repetition, so test multiple blocks.
- Ignoring directionality: an asymmetrical or pictorial block may not tolerate arbitrary rotation.
- Adding sashing automatically: it may hide a desirable corner-to-corner motif.
- Assuming setting triangles are interchangeable: side triangles and corner triangles serve different perimeter positions.
- Cutting before confirming finished size: a nominal “12-inch block” may not measure 12 inches after piecing and pressing.
- Planning only the center: the outer edges and eventual border must be considered from the beginning.
- Underestimating alignment: sashing and cornerstone intersections create visible reference lines, so inconsistent measurements show quickly.
Bottom line
Use a straight, block-to-block setting when the blocks’ interaction is the main attraction and you want the simplest construction. Add setting squares or alternate blocks when you want spacing, rhythm, or variety. Choose sashing when individual blocks need framing, while remembering that it can interrupt secondary motifs. Choose an on-point setting when diagonal movement is worth the extra planning and correctly sized setting pieces.
The most reliable decision method is simple: make several small test layouts, photograph them, inspect the result from a distance, and calculate all additional units before cutting. The best setting is the one that supports both the geometry of your blocks and the visual story you want the finished quilt to tell.
Frequently Asked Questions
What is a straight quilt setting?
A straight setting places square quilt blocks in aligned horizontal rows and vertical columns, with the block edges parallel to the quilt edges. Blocks may touch directly or be separated with setting squares, alternate blocks, or sashing.
When should I use sashing between quilt blocks?
Use sashing when you want to separate busy blocks, emphasize each block as an individual unit, or create a strong lattice. Avoid adding it automatically if adjoining block corners already create a secondary design you want to preserve.
What does on point mean in quilting?
An on-point setting rotates square blocks 45 degrees so they appear as diamonds. The quilt is assembled in diagonal rows and requires correctly sized setting triangles along the edges and corner triangles at the corners.
Recommended Free Tools
Is one quilt block setting better than the others?
No. The best setting depends on block geometry, directionality, the desired visual density or movement, the presence of a secondary design, fabric and time available, and your tolerance for additional cutting and alignment.
How can I test a quilt setting before sewing the whole top?
Lay out several finished blocks, try different rotations and spacing, photograph the alternatives, and inspect them from a distance. This exposes secondary designs and edge problems before you cut sashing or setting triangles.
The Bottom Line
Choose the setting by design priority: straight settings are easiest, sashing separates and frames, alternate blocks add rhythm, and on-point settings add diagonal movement but require more careful triangle and row planning. Test several finished blocks before cutting.
Quick Recap

Product prices and availability are accurate as of the date/time indicated and are subject to change. Any price and availability information displayed on Amazon at the time of purchase will apply.




