Outdated Drivers Are Slowing You Down
What’s actually slowing this PC down?
Pick the symptom - the matching free tool is one click away.
One free scan finds every outdated or missing driver and matches the right update for your exact hardware.
Scan My Drivers Free →Free scan · exact hardware match
ThatPainter is reader-supported. When you buy through links on our site, we may earn an affiliate commission. Learn More
Use 16 bits per channel while capturing, scanning, and editing whenever your software and file support it. Deliver the finished print file as 8-bit when your lab, printer, or file format requires it. For most ordinary photo or artwork prints, a correctly prepared 8-bit file is sufficient. The main advantage of 16-bit is not sharper printing; it is preserving smoother tonal transitions while you edit.
#1 Best Overall

- Professional Grade: Prepare to be amazed at the vibrant and detailed prints of our photo paper 8.5 x 11
- Buy In Bulk & Save: Each pack of photo paper 8.5 x 11 glossy contains 100 sheets, providing sample supply for your photo printing projects
- Brilliant Quality: Every sheet of our photo paper guarantees a spectacular print
- Ready to Print: Our glossy photo paper 8.5 x 11 is compatible with any inkjet printer
- Satisfaction Guarantee: We are committed to your satisfaction; If our photo printer paper does not meet your expectations, we promise to make it right
One important correction: 8-bit versus 16-bit describes tonal or color depth, not print resolution. Print sharpness depends on pixels, print size, PPI, resampling, sharpening, the printer, paper, and viewing distance.
8-bit and 16-bit are not the same as print resolution
Bit depth describes how many numerical values are available for each color channel. In an RGB image:
- 8 bits per channel provides 256 possible values for red, green, and blue.
- 16 bits per channel provides up to 65,536 values per channel.
An 8-bit RGB image is often called 24-bit color because it has 8 bits for each of three channels. It is not limited to 256 total colors; it can represent more than 16 million RGB combinations. A 16-bit RGB image is commonly called 48-bit color.
Adobe explains the relationship between bit depth, color information, file size, and Photoshop’s 8-, 16-, and 32-bits-per-channel modes in its Photoshop bit-depth documentation.
The Tool Desk
Outbyte PC Repair FREEClear out junk files and repair common Windows errorsFree Scan →Outbyte Driver Updater FREEScan for outdated or missing drivers - takes under a minuteDriver Scan →Spatial resolution is a separate issue. It concerns pixel dimensions, PPI (pixels per inch), print size, resampling, and printer DPI (dots per inch). A 16-bit file does not contain more pixels than an otherwise identical 8-bit file, so it does not automatically produce a sharper print or recover missing detail.
The quick decision
| Situation | Best choice |
|---|---|
| RAW camera file or original high-bit-depth artwork | Keep the highest practical bit depth |
| 16-bit scan of a negative, slide, or artwork | Retain 16-bit during editing |
| Heavy shadow, exposure, contrast, or color adjustments | Work in 16-bit |
| Smooth skies, fog, skin, gradients, or studio backgrounds | Prefer 16-bit while editing |
| HDR or wide-dynamic-range work | Use 16-bit or higher when the complete workflow supports it |
| Finished image with modest adjustments | 8-bit is generally adequate |
| JPEG upload to a photo lab | Follow the lab’s JPEG specification; 8-bit is normally appropriate |
| Layered PSD, PSB, or TIFF master | Retain 16-bit if supported by the workflow |
| Commercial press or book printer | Follow that printer’s exact prepress requirements |
| Printer software explicitly supports 16-bit input | Use it for delicate gradients, then verify with a test print |
The practical rule is simple: edit high, deliver smart. Preserve 16-bit data when it protects the image, but do not force it into a delivery workflow that cannot use it.
What 16-bit actually improves
Most of the benefit appears during editing, when image values are repeatedly changed. Every tonal adjustment involves rounding, interpolation, or redistribution of values. More available values give the software more room to make those changes without creating obvious gaps between neighboring tones.
Free tools Windows power users keep installed
One-click scans. No signup required.
Gradients and smooth transitions
Large areas of gradually changing tone are the classic case: blue skies, mist, painted washes, skin, seamless backdrops, subtle grayscale ramps, and low-contrast backgrounds. An 8-bit workflow may be perfectly adequate, but aggressive edits can make its limited steps visible as banding or posterization.
Adobe describes Photoshop’s 16-bit mode as suitable for many adjustments, layers, adjustment layers, and filters, while noting that some features still require conversion to 8-bit. See the supported bit-depth guidance.
Rank #2
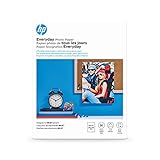
- Create affordable photo projects with a bright, glossy finish
- Customize photos with easy-to-use editing tools and print from your phone with HP Smart app
- Handle durable, quick-dry photos right from the printer
- Make memories last with photos that resist fading for decades when printed with Original HP Ink
Shadow recovery and strong tonal corrections
Raising deep shadows, changing exposure, applying a strong Curves adjustment, or compressing a high-dynamic-range image can exaggerate small differences between adjacent tones. A native 16-bit RAW conversion or scan gives those operations more information to work with.
Color grading and compositing
Channel adjustments, masks, soft transitions, repeated edits, noise reduction followed by sharpening, and extensive retouching can all benefit from additional precision. This is particularly useful for fine-art prints where a broken gradient or uneven wash is more objectionable than a small difference in file size.
What 16-bit cannot do
16-bit does not restore information that has already been discarded. Converting an 8-bit JPEG to 16-bit creates a larger numerical container; it does not recreate the original RAW data. Similarly, converting an already posterized gradient to 16-bit does not automatically repair it.
There is still a reason to convert an 8-bit working copy to 16-bit before additional editing: it can reduce further rounding damage during subsequent operations. But that is not the same as recovering lost tones.
When 8-bit is perfectly reasonable
Choose 8-bit without unnecessary anxiety when the image is finished, adjustments are modest, and its tones are already clean. It is also the sensible choice when:
- A photo lab specifically requests a JPEG.
- The destination software or plug-in does not support 16-bit.
- The file format cannot preserve 16-bit data.
- The image uses mostly flat colors and hard edges, with little tonal modeling.
- Storage, transfer speed, and compatibility matter more than additional editing headroom.
- The image has been soft-proofed and test-printed successfully.
A high-quality 8-bit JPEG can be an entirely appropriate delivery file. The important distinction is that 8-bit is often adequate for delivery, while 16-bit is more valuable for editing and preservation.
Does 16-bit make a print sharper?
No—not by itself. Bit depth can help preserve smoother color and tonal transitions, but it adds no pixels and creates no new edge detail.
Apparent sharpness is more strongly affected by:
- The quality and focus of the original capture or scan.
- Pixel dimensions at the intended print size.
- Effective PPI and any resampling.
- Output sharpening appropriate to the paper surface.
- Lens, scanner, brush, or source detail.
- Ink placement, printer alignment, and paper texture.
- Viewing distance and lighting.
For a soft print, changing from 8-bit to 16-bit is usually the wrong first fix. Check the image dimensions, print scaling, sharpening settings, paper selection, and printer maintenance instead.
How the print pipeline changes the result
Your file may pass through several stages before ink reaches paper:
- The camera or scanner records the original data.
- RAW-processing software demosaics and adjusts it, or scanning software creates the image.
- You edit the image in Photoshop or another application.
- Color management converts between working, display, and printer color spaces.
- A print application, operating system, driver, plug-in, or RIP processes the file.
- The printer converts color values into ink or toner placements.
- Paper, lighting, and viewing conditions affect the final appearance.
At these stages, the workflow may convert color spaces, reduce bit depth, interpolate pixels, clip out-of-gamut colors, apply dithering, or use printer-specific screening. A nominally 16-bit source therefore does not guarantee a physical print with 65,536 separately printable levels per channel.
Do these 3 things before closing this tab:
1Scan for outdated or missing drivers - takes under a minute2Clear out junk files and repair common Windows errors3Fix the driver behind crashes, sound loss and screen glitchesRank #3

- Photo Paper Package: 36 sheets of glossy photo paper, 8.5×11 inch, industry standard 180gsm/48lb, single-sided printing and blank back side for recording or writing something; compatible with inkjet printers and dye ink
- Glossy Finish: our glossy photo paper features its a reflective finish, that adds a professional and attractive touch and makes every picture look like a work of art; the printed photos and graphics are so outstanding
- Leave Vivid Colors: thanks to the good ink absorption of the picture paper, the printed photos come out vibrant colors and sharp details that truly come to life; remain beautiful landscapes and impressive moments forever
- Instant Dry: due to the advanced super cast coating, the ink on prints dry quickly without smearing and jamming; plus, the prints retain their vibrant color over time; makes your memories and designs shine in their full glory
- Wide Application: perfect for printing photos to record important and sweet moments, and also ideal for printing detailed graphics, various greeting cards, posters, chip bags, flyers, brochures, calendars, baby book
Adobe notes that displays, printers, and papers reproduce different ranges of color and brightness, making color management important for predictable output. Its guidance is available in Preparing images for printing in Photoshop.
In practice, a correctly profiled 8-bit workflow can produce a better print than a poorly managed 16-bit workflow.
Printing from Photoshop
Preserve the master
- Open the RAW file, scan, or original high-bit-depth artwork.
- Save a layered master as PSD, PSB, TIFF, or another format that preserves the required bit depth.
- Perform major tonal and color work in 16 Bits/Channel where supported.
- Soft-proof with the correct printer-and-paper profile when available.
- Duplicate the master for printing or delivery.
- Convert the duplicate to 8-bit only if the destination requires it.
- Export in the file format, color space, and dimensions specified by the lab or printer.
Change bit depth
In Photoshop, use:
Image > Mode > 16 Bits/Channel
or:
Image > Mode > 8 Bits/Channel
Some Photoshop tools and filters are unavailable in 16-bit mode. If conversion is necessary, save the high-bit-depth master first and convert a copy.
Print from Photoshop
Use:
File > Print
Choose the printer, orientation, position, scale, color-management method, paper type, and printer settings. Adobe’s Photoshop printing documentation describes a macOS option called Send 16-bit Data, which Adobe associates with improved subtle graduated tones.
This option is not a universal guarantee. Its availability may depend on Photoshop, macOS, the printer, and the driver. The driver may still convert or reduce the data internally. Test it with a difficult gradient rather than assuming it will improve every photograph or painting.
Avoid double color management
Use one clearly defined color-management authority:
- If Photoshop manages color, disable the printer driver’s independent color adjustment where that option is available.
- If the printer driver manages color, do not simultaneously apply a separate Photoshop printer-profile conversion unless the documented workflow requires it.
Labels vary by operating system, printer, and driver, so check the manual for the specific combination you use. Also make sure the selected ICC profile matches the actual printer, ink, and paper.
Canon, Epson, and other printer-specific workflows
Support for high-bit-depth input is workflow-specific. Do not infer that every printer bearing a professional label accepts or preserves 16-bit data from every application.
Quick wins for a faster PC:
Scan for outdated or missing drivers - takes under a minuteDriver Scan →Repair Windows errors before they cause bigger problemsFix Now →Canon’s Print Studio Pro documentation describes a supported 16-bit and HDR workflow that can produce smoother gradations. Canon’s related Windows documentation identifies the XPS printer driver as a requirement for HDR printing in the documented configuration. Those instructions are version-, model-, driver-, and operating-system-dependent.
Epson’s professional SureColor P-series includes printers such as the P700, the P900, and the 17-inch P5370. Their professional positioning and pigment-ink systems may make them attractive for artists who need repeatable, controlled output, but they do not by themselves prove an end-to-end 16-bit print path. Check the exact model and driver documentation.
Rank #4

- This vibrant, glossy photo paper gives you crisp, clear photos that are High quality without the High cost - an Economical choice for great prints
- An Economical choice for great prints
- This vibrant, glossy photo paper gives you crisp, clear photos
- This vibrant, glossy photo paper gives you crisp, clear photos that are high quality without the high cost, an economical choice for great prints
File-format choices
JPEG
In Photoshop’s documented workflow, JPEG export is limited to opaque RGB and grayscale images at 8 bits per channel. Saving a 16-bit image as JPEG therefore requires conversion to 8-bit. See Adobe’s graphics-format guidance.
Keep your 16-bit master and export an 8-bit JPEG copy when a lab requests JPEG. Never overwrite the master during that conversion.
Recommended Free Tools
TIFF
TIFF can preserve higher bit depths, subject to the image mode, compression, application, and receiving service. Adobe’s file-format documentation describes 8- and 16-bit TIFF samples in relevant contexts.
PSD and PSB
PSD is appropriate for layered Photoshop masters and high-bit-depth editing. PSB is intended for very large documents. Adobe documents 1-, 8-, 16-, and 32-bit depth values for Photoshop files in its file-format specification.
PDF behavior depends on the application, PDF standard, placed-image handling, and printer’s workflow. Placing a 16-bit image in a PDF does not guarantee that the final PDF or press output retains the same effective precision. Ask the commercial printer for its required PDF standard, color profile, image resolution, and bit depth.
Independent reader supportYour contribution helps us test, update, and keep practical guides available for everyone.Bit depth and RGB versus CMYK
These are separate decisions:
- RGB versus CMYK describes the color model.
- 8-bit versus 16-bit describes channel precision.
A CMYK file can be 8- or 16-bit where the application and workflow support it, just as RGB can be 8- or 16-bit. Photoshop documents multiple color modes and their differing feature and format support in its color-modes documentation.
Recommended Free Tools
For home photographic inkjet printing, do not automatically convert to CMYK. Many workflows expect RGB and perform the conversion through the printer profile and driver. Use the manufacturer’s recommended process and the ICC profile for the exact printer-and-paper combination.
For commercial printing, ask the printer or prepress department whether it wants RGB or CMYK, which profile to use, which PDF standard to submit, and whether it performs the conversion. Adobe recommends confirming commercial requirements with prepress staff in its guidance on printing for a commercial press.
How to run an 8-bit versus 16-bit test
If you want to know whether the difference matters for your own printer and paper, make a controlled comparison.
Build a useful test image
Include:
- A blue-to-white sky gradient.
- A black-to-gray shadow gradient.
- Skin tones or similarly subtle warm colors.
- Saturated red, green, and blue patches.
- Fine detail and small text.
- A smooth grayscale ramp.
- A featureless background where banding will be easy to see.
Keep the comparison fair
- Use the same image, paper, printer, scaling, and sharpening.
- Prepare one 8-bit path and one supported 16-bit path.
- Use the same color-management method for both.
- Print under identical driver settings.
- Compare under consistent lighting and at normal viewing distance.
Look for banding, posterization, blocked shadows, broken highlights, color shifts, visible dithering, and actual detail sharpness. Inspecting only at extreme magnification can exaggerate differences that are invisible in normal use.
Quick wins for a faster PC:
Clear out junk files and repair common Windows errorsFree Scan →Fix the driver behind crashes, sound loss and screen glitchesFind Drivers →Best Value

- Glossy Photo Paper for Bright, Detailed Prints: Print vivid family photos, school projects, brochures, flyers, and colorful image-based documents with a glossy finish that helps colors look sharper and more vibrant
- Made for Dye Ink Inkjet Printers: Designed for use with dye ink inkjet printers for best print results. Recommended for buyers who want photo-quality output on a smooth glossy surface
- Standard 8.5 x 11 Letter Size, 100 Sheets: Includes 100 sheets in US letter size, making it easy for home, school, office, and craft users to print photos and presentation materials without frequent reordering
- 180gsm Thickness with Instant-Dry Coating: The 48lb 180gsm paper offers a solid feel, while the instant-dry surface helps reduce smearing during normal post-print handling
- Versatile Choice for Everyday Photo and Creative Printing: Suitable for printing family pictures, invitations, portfolio pages, flyers, reports, classroom materials, and DIY projects. No watermark on the back for a cleaner finished look
Common problems and fixes
The print is blurry
This is usually a spatial-resolution or output problem, not an 8-bit problem. Check pixel dimensions, print size, resampling, focus, sharpening, paper selection, and printer alignment.
The gradient is banded
Keep the source native 16-bit through editing if possible. Avoid severe clipping and excessive adjustments, and test the supported 16-bit print path. Banding can also result from an 8-bit source, poor dithering, a display limitation, or the driver reducing precision.
The file becomes 8-bit when exported
That is expected for JPEG in Photoshop’s documented workflow. Preserve the master and export an 8-bit copy.
The print is too dark or the colors are wrong
Check monitor calibration, the paper profile, rendering intent, selected paper type, and whether both Photoshop and the printer driver are applying corrections. More bit depth will not compensate for incorrect color management.
The file is too large or slow
16-bit files require more storage and may process more slowly. Keep high-bit-depth masters for images that need them, and create appropriately sized 8-bit delivery copies. Adobe specifically notes that higher bit depth increases file size.
The printer appears to ignore 16-bit
The application, operating system, driver, plug-in, or RIP may reduce the data before printing. Confirm that the exact printer and software combination supports the setting, then compare controlled test prints. A checkbox labeled “16-bit” may refer to input transfer or internal processing rather than the physical ink output.
Should you buy a 16-bit printer?
Do not make the buying decision from a “16-bit” label alone. For color-critical printing, a reliable color-managed workflow, accurate ICC profiles, suitable paper, monitor calibration, and repeatable test prints may matter more.
- Occasional prints: A reputable online lab may be cheaper and simpler than maintaining a printer. Mpix offers photographic and fine-art print products; see its print overview.
- Frequent desktop printing: A professional photo printer can make sense when you value control over paper, profiles, proofing, and repeatability.
- Large fine-art work: A 17-inch printer may suit artists who regularly need larger output, but ink, paper, maintenance, and calibration add to ownership cost.
- Commercial books and brochures: Follow the printer’s prepress specification rather than choosing hardware based primarily on bit depth.
Printer prices and availability change, and “professional” branding does not prove that a device accepts an end-to-end 16-bit workflow.
The practical rule
Keep native 16-bit data from RAW files and scans when possible. Do your substantial tonal, color, gradient, and compositing work in 16-bit. Preserve that master for future edits. Then make a separate delivery file in the format and bit depth your printer, lab, or commercial press actually supports.
For many finished prints, that delivery file will be a high-quality 8-bit JPEG. For a verified TIFF, PSD, or plug-in workflow, retaining 16-bit may protect delicate gradients. In neither case should bit depth be confused with sharpness, PPI, or printer DPI.
Quick Recap

Product prices and availability are accurate as of the date/time indicated and are subject to change. Any price and availability information displayed on Amazon at the time of purchase will apply.




