Do these 3 things before closing this tab:
Free tools Windows power users keep installed
One-click scans. No signup required.
1Scan for outdated or missing drivers - takes under a minute2Repair Windows errors before they cause bigger problems3Fix the driver behind crashes, sound loss and screen glitches
ThatPainter is reader-supported. When you buy through links on our site, we may earn an affiliate commission. Learn More
You can turn one old necktie into wearable jewelry with either a folded, sewn ruffle; a soft bead-filled tube that ties in a bow; or a no-sew tassel pendant. Start with the ruffle design if you have only a needle, thread and a button. Choose the bead tube for a flexible statement necklace, or the tassel when you want to avoid sewing and swap the pendant between chains.
Choose the design before cutting
| Design | Best for | Main supplies | Construction note |
|---|---|---|---|
| Folded ruffle | Sculptural necklace made with basic sewing tools | Necktie, pins, needle, thread, large button; optional snap | Fold and stitch repeated ruffles from the back |
| Knotted bead tube | Soft necklace with a bow closure | Necktie, needle, thread, beads, iron | Turn a sewn fabric tube, then knot around beads |
| Tassel pendant | No-sew, detachable accent | Necktie, jewelry wire, pliers, scissors, ruler, lobster clasp, iron | Layer cut strips and bind their center with wire |
| Layered collar | Broad collar shape | Layered tie fabric, sewing supplies, brooch or button, Velcro or snap | High-level variation; exact measurements depend on your neckline |
Silk, polyester and blended ties behave differently, and their internal lining varies. Work gently when opening the back and test folds or knots on scraps before committing to a final layout.
Method 1: Sew a folded ruffle necklace
This is the most straightforward approach for a hand-sewn statement piece. Attosa’s 2018 ThriftyFun tutorial reports about 90 minutes for her project; treat that as her personal estimate, not a guaranteed time.
Quick wins for a faster PC:
Scan for outdated or missing drivers - takes under a minuteDriver Scan →Repair Windows errors before they cause bigger problemsFix Now →Materials
- One necktie
- Sewing pins
- Needle and thread matching, or intentionally contrasting, the tie
- One large decorative button
- One snap button if you want a separate closure rather than pulling the necklace over your head
Steps
- Lay the tie flat and decide where the necklace should sit. Keep the pointed end or a section with a pleasing pattern as the visual center.
- Fold the tie back and forth into a sequence of ruffles. Adjust each fold until the fullness looks even, then pin through the layers to hold it.
- Turn the piece over. Stitch across the top and bottom of each fold from the back, keeping the thread away from the visible front as much as possible.
- Continue pinning and stitching along the tie until you reach the desired length and fullness. Make sure every fold is secured so the ruffles do not unfold during wear.
- Sew the accent button onto the front or center area. If you prefer an opening closure, sew one half of a snap to each end and check the alignment before trimming anything.
- Try the necklace on carefully and reinforce any point that pulls. Trim loose threads.
Method 2: Make a knotted bead-tube necklace
A fabric tube creates a softer, bow-tied design. The tutorial by Aletha Israels, republished by Research Ecomakery, uses example dimensions rather than a fixed pattern: her strip is about 3.5 inches wide, she uses about eight beads, and leaves roughly seven inches at each end for the bow. Measure your own tie and beads instead.
#1 Best Overall

- What You Get - You will get a box of crimp beads in 2 colors, including 400 pieces brass crimp tubes beads, 200 pieces crimp bead covers, 60 pieces knot covers, 200 pieces wire guardians, 40 pieces lobster clasps, 300 pieces jump rings, sufficient amount can meet your different needs of jewelry making
- Come with Crimping Pliers - High precision grooves guarantee a perfect crimp every time, and anti-slip grip handles for a maximum comfort, this jewelry pliers is ideal for electrical work, jewelry design, beading, all wire crafting projects
- Sturdy and Flexible Beading Wire: The tiger tail beading wire are 65 ft in length, 0.015 inch/0.38mm in diameter, made of 7 micro-wires of stainless steel stranded together with a protective nylon coating. Strong and durable beading wire with good flexibility, good drape and good kink resistance
- Convenient Container Box - All crimp beads covers are individually placed in a 12 compartment storage container to keep small parts neat and organized
- Suitable for DIY: These jewelry making supplies are used to crimp to hide the knots in your string, leather, nylon string, thread, metal wire, suede, and other fibers; can be applied with jump ring, lobster clasp, earring hooks, beads, suitable for making earring, bracelets, necklaces, anklets and more
Prepare the fabric
- On the back of the tie, carefully split the existing stitches. Remove the inner structure and lining, then press the fabric flat.
- Cut one long strip from tip to tip. A skinny tie may not provide enough room for large beads, so plan on smaller beads if the tube is narrow.
- Fold the strip lengthwise with right sides together. Sew the bottom and long edge, leaving an opening for turning.
- Turn the tube right side out through the opening and press it flat. Avoid crushing delicate fabric with excessive heat.
Add knots and beads
- Leave matching unfilled lengths at both ends for the bow. Tie a firm knot near one end.
- Insert a bead into the tube, slide it against the knot, and tie another knot on the far side.
- Repeat the knot–bead–knot sequence along the usable length. Space beads by eye or mark positions lightly before tying.
- Hand-sew the turning opening closed. Tie the two unfilled ends into a bow around the neck and adjust the knot tension for comfort.
Method 3: Build a no-sew tassel pendant
Kim Pepper’s 2019 Salvaged Living project uses wire rather than stitching to form a detachable tassel. Her example is about seven inches long, made from strips approximately 14 inches long and 1/2 to 3/4 inch wide; those measurements are project-specific starting points.
Steps
- Cut the stitches along the tie’s back and remove its lining or form material. Press the fabric flat.
- From the narrow end, cut multiple strips. Use a ruler for consistent widths, but alter the strip count and length to suit the tie and the fullness you want.
- Layer the strips, keeping their ends aligned. Fold the bundle at its center.
- Wrap jewelry wire tightly around the folded center. Use pliers to twist and tighten the wire, then tuck or trim the end so it cannot snag clothing.
- Trim the tassel ends evenly if necessary. Attach a lobster clasp to the wire loop so the tassel can clip onto a separate necklace chain. This makes the accent interchangeable.
Adapt the layered collar idea
The Do It, Gurl “DIY Necktie Jewelry” video outlines a wider collar: layer tie fabric, size it to the neckline, sew the layers together, join the top and bottom edges, and decorate with a brooch or button. Velcro or snap buttons can serve as connectors. Because the description does not specify measurements or a complete closure pattern, use it as a design direction and fit the collar directly on a paper or fabric template first.
Rank #2

- 【Including Everything You Need】- Looking for the ideal Christmas or birthday gift for your creative and crafty daughter, niece, or friend? Look no further than our bracelet making kit for girls! Designed for girls ages 5-12, this kit includes everything needed to create beautiful and unique bracelets.
- 【Funny Crafts Kit for Girls】- This kit includes 2640 pcs of clay beads (12 colors), a variety of pony beads, charm beads and string. It creates up to dozens of ways to play with the beads for arts and crafts for kids.Enjoy DIY handmade jewelry or make a meaningful craft gift. This jewelry making kit brings lots of fun times for girls and keeps them busy!
- 【Friendship Bracelet Kit】- Girls can make personalized fashion bracelets for all occasions and moods, which is a very nice way to express their individuality and friendship.Make a bracelet for a dear friend to express your friendship. Or show your appreciation for a family member by giving them a DIY bracelet as a gift. What a lovely way this would be.
- 【Be Friendly to Beginner】- Accompanied by instructions, even beginners can have fun right away. This kit is perfect for playing with kids during the holiday season and helps improve hand-eye coordination, perception of colors, manual dexterity and concentration.
- 【Meaningful Gifts for Girls 】- Whether it's a birthday present or a Christmas gift, this bracelet making kit will inspire girls' creativity and bring them endless fun. What could be more meaningful than seeing little girls smile?
Fit, finishing and safety checks
- Keep the closure or bow at the back or side where it will not press into your neck.
- Check that button, snap and clasp attachments are reinforced; a single loose stitch can let a heavy accent fall off.
- Cover or bend wire ends completely with pliers. Test the finished pendant against a scrap of fabric for snags.
- Balance bead weight and ruffle fullness so the necklace does not twist while worn.
- Do not assume the finished piece is washable. The sources do not establish cleaning instructions or durability tests, and tie fabrics and linings differ. The Make: overview notes laundering considerations when a tie necklace is sewn to clothing, particularly when silk is involved; store your necklace dry and follow the fabric manufacturer’s care guidance when known.
The Bottom Line
For the lowest-cost, most adaptable result, sew the folded ruffle and add a button or snap. Use the bead tube when you want a bow-tied style sized around your own beads, and choose the wire-bound tassel when avoiding sewing or changing pendants matters most.
What’s actually slowing this PC down?
Pick the symptom - the matching free tool is one click away.
Quick Recap
Best Value
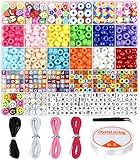
- Perfect Bracelet Making Kit: A box contains about 300pcs pony beads in 12 colors, about 90pcs polymer clay beads in 6 types(contains smile face beads, animal beads, fruit beads, flower beads, rainbow beads and star beads),350pcs random letter beads in 3 types,22pcs plastic smile beads and 50pcs small round beads,1 roll of 6 meters elastic string,4 woven ropes. You can make bracelets or jewelry according to your favorite color and style.
- Suitable Size: These pony beads have a diameter of 9mm and a height of 6mm with a 4mm hole, The polymer clay beads about 10mm long with a 2mm hole, and the size of letter beads is 6*6*6mm,the diameter of the hole is 4mm.All beads are separately stored in a 27 grid plastic box, which is very convenient to store and carry. If there are any missing parts, please don't hesitate to contact us.
- Premium Materials: All of our beads are made of healthy and environmentally friendly materials, light and durable, comfortable to the touch, not easy to fade, waterproof, and can be worn when bathing or swimming. You can use and wear it with confidence.
- Wide Application: These different kinds of beads are very suitable for making necklaces, bracelets, hair braids, earrings, pendants, etc. All these sleek, small and exquisite beads are packed separately in a beautiful compact box, so you will not mix them. Please use your endless imagination to connect these letters, smile faces, animals, fruits and stars together.
- Great Gift for Kids: This great value bracelet making kit would be a perfect gift to help your girls to improve hand-eye coordination, improve the practical ability and concentration, broaden imagination, training creativity and logical thinking. Your best friend, and granddaughter will love to receive this craft kit for Christmas, Birthday, Thanksgiving Day.
Rank #4
- Please Note: If the pliers you received have some oil on the head that make it look like dirty, please do not worry. The jewelry pliers are coated with oil to prevent rust. Please wipe them clean with a cloth before use and apply oil to them before storage, which will help the pliers keep anti-rust.
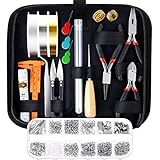
- SUPERIOR BEADING PLIERS: The jewelry repair tool has 3 necessary jewelry pliers: round nose plier, wire cutting plier and chain nose plier. Each plier has double leaf spring and non-slip handles which make them effective and safe for use
- VARIOUS TYPES OF JEWELRY MAKING ACCESSORIES: Totally 845 pieces different styles of jewelry findings include open jump rings (4 mm, 5 mm, 6 mm, 8 mm), lobster clasps, eye pins, screw eye pins, crimp beads, earring hooks, ribbon ends, cord ends and rubber earring back
- A MUST HAVE JEWERY MAKING SUPPLIES: The necklace repair kit makes jewelry making and necklace repair easy and smooth. It’s perfect for either professional or just amateur jewelry making lovers and starter to do their jewelry making project, jewelry beading project, jewelry repair and other DIY projects
- INCLUDE ALL YOU NEED: Paxcoo jewelry making supplies kit includes 3 jewelry pliers, 2 rolls of copper wire in silver and gold, 1 clear beading string cord, 6 needles, 1 tweezers, 1 caliper, 1 awl, 1 jump ring opener, 1 thimble ring, 1 thread scissors, 1 tape measure, 3 needle threaders, 1 zip pouch and a box of 12 different kinds of jewelry findings
Rank #3
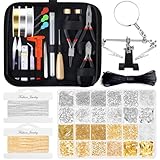
- 【Include All You Need】This jewelry making supplies kit includes 3 jewelry pliers, 2 rolls of copper wire, 2 rolls of necklace chain, 1 elastic string, 1 waxed necklace cord, 1 adjustable helping hands, 6 needles, 2 tweezers, 1 caliper, 1 awl, 1 jump ring opener, 1 thimble ring, 1 thread scissors, 1 tape measure, 3 needle threaders, 1 zip pouch, 1830Pcs jewelry findings, Including the basic tools and findings you need for most projects for earring making, necklace repair and bracelet fix.
- 【Various Types of Jewelry Findings】Totally 1830 pieces different styles of jewelry findings include open jump rings (4mm, 5mm, 6mm, 8mm), lobster clasps, eye pins, screw eye pins, crimp beads, earring hooks, ribbon ends, cord ends and rubber earring back.
- 【Superior Beading Pliers】The jewelry repair tool kit has 3 necessary jewelry pliers: round nose plier, wire cutting plier and chain nose plier. Each plier has double leaf spring and non-slip handles which make them effective and safe for use.
- 【A Must Have Jewelry Making Supplies】The jewelry necklace repair kit and Jewelry making Charms make jewelry making and necklace repair easy and smooth. It’s perfect for either professional or just amateur jewelry making lovers and starter to do their jewelry making project, jewelry beading project, jewelry repair and other DIY projects
- 【Easy Organized】The jewelry wire wrapping kit comes with a premium black zip pouch, so you can keep your tools handy, organize and safe, and no worry about losing tools or accessories

Product prices and availability are accurate as of the date/time indicated and are subject to change. Any price and availability information displayed on Amazon at the time of purchase will apply.




