Outdated Drivers Are Slowing You Down
Outdated Drivers Are Slowing You Down
One free scan finds every outdated or missing driver and matches the right update for your exact hardware.Free scan · exact hardware matchPC Slower Than It Used to Be?
A free scan shows the junk files, broken settings and background clutter dragging Windows down - then fixes them in one click.Free scan · Windows 10 & 11Outbyte Driver Updater · freeOne free scan finds every outdated or missing driver and matches the right update for your exact hardware.
Scan My Drivers Free →ThatPainter is reader-supported. When you buy through links on our site, we may earn an affiliate commission. Learn More
For most cured epoxy tabletops, river tables and large flat casts, the best all-around choice is a variable-speed 5-inch random orbital sander with reliable dust extraction and quality hook-and-loop discs. Use it to level and refine the surface, change grits without skipping, then move to wet sanding and polishing for a clear, glossy finish. A belt sander is useful only for major stock removal; it is faster but easier to gouge the epoxy.
Which type of sander is best for epoxy resin?
Choose the tool according to how much material must be removed and how much control the finish requires.
| Sander type | Best use | Main limitation |
|---|---|---|
| Variable-speed random orbital, usually 5-inch | General leveling, scratch removal and medium-to-fine dry sanding on cured epoxy | Removes material more slowly than a belt sander |
| Belt sander | Rapid removal of substantial high spots or excess cured resin | Harder to control; limited grit choices and a greater risk of gouging or overheating |
| Detail or finishing sander | Small areas, edges and corners | Small pad covers less surface and can leave an uneven overall finish |
| Hand sanding block | Edges, tight areas and final inspection | Slow on a large tabletop |
A stable pad, variable speed, a vacuum connection or effective dust bag, and readily available abrasives from about 80 through 1000 grit matter more than a particular consumer brand. Five- and six-inch random-orbital systems are both documented in 3M’s technical guide; select the size that matches the work area and the abrasives you can consistently obtain.
Quick wins for a faster PC:
Repair Windows errors before they cause bigger problemsFix Now →Fix the driver behind crashes, sound loss and screen glitchesFind Drivers →Before sanding: make sure the epoxy is fully cured
Do not sand soft or partly cured resin. It can clog the disc, smear instead of cut, generate excessive heat and obscure whether scratches have actually been removed. WEST SYSTEM advises allowing epoxy to cure thoroughly before sanding, and Smooth-On’s tabletop procedure is likewise written for fully cured material.
#1 Best Overall
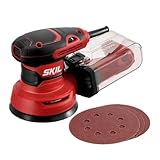
- POWERFUL - With a 2.8 amp motor and 13,000 orbits per minute, it's able to deliver a smooth performance over a variety of sanding applications.
- EASY TO CLEAN DUST CONTAINER - The X-flow dust collector uses cyclone force to collect dust in it's easy-to-empty transparent container.
- SPEED CONTROL - Variable speed control provides the right amount of power and control across different materials.
- LOW VIBRATION - Through its ergonomic design and a soft rubber grip your hand stays comfortable while counterweight balance reduces hand fatigue from vibration. All so that you can work longer.
- SAND IN TIGHT PLACES - With a compact size and ergonomic design This sander can get into tight spaces easily and maximizes user control.
Wet sanding has an additional benefit: WEST SYSTEM notes that it removes amine blush, the waxy film that can form during epoxy cure. If the surface is still tacky, flexible or easily marked with a fingernail, wait and follow the resin maker’s cure guidance rather than trying to sand through it.
Prepare the surface and tool
- Secure the workpiece so vibration cannot make the sander skip or tilt.
- Fit a sound hook-and-loop backing pad and a fresh, flat disc. Epoxy residue on a worn or dirty disc can create deep random scratches.
- Connect a shop vacuum where the sander and hose are designed for extraction, or use a properly sealed dust bag. 3M reports substantial dust and abrasive-life improvements for its vacuum-assisted systems under specified test conditions; those figures are not universal epoxy results.
- Keep separate discs or pads for coarse removal, intermediate sanding and wet finishing. Clean the surface between grits.
- Wear a NIOSH-approved respirator, protective eyewear and protective clothing. This is Smooth-On’s stated safety guidance for machining, sanding or polishing fully cured epoxy.
When to use a planer, router jig or belt sander
Severe steps or uneven slabs
If a river table has a pronounced height difference between wood and resin, sanding the entire area flat can waste abrasives and overheat the surface. Lee Valley identifies a router flattening jig as an option for major misalignment. A thickness planer or hand-held power planer can also work, but epoxy quickly dulls cutting blades.
Large amounts of excess cured resin
A portable belt sander can remove substantial material faster than a random orbital. Use light, controlled passes and inspect often. Because belt sanders offer fewer practical grit changes, switch to a random orbital after the coarse-to-medium work is complete. Do not use a belt sander as the final finishing tool.
Rank #2

- 3-Amp motor spins the pad at 8,000 - 12,000 OPM
- Separate counterweight design reduces vibration for improved comfort
- Improved dust-sealed switch protects against dust ingestion for longer switch life
- Dust port is designed to fit directly to the DWV010 or DWV012 dust collectors
- Shorter height allows the user to get closer to the workpiece
Minor unevenness
For stipple, sags and ordinary high spots, WEST SYSTEM says an orbital or reciprocating sander with 80- or 100-grit paper works well initially on well-cured epoxy. A random orbital is generally easier to control across a tabletop.
A grit sequence for a glossy epoxy tabletop
The objective is to remove the complete scratch pattern from the preceding grit. Moving to a finer number before those scratches are gone only buries the problem under finer scratches.
| Stage | Grit or pad | Method and purpose |
|---|---|---|
| Initial leveling | 60 grit | Dry sanding for severe unevenness; use only as much as needed |
| Coarse refinement | 80, 100 and 120 grit | Dry sanding to remove the 60-grit pattern and establish a flat surface |
| Intermediate refinement | 180, 240 and 320 grit | Dry sanding; inspect under good light after each change |
| Fine dry sanding | 400, 600, 800 and 1000 grit | Dry sanding until the surface is uniformly and slightly hazed |
| Wet sanding | 1200, 1500 and 2000 grit | Use waterproof silicon-carbide paper or suitable wet-finishing pads; keep residue cleared |
| Pre-polish refinement | 3000 and 4000 foam-backed pads | Wet finishing to reduce the remaining haze before compound |
This sequence follows Smooth-On’s clear-Epoxacast tabletop procedure: dry 60 through 1000, wet 1200 through 2000, then wet 3000 and 4000 foam-backed pads. Resin hardness, the wood-to-resin layout and the desired coating can require a different stopping point. Lee Valley also recommends removing the previous scratch pattern and identifies Abralon 2000x as a pre-buffing option.
Rank #3

- SMOOTH FINISH: pad dampening system designed to eliminate swirl marks on both flat and contoured surfaces
- EASY DISC ATTACHMENT: through Bosch's signature Hook and Loop disc attachment system, sanding pads stick to the hand sander, acting like a Velcro-adhesion material
- VARIABLE SPEED CONTROL: powerful 2.5 AMP motor allows speed to work-piece and task matching with ease; no-load OPM: 7,500-12,000
- DUST COLLECTION: features a micro filter system for fine dust and trapping particles as small as a 1/2-micron in diameter. Durable and compact, the dust canister shows dust level and easily detaches for mess-free tasks
- KIT CONTENTS: Includes sanding pad, sanding disc, dampening ring, dust canister, vacuum adapter and carrying bag
How to sand epoxy without swirls, heat or cloudy patches
Use controlled speed and constant movement
Run the random orbital at a moderate setting appropriate to the disc and material. Keep the pad flat, use only light pressure and keep the tool moving. Holding it in one place can dish the surface, create swirl marks or soften the epoxy with heat.
What’s actually slowing this PC down?
Pick the symptom - the matching free tool is one click away.
Let the abrasive cut
Pressing harder usually loads the disc and raises temperature rather than making the cut cleaner. Replace a glazed or contaminated disc. Durable aluminum-oxide abrasives are a strong general-purpose choice; WEST SYSTEM identifies silicon-carbide paper as useful for finishing and wet sanding.
Inspect after every grit
Vacuum or wipe away residue, then examine the surface in raking light. Continue at the current grit until the previous scratches are gone across the whole area. A uniform, slightly hazed surface after fine dry sanding is preferable to isolated shiny patches that still contain coarse scratches.
Rank #4

- 3.0 amp motor that spins the pad at 12,000 OPM
- Shorter height allows the user to get closer to work piece
- Separate counterweight design reduces vibration for improved comfort
- Rubber over-mold in all of the critical areas of the sander
- Improved dust-sealed switch to protect against dust ingestion for longer switch life
Control dust and water
Vacuum extraction improves cleanliness and reduces airborne dust, according to 3M’s guide. For wet sanding, use a setup designed to keep water away from electrical components; never splash a standard electric sander or an unprotected connection. Wet slurry should be cleared frequently so grit particles do not drag new scratches across the resin.
Independent reader supportYour contribution helps us test, update, and keep practical guides available for everyone.Polishing the clear epoxy
Polish only after the sanding pattern has been refined. Compound cannot reliably hide coarse scratches. Smooth-On specifies a variable-speed polisher with wool and foam pads and progressively lower pad speeds, using Mirka Polarshine compounds. Lee Valley recommends a lamb’s-wool buff and polishing compound after Abralon 2000x.
- Clean and dry the surface after the final wet-sanding stage.
- Work a small area with the recommended compound and a wool pad at controlled speed.
- Remove residue and check clarity before moving across the rest of the piece.
- Use a foam pad for the finer polishing stage, reducing speed as directed by the compound maker.
Stop if the surface becomes hot. Allowing the pad to dwell in one spot can reintroduce haze or distort a thin clear layer.
Best Value

- Brushless motor provides runtime and efficiency to get the job done
- Variable-speed control from 8,000 to 12,000 OPM to match the speed to the application.
- Low-profile height allows user to get close to work surface for precise sanding.
- Replaceable 8-hole hook-and-loop sanding pad (DWE64233) for quick, easy paper changing.
- Dust-sealed switch to protect against dust ingestion for long switch life
Practical buying checklist
- Variable speed: gives you more control over heat and cut rate.
- Five-inch pad: a useful balance of maneuverability and coverage for most tabletops; six-inch systems are also available.
- Dust extraction: look for a vacuum port, sealed dust path or effective dust bag.
- Stable backing pad: a flat, compatible hook-and-loop pad helps prevent edge digging.
- Abrasive availability: confirm that 80-1000 grit dry discs and waterproof finishing supplies are easy to replace.
- Comfort and balance: a tool that stays flat in your hands is easier to control over a large cast.
Safety limits and realistic expectations
Sand only fully cured resin and follow the epoxy manufacturer’s safety data. Use local extraction or wet sanding where practical, wear respiratory and eye protection, and prevent skin contact with dust and slurry. Smooth-On’s maximum recommended planing cut is 1/32 inch (0.08 cm) or less. In its tabletop procedure, the maximum sanded depth per pass is 1/64-1/32 inch (0.04-0.08 cm). Those figures are procedure-specific limits, not a universal setting for every resin, tool or workpiece.
A flawless-looking result depends on cure, resin formulation, thickness, embedded wood movement, lighting and the chosen final coating. The sander is only one part of the process: flat preparation, clean abrasives, complete scratch removal and disciplined heat control determine the finish.
Quick Recap

Product prices and availability are accurate as of the date/time indicated and are subject to change. Any price and availability information displayed on Amazon at the time of purchase will apply.




