Recommended Free Tools
PC Slower Than It Used to Be?
Free scan · Windows 10 & 11
Crashes, No Sound, or Screen Glitches?
Free scan · under a minute
Windows Errors? Fix Them Before They Spread
Free scan · no reinstall
ThatPainter is reader-supported. When you buy through links on our site, we may earn an affiliate commission. Learn More
A bent-wire crank toy is a small hand-cranked automaton: turning a wire crankshaft drives a connecting rod and piston, making a bird or other figure bob. The Make project by Matt Mets uses five wire-made elements—frame, crankshaft, piston, connecting rod and art—and is rated Easy with a stated build time of 1–3 hours.
What you need
Use 20 AWG bare wire; the project specifically suggests ordinary fence wire. Gather wire snips, pliers, a ruler and the downloadable template. Round-nose pliers are recommended for starting the frame’s cylindrical coil.
What’s actually slowing this PC down?
Pick the symptom - the matching free tool is one click away.
| Part | Wire length | Purpose |
|---|---|---|
| Frame | About 24 inches | Supports the crankshaft and guides the piston. |
| Crankshaft | About 8 inches | Provides the hand crank and offset crank pin. |
| Piston | 6 inches | Moves vertically and carries the figure. |
| Connecting rod | 5 inches | Links the crank pin to the piston. |
| Art | Shape of your choice | A bird or another figure attached to the piston. |
The lengths are the project’s starting measurements, not finished dimensions that must be cut before every bend. Leave enough wire for forming coils, hooks and handles, then trim only after the fit is working.
#1 Best Overall

- An amazing interactive automata model powered by the simple crank; Great Christmas gift, birthday present and DIY project for kids
- Assemble the paper kit and turn crank to enjoy this automation; The only tool needed is glue
- Designed by Keith Newstead, a world-renowned British automata designer, whose fabulous automata works can be seen in the British Museum, the Tower of London, and the UK's National Gallery
- Learn the mechanical principles of levers and gears
- Recommended for children 7 years old or older; WARNING: CHOKING HAZARD- Small parts. Not suitable for children under 3 years.
How the five-piece mechanism works
The frame has loops that hold the crankshaft. The piston passes through the frame’s top coil, while the connecting rod hooks onto the crankshaft. When you turn the handle, the crank pin travels around the shaft’s centerline; that offset motion pulls and pushes the rod, which raises and lowers the piston. The figure fixed to the piston therefore bobs.
Keeping the mechanism separate from the art is the key design advantage. You can replace the bird with another lightweight figure without changing the crank, rod or frame geometry.
Rank #2

- Build 8 physics-driven kinetic creatures using LEGO Technic bricks and papercraft.
- Includes every LEGO element you need!
- STEM content about axles, cams, cranks, engineering in everyday machines is included in the 64-page book, alongside the step-by-step instructions.
- Model number: 9781338603453
Build the bent-wire crank toy
- Prepare the wire. Straighten the 20 AWG bare wire as needed and measure each starting length with a ruler. Cut the 24-inch frame piece, 8-inch crankshaft piece, 6-inch piston and 5-inch connecting rod with wire snips.
- Form the frame. Begin the 24-inch piece with a cylindrical coil, using round-nose pliers for a clean initial loop. Continue bending the wire into the frame shown by the template, including the loops that will support the crankshaft and the top coil that will guide the piston.
- Make the crankshaft. On the 8-inch piece, create the zig-zag section with 180-degree bends. Add the flat coil and the perpendicular right-angle bends that form the crank and crank pin. The shaft must sit freely in the frame loops rather than bind against them.
- Shape the piston. Bend the 6-inch wire so it can pass through the frame’s top coil. Keep the sliding section straight enough to travel up and down without catching.
- Make the connecting rod. Form the 5-inch wire into a link with a hook that engages the crankshaft. The other end must meet the piston so the crank’s rotation can transmit vertical movement.
- Assemble and test. Put the crankshaft into the frame loops, thread the piston through the top coil and hook on the connecting rod. Turn the handle slowly. Correct any rubbing or snagging before attaching the decorative figure.
- Add the art. Make a bird or another chosen shape and attach it to the top of the piston. Keep the attachment secure and the figure light enough that the piston can move through its full stroke.
Getting a smoother bob
Align the guides
The piston should remain in the frame’s top coil while the crankshaft stays seated in its support loops. If either wire is twisted out of line, the mechanism can drag instead of converting rotation into a clean vertical stroke.
Quick wins for a faster PC:
Fix the driver behind crashes, sound loss and screen glitchesFind Drivers →Repair Windows errors before they cause bigger problemsFix Now →Check the crank pin
The offset crank pin determines how far the connecting rod travels. A consistent bend and right-angle transitions help the rod follow the crank without slipping off its hook.
Rank #3

- Build Your Own Unicorn Automata: A hands-on wooden STEM kit for kids 6+ that lets children assemble a magical unicorn that moves with a simple crank
- STEM Learning Made Fun: Introduces mechanics, cams, and gears—turning playtime into engineering exploration
- Creative & Educational: Kids decorate and personalize their unicorn while learning real science and problem-solving skills.
- Great Birthday Gift for Kids: Perfect for young makers who love crafts, STEM toys, and fantasy play.
- Screen-Free Activity: Encourages curiosity, focus, and hands-on building—an ideal STEM kit for kids ages 6-12
Test before decorating
Run the bare mechanism through several slow turns first. It is easier to adjust a coil, hook or guide before a bird or other artwork is attached.
Choose and customize the moving figure
The source design treats the art as its own fifth piece, so the bird is not a fixed template requirement. You can retain the same functional geometry and change the silhouette, posture or subject. Attach the figure to the piston only after confirming that it clears the frame throughout the crank’s rotation.
Rank #4

- 🎁 Ideal Gift for Kids & Teens: This STEM solar robot kit celebrates child’s growing skills and important milestones. Whether for birthdays, holidays, it’s the perfect gift that grows with them and offers screen-free fun
- 📚 STEM Educational Toy: This solar educational toy brings science to life! The fun DIY building experience sparks children's curiosity in engineering and renewable energy, while nurturing their problem-solving skills
- ☀️ Powered by the Sun: Enjoy outdoor play with solar power or switch to a strong artificial light source indoors, such as a flashlight, ensuring uninterrupted play for children. This solar build bot toy encourages kids to have fun while exploring renewable energy
- ⚡ Upgraded Larger Solar Panel: Features a large sun-catching surface to harvest more sunlight and deliver stronger power output. Kids discover renewable energy principles through play - a fun educational toy for ages 8+
- 🤖 12-in-1 Buildable with Increasing Challenge: With 190 parts, kids can build 12 models like robots, cars, and more. From simple beginners to advanced builds, the varying difficulty levels allow it to grow with your child’s skills. Each robot sparks children’s creativity
For a painted finish, complete the wire adjustments first; paint or other surface decoration can make later bending more difficult and may add weight to the moving part.
Common problems and fixes
- The crank will not turn: Check that the shaft is seated in both frame loops and that no bend presses against the frame.
- The piston sticks: Straighten the piston’s sliding section and realign the frame’s top coil so the wire has a clear vertical path.
- The bird barely moves: Inspect the connecting-rod hook and crank-pin connection; the rod must remain engaged as the handle rotates.
- The motion is uneven: Look for inconsistent bends or a tilted guide. Re-form the affected coil or right-angle bend, then test again without the art attached.
- The figure falls off: Strengthen the attachment at the piston and reduce the figure’s weight or size until the piston moves freely.
What this project is—and is not
This is a deliberately simple wire automaton, not a motorized mechanism. Its appeal comes from the five-piece architecture, visible crank motion and interchangeable art. The named material is 20 AWG bare wire, and the cited project does not establish performance specifications for other gauges or wire types; changing material may alter how easily it bends and how well it holds the formed shape.
Quick Recap
Best Value
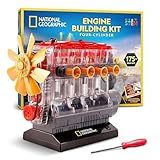
- BUILD YOUR OWN ENGINE – Assemble a clear 4-cylinder engine model kit with 175+ durable pieces. A fun DIY engineering toy engine that shows how pistons, valves, and gears really move.
- WORKING MODEL ENGINE – Install 3 AA batteries (not included), press start, and see this visible engine model kit come to life as pistons, valves, and gears move just like a real car engine.
- COMPLETE STEM ACTIVITY KIT – This kids engine build kit includes everything needed: 175+ parts, tools, illustrated instructions, and a Learning Guide for an engaging STEM toy experience.
- FUN & EDUCATIONAL – Encourages problem-solving skills and curiosity while teaching kids about mechanics and engineering. Perfect model engine kit for young builders and hobby kits for boys and girls.
- GREAT STEM GIFT – An exciting engine building kit for kids who love cars, building toys, and model kits. Inspires creativity and discovery through hands-on STEM play!

Product prices and availability are accurate as of the date/time indicated and are subject to change. Any price and availability information displayed on Amazon at the time of purchase will apply.




