ThatPainter is reader-supported. When you buy through links on our site, we may earn an affiliate commission. Learn More
Foundation paper piecing (FPP) is a machine-sewing method that uses a numbered paper pattern to guide fabric placement and seam order. Sew through the fabric and foundation along the printed lines, then remove the paper when the unit is secure. It is especially useful for designs with sharp angles, small pieces, or intersections that are difficult to piece accurately by other methods.


What you need for foundation paper piecing
Gather the pattern, fabric, sewing machine and thread, and tools for cutting and pressing. Helpful options include pins or clips, washable glue, scissors, a rotary cutter, cutting mat, and ruler.
- Foundation: Use the paper specified or supported by the pattern. Tutorials use both ordinary printer paper and specialty foundation paper; the cited instructions do not establish that one is universally better. Availability and how easily a paper handles and tears away can guide your choice.
- Trimming tools: A rotary cutter, mat, and ruler with quarter-inch markings are useful. An Add-a-Quarter ruler is a convenience, not a requirement; a small acrylic ruler marked in quarter inches is another option.
- Pressing: Have an iron or another way to press each fabric piece open after sewing.
How to foundation paper piece
- Print and check the pattern. Print at the scale specified in its instructions. One tutorial recommends 100% scale, but pattern requirements can differ. Verify the pattern’s stated measurement before cutting fabric.
- Prepare the first fabric piece. Cut it larger than the numbered section it must cover. The piece needs enough extra fabric to cover the section after it is folded back and sewn; check the coverage before stitching.
- Position the fabric behind the foundation. Put the fabric on the unprinted side of the paper so it will cover the target section when folded open. The printed side should face you as you sew.
- Sew in numerical order. Stitch on the printed line that separates the sections, following the pattern’s sequence. A shorter stitch length helps perforate the paper for removal. Zahm Co. uses about 1.2–1.4 in its tutorial, but that is a tutorial-specific setting; machine and paper differences mean it should not be treated as a universal setting.
- Trim and press each addition. Fold the paper back along the line you just sewed. Trim the fabric edge to a 1/4-inch seam allowance, then fold the new piece open and press it. Repeat the coverage check, stitching, trimming, and pressing for the next numbered section.
- Trim the finished unit to the pattern edge. Use the indicated outer trim line. Patterns vary: some include the seam allowance in the marked edge, while others call for trimming beyond it. Follow the pattern’s instructions rather than assuming the edge convention.
- Remove the paper when the unit is secure. Depending on the pattern and assembly, this may be after joining subunits or after securing the unit in the project. Peel carefully so you do not tug at stitched seams; tweezers can help lift small paper fragments.
How large should you cut the fabric?
There is no single cut size that works for every numbered section. Cut each piece generously enough to cover its target area after folding and stitching, then confirm coverage before sewing. If fabric does not extend over the full section, reposition it or cut a larger piece before stitching; guessing that a narrow margin will be enough can leave a gap once the piece is pressed open.
Recommended Free Tools
#1 Best Overall
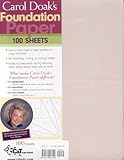
- High-Quality Foundation Paper: 100 sheets of 8.5" x 11" foundation paper designed for quilting and sewing projects
- Printer Compatibility: Compatible with inkjet and laser printers as well as most home and office printers for easy printing
- Durable and Stable Material: No shrinking, curling, or brittleness - durable paper for stitching and easy removal after use
- Versatile Sewing Applications: Suitable for paper piecing, applique, and other sewing techniques with professional quality results for crafters
- Safe and Biodegradable: Acid-free and biodegradable paper that is safe for long-term storage
When foundation paper piecing is a good choice
Consider FPP when a design has difficult angles or small pieces and intersections that call for controlled placement. Its numbered sequence and printed sewing lines provide clear guides. The trade-off is a repeated cycle of checking coverage, sewing, folding, trimming, and pressing, followed by removing the paper. The cited tutorials do not provide measured comparisons of FPP’s speed, accuracy, or cost against other piecing methods, so the choice depends on the design and the maker’s preferred workflow.
Quick Recap
Sources and further instructions
- AllPeopleQuilt: How to Foundation Paper Piece
- Zahm Co.: How to Foundation Paper Piece
- American Quilter’s Society: Foundation Paper Piecing

Product prices and availability are accurate as of the date/time indicated and are subject to change. Any price and availability information displayed on Amazon at the time of purchase will apply.




