Quick wins for a faster PC:
Clear out junk files and repair common Windows errorsFree Scan →Fix the driver behind crashes, sound loss and screen glitchesFind Drivers →ThatPainter is reader-supported. When you buy through links on our site, we may earn an affiliate commission. Learn More
To zoom in or out of a video in After Effects, animate the footage layer’s Scale property with two keyframes. Set the starting scale, move the playhead, then increase the value for a zoom-in or decrease it for a zoom-out. Add Position animation when the subject is not centered, and use easing to make the movement feel natural.
This tutorial animates the rendered video itself—not the Composition panel’s preview magnification or the Timeline’s zoom controls.
Basic method: animate Scale
Scale controls how large a layer appears inside the composition. A larger percentage makes the video appear closer; a smaller percentage makes it appear farther away, as long as the layer still covers the composition frame.
Crashes, No Sound, or Screen Glitches?
Random freezes, missing sound and display glitches usually trace back to one bad driver. Find and replace yours safely.Free scan · under a minuteWindows Errors? Fix Them Before They Spread
Repair common Windows errors and clear accumulated junk for a smoother, more stable PC - no reinstall needed.Free scan · no reinstall#1 Best Overall
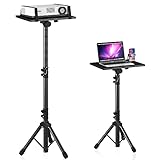
- 【𝑼𝒑𝒈𝒓𝒂𝒅𝒆𝒅 𝑷𝒓𝒐𝒕𝒆𝒄𝒕𝒊𝒐𝒏 𝑫𝒆𝒗𝒊𝒄𝒆】: Projector Stands add a safety latch, which avoids the danger of falling. Laptop tripod is made of thickened aluminum metal to ensure overall stability. Metal top tray prevents warping in the transportation process.
- 【𝑺𝒊𝒎𝒑𝒍𝒆 𝑰𝒏𝒔𝒕𝒂𝒍𝒍𝒂𝒕𝒊𝒐𝒏 & 𝑺𝒕𝒂𝒃𝒍𝒆】: It may take you 5-10 min to install according to attached accessories and instructions manual(No extra tool to set up). Before using the projector tripod, tighten the lock for each connection to ensure more stability.
- 【𝑴𝒖𝒍𝒕𝒊𝒇𝒖𝒏𝒄𝒕𝒊𝒐𝒏𝒂𝒍 𝑺𝒄𝒆𝒏𝒆𝒔】: The enlarged top tray(15" x 11") supports various sized devices, such as projectors, laptops, music players, and DJ equipment. This tripod stand is suitable for home party, conference, speech, report, DJ, office.
- 【𝑾𝒊𝒅𝒆𝒍𝒚 𝑨𝒅𝒋𝒖𝒔𝒕𝒂𝒃𝒍𝒆 𝑯𝒆𝒊𝒈𝒉𝒕 & 𝑻𝒊𝒍𝒕】: The projector tripod stand is easily adjusted from 23 to 46 inches for height to meet personal needs. The top tray can be easily tilted within a range of 180° to provide a comfortable viewing angle. Maximum load capacity is 22 lb.
- 【𝑷𝒐𝒓𝒕𝒂𝒃𝒍𝒆 & 𝑭𝒐𝒍𝒅𝒂𝒃𝒍𝒆】: Detachable design makes the projector holder easier to store and carry out.After disassembled by section, they fit perfectly into the provided bag. Sponge pads and elastic belts enhance the stability of outdoor & indoor use.
- Import your video and place it in a composition. You can drag the footage into the Timeline or onto the New Composition button.
- Select the footage layer in the Timeline.
- Press S to reveal the layer’s Scale property. You can also expand the layer and open Transform > Scale. Adobe documents Scale as one of the standard layer properties that can be animated. See Adobe’s After Effects reference documentation.
- Move the playhead to the frame where the zoom should begin.
- Click the Scale stopwatch. This creates the first Scale keyframe. For a normal full-frame clip, the starting value is often 100%, although your value may be different if the footage has already been resized or reframed.
- Move the playhead to the point where the zoom should end.
- Change the Scale value. For example, changing 100% to 120% creates a zoom-in. After Effects automatically creates a second keyframe and interpolates the motion between the two keyframes.
Press the spacebar to preview the composition, or use the Preview panel. If the move is too fast, move the second keyframe farther away. If it is too slow, move the keyframes closer together.
Example: a simple push-in
Suppose you want a gentle zoom during a five-second clip:
- At 0:00:00:00: set Scale to 100% and click the stopwatch.
- At 0:00:05:00: set Scale to 115%.
The result is a gradual 15-percent enlargement over five seconds. There is no universal “correct” zoom percentage: the appropriate amount depends on the composition size, source resolution, subject, and intended style.
How to zoom out
A zoom-out uses the same technique with the Scale values reversed. Set a larger value first, then a smaller value later.
Quick wins for a faster PC:
Repair Windows errors before they cause bigger problemsFix Now →Fix the driver behind crashes, sound loss and screen glitchesFind Drivers →Clear out junk files and repair common Windows errorsFree Scan →- Place the playhead at the start of the move.
- Set Scale to a larger value, such as 120%, and click the Scale stopwatch.
- Move the playhead to the end of the move.
- Set Scale to 100%.
For a clip that begins at its normal size and pulls back to a smaller image, use values such as 100% to 85%. Be careful: reducing Scale can reveal empty space around the layer if the video no longer fills the composition.
Aim the zoom at a subject with Position
Scale enlarges a layer around its anchor point. If the important subject is off-center—a face, product, screen detail, or sign—a Scale-only zoom may enlarge the wrong part of the image or allow the subject to drift out of frame.
Animate Position along with Scale:
- At the first Scale keyframe, press P to reveal Position and set the starting framing.
- Move to the final Scale keyframe.
- Adjust Position so the subject lands in the desired place in the composition.
- Scrub through the move and add or revise Position keyframes if the subject drifts.
For example, if a person is on the right side of the frame and you scale the footage up, the enlarged layer may push that person partly outside the composition. Move the layer’s Position while enlarged until the person remains visible and properly framed.
Rank #2

- ERGONOMIC HEIGHT ADJUSTMENT: This monitor stand features 3 height settings at 3.94”, 4.72”, and 5.51” tall. Choose the most comfortable and ergonomic viewing height by pressing the buttons on the legs to adjust the stand.
- DESKTOP ORGANIZER: This computer monitor stand provides 12.40” x 7.09” storage space underneath the platform to organize office supplies. Stack two monitor stands together to double the functionality of your workspace.
- EFFECTIVE HEAT DISSIPATION: The monitor riser is made of powder-coated steel with a ventilated platform designed to improve heat dissipation. The ventilation helps to keep your laptop cooler and avoid overheating.
- WIDE COMPATIBILITY: The monitor stand riser supports up to 44 lbs to hold monitors, laptops up to 15.6”(Width< 9.25''), printers, gaming consoles, and more. The anti-slip rubber pads add stability and protect surfaces from scratches.
- EASY ASSEMBLY: Tools are not required for the monitor stand assembly. Simply screw the four legs onto the preassembled bolts of the monitor stand riser platform. Have your desk organized for more productivity in no time.
Position and Scale are independent animated properties. The Scale animation creates the change in apparent distance; Position determines where the enlarged image sits in the frame.
Use Anchor Point to change the zoom origin
The Anchor Point determines the point around which a layer scales and rotates. Most layers start with the anchor point near the center, which produces a centered zoom. Moving the anchor point toward the subject changes the origin of the scaling.
Before setting your Scale keyframes:
- Select the footage layer.
- Choose the Pan Behind (Anchor Point) tool in the toolbar, then drag the anchor point toward the area you want to use as the zoom origin.
- Set the initial Scale value and create the animation.
You can also use Layer > Transform > Center Anchor Point In Layer Content when you need to restore the anchor point to the layer’s center. Adobe lists Ctrl+Alt+Home on Windows and Command+Option+Home on macOS for centering the anchor point. See Adobe’s documentation on layer properties and anchor points.
Changing the anchor point is not always a substitute for Position animation. For precise composition framing—especially when the target must end at a specific screen location—animate Position as well.
Make the zoom smoother
Default linear keyframes change the speed abruptly: the animation starts at a constant rate and stops at a constant rate. That can make a zoom feel mechanical.
- Select the Scale keyframes. If Position is animated, select those keyframes too.
- Apply an easing command, such as Keyframe Assistant > Easy Ease, from the keyframe context menu.
- Preview the entire move.
- For more control, open the Graph Editor and refine the speed curve.
Adobe’s animation basics documentation covers keyframe editing, interpolation, easing, and Graph Editor workflows.
Choose the timing deliberately
- Longer duration: creates a subtle, cinematic push-in.
- Shorter duration: creates a sharper emphasis suitable for energetic edits and social videos.
- More Scale change: makes the move more obvious but can expose softness and compression artifacts.
- Less Scale change: produces a restrained movement that may be easier to integrate into dialogue or documentary footage.
Do not judge the effect only from its first and last frames. Preview the complete animation to check for unwanted drift, an abrupt speed change, or a subject that leaves the frame.
Rank #3

- Design: The monitor stand for the desk has a large 14.6 x 9.3 inches plastic shelf that fits most flat screen displays, laptops, and printers, with a maximum support weight of up to 44 lbs (20kg). Rubber pads prevent slipping or damage to your work surface
- Ergonomic: The height-adjustable monitor riser can raise a computer monitor, notebook, or any device by 4.5 inches, 5.3 inches, or 6.1 inches off the desk to create a comfortable viewing and sitting position which helps reduce stress on the neck and back
- Ventilated: The computer stand has a large sturdy platform with vented holes, this stand will prevent overheating and keep the device running cool
- Organization: The sleek modern black design complements any desk while adding extra space underneath the stand for storage
- Easy Installation: Tools are not required for assembly of this computer accessories. All components fit together smoothly for fast setup to organize your desk quickly
Composition-panel zoom is not a video zoom
After Effects uses the word “zoom” for several unrelated controls:
| Control | What it changes | Does it affect the render? |
|---|---|---|
| Layer Scale | The size of the video layer over time | Yes |
| Composition-panel Magnification Ratio or Zoom tool | How large the composition appears in the application window | No |
| Timeline Zoom In/Zoom Out | How much of the time ruler is visible | No |
If you zoom the Composition panel to 100%, 200%, or another viewing percentage, you have only changed your view of the workspace. It does not create animation and will not appear in the exported video. The actual effect requires Scale keyframes on the footage layer. Adobe explains the distinction between view magnification and layer scaling; Timeline viewing controls are described in Adobe’s preview documentation.
When Scale and Position are not enough
Use a 3D camera for a 3D scene
A camera-based move is useful when your composition contains several 3D layers and you want to travel through the scene with depth and perspective. You must work with 3D layer switches, camera position, point of interest, and camera settings, typically in a composition using the Classic 3D renderer.
For one ordinary 2D video clip, a camera is usually unnecessary. Animating Scale and Position is easier to understand, faster to set up, and more predictable for a basic push-in or pull-back. Adobe’s current Properties panel documentation covers camera transforms and settings.
Use motion tracking when the subject moves
If the target moves independently through the shot, manually setting a beginning and ending Position may not keep it framed. Motion tracking can analyze a suitable visual feature and provide movement data to guide Position, which you can combine with a Scale animation.
Adobe’s tracking workflow distinguishes among:
- One-point tracking: generally tracks Position.
- Two-point tracking: can track Position, Scale, and Rotation.
- Four-point tracking: can support corner-pin-style perspective work.
Choose a high-contrast feature that remains visible for as much of the shot as possible. Tracking data may need cleanup if the feature becomes obscured, changes appearance, or leaves the frame. Adobe’s motion-tracking documentation explains these tracking approaches.
Recommended Free Tools
Troubleshooting
The layer moves unexpectedly when it scales
Check the Anchor Point. Scaling occurs around that point, so an anchor point that was moved away from the center can make the layer appear to slide as it enlarges. Restore or reposition the anchor point, then use Position to establish the final framing.
Rank #4
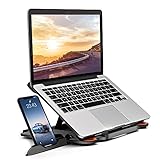
- 【Customizable Ergonomic Heights】Adjustable 8-level height (5.5" to 7.0") aligns your screen to eye level, reducing neck strain during long work hours. Ideal for office tasks, gaming, or video calls—maintain a healthy posture effortlessly.
- 【Sturdy & Lightweight Design】Crafted from aircraft-grade ABS + non-slip silicone pads, this stand securely holds 10-17” laptops and tablets without wobbling. The matte finish resists scratches and fits MacBook Pro 16", Dell XPS 17, and gaming laptops.
- 【Portable & Space-Saving】Folds flat to 0.6" thickness—slips into backpacks or drawers. Use it on cramped desks, coffee shops, or beds. The built-in phone holder creates a dual-screen workstation for multitasking.
- 【360° Rotation & Team Collaboration】Smooth rotating base lets you share screens in meetings or switch between portrait/landscape modes. The side phone slot keeps notifications visible without interrupting workflow.
- 【Heat Dissipation & Universal Compatibility】Hollow airflow design prevents overheating during intensive tasks. Compatible with all 10-17” laptops, tablets, and phones—including HP Spectre, iPad Pro, and ASUS ROG.
The zoom is centered on the wrong object
Move the Anchor Point toward the intended zoom origin, or animate Position at the final Scale value. For exact framing, use both.
The animation does not appear in the exported video
Confirm that you animated Layer > Transform > Scale on the footage layer. Changing Composition-panel magnification does not affect the render. Also check that the Scale stopwatch is enabled and that two Scale keyframes exist at different times.
The subject leaves the frame
Add Position keyframes and adjust the enlarged layer’s location. Scrub through the complete zoom rather than checking only the final frame; the subject may drift out of view in the middle of the move.
What’s actually slowing this PC down?
Pick the symptom - the matching free tool is one click away.
The movement feels mechanical
Select the Scale and Position keyframes and apply easing. If the result still feels wrong, use the Graph Editor to adjust the speed curve rather than changing only the final percentage.
The enlarged image looks soft
Reduce the amount of enlargement, use a higher-resolution source, or avoid repeatedly scaling footage that has already been enlarged. Scaling cannot restore detail that was not present in the source, and heavy enlargement makes softness and compression artifacts more visible.
The zoom is too abrupt
Increase the distance between the keyframes for a slower move, or refine the temporal speed curve with easing and the Graph Editor.
Independent reader supportYour contribution helps us test, update, and keep practical guides available for everyone.Continue learning After Effects
The Scale-and-Position workflow is enough for most basic video zooms. If you want a broader, structured introduction to After Effects animation, Adobe After Effects Classroom in a Book 2026 Release is an official hands-on training title identified in Pearson’s 2026 professional-computing catalog. It is optional learning material—not a requirement for creating this zoom effect—and edition availability should be checked before purchase. View the Pearson catalog reference.
Best Value

- 【17.3" FHD IMMERSIVE DISPLAY】 This hp 17 inch laptop features a stunning 17.3-inch Full HD (1920 x 1080) Anti-Glare screen. The narrow-bezel design and high-definition resolution provide an expansive, crystal-clear viewing area, perfect for video editing, detailed spreadsheets and professional video conferencing.
- 【ULTRA RYZEN 5 PERFORMANCE】 Powered by the AMD Ryzen 5 7520U processor (4 Cores, 8 Threads, Up to 4.3GHz), this hp 17 laptop delivers high-efficiency multitasking that beats i7-1165G7 in multi-core benchmarks. Best laptop for video editing. Ideal for 2026 AI-enhanced office workflows, student productivity, and seamless streaming.
- 【ELITE MEMORY & STORAGE】 Configured with up to high-speed 16GB DDR4 RAM and 1TB PCIe NVMe M.2 SSD for rapid boot-ups and massive data access. This hp 17 ensures zero-lag performance even when running multiple browser tabs and memory-intensive professional applications simultaneously.
- 【WINDOWS 11 PRO & HARDWARE SUPPORT】 This hp 17.3 laptop runs on Windows 11 Pro, delivering enterprise-level security, while the integrated 720p privacy camera features a physical shutter for secure video conferencing. Stay connected with ultra-fast Wi-Fi 6 and Bluetooth 5.3, and power through your day with up to 9 hours of battery life. The laptop 17 with a full-size keyboard with a numeric keypad makes this hp 17” laptop a ready-to-deploy solution for business users requiring reliability, security, and sustained performance.
- 【CONNECTIVITY & CONTROL】 Equipped with Wi-Fi 6, Bluetooth, USB Type-C, and HDMI for ultimate peripheral support. As a complete video editing laptop solution includes mouse and tablet stand to protect your device and streamline your mobile workstation setup.
Frequently Asked Questions
What is the fastest way to zoom in on a video in After Effects?
Select the footage layer, press S, enable the Scale stopwatch, set a starting value, move the playhead, and increase Scale. For example, animating 100% to 120% creates a zoom-in.
How do I zoom out in After Effects?
Animate Scale downward over time, such as 120% to 100% or 100% to 85%. Make sure the layer remains large enough to cover the composition if you do not want empty borders.
Why does my After Effects zoom move away from the subject?
Scale occurs around the layer’s Anchor Point. Reposition the anchor point toward the intended zoom origin and animate Position if the subject still needs precise framing.
Does zooming the Composition panel animate the video?
No. Composition-panel magnification only changes how you view the work area. To animate the rendered video, create Scale keyframes on the footage layer.
Can After Effects keep a moving subject centered during a zoom?
Yes. You can animate Position manually or use motion tracking to guide Position, then combine that movement with the Scale animation.
The Bottom Line
For a normal 2D clip, select the footage layer, animate Scale, use Position to keep the subject framed, adjust the Anchor Point when the zoom origin is wrong, and apply easing for smoother motion. Composition and Timeline zoom controls only change the editor’s view.
Quick Recap





