Crashes, No Sound, or Screen Glitches?
Outbyte Driver Updater · freeRandom freezes, missing sound and display glitches usually trace back to one bad driver. Find and replace yours safely.
Find the Right Drivers →ThatPainter is reader-supported. When you buy through links on our site, we may earn an affiliate commission. Learn More
Use Photoshop’s Sponge tool to change saturation only where you paint. Select Saturate to intensify a muted area or Desaturate to make an overly colorful area recede. For natural-looking results, start with a low-to-moderate Flow, make short passes, and use a selection or mask when the edge needs protection.
The Sponge tool lets you increase or reduce color intensity in a specific part of an image. Choose Saturate to make an area more vivid or Desaturate to make it quieter, then paint over the target with a controlled brush and a low-to-moderate Flow. For the safest result, use short passes, inspect the image at 100% zoom, and constrain the work with a selection or layer mask when nearby pixels must remain untouched.
This guide describes the traditional Photoshop desktop workflow. Photoshop on the web also includes Saturation (Sponge), while Photoshop on iPad has its own layout and control set. The labels and editing behavior are not identical across all three surfaces.
PC Slower Than It Used to Be?
A free scan shows the junk files, broken settings and background clutter dragging Windows down - then fixes them in one click.Free scan · Windows 10 & 11Crashes, No Sound, or Screen Glitches?
Random freezes, missing sound and display glitches usually trace back to one bad driver. Find and replace yours safely.Free scan · under a minuteWhat the Sponge tool does
The Sponge tool changes saturation locally rather than applying one adjustment across the entire document. That makes it useful for tasks such as:
#1 Best Overall

- Battery-Free Pen: StarG640 drawing tablet is the perfect replacement for a traditional mouse! The XPPen advanced Battery-free PN01 stylus does not require charging, allowing for constant uninterrupted Draw and Play, making lines flow quicker and smoother, enhancing overall performance
- Ideal for Online Education: XPPen G640 graphics tablet is designed for digital drawing, painting, sketching, E-signatures, online teaching, remote work, photo editing, it's compatible with Microsoft Office apps like Word, PowerPoint, OneNote, Zoom, Xsplit etc. Works perfect than a mouse, visually present your handwritten notes, signatures precisely
- Compact and Portable: The G640 art tablet is only 2 mm thick, it's as slim as all primary level graphic tablets, allowing you to carry it with you on the go
- Chromebook Supported: XPPen G640 digital drawing tablet is ready to work seamlessly with Chromebook devices now, so you can create information-rich content and collaborate with teachers and classmates on Google Jamboard’s whiteboard; Take notes quickly and conveniently with Google Keep, and effortlessly sketch diagrams with the Google Canvas
- Multipurpose Use: Designed for playing OSU! Game, digital drawing, painting, sketch, sign documents digitally, this writing tablet also compatible with Microsoft Office programs like Word, PowerPoint, OneNote and more. Create mind-maps, draw diagrams or take notes as replacement for mouse
- bringing color back into a muted garment or object;
- reducing the intensity of a distracting background;
- making one painted or photographed detail stand out;
- muting an overly colorful area so the subject receives more attention.
Saturation increases color intensity. Desaturation reduces it. The tool does not automatically detect edges, protect skin tones, or preserve every neighboring pixel, so precision still depends on your brushwork and any selection or mask you use.
On a grayscale image, Adobe documents a different behavior: the Sponge tool increases or decreases contrast by moving gray levels away from or toward middle gray.
How to select the Sponge tool
- Open the image in Photoshop.
- In the Tools panel, locate the Dodge tool.
- Click and hold the Dodge tool to reveal the related tools.
- Select Sponge Tool.
The Sponge tool is grouped with the Dodge and Burn tools. You can also press O to select the tool group, then cycle through the grouped tools if necessary. If pressing O selects Dodge or Burn instead, choose Sponge from the tool flyout or cycle through the group until the Sponge icon and options appear.
Free tools Windows power users keep installed
One-click scans. No signup required.
Set Saturate or Desaturate
After selecting the Sponge tool, look at the Options bar and set Mode to one of the two available operations:
| Mode | Use it when | What happens |
|---|---|---|
| Saturate | An area looks dull or needs more color emphasis | Color intensity increases as you paint |
| Desaturate | An area is distracting, too colorful, or should recede | Color intensity decreases as you paint |
If the result looks opposite to what you intended, check this setting first. Selecting Desaturate when you meant to enhance a subject is one of the most common Sponge-tool mistakes.
Rank #2

- Word-first 16K Pressure Levels: The upgraded stylus features 16,384 levels of pressure sensitivity and supports up to 60 degrees of tilt, delivering smoother lines and shading for a natural drawing experience. With no battery or charging needed, it operates like a real pen, making it easy for beginners to create effortlessly. This functionality helps novice artists develop their skills and explore their creativity without the intimidation of complex tools
- Designed for Beginners: This drawing pad desinged with 8 customizable shortcuts for both right and left-hand users, express keys create a highly ergonomic and convenient work platform
- Perfectly Adapted for Android: The XPPen Deco 01 V3 art tablet supports connections with Android devices running version 10.0 and above. It is recommended to download the XPPen Tools Android application, which adapts to your smartphone's screen aspect ratio, ensuring accurate mapping. It also supports mapping on Android screens with different aspect ratios in portrait mode
- Large Drawing Space, Bigger Bold Inspiration: This expansive drawing pad has10 x 6.25-inch helps you break through the limit between shortcut keys and drawing area
- Easy Connectivity for Beginners: The Deco 01 V3 offers USB-C to USB-C connectivity, plus adapters for USB C. This ensures easy connection to various devices, allowing beginner artists to set up quickly and focus on their creativity without compatibility concerns. Whether using a laptop, tablet, or desktop, the Deco 01 V3 provides a seamless experience, making it an ideal choice for those just starting their digital art journey
Choose a brush and control the effect
Brush size and edge
Choose a brush tip that covers the target without extending too far into surrounding areas. A soft-edged brush is generally a useful starting point for gradual transitions. A harder brush can be more suitable for an area with a clearly defined boundary. These are practical workflow recommendations, not a claim that one preset is objectively best.
Adjust the brush size as you move between broad regions and small details. A large brush can make a background pass efficient; a smaller brush gives you more control around a subject’s edges.
Flow
Flow controls the rate at which the saturation change accumulates. A lower Flow produces a more gradual build-up, making it easier to stop before the color becomes unnatural. A high Flow can create a strong change quickly.
For a restrained correction, start with a low-to-moderate Flow rather than trying to achieve the final effect in one stroke. Short strokes and repeated passes are easier to evaluate than one long, heavy pass. The ideal value depends on the image, brush size, and amount of correction needed.
Vibrance
Enable Vibrance when it suits the correction. Adobe describes this option as helping minimize clipping for colors that are already fully saturated or fully desaturated. It is especially worth considering when an area is already close to a color or saturation limit.
Rank #3
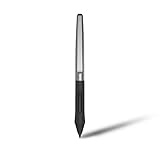
- Battery-free Stylus - Only COMPATIBLE to Huion Inspiroy H640P/H950P/H1060P/H610Pro V2/HS610/HS64/H420X/H580X/H610X; Never worry about pen-charging, and eco-friendly of use; Without operating battery, the pen is only 16g in weight, and its front end is made of wearable silicone for soothing feel.
- NOT COMPATIBLE with iPad, other Graphics Tablet or Huion Graphics Monitor GT Series; Huion provides one year warranty.
- Two Customizable Pen Buttons - Set the function to your reference like eraser, fasten your working efficiency; Palm rejection design of dual keys on both sides of the pen helps reduce touch frequency and realize most effective creation.
- Long-lasting Lifespan - First of Huion's products features battery-free stylus, say goodbye to charging cables; Don't need to worry about the potential battery leakage and run-out.
- 8192 Levels of Pen Pressure Sensitivity - Enjoy the accuracy and precision when drawing; Having 233 PPS report rate, 5080LPI resolution, you can paint or draw or sketch smoothly on your Huion Inspiroy series Tablets.
Vibrance is not a substitute for careful painting. Inspect the result at normal viewing size as well as at 100% zoom, and reduce the effect if detail or believable color is lost.
Do these 3 things before closing this tab:
1Clear out junk files and repair common Windows errors2Fix the driver behind crashes, sound loss and screen glitches3Repair Windows errors before they cause bigger problemsA controlled Sponge-tool workflow
- Identify the exact target. Decide whether you are enhancing a subject, muting a distraction, or correcting a small area. Avoid beginning with broad strokes unless the entire region genuinely needs the same treatment.
- Protect nearby areas when precision matters. Make a selection around the target or work through a layer mask. This limits where your strokes can affect pixels; the Sponge tool itself does not provide automatic edge protection.
- Select Sponge and choose a brush. Start with a moderate brush size and use a soft edge where a gradual transition is appropriate.
- Choose the mode. Select Saturate to intensify color or Desaturate to reduce it.
- Lower the Flow before painting. A gradual effect gives you room to evaluate the color between passes.
- Enable Vibrance if appropriate. This can help minimize clipping near fully saturated or fully desaturated colors.
- Paint with short strokes. Drag over the target area, release, and inspect the result. Build the effect with additional passes instead of committing to a single strong stroke.
- Check the edges and the overall balance. View the image at 100% to look for accidental spillover, halos, or patchy color. Then zoom out to confirm that the adjustment still looks natural in the complete image.
Mouse, trackpad, or graphics tablet?
A mouse or trackpad is sufficient to use the Sponge tool. You do not need a graphics tablet for this technique.
A pressure-sensitive tablet can provide finer control for brush-based work. Photoshop can use pen pressure to control painting-tool behavior such as size or opacity, depending on the relevant brush and tablet settings. This can make gradual strokes more comfortable, particularly when you are working around detailed edges, but it is an optional accessory rather than a prerequisite.
Desktop, web, and iPad differences
Photoshop desktop
The desktop workflow described above uses the Tools panel, the grouped Dodge and Burn tools, and the Options bar. Use O for the Dodge/Burn/Sponge tool group.
Rank #4

- Exclusive for Ugee's S640/S640W/S1060/S1060W/M708 V3 digital drawing tablets: The Ugee stylus is specifically designed to work with these devices, giving you precise and intuitive control over your artwork
- Not compatible with iPads or other graphics displays: This pen is specifically designed for digital drawing boards, so your customers won't have to worry about accidentally contaminating their devices with other pens or devices
- EMR technology: The Ugee stylus uses an EMR,which means it doesn't require a battery or charging socket. Simply place the stylus on the graphics drawing tablet and it's ready to go
- Two quick-access buttons: The Ugee stylus features two built-in buttons, allowing you to quickly switch between your pen stroke and eraser without ever having to take your hand off the tablet
- 8192 pressure sensitivity and ±60°tilt: The Ugee stylus features high-resolution pressure sensitivity and precise side peaks, allowing you to create detailed and expressive artwork
Photoshop on the web
Adobe’s feature comparison lists Saturation (Sponge) as available in Photoshop on the web as well as on desktop. The tool may appear in a different location or expose different controls in the browser interface, so do not assume that every desktop Options-bar label is presented in exactly the same way.
Photoshop on iPad
Photoshop on iPad includes the Sponge tool, but its controls are presented through the iPad interface. Adobe’s iPad documentation describes controls for Size, Flow, Hardness, Mode, Angle, and Roundness, along with a choice between Saturation and Vibrance controls.
Adobe also notes that Sponge edits on iPad are destructive. That makes it particularly important to preserve a copy or use an appropriate duplicate before making a correction you may need to revise. Do not follow a desktop screenshot or instruction literally if the control is absent from your iPad workspace.
Independent reader supportYour contribution helps us test, update, and keep practical guides available for everyone.When a Hue/Saturation adjustment layer is better
The Sponge tool is convenient for a quick, localized, brush-based correction. However, it is not the only way to adjust color, and it is not automatically the best choice when reversibility matters.
Crashes, No Sound, or Screen Glitches?
Random freezes, missing sound and display glitches usually trace back to one bad driver. Find and replace yours safely.Free scan · under a minuteWindows Errors? Fix Them Before They Spread
Repair common Windows errors and clear accumulated junk for a smoother, more stable PC - no reinstall needed.Free scan · no reinstallFor an editable workflow, use a Hue/Saturation adjustment layer. Adobe’s documented Adjust colors workflow creates a Hue/Saturation adjustment layer and lets you change Hue, Saturation, and Lightness. A color-range tool can further refine which colors are targeted.
Best Value
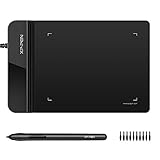
- Ultra thin tablet: Active Area 4 x 3 inches. Fully utilizing our 8192 levels of pen pressure sensitivity―Providing you with groundbreaking control and fluidity to expand your creative output. Please note: The 4 x 3 inches is very small, please confirm that it will meet your needs before you purchase it
- OSU game: Designed for OSU! gameplay, drawing, painting, sketching, E-signatures etc. No need to install drivers for OSU! It's also designed for both right and left hand users
- Accurate Pen Performance: StarG430S computer graphics tablet is the perfect replacement for a traditional mouse! The XPPen advanced Battery-free PN01 stylus does not require charging, allowing for constant uninterrupted Draw and Play, making lines flow quicker and smoother, enhancing overall performance
- Compact and Portable: The G430S art tablet is only 2 mm thick, it’s as slim as all primary level graphic tablets,Ultra-thin and portable, allowing you hold it in one hand and carry it on the go. This graphic drawing tablet supports Mac. However, since the product interface is micro USB to USB-A, if your computer is a Mac and does not have a USB-A port, you will need to purchase an OTG transfer adapter to ensure compatibility with your Mac. So please confirm your computer port before you purchase it
- PLEASE NOTE: The XPPen StarG 430 is compatible with the Windows system 11/10/8/7(32/64 bit), and the Mac OS X version 10.10 or later, but it is incompatible with iOS and iPad OS. If your computer is a Mac, you need to grant permission to the Mac preferences first. Please go to our official website, and according to the guide: XPPen>Support>FAQ, find out the Star G430 and click, then click the question according to your Mac system. There are detailed guidelines for installing the driver so your tablet will work correctly. It's possible incompatible with the customer's own EMR system or other signature system. Please feel free to contact us to confirm the compatibility before your purchase
| Choose the Sponge tool when… | Choose an adjustment layer when… |
|---|---|
| You want a fast brush-based correction in a specific area. | You expect to revisit the amount or change the color later. |
| The target is easiest to define by painting. | You want to adjust Hue, Saturation, or Lightness independently. |
| You are comfortable evaluating the effect as you apply it. | You need a clearly editable workflow with a mask or color-range refinement. |
A practical compromise is to use a selection or mask to constrain the target, then choose the method that matches the project’s need for speed versus editability. The adjustment-layer method is more clearly suited to changes that must remain independently adjustable.
Common problems and fixes
- The colors became stronger when I wanted them weaker.
- Change Mode from Saturate to Desaturate. The two modes perform opposite operations.
- The effect is much too strong.
- Undo the last pass, lower Flow, reduce the brush size if spillover is involved, and rebuild the effect with shorter strokes. High Flow applies the change more rapidly.
- The color is clipping or losing believable detail.
- Enable Vibrance when appropriate, reduce Flow, and stop adding passes once the target is sufficiently vivid. Vibrance is intended to help minimize clipping near fully saturated or desaturated colors, but it does not make unlimited saturation safe.
- Nearby pixels changed too.
- Undo the affected strokes and create a tighter selection or layer mask before painting again. Also use a smaller or softer brush where the edge requires a gradual transition.
- I cannot find the Sponge tool.
- Click and hold the Dodge tool to open its grouped tools, then select Sponge. Press O to return to the group if you have switched to another tool.
- The controls in a tutorial do not match my screen.
- Check whether you are using Photoshop desktop, Photoshop on the web, or Photoshop on iPad. These surfaces have different layouts and control availability. The iPad version, in particular, documents a different control arrangement and destructive Sponge edits.
- Do I need a tablet?
- No. A mouse or trackpad works. A pressure-sensitive tablet is an optional way to gain more brush-control options.
- I need to revise the adjustment later.
- Use a Hue/Saturation adjustment layer, ideally with a mask or refined color range, instead of relying only on direct Sponge strokes.
Optional structured learning
If you are learning more than this one tool, Adobe Photoshop Classroom in a Book is a project-based Photoshop training reference. It is not required for using the Sponge tool, but a structured workbook can be useful when you want guided practice across Photoshop’s wider toolset.
Quick recap
- Open the Dodge/Burn tool group and select Sponge, or press O to access the group.
- Use Saturate to increase color intensity and Desaturate to reduce it.
- Start with a moderate brush, a suitable edge, and low-to-moderate Flow.
- Use short passes and inspect the result at 100% zoom.
- Enable Vibrance when appropriate to help minimize clipping near saturation limits.
- Use a selection or layer mask when nearby pixels must be protected.
- Choose a Hue/Saturation adjustment layer when the change needs to remain editable.
Frequently Asked Questions
How do I find the Sponge tool in Photoshop?
Select the Dodge tool group and choose Sponge, or press O to access the grouped Dodge, Burn, and Sponge tools. If another grouped tool appears, cycle through the group or open the tool flyout by clicking and holding Dodge.
What’s actually slowing this PC down?
Pick the symptom - the matching free tool is one click away.
What is the difference between Saturate and Desaturate?
Choose Saturate to increase color intensity and Desaturate to reduce it. If the result moves in the opposite direction from what you intended, check the Mode setting in the Options bar.
Do I need a graphics tablet to use the Sponge tool?
No. A mouse or trackpad is enough. A pressure-sensitive tablet is optional and can provide additional brush-control options for painting-based edits.
Is the Sponge tool non-destructive?
Use a Hue/Saturation adjustment layer when the edit must remain adjustable. The Sponge tool is useful for a quick localized brush correction, while an adjustment layer can be revisited and refined with Hue, Saturation, Lightness, a mask, or a color range.
The Bottom Line
For controlled local color changes, select the Sponge tool, choose Saturate or Desaturate, lower Flow, and build the effect with short passes. Use Vibrance when appropriate, protect precise edges with a selection or mask, and switch to a Hue/Saturation adjustment layer when reversibility matters.
Quick Recap

Product prices and availability are accurate as of the date/time indicated and are subject to change. Any price and availability information displayed on Amazon at the time of purchase will apply.




