Quick wins for a faster PC:
Scan for outdated or missing drivers - takes under a minuteDriver Scan →Repair Windows errors before they cause bigger problemsFix Now →Fix the driver behind crashes, sound loss and screen glitchesFind Drivers →
ThatPainter is reader-supported. When you buy through links on our site, we may earn an affiliate commission. Learn More
The most dependable beginner method is simple: choose a firm pumpkin, set it on a stable and well-lit surface, make a top or bottom opening with a purpose-built pumpkin saw, scoop it clean, transfer a simple design, and cut with slow sawing motions. Finish with an LED tea light and display the pumpkin in a cool, shaded, dry place.
For a Halloween display, carve about 2–7 days beforehand. A pumpkin may last longer in cool, favorable weather, but heat, humidity, freezing temperatures, damage, and the pumpkin’s original condition can shorten its life considerably.
As an Amazon Associate I earn from qualifying purchases.
Recommended Free Tools
The quick visual guide
| Stage | What to do | What success looks like |
|---|---|---|
| 1. Choose | Pick a firm pumpkin with an intact stem and a stable base. | It sits flat without rocking, and the rind has no soft spots, leaks, bruises, or cuts. |
| 2. Prepare | Wash and dry the outside; cover a flat work surface. | The pumpkin is clean, dry, and unable to roll. |
| 3. Open | Cut from the top for a traditional lid or from the bottom for a cleaner display. | The opening is large enough for your hand and scoop. |
| 4. Hollow | Remove seeds and stringy pulp, then scrape the design-facing wall. | The inside is clean, reasonably even, and free of loose wet scraps. |
| 5. Transfer | Tape on a paper pattern and prick along its lines, or draw a simple face. | The cutting lines are clear and solid bridges remain between features. |
| 6. Carve | Cut small interior details first, then work toward larger openings. | Pieces remain supported until their surrounding cuts are complete. |
| 7. Light | Use an LED tea light or another battery-operated light. | The light is stable, contained, and not touching wet pulp. |
| 8. Preserve | Keep the finished pumpkin cool, shaded, dry, and protected from rain and frost. | It remains firm and odor-free until display day. |
What you need
Basic carving kit
- A firm pumpkin.
- A purpose-built pumpkin-carving saw with small, dull serrated teeth.
- A large spoon, sturdy scoop, or pumpkin-gutting tool.
- A washable or dry-erase marker.
- A paper pattern, tape, and a pin, toothpick, or sharpened pencil for transferring it.
- A drop cloth, newspaper, or tray.
- A bowl for seeds and a separate container for stringy pulp.
- Paper towels.
- An LED tea light or battery-operated light.
For a first carving, a pumpkin saw is a better default than a pointed chef’s or paring knife. Federal Halloween safety guidance calls for a stable, flat work surface, good lighting, and instruments designed for pumpkin carving with dull serrations. A kitchen knife can require less force in some circumstances, but it also has a pointed blade that can slip unpredictably; this guide does not recommend it as the beginner tool.
#1 Best Overall
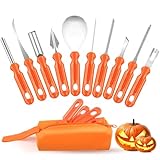
- 👻 Essential for Spooky Halloween Fun--Pumpkin carving remains a beloved Halloween staple, and our premium carving kit streamlines the craft with improved safety and convenience. Ditch risky household knives and craft intricate, eye‑catching Jack‑O'‑Lanterns with total ease.
- 🛠️ Complete 10‑in‑One Professional Carving Set--This all‑round 10‑piece toolkit suits novice crafters and seasoned carvers alike, containing a serrated pulp scooper, double‑sided saw, curved cutting saw, pumpkin drill, V‑groove chisel, arc etching tool and bent carving knife. Paired with a neatly stitched storage pouch fitted with heavy‑duty zippers, it keeps all tools sorted and well‑protected for seasonal reuse.
- ⚙️ Premium Stainless Steel, Exceptional Durability--Each carving implement is forged from sturdy stainless steel via high‑temperature reinforcement craft, delivering sharp cutting performance and outstanding wear resistance. Built to withstand repeated annual use for casual hobbyists and dedicated Halloween enthusiasts.
- ✋ Ergonomic Halloween‑Style Non‑Slip Grips--Boasting festive bright orange PP handles with anti‑slip texture, these tools ensure steady, comfy holding for detailed precision carving. Cut cleanly with minimal force to extend your tools’ service life.
- 🎁 Ideal Family‑Focused Halloween Gift--Spark warm family bonding and creative fun with this practical pumpkin carving kit, an impeccable seasonal gift choice for all ages. Crafted with safety prioritized; adult supervision is required for kids under 13 for secure carving activities.
Optional tools for experienced adult carvers
- An ice-cream scoop or thin-edged fleshing loop for smoothing the inner wall.
- A commercial stencil kit.
- Small gouges or loop tools for shallow shading.
- Cookie cutters for simple shapes.
- A drill for a hole-pattern design.
Drills, X-Acto knives, linoleum tools, professional gouges, and similar tools are advanced, adult-only options—not essentials for a first pumpkin. The CDC’s Halloween safety guidance also emphasizes using the right tool rather than improvising with a sharp household blade.
Choose a pumpkin that is easy to carve
Look for a pumpkin with a firm rind, solid color appropriate to its variety, and no soft spots, leaking areas, bruises, punctures, or cuts. Set it on a flat surface before buying it. A broad, relatively smooth face gives a beginner more room for a stencil, while the broadest part of the pumpkin should be large enough for the planned design.
Do these 3 things before closing this tab:
1Fix the driver behind crashes, sound loss and screen glitches2Repair Windows errors before they cause bigger problems3Scan for outdated or missing drivers - takes under a minuteChoose one with an intact stem if you want a traditional top lid, but do not use the stem as a handle. Lift the pumpkin from underneath or carry it with both hands. A stable, flat base is especially important because a pumpkin that rocks while you cut is harder to control.
A hard rind, mature color, and a dull or slightly waxy-looking exterior can indicate maturity. Some pumpkins also sound hollow when tapped, although that test varies by variety and is less useful than checking for firmness and damage. See the K-State Extension guidance on selecting and preserving pumpkins for those maturity indicators.
Jack-o’-lantern pumpkin or pie pumpkin?
Most pumpkins sold for carving are bred primarily for decoration. They tend to have thinner, stringier, blander flesh than pie pumpkins. Pie pumpkins are usually smaller and sweeter, but they can still be carved if their shape and wall thickness suit the design. The University of Minnesota Extension explains the difference between jack-o’-lantern and eating pumpkins.
If you want to eat pumpkin flesh, choose an eating variety and keep it separate from the carving project. A pumpkin used outdoors, treated with chemicals, painted, or exposed to candle soot should be considered decorative rather than edible.
The Tool Desk
Outbyte Driver Updater FREEFix the driver behind crashes, sound loss and screen glitchesFind Drivers →Outbyte PC Repair FREEClear out junk files and repair common Windows errorsFree Scan →Set up a safe work area
- Cover a sturdy, flat table or counter with newspaper, a washable mat, or a drop cloth.
- Use bright, even lighting so you can see both the design lines and the blade.
- Place the pumpkin on a nonslip surface or steady it with a folded towel so it cannot roll.
- Put the saw and scoop within the adult’s reach, but keep them clear of the pile of wet pulp.
- Place one bowl nearby for seeds and another for discarded pulp.
- Keep children on the side opposite the adult’s cutting hand and outside the blade path.
Do not hold a pumpkin in your lap while carving. The CDC recommends a stable, flat surface and good lighting; those two details prevent many avoidable slips.
Top, bottom, or back opening?
There is no single correct opening. Choose based on the look you want and how you plan to place the light.
| Opening | Best for | Advantages | Watch out for |
|---|---|---|---|
| Top | A traditional jack-o’-lantern with a visible lid and stem. | Familiar appearance; easy to understand and hollow. | The lid can fall inside, and the cut edge remains visible. |
| Bottom | A clean silhouette and simple LED placement. | The cut is hidden; the pumpkin can sit over a light; there is no lid to drop inward. | The opening must be level, and removing too much material can weaken the base. |
| Back | A design where you want to leave the face and top intact. | Keeps the visible top and front uninterrupted. | Hollowing and changing the light may be less convenient. |
If you cut from the top
Make the opening around the stem rather than cutting directly through it. Angle the saw slightly inward as you cut so the lid rests on the pumpkin’s rim instead of dropping through the opening. A notch, zigzag, or irregular puzzle-piece cut gives you an alignment mark and is often easier to replace than a perfect circle.
After removing the lid, scrape excess pulp from its underside. If the lid is thick or wet, trimming its underside helps it sit more securely.
If you cut from the bottom
Place the pumpkin on its stable base and mark a level opening large enough for your hand, scoop, and light. Leave a substantial rim around the opening so the pumpkin remains strong. Cut the plug out carefully, then hollow the pumpkin through this opening. A bottom opening is particularly convenient when the pumpkin will sit over an LED light.
Rank #2

- 【10 Professional Pumpkin Carving Kit】 The package includes Pumpkin scooper X 1, Small saw X 2, Pumpkin drill X 1, Etching tool X 1, Double-sided saw X 1, Carving Knife X 1, Small Knife X 1, Carving Tools X 2. The different specifications of craving kits will create interesting Halloween pumpkin designs. Tools can be neatly organized and stored in the sturdy zippered nylon carrying case after use.
- 【High-quality Stainless Steel】 10pcs carving set are made by premium stainless steel, thicker than normal carving tools, will not break. Non-slip handle design, easy to grip plastic handle make carving any pattern a breeze. The durable material ensure the tools can be re-used for many years.
- 【Safe & Easy to Use】 The easy-grip handle, and sharp & sturdy antirust blade of our pumpkin carving kit is designed specifically for carving your own Halloween jack-o-lantern pumpkins. Suitable for adults and children. Children use tools that require adult supervision. Not recommended for children under 7 years old.
- 【Carve Perfect Jack-O-Lanterns】 Our 10 pieces of pumpkin tools have different functions, so they can help you cut and create realistic 3D pumpkin details, such as hair, teeth, nose and eyes, to make the pumpkin character look expressive. Let your pumpkin lantern stand out from the crowd and play happily on this Halloween
- 【Have Fun with Family】 Halloween won’t be completed without carving pumpkins and jack-o'-lanterns! Creating a jack-o-lantern is a fun job, our pumpkin carving kit has 10pcs, can allow you to cooperate with your families and friends at the same time, enjoy the happy Halloween pumpkin carving time.
These top- and bottom-cutting approaches are also described in the guides from This Old House and NC State Extension.
How to carve a pumpkin step by step
1. Clean and dry the pumpkin
Wipe or rinse dirt from the exterior, then dry it completely. A dry surface makes a marker easier to see and helps paper tape stay attached. If you plan to save the seeds, wash the pumpkin before cutting and use clean tools and bowls. Produce should be washed before cutting or preparing; the University of Minnesota’s produce-washing guidance explains why.
Common mistake: Applying a stencil to a dusty or wet surface. It slips, smears, and makes the design harder to follow.
2. Mark and cut the opening
Decide on a top, bottom, or back opening, then draw the opening with a marker. Make it large enough that your hand can pass through comfortably. A cramped opening makes hollowing difficult and encourages you to use excessive force.
Use short, controlled back-and-forth strokes with the pumpkin saw. Keep the other hand well away from the blade path. Do not stab the pumpkin or force the tool straight through the rind.
3. Scoop out the seeds and pulp
Pull out the seeds and stringy fibers by hand, then scrape the inside with a large spoon or scoop. Pay particular attention to the wall directly behind the future design. Remove loose, wet scraps and pat the interior dry with paper towels.
The wall does not need to be perfectly thin for a basic face. It should be clean and reasonably even. A thinner, more uniform wall generally lets more light through, but scraping too aggressively can weaken the pumpkin.
PC Slower Than It Used to Be?
A free scan shows the junk files, broken settings and background clutter dragging Windows down - then fixes them in one click.Free scan · Windows 10 & 11Outdated Drivers Are Slowing You Down
One free scan finds every outdated or missing driver and matches the right update for your exact hardware.Free scan · exact hardware matchFor ordinary carving, some visual guides suggest shaving the design-facing wall to about 1 inch; advanced shaded designs may use thinner sections. Treat those measurements as technique preferences, not mandatory targets. A sound pumpkin with a strong wall is better than one scraped until it collapses.
4. Transfer a design
A simple face can be drawn directly on the pumpkin. For symmetry or a more detailed image, use a stencil. The most dependable beginner method is the tape-and-pinprick transfer described below.
5. Cut the small sections first
Follow the marked lines with slow sawing motions. Begin with small interior details, then work outward toward larger openings. Complete each nearby outline before removing its piece. Leaving pieces temporarily in place helps the rind support itself while you finish the surrounding cuts.
When the design is complete, push pieces gently from the inside. Avoid twisting the saw to pry a piece loose; twisting can split a thin bridge or tear the edge of a cut.
Free tools Windows power users keep installed
One-click scans. No signup required.
Rank #3

- Complete Halloween Pumpkin Carving Kit – Includes 4 safe and durable carving tools plus 12 stencil patterns to help you design spooky, silly, and creative jack-o’-lanterns for Halloween.
- Perfect for Halloween Decorations – Ideal for carving pumpkins for porches, parties, haunted houses, trick-or-treat night, and fall festivals; create glowing pumpkin decorations that set the mood.
- Fun for Kids & Adults – Family-friendly kit makes pumpkin carving safe, easy, and enjoyable; great Halloween activity for children, teens, and adults to enjoy together.
- Endless Carving & Decorating Ideas – Use included stencils or create your own designs for ghosts, witches, bats, monsters, and other classic Halloween icons; perfect for DIY Halloween décor.
- Must-Have Halloween Essential – Durable, reusable pumpkin carving tools ensure you’re ready for Halloween traditions year after year; the ultimate kit for jack-o’-lantern carving and decorating.
6. Clean the design
Remove scraps, dangling fibers, and loose seeds. If an edge looks rough, make a few controlled trimming strokes with the saw. Do not keep widening narrow features simply to make them brighter. A narrow bridge between two openings is a structural support and can break easily.
7. Add optional shading
For a softer glow, scrape away only the orange outer skin or part of the pumpkin wall instead of cutting all the way through. Leaving lighter flesh in place creates a dimmer area that can function as a highlight or shadow.
A full cut-through produces the brightest light. A shallow scrape produces a softer glow, and different wall thicknesses can create layered shading. Use loop tools or small gouges only if you are an experienced adult carver. An X-Acto knife is not a beginner requirement.
8. Insert the light
Place an LED tea light, battery-operated candle, or battery-powered string light inside the pumpkin. A glow stick can work for a short display where appropriate. Keep the light stable and prevent it from sitting in wet pulp. A bottom opening makes positioning especially easy; with a top opening, set the light on a dry, stable spot inside.
9. Display it carefully
Set the pumpkin where it will not be knocked over, rained on, baked in direct sun, or exposed to a freezing night. Bring it indoors if a freeze is expected. Check it daily and remove it from display when it becomes soft, leaky, foul-smelling, or heavily moldy.
How to transfer a pumpkin-carving stencil
- Print and size the pattern. Measure the broadest usable face of the pumpkin. Resize the design so it fits without wrapping across severe ridges or the sides.
- Identify the removal areas. Mark the sections that should be cut completely through. Leave solid bridges between eyes, teeth, lettering, and other neighboring openings.
- Tape the paper to the pumpkin. Secure the pattern so it cannot shift. A flat paper sheet may buckle around a curved pumpkin, so use a design that fits the surface rather than forcing it around a sharp curve.
- Prick along the lines. An adult should use a pin, toothpick, or sharpened pencil to make closely spaced holes along every cutting line.
- Remove the paper. Peel it away carefully without rubbing out the marks.
- Connect the dots. Use a washable or dry-erase marker if the pinpricks are difficult to follow. Then check that every bridge is wide enough to survive cutting.
This approach adapts the template-transfer methods shown by NASA Space Place and the National Park Service. NASA also demonstrates tracing a paper template on a rounded pumpkin. A permanent marker can bleed through a thin template and may leave marks that are difficult to remove, so use it only when visible guide marks are acceptable or will be covered with paint.
Design rules that prevent breakage
- Use large, uncomplicated shapes for a first carving.
- Leave broad bridges between eyes, teeth, letters, and other cutouts.
- Avoid long, thin points and closely spaced parallel lines.
- Do not stretch a flat pattern across the pumpkin’s ridges.
- When in doubt, turn two small openings into one larger opening rather than leaving a fragile strip.
How to keep a carved pumpkin looking good
The highest-value steps
- Start with a mature, unblemished pumpkin.
- Remove all loose pulp and seeds after carving.
- Pat the interior dry and remove standing water.
- Keep the pumpkin cool, shaded, and protected from rain.
- Bring it inside during a freeze.
- Use an LED light rather than a candle.
- Carve close to the day you need to display it.
There is no reliable universal lifespan. K-State Extension describes a carved pumpkin lasting from a few days to about a week before noticeable rot in many conditions, while retail guidance such as Home Depot’s guide gives a more optimistic two- to three-week possibility. Those figures are not guarantees. Temperature, humidity, wall thickness, handling, pumpkin variety, and pre-existing damage matter more than any single preservation trick.
For a dependable Halloween display, plan on 2–7 days. In a cool, dry climate a firm pumpkin may remain presentable longer; in hot or humid weather, carve as close to the event as practical and limit outdoor display to cooler hours when possible. Warm conditions speed mold and collapse, while freezing can damage the pumpkin’s water-rich flesh. The University of Minnesota Extension discusses both warm-weather decay and freezing concerns.
The Tool Desk
Outbyte PC Repair FREERepair Windows errors before they cause bigger problemsFix Now →Outbyte Driver Updater FREEFix the driver behind crashes, sound loss and screen glitchesFind Drivers →Petroleum jelly: optional, not a cure
A thin layer of petroleum jelly on exposed cut edges may slow moisture loss. It does not stop microbial decay, and it should never be used with an open-flame candle. Treat it as an optional decoration-preservation measure, not a guarantee. See the guidance from Utah State University Extension and NC State Extension.
Bleach treatment: decoration only and easy to misread
Some extension sources, including Utah State University and K-State, discuss a “10 percent bleach solution” for decorative pumpkins. NC State clarifies that wording as 9 parts water to 1 part chlorine bleach. That is not the same as a solution containing 10 percent sodium hypochlorite, so do not improvise the concentration.
This is an optional treatment for a decorative pumpkin only. Save any edible seeds before applying it, use gloves and ventilation, follow the bleach product label, and check local disposal guidance. Never mix bleach with vinegar, ammonia, or another cleaner; the CDC’s bleach guidance explains this chemical-safety rule. Do not use bleach-treated pumpkins for food, compost, or animal feed unless local extension guidance specifically supports that disposal route. For most family displays, cool and dry storage plus timely carving is the lower-risk choice.
Rank #4
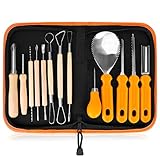
- 13-PIECE ALL-IN-ONE PROFESSIONAL SET: Dominate any pumpkin carving contest with 13 master-grade tools! This heavy-duty kit includes 6 double-sided stainless steel detail sculptors,2 sharp heavy duty stainless steel pumpkin scoop tool with scraper, 2 sturdy tooth saws, 2 precision hole punches, and 1 detail engraving pen. This kit has everything you need.
- PREMIUM STAINLESS STEEL & ERGONOMIC GRIP: Engineered for professional-grade performance year after year. Crafted from solid, high-tensile stainless steel, these tools are built to last without rusting, bending, snapping, or pitting. The ergonomically designed, non-slip handles provide maximum comfort, precision control, and confidence for intricate carving.
- SAFE & MEMORABLE FAMILY CRAFTING: Create unforgettable Halloween traditions with a fun activity the whole family can enjoy! With varying tool sizes and specialized blunt-edge designs for scooping and punching, there’s a perfectly safe task for everyone. Ditch the dangerous kitchen knives and enjoy a safer, smoother crafting experience.
- LUXURY WRISTLET STORAGE BAG INCLUDED: Keep your tools organized, protected, and highly portable. Our premium leather storage case features dedicated slots for each tool and a convenient wristlet strap. Whether you're heading to a neighborhood carving block party or helping with a school DIY project, you can carry your kit completely hands-free.
- 100% Service】We’re dedicated to enhance your carving experience. Our aim: 100% satisfied customers. However, if you’re not happy with your Pumpkin Carving Set, you can return it anytime. We’ll ask no questions.
Vinegar treatment: not a sanitizer
NC State presents diluted vinegar as an alternative in some situations where the pumpkin will later be composted or fed to animals. However, the University of Minnesota notes that vinegar is not an adequate sanitizer for food-contact surfaces. If used at all, describe it only as an optional, non-validated mold-control suggestion—not as a food-safe sanitizing step. Never combine vinegar and bleach; the reaction can produce dangerous fumes. Poison Control also warns about unsafe vinegar mixtures.
Why an LED light is the safest default
An LED tea light or battery-operated candle gives the traditional glow without an exposed flame. Battery-powered string lights and, for some short displays, glow sticks are other options recommended by the CPSC, National Fire Protection Association, and U.S. Fire Administration.
LEDs also produce less heat than a candle, which can help reduce drying and deterioration. They are not automatically risk-free: keep the battery compartment closed, follow the product instructions, and keep loose button batteries away from children. A 2026 CPSC recall of a Halloween pumpkin-carving kit involved accessible button batteries and illustrates why battery compartments and spare batteries deserve attention.
If you insist on using a real candle
A real candle is not the recommended choice, especially around children, costumes, dry leaves, curtains, or other Halloween decorations. If you use one:
- Use a stable holder and place the pumpkin where it cannot be tipped over.
- Keep the flame and pumpkin away from anything that can burn. The U.S. Fire Administration’s general candle guidance calls for at least 12 inches of clearance from combustible materials where that rule applies.
- Never leave the candle unattended.
- Extinguish it before leaving the house or going to bed.
- Do not coat cut surfaces with petroleum jelly or vegetable oil.
What children can safely do
Use the following division of labor:
- Adult: cuts the opening, handles the pumpkin saw, makes any pinpricks, trims edges, and installs the light.
- Child: chooses the design, helps tape on the paper, draws with a washable marker, scoops pulp under supervision, sorts seeds, and decorates the outside.
A carving kit may reduce the force needed for some cuts, but it does not make a sharp or serrated tool appropriate for unsupervised children. In an October 18, 2022 Halloween safety release, the CPSC reported that pumpkin carving accounted for an estimated 55% of Halloween-related emergency-department injuries during the preceding three years. That is a historical estimate, not a current 2026 injury rate, but it explains why the adult-only cutting boundary matters.
Pumpkin-carving troubleshooting
The lid falls inside
For the next cut, angle the saw inward and add a notch or irregular alignment mark. Trim excess pulp from the underside so the lid rests on the rim. If the lid has already fallen in, set it back on top and use a bottom or rear opening for light access if necessary.
The pumpkin rolls while you work
Stop cutting, move it to a flat surface, and place a folded towel or nonslip mat underneath. Rotate the pumpkin by turning the pumpkin—not by reaching around a moving blade. If it still will not sit securely, choose a bottom opening or a different pumpkin with a flatter base.
The pattern is too large or distorted
Do not force the paper around severe curves. Resize it before taping, use only the broadest face, or divide the design into separate sections. A simpler pattern that follows the pumpkin’s shape will look better than a stretched detailed image.
A design piece breaks
First, stop cutting and check whether the pumpkin is still structurally sound. You can reinsert the piece and secure it with toothpicks from inside, enlarge the surrounding opening to turn the break into an intentional tooth, eye, scar, or other feature, or add temporary internal support. Do not use glue inside a pumpkin that will contain an open flame.
The light is too dim
- Remove wet scraps and seeds that block the light.
- Scrape the wall behind the design more evenly.
- Use a brighter battery-operated LED.
- Widen overly narrow openings only if enough structural material remains.
- Move the light toward the center or use a bottom opening for better placement.
The pumpkin starts to soften or smell
Move it out of sun and rain and remove standing moisture, but do not expect a treatment to restore a collapsing pumpkin. If it is leaking, foul-smelling, or heavily moldy, remove it from the display and discard it. Do not eat it or give it to animals.
The pumpkin freezes
Bring it into a cool indoor location before the freeze. Freezing can damage the flesh, and repeated thawing can accelerate collapse. A pumpkin that has already become soft or cracked may not recover.
Best Value

- 【13 Professional Pumpkin Carving Kit】 The package includes 8 x double-sided sculpting tools, 2 x sharp sturdy tooth saws, 1 x heavy duty scooper, 1 x etching tool, 1 x drill. The different specifications of craving kits will create interesting Halloween pumpkin designs. Tools can be neatly organized and stored in the sturdy zippered nylon carrying case after use.
- 【High-quality Stainless Steel】 13pcs carving set are made by premium stainless steel, thicker than normal carving tools, will not break. Non-slip handle design, easy to grip plastic handle make carving any pattern a breeze. The durable material ensure the tools can be re-used for many years.
- 【Safe & Easy to Use】 The easy-grip handle, and sharp & sturdy antirust blade of our pumpkin carving kit is designed specifically for carving your own Halloween jack-o-lantern pumpkins. Suitable for adults and children. Children use tools that require adult supervision. Not recommended for children under 7 years old.
- 【Carve Perfect Jack-O-Lanterns】 Our 13 pieces of pumpkin tools have different functions, so they can help you cut and create realistic 3D pumpkin details, such as hair, teeth, nose and eyes, to make the pumpkin character look expressive. Let your pumpkin lantern stand out from the crowd and play happily on this Halloween
- 【Have Fun with Family】 Halloween won’t be complete without carving pumpkins and jack-o'-lanterns! Creating a jack-o-lantern is a fun job, our pumpkin carving kit has 13pcs, can allow you to cooperate with your families and friends at the same time, enjoy the happy Halloween pumpkin carving time.
Seeds, flesh, and disposal
Saving and roasting the seeds
Separate seeds before using bleach, vinegar, petroleum jelly, paint, or any other decorative treatment. Rinse the seeds thoroughly, dry them, and roast them separately using a tested seed-roasting recipe. Illinois Extension provides seed-cleaning and roasting guidance.
Do not eat seeds or flesh from a pumpkin that has been treated with bleach or household cleaner, exposed to petroleum products or paint, contaminated by outdoor display, or placed near candle soot. A carved jack-o’-lantern is primarily a decoration, and its flesh is generally stringier and less flavorful than flesh from a pie pumpkin.
Do these 3 things before closing this tab:
1Clear out junk files and repair common Windows errors2Fix the driver behind crashes, sound loss and screen glitches3Repair Windows errors before they cause bigger problemsComposting the pumpkin
- Remove the candle or LED light, batteries, tape, paper, paint, toothpicks, and other decorations.
- Do not compost a pumpkin treated with bleach or another chemical unless local guidance specifically allows it.
- Do not feed chemically treated pumpkins to wildlife or livestock.
- Check your municipality’s rules if you use a curbside or community compost service.
- Discard pumpkins that are heavily moldy, foul-smelling, or leaking rather than leaving them where children or animals can contact them.
When carving is not the best option
Choose an artificial pumpkin if you want to carve weeks before Halloween, create an intricate design, display the result indoors, avoid food waste, or reuse the same design each year. Faux pumpkins vary: some have pre-thinned walls or light openings, while others do not, so follow the specific product instructions.
For toddlers, households avoiding cutting tools, or anyone who wants a no-mess project, decorate instead with paint, markers, stickers, vinyl shapes, adhesive felt, or googly eyes. A painted pumpkin can be just as creative, and it can be combined with a paper or felt face without making a cut at all.
Frequently Asked Questions
How many days before Halloween should I carve a pumpkin?
For the most reliable result, carve it about 2–7 days before you need to display it. A firm pumpkin kept cool, shaded, dry, and protected from rain may last longer, but warm or humid weather can cause it to rot sooner. Do not treat two or three weeks as a guarantee.
Is it better to cut a pumpkin from the top or the bottom?
A top opening gives the traditional look and keeps the stem visible. A bottom opening hides the cut and makes it easy to place the pumpkin over an LED light. For a bottom opening, cut level and leave enough material around the edge to keep the pumpkin stable.
Quick wins for a faster PC:
Scan for outdated or missing drivers - takes under a minuteDriver Scan →Repair Windows errors before they cause bigger problemsFix Now →Can children use a pumpkin-carving kit?
Children can participate in scooping, drawing, pattern selection, and decorating, but adults should handle all cutting. A kit may require less force, but it does not remove the risk from serrated tools.
Can you eat the pumpkin after carving it?
Save and wash the seeds before applying any decorative treatment, and roast them separately using a tested recipe. Do not eat a pumpkin or its seeds after exposure to bleach, household cleaners, petroleum products, paint, candle soot, or outdoor contamination. Jack-o’-lantern flesh is also usually stringier and blander than pie-pumpkin flesh.
What is the safest light for a jack-o’-lantern?
Use an LED tea light, battery-operated candle, or battery-powered string light. These avoid an exposed flame, but keep button batteries and loose batteries away from children and make sure the battery compartment is secured.
The Bottom Line
Choose a sound, stable pumpkin; work on a flat, well-lit surface; let an adult handle the saw; and use a simple design with strong bridges between cutouts. Hollow the pumpkin thoroughly, transfer the pattern with tape and pinpricks, cut small details before large openings, and push pieces out gently from inside. An LED light and a cool, shaded, dry display will do more for safety and longevity than most preservation hacks.
Recommended Free Tools
Quick Recap

Product prices and availability are accurate as of the date/time indicated and are subject to change. Any price and availability information displayed on Amazon at the time of purchase will apply.




