ThatPainter is reader-supported. When you buy through links on our site, we may earn an affiliate commission. Learn More
Make a classroom-sized paper tree by building a light cardboard trunk and broad base, adding textured paper branches, then attaching folded paper leaves. A freestanding tree should be prototyped at small scale first, kept within a stable footprint, and decorated only with lightweight materials.
Choose the format and size
Decide whether the tree will be a flat wall display or a three-dimensional tree that stands on the floor. Sketch the silhouette and make a small cardstock model before cutting full-size pieces. This reveals weak joints, an unstable shape, or branches that are too heavy.
For a freestanding classroom tree, the California Learning Resource Network (2025) recommends a trunk about 2–4 feet tall, a base about 1.5–2.5 feet wide, and cardboard at least 4 mm thick where support is needed. These are practical recommendations, not universal engineering requirements; increase the base for a taller or wider canopy.
#1 Best Overall

- Package include: This classroom tree bulletin board set includes 102 leaves in 3 colors and 3 sizes (17 of each style), offering a diverse range for a natural and lively look. There are also 10 green paper pom poms, with 5 10 inch dark green and 5 12 inch light green ones, adding a touch of fullness and festivity. Plus, 2 rolls of kraft wrapping paper, approximately 380mm wide and 0.1mm thick, about 30 meters per roll, give you plenty of material for creative expression
- Versatile for All Year: You can customize this classroom 3D tree bulletin board set to match different themes throughout the year, whether it's seasonal changes, holidays such as Christmas or Halloween, or educational themes. This flexibility makes it an ideal fit for year round classroom use. Moreover, it creates an eye catching visual centerpiece that draws students' attention, encouraging them to engage with learning materials and proudly display their achievements
- Simple Assembly: Our classroom tree shaped bulletin board set has all the necessary parts included. To assemble, just cut the kraft paper to the size you want and shape it into a tree trunk. Then, use adhesive dots to attach the unfolded paper pom poms to the trunk. The whole process is straightforward, quick, and saves you a lot of time and effort. You can have a stunning classroom tree up in no time, without the need for complex tools or skills
- Durable Material: This green tree bulletin board set is crafted from quality paper. It's sturdy enough to withstand the daily hustle and bustle of classroom activities, from students accidentally bumping into it to frequent handling during decorations. Its durability ensures that it maintains its beauty throughout the entire school year, providing a long lasting and attractive addition to your classroom decor
- Spark Student Creativity: This nature classroom decor set offers students a large canvas to showcase their work and ideas. Whether it's displaying their art projects, writing assignments, or scientific discoveries, there's plenty of space for them to express themselves. It's an ideal choice for creating a lively and engaging classroom environment. It also serves as a wonderful everyday decoration that keeps the classroom vibrant and inspiring
Materials
| Part | Recommended materials | Notes |
|---|---|---|
| Trunk, base and strong branches | Corrugated cardboard or opened recycled boxes | Use the thickest cardboard for load-bearing parts. |
| Bark and branch covering | Brown butcher paper or kraft paper | Score or crumple it to create texture. |
| Leaves | Green construction paper or cardstock | Use several shades for visual depth. |
| Adhesives | PVA/white glue, glue stick, sticky tape and, for adults, hot glue | Hot glue is useful on cardboard joints but requires adult supervision. |
| Tools | Pencils, ruler, child-safe scissors and, for adults, a utility or X-Acto knife | Children should not handle utility knives. |
| Decorations | Crayons, markers, optional tissue or crepe paper, stickers and lightweight labels | Avoid heavy objects that pull branches down. |
Build the freestanding trunk and base
- Draw two trunk profiles. On cardboard, draw matching irregular trunk shapes with a wider lower section and narrower top. Cut them out with an adult-handled utility knife or have an adult pre-cut them.
- Create depth. Score one profile at several vertical points so it can bend around the second profile. Glue or tape the edges together to form a hollow trunk. Leave the bottom open if it will slide into a base slot.
- Use a modular option for a very large tree. Open cardboard boxes, roll the panels into cylinders, tape the seams, and have an adult hot-glue the seams. Stack and secure sections until they reach the planned height.
- Cut the base. Cut a circular or polygonal cardboard base wider than the trunk. Cut a slot just wider than the trunk so it fits snugly without crushing the cardboard.
- Join trunk and base. Insert the trunk perpendicular to the base and glue around the joint. Add triangular cardboard gussets on two or four sides if the trunk wobbles.
- Alternative interlocking support. Cut two matching trunk shapes with central slots. Slide the shapes together at right angles to make a cross-shaped support, then attach that support to a broad base.
Add branches that keep the tree balanced
- Plan the branch pattern. Place the largest branches low on the trunk, with shorter branches higher up. Spread them around the trunk rather than concentrating them on one side.
- Cut branch forms. Trace varied branch templates onto cardboard or brown butcher paper. Make lower branches thicker and longer than upper twigs.
- Add texture. Score cardboard, twist paper gently, or crumple and flatten kraft paper before attaching it. Texture hides seams and gives the trunk a more natural surface.
- Attach in stages. Glue the main branches first and let the joints set. Add smaller twigs only after the trunk still stands straight under the partial load.
- Reinforce weak joints. Wrap a paper strip around a branch-to-trunk connection or add a hidden cardboard tab behind the joint. Do not rely on a single narrow strip of tape for a heavy branch.
Make raised 3D leaves
- Cut simple leaf shapes from green construction paper or cardstock. Vary the sizes and use multiple greens.
- Fold each leaf down the center to create a raised vein.
- Gently fold the two edges inward so the leaf holds a shallow, three-dimensional curve.
- Attach leaves with PVA glue, a glue stick or small pieces of tape. Place a few leaves in clusters and leave some branch structure visible.
- Allow glued areas to dry before moving the tree or adding another layer.
Leaves can carry the lesson as well as the decoration. Students can write names or family members on them, add seasonal observations, record research findings, or turn them into creative-writing prompts.
Classroom display ideas
Science and ecology tree
Use green leaves for plant parts, habitats, food webs or student facts. The Museum of Australian Democracy at Old Parliament House describes trees as helping animals, humans, other plants and the planet stay healthy; that message can become the class display caption.
Rank #2

- Complete Classroom Tree Kit: stop searching for multiple supplies; This all in one set includes 48 pcs colorful paper pom poms(6 colors, 4 sizes), 1pcs kraft paper roll (15 inches x 98 feet), 1 roll of brown masking tape, and 2 rolls of clear double sided tape; Open the box and start decorating your classroom display instantly
- Vibrant Paper Pom Poms: create stunning 3D effects with 48 pcs bright color tissue paper pom poms in yellow, orange, rose, blue, green, and purple; Each color and size combination comes in a pair across 4 sizes (8 / 10 / 12 / 14 inches); These paper flowers bring eye catching dimension to any classroom decor from any angle
- Long Kraft Paper Roll: this sturdy 15 inch x 98 feet kraft paper roll is made from virgin wood pulp, strong enough to be twisted, wrinkled, and shaped into realistic 3D trunks and branches; The extra long length covers an entire classroom wall with plenty left for borders, accents, and year round craft projects
- Simple Assembly: assembly is straightforward with the included brown masking tape and double sided tape; Cut the kraft paper to your desired size, then twist or crumple it to create a realistic trunk shape; Attach the unfolded paper pom poms to the trunk or wall in a few easy steps for a lifelike classroom tree
- Ideal for Multiple Settings: this versatile classroom decor tool transforms any blank wall into an engaging learning space, whether applied for back to school open houses, reading corners, birthday parties, or church decorations; The bright colors remain highly visible even in larger classrooms, making it ideal for bulletin boards, chalkboards, walls, doors, windows, and nurseries
Seasonal tree
Swap green leaves for spring buds, summer green, autumn colors or bare branches. Keep the cardboard structure and replace only the paper canopy.
Family or community tree
Write names or add lightweight paper photos to leaves. Establish a classroom rule for what information is appropriate to display before students contribute.
Rank #3
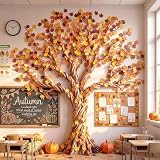
- Complete Bulletin Board Set: our fall classroom bulletin board set includes 100 maple leaves in 3 colors, gold orange and brown, cutouts and 1 roll of kraft paper; This fall bulletin board decorations provides enough material to cover large wall areas; Apply this tree to classroom wall to bring fall atmosphere into learning space
- Large Size: our tree classroom decor about 15.35 x 590 inches covers large bulletin board areas; Match with 100 maple leaves with clear veins lifelike shapes for layered fall landscape; This fall classroom tree instantly catches the eye and transforms course activities into an immersive fall experience
- Fun Shapes: cut kraft paper into trunk shapes, twist gently for natural 3D curves; Attach maple leaves with included adhesive dots for a customized bulletin board decorations; Teachers and students can arrange leaves together, making each fall classroom tree a classroom project, turns the bulletin board into a collaborative fall activity
- Good Material: our fall classroom tree thickened kraft paper trunk resists tearing deformation, retain original shape after long hanging; Keeps vibrant colors from fading; Adhesive dots are safe; Each simulated maple leaf is flexible lightweight for repeated use; Reliable for classroom bulletin boards
- Widely Applications: this classroom bulletin board set suit for fall school wall displays, back to school decorations, and sports day backgrounds; The kraft craft fall bulletin board also suits rustic classroom decor, library fall atmosphere, community activities, family Thanksgiving gatherings, and classroom craft activities
Changing learning display
Use removable tape or small paper loops so leaves can be replaced as the class completes units. A tree made this way becomes an evolving display rather than a one-day craft.
Safety, stability and maintenance
- Adults should cut thick cardboard with utility or X-Acto knives and operate hot-glue guns. Provide child-safe scissors for students.
- Keep the trunk perpendicular to a broad base and test it before adding the canopy. Gently shake the finished tree; reinforce any movement at the trunk, base or branch joints.
- Keep decorations light. Avoid attaching books, dense objects or anything that can make the tree top-heavy.
- Keep the paper tree away from radiators, heaters, candles and other heat or flame sources. If you add lights, use cool, battery-operated LEDs and follow the light maker’s instructions.
- Inspect loose joints periodically, dust the surface gently, and store disassembled sections in a dry, protected place.
Troubleshooting
The tree tips over
Widen or weight the base, shorten the highest branches, and move heavy branches lower. Confirm that the trunk is vertical before regluing.
Rank #4

- Seasonal Trees Craft Kit: This four seasons tree paper ornament kit contains 32 tree cards, 32 tree stump cards (to form 32 complete 3D trees), and 32 matching stickers for 4 seasons (spring, summer, autumn, winter). It's a generous quantity for your daily use, replacement, and sharing with friends.
- Seasons Themed Design: This DIY tree craft kit is 4 seasons theme and includes tree trunks, snowy tree trunks, spring summer autumn winter stickers of various shapes. The tree craft kit is suitable for any seasons activity, showing the beauty of the season.
- Fun to Assemble: Make your own craft with this DIY seasonal trees craft kits, this kit not only provides fun interactive activities but also inspires gratitude and creativity; unleash your creativity and immerse yourself in this fun-filled DIY craft kit.
- Reliable Material: The seasons tree craft kits are made of sturdy cardboard with clear printing and vibrant colors and printed on double side. The spring summer autumn winter stickers are lightweight and adhesive, reusable, not easy to fade and break, and have a long service life.
- Wide Application: The four seasons tree decorations are suitable for spring, summer, fall, winter holiday, Christmas, family gathering, indoor and outdoor events, anniversaries, home and seasons theme party, also can be used as a gift to leave a good memory of holiday party.
Branches sag
Replace thin paper with cardboard, shorten the branch, add a hidden support strip, or remove some leaves.
The trunk bends at the base
Add triangular gussets around the slot, increase the slot’s fit, or rebuild the base with thicker corrugated cardboard.
Do these 3 things before closing this tab:
1Fix the driver behind crashes, sound loss and screen glitches2Clear out junk files and repair common Windows errors3Scan for outdated or missing drivers - takes under a minuteBest Value

- Thanksgiving Decorations: Create an autumnal atmosphere in your space! The set includes 1 roll of extra-large kraft paper, 21 fluffy paper pom-poms (orange, yellow, and amber in 3 sizes), 100 artificial maple leaves (2 styles), and 2 sheets of double-sided adhesive dots for easy attachment—all you need to create a stunning, oversized decorative tree.
- Fall Theme: Let Your Imagination Run Wild! Brown kraft paper is easy to twist and shape, allowing you to create textured trees on any flat surface. Combined with three-dimensional paper pom-poms and a variety of maple leaf decorations, this set offers rich visual layers and creates a festive harvest atmosphere.
- Extra-Large Size: The kraft paper roll measures 105 feet in total length—enough to create a floor-to-ceiling tree or decorate multiple rooms. The set includes 21 pom-poms (8 inches, 10 inches, and 12 inches) and 100 maple leaves (3.2 x 2.5 inches) to create a lush, full-looking tree—perfect for large classroom walls, hallways, and living room backdrops.
- Premium Materials: Designed for long-term display. Our extra-long paper rolls are made from thickened kraft paper, while the vibrant pom-poms are crafted from high-quality copy paper. The included high-tack adhesive is tear-off and leaves no residue, ensuring a secure hold without damaging walls.
- Perfect for Many Occasions: The ideal decoration for creating a festive atmosphere! Great for Thanksgiving, classroom bulletin boards, fall parties, library displays, school hallway decorations, and creative fall photo backdrops—get ready for the holiday season.
Glue joints keep opening
Clean dust from the surfaces, use a wider glue tab or paper wrap, and allow the adhesive to cure before loading the joint.
The canopy looks lopsided
Redistribute branches around the trunk, then add leaves in small groups rather than filling one side first.
How long does the leaf activity take?
The Museum of Australian Democracy at Old Parliament House lists its National Tree Day paper-tree activity time as 20 minutes. A full freestanding classroom tree takes longer because cutting, structural assembly, drying and testing are additional steps.
Quick Recap

Product prices and availability are accurate as of the date/time indicated and are subject to change. Any price and availability information displayed on Amazon at the time of purchase will apply.




